Do you know how to add a custom column based on an if statement using the Power Query editor in Power BI? This Microsoft Power BI tutorial will let you add a custom column using the Power Query editor with examples.
- Power query add column if contains
- Power query add column if blank
- Power query add column if null
- Power query add column if and
- Power query add column if or
- Power query add column multiple if
- Power query add column each if
- Power query add column if it doesn’t exist
- Power query add column if an error
- Power query add column count if
Power query add column if else
Let us see how we can add the custom column based on the if-else using the power query editor in Power BI.
In this example, I will use the Products Table data mentioned below. You can download the sample data from here.
- Load the table data into the Power BI desktop, In the ribbon, under the Home option click on the Transform data option.
- Choose the custom column under the add column option.
- Now, enter the New column Name, In the Custom Column Formula box apply the below-mentioned formula:
- Once the formula has been added to the formula box, click on the Ok button.
= if [Profit] >350 then "True" else "False"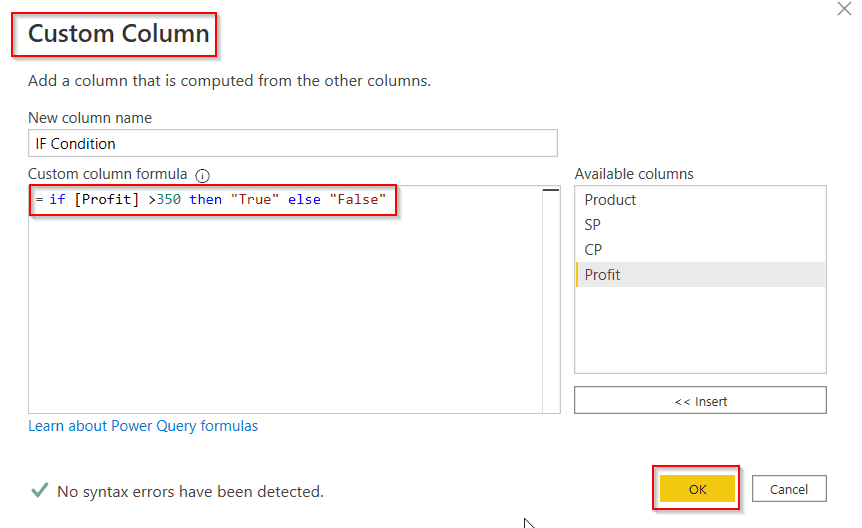
- The screenshot below shows that the custom column has been added with the expected result value based on the condition it displays True / False.
=Table.AddColumn (#"Added Custom", "IF Condition", each if [Profit] >350 then "True" else "False"- Click on the Close and Apply option from the ribbon so that the changes will be reflected on the Power BI desktop.

This is how to add the custom column based on the if-else using the power query editor in Power BI.
Also read: How to duplicate multiple columns using Power Query
Power query add column if blank
Let us see how we can add the custom column based on if blank using the power query editor in Power BI.
In this example, I will use the Products Table data mentioned below. You can download the sample data from here, where you can see that the Country column has two blank values.
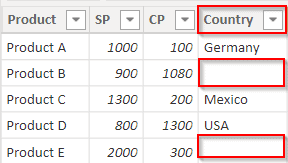
- Open the Power BI desktop and load the data into it, In the ribbon, under the Home option click on the Transform data option.
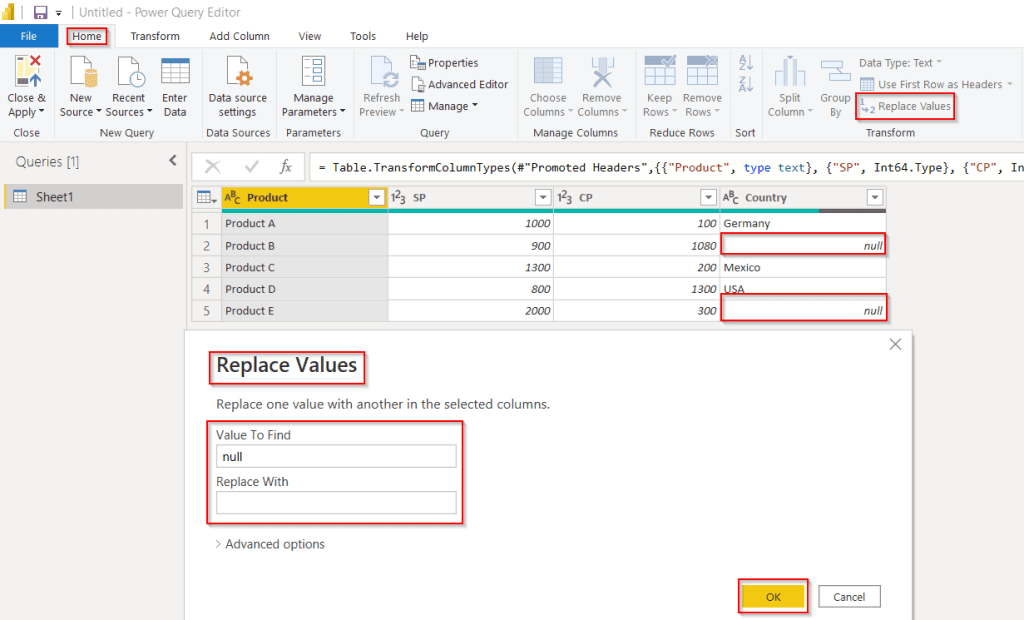
- By default, in the Power Query editor the blank values will be taken as null values, so replace the null values with empty values.
- From the ribbon click on the Home tab, and select the Replace value option. In the replace value window, enter the find value as null, leave the replace value blank, and click on the OK button as shown below.
- Choose the custom column under the add column option.
- Now, enter the New column Name, In the Custom Column Formula box apply the below-mentioned formula:
- Once the formula has been added to the formula box, click on the Ok button.
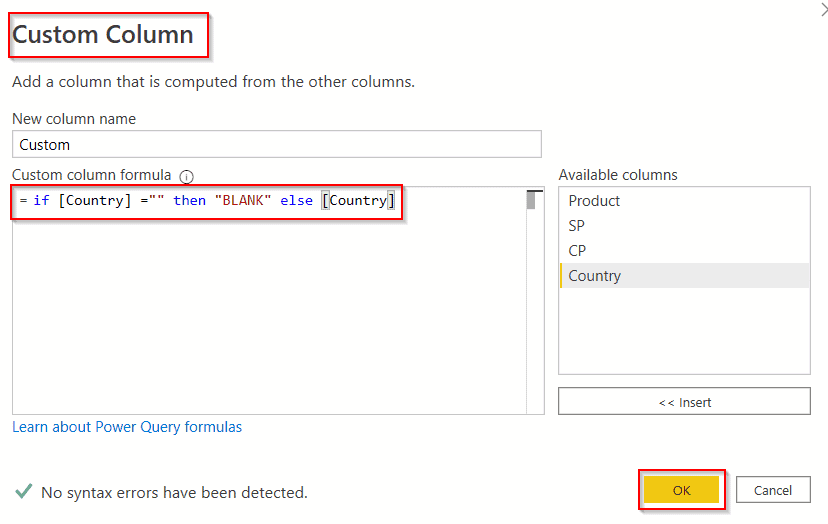
- The screenshot below shows that the custom column has been added with the expected result value based on the condition it displays Blank or the country.
= Table.AddColumn(#"Replaced Value1", "Custom", each if [Country] ="" then "BLANK" else [Country])- Click on the Close and Apply option from the ribbon so that the changes will be reflected on the Power BI desktop.

This is how to add the custom column based on the if blank using the power query editor in Power BI.
Check out: How to add an empty column in Power BI
Power query add column if null
Let us see how we can add the custom column based on if null using the power query editor in Power BI.
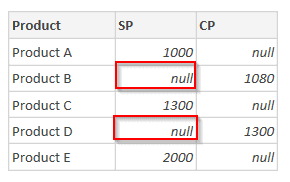
Here in the above screenshot, you can see that the SP column has two null values, so we have to create a custom column to display the Null or NotNull.
- Load the table data into the Power BI desktop, In the ribbon, under the Home option click on the Transform data option.
- Choose the custom column under the add column option.
- Now, enter the New column Name, In the Custom Column Formula box apply the below-mentioned formula:
- Once the procedure has been added to the formula box, click on the Ok button
= each if [SP] =null then "NULL" else "NOTNULL"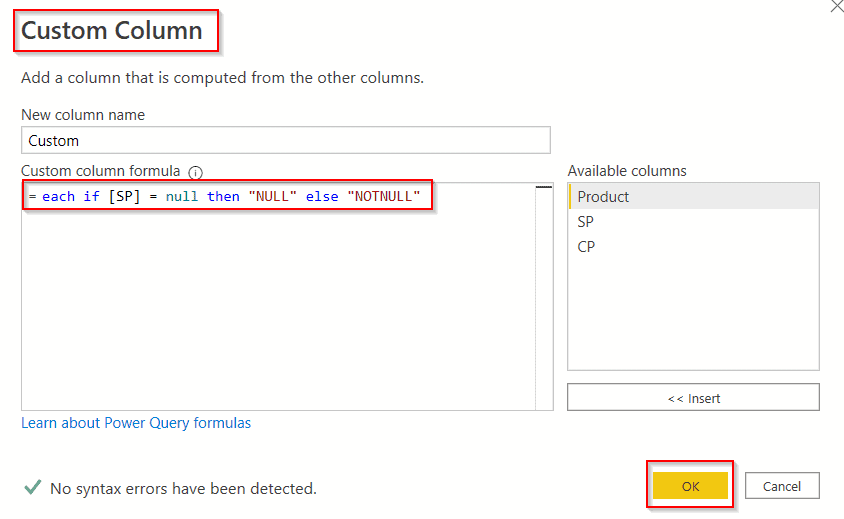
- The screenshot below shows that the custom column has been added with the expected result value based on the condition it displays NULL / NOT NULL.
= Table.AddColumn(#"Removed Columns", "Custom", each if [SP] = null then "NULL" else "NOTNULL")- Click on the Close and Apply option from the ribbon to reflect the changes on the Power BI desktop.

This is how to add the custom column based on if null using the power query editor in Power BI.
Read: How to add a column with a dropdown list in Power Query
Power query add column if and
Let us see how we can add the custom column based on if and using the power query editor in Power BI.
- Open the Power BI desktop and load the data into it, In the ribbon, under the Home option click on the Transform data option.
- Choose the custom column under the add column option.
- Now, enter the New column Name, In the Custom Column Formula box apply the below-mentioned formula:
- Once the formula has been added to the formula box, click on the Ok button.
if [Country] = "Mexico" and [Profit] >= 1500 then "Match" else "Mismatch"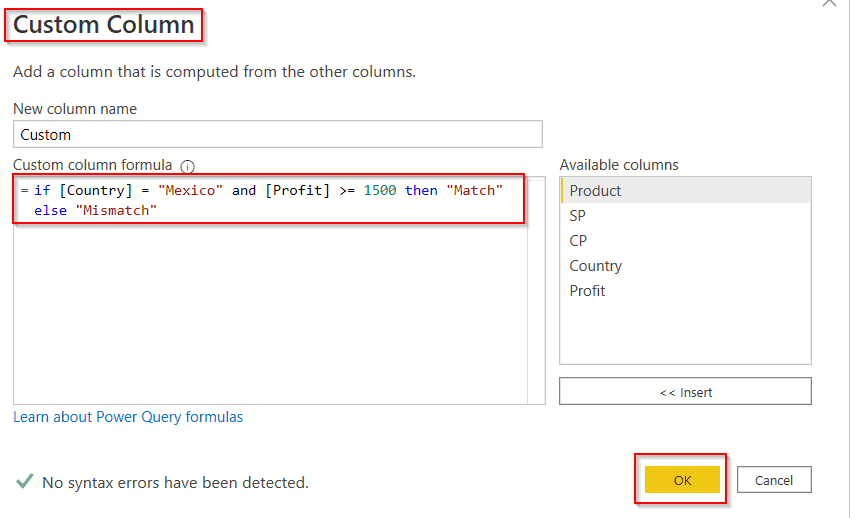
- The screenshot below shows that the custom column has been added with the expected result value based on the condition it displays Match / Mismatch.
= Table.AddColumn(#"Removed Columns", "Custom", each if [SP] = null then "NULL" else "NOTNULL")- Click on the Close and Apply option from the ribbon to reflect the changes on the Power BI desktop.

This is how to add the custom column based on if and using the power query editor in Power BI.
Have a look: How to add a column with the same value in Power BI
Power query add column if or
Let us see how we can add the custom column based on if or using the power query editor in Power BI.
- Open the Power BI desktop and load into it, under the Home option click on the Transform data option from the ribbon.
- Choose the custom column under the add column option.
- Now, enter the New column Name, In the Custom Column Formula box apply the below-mentioned formula:
- Once the formula has been added to the formula box, click on the Ok button.
= Table.AddColumn(#"Added Custom", "Custom", each if [Country] = "Mexico" and [Profit] >= 1500 then "Match" else "Mismatch")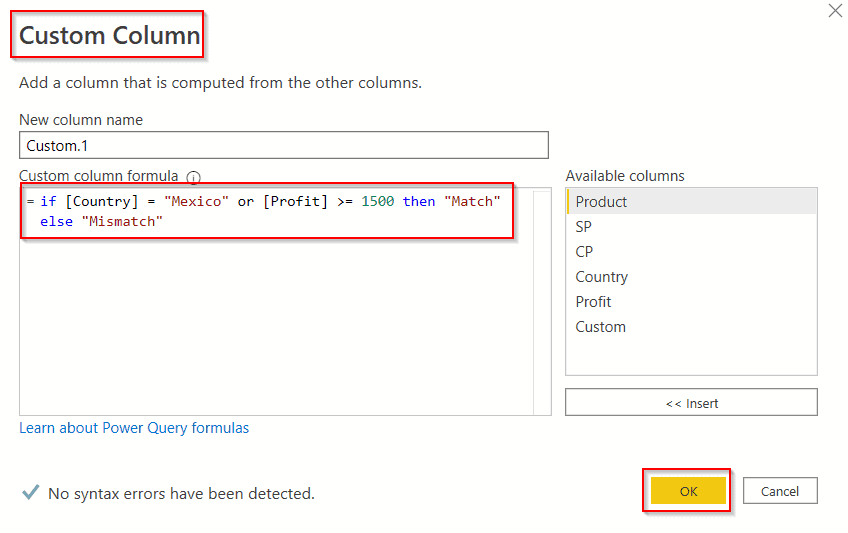
- The screenshot below shows that the custom column has been added with the expected result value based on the condition it displays Match / Mismatch.
= Table.AddColumn(#"Added Custom1", "Custom.1", each if [Country] = "Mexico" or [Profit] >= 1500 then "Match" else "Mismatch")- Click on the Close and Apply option from the ribbon to reflect the changes on the Power BI desktop.

This is how to add the custom column based on if or using the power query editor in Power BI.
Also Check: How to add column with a fixed value in Power BI
Power query add column multiple if
Let us see how we can add the custom column based on multiple if or nested if using the power query editor in Power BI.
- Load the table data into the Power BI desktop, In the ribbon, under the Home option click on the Transform data option.
- Choose the custom column under the add column option.
- Now, enter the New column Name, In the Custom Column Formula box apply the below-mentioned formula:
- Once the formula has been added to the formula box, click on the Ok button.
if [Country] =  "Germany" then[Profit] * 2
 else if [Country] = "Mexico" then [Profit] * 2
  else if [Country] = "USA" then [Profit] * 2
   else "False"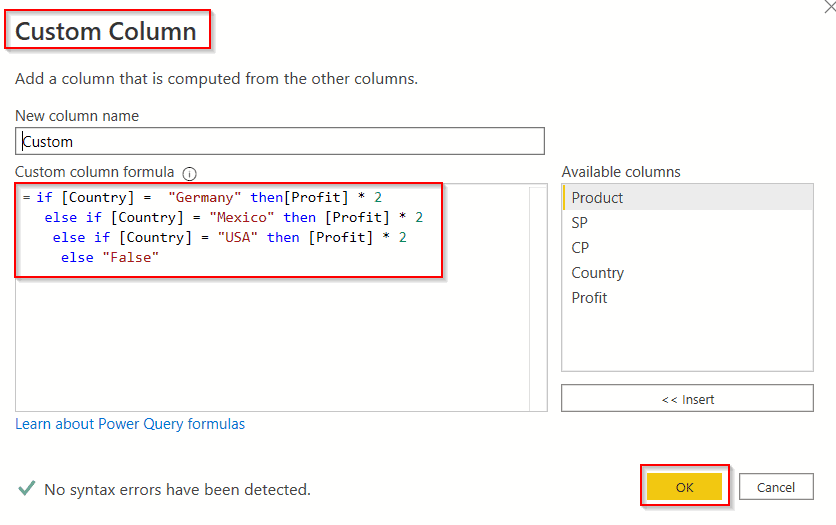
- The screenshot below shows that the custom column has been added with the expected result value based on the condition.
= Table.AddColumn(#"Added Custom", "Custom", each if [Country] =  "Germany" then[Profit] * 2
 else if [Country] = "Mexico" then [Profit] * 2
  else if [Country] = "USA" then [Profit] * 2
else "False")- Click on the Close and Apply option from the ribbon to reflect the changes on the Power BI desktop.

This is how to add the custom column based on multiple if or nested if using the power query editor in Power BI.
Read: How to add column from another table in Power BI [3 Different ways]
Power query add column each if
Let us see how we can add the custom column based on each if using the power query editor in Power BI.
- Load the table data into the Power BI desktop, In the ribbon, under the Home option click on the Transform data option.
- Choose the custom column under the add column option.
- Now, enter the New column Name, In the Custom Column Formula box apply the below-mentioned formula:
- Once the procedure has been added to the formula box, click on the Ok button
= each if [Profit]= 1500 then "True" else "False"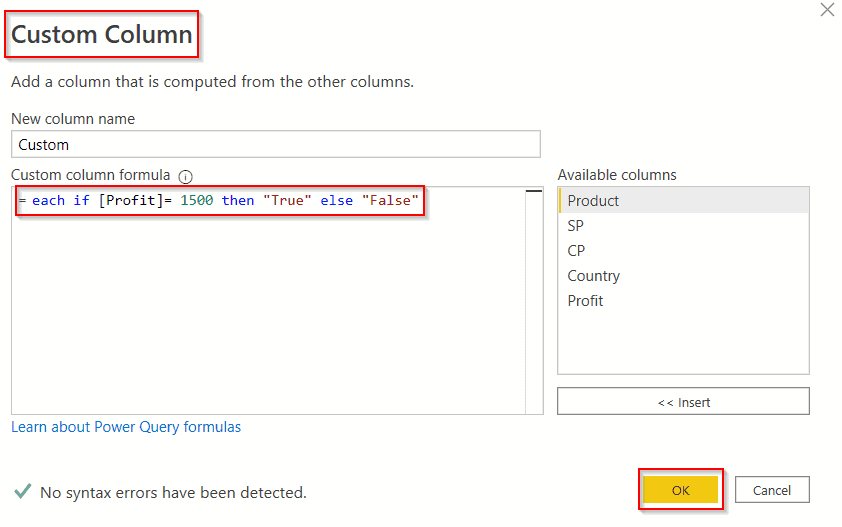
- The screenshot below shows that the custom column has been added with the expected result value based on the condition it displays True / False
= Table.AddColumn(#"Added Custom", "Custom", each if [Profit]= 1500 then "True" else "False")- Click on the Close and Apply option from the ribbon to reflect the changes on the Power BI desktop.

This is how to add the custom column based on if null using the power query editor in Power BI.
Read: Power Query Add Column [35+ Examples in Power BI]
Power query add column if it doesn’t exist
Let us see how we can add a column using the Power Query editor if it doesn’t exist in Power bi.
- Load the table data into the Power BI desktop, In the ribbon, under the Home option click on the Transform data option.
- Choose the custom column under the add column option.
- Now, enter the New column Name, In the Custom Column Formula box apply the below-mentioned formula:
- Once the formula has been added to the formula box, click on the Ok button
= if Table.HasColumns(#"Product Set1",[Product] ) then "True" else "False"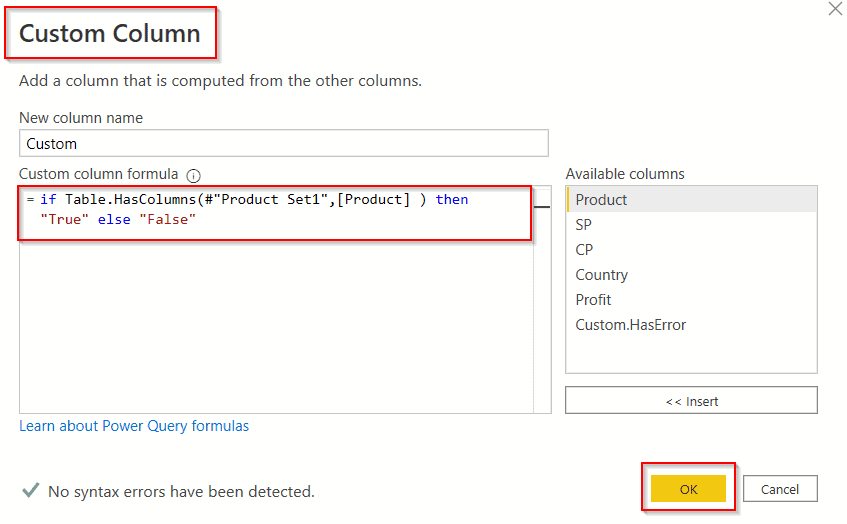
- The screenshot below shows that the custom column has been added with the expected result value based on the condition it displays True / False.
= Table.AddColumn(#"Expanded Custom", "Custom", each if Table.HasColumns(#"Product Set1",[Product] ) then "True" else "False")- Click on the Close and Apply option to reflect the changes on the Power BI desktop.

This is how to add a column using the Power Query editor if it doesn’t exist in Power Bi.
Power query add column if an error
Let us see how we can add a column based on an error using the power query editor in Power BI.
In this example, I have used the below sample data, which has two error fields in the Price value column.

- Open the Power BI desktop and load the data into it, under the Home option click on the Transform data option from the ribbon.
- Choose the custom column under the add column option.
- Now, enter the New column Name, In the Custom Column Formula box apply the below-mentioned formula:
- Once the formula has been added to the formula box, click on the Ok button.
= try [Price] otherwise [Bike Names]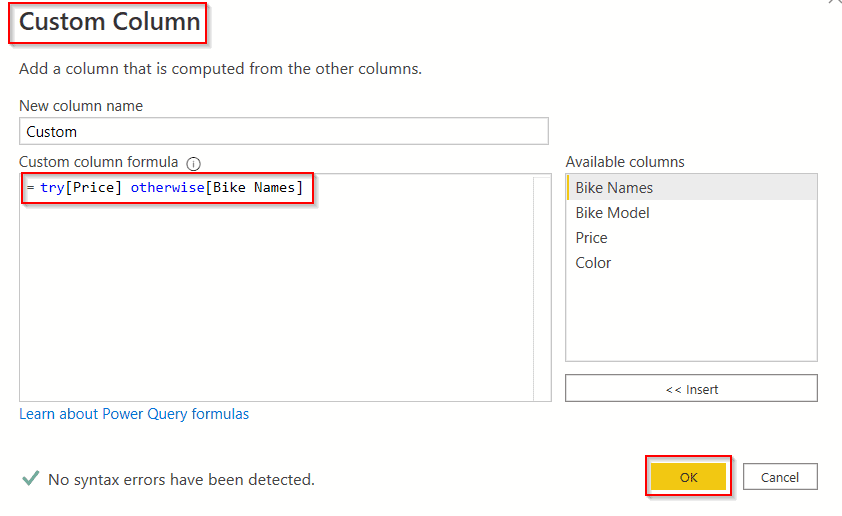
- The screenshot below shows that the custom column has been added with the expected result value, using try catch error handles, if the Price column has values it displays the same value in the custom column.
- If the error occurs in the Price column then the Bike Names will be displayed in the custom column.
= Table.AddColumn(#"Changed Type1", "Custom", each try[Price] otherwise[Bike Names])- Click on the Close and Apply option to reflect the changes on the Power BI desktop.

This is how to add a column based on an error using the power query editor in Power BI.
Also check: How to Filter Power BI Dax Based On Condition
Power query add column count if
Let us see how we can add a column based on the condition using count if using a power query editor in Power BI.
In this example, I have used the sample data below to calculate the items’ count using the count function in the Power BI power query editor.
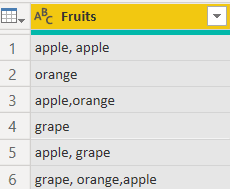
- Open the Power BI desktop and load the data into it, under the Home option click on the Transform data option from the ribbon.
- Choose the custom column under the add column option.
- Now, enter the New column Name, In the Custom Column Formula box apply the below-mentioned formula:
- Once the formula has been added to the formula box, click on the Ok button.
=List.Count(Text.Split([Fruits],"apple"))-1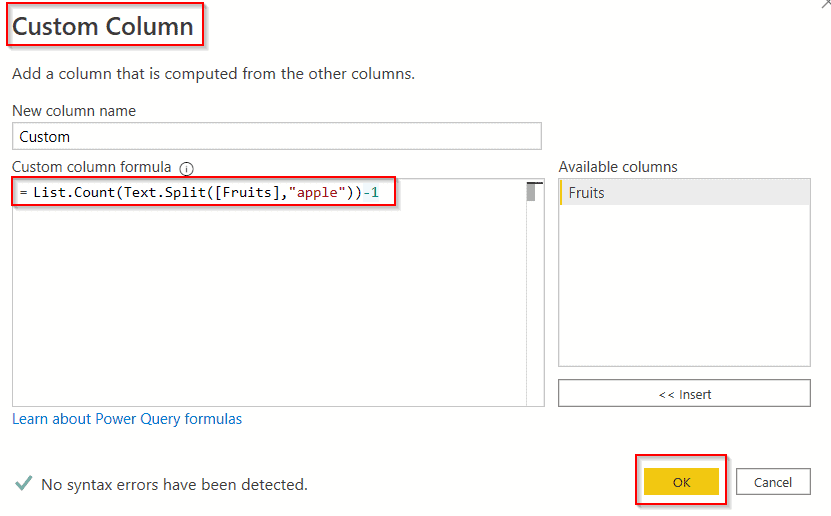
- The screenshot below shows that the custom column has been added and displayed the value count.
= Table.AddColumn(#"Changed Type", "Custom", each List.Count(Text.Split([Fruits],"apple"))-1)- Click on the Close and Apply option to reflect the changes on the Power BI desktop.

This is how to add a column based on the condition using count if using a power query editor in Power BI.
Furthermore, you may like some more Power BI tutorials:
- How to Filter Blank Value in Power BI
- How to Append Columns in Power Query
- Power BI Dax Filter [With 15+ Examples]
- Power BI DAX Filter If [With Real Examples]
- How to Filter Date using Power BI DAX
- How to merge columns in Power Query
- Power BI Slicer Multiple Columns
- Power BI Create Table From Another Table
This Power BI tutorial covered how to add a column using the Power Query editor in Power BI based on the If statement, and we also examined the following topics:
- Power query add column if contains
- Power query add column if blank
- Power query add column if null
- Power query add column if and
- Power query add column if or
- Power query add column multiple if
- Power query add column each if
- Power query add column if it doesn’t exist
- Power query add column if an error
- Power query add column count if
I am Bijay a Microsoft MVP (10 times – My MVP Profile) in SharePoint and have more than 17 years of expertise in SharePoint Online Office 365, SharePoint subscription edition, and SharePoint 2019/2016/2013. Currently working in my own venture TSInfo Technologies a SharePoint development, consulting, and training company. I also run the popular SharePoint website EnjoySharePoint.com