Are you unsure about the best way to transfer data from Dataverse to Power Apps? Be at ease. Simple and easy steps can be taken to do that. This Dataverse tutorial will assist you to work with Power Apps get data from Dataverse Table.
In addition, we’ll look what are the various screens in the Power Apps Canvas app, how to save and publish the app, and how to update the Dataverse table or Dataverse Connector in the Power Apps Canvas App, among other things.
Create Power Apps Canvas App With Data From Microsoft Dataverse
We will create a canvas app in Power Apps for this scenario using a car details table from Dataverse. We can create, update, or remove an account as well as browse through all of the accounts in this app.
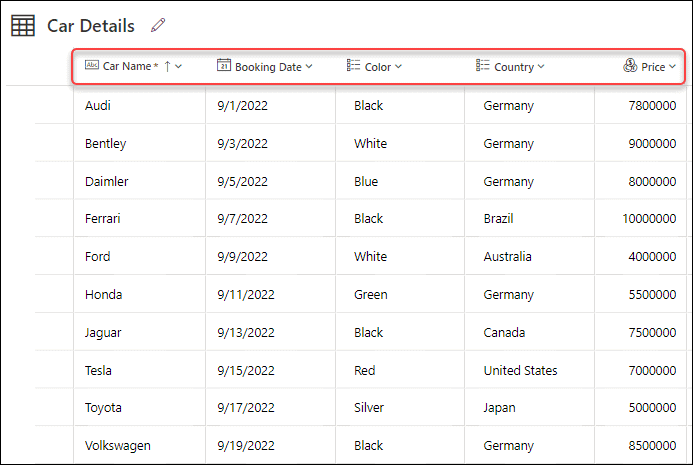
- Let’s start with this. The below screenshot represents a Dataverse table named Car Details. This table has various fields (like Car Name, Booking Date, Color, etc.) along with some records.
- Here, we will retrieve all the Dataverse table records and display them in the Power Apps Canvas app.
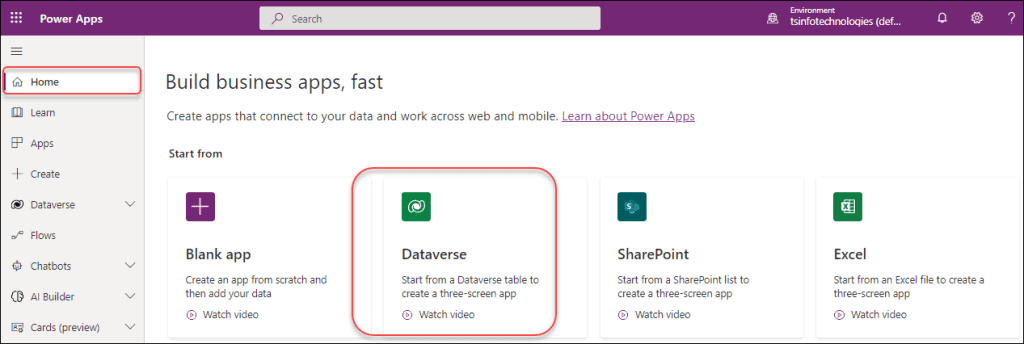
- Sign in to Power Apps. On the Power Apps Home page, Click on the Dataverse under the Start from category.
- When using Dataverse for the first time, you are prompted to establish a connection. Select + New connection -> Choose Microsoft Dataverse under Connections -> Click on Create.

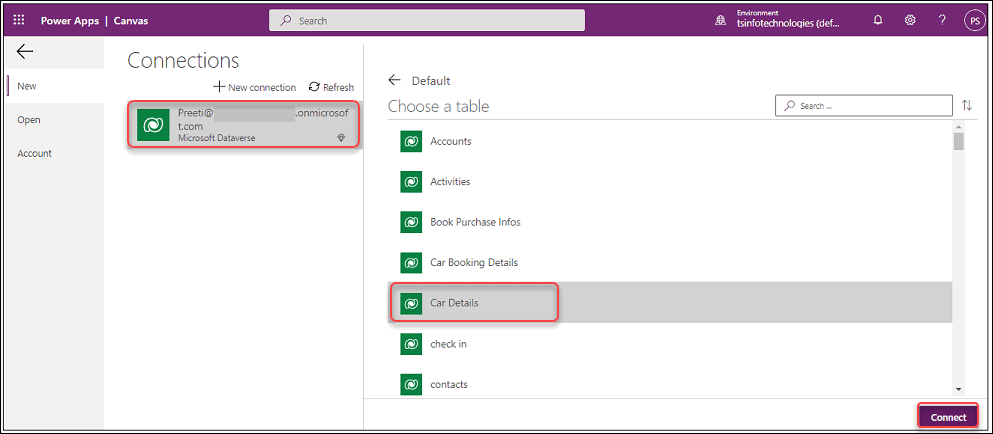
- You must next select a Dataverse Standard or Custom table after the Dataverse connection has been made. Choose your table (in this case, Car Details) under Choose a table, and then click Connect.
- The Power Apps studio will then begin processing after that. Also, you can select Skip if the Welcome to Power Apps Studio dialogue box opens.

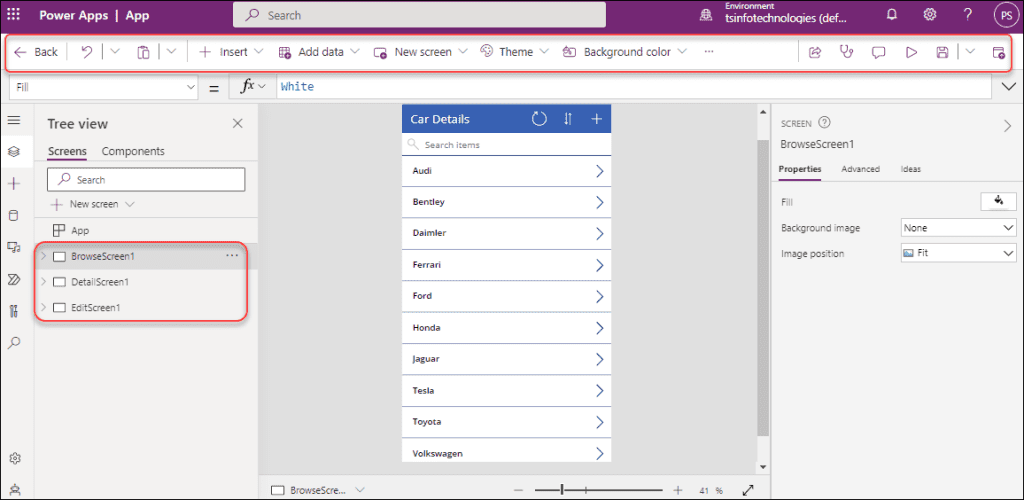
- The Power Apps Canvas app now appears as shown in the picture below. There are three different screen kinds in this app. Such as:
- BrowseScreen1: This is a screen that shows a list of items in a control called Power Apps Gallery. We can browse any item, refresh the data, and sort the data alphabetically in the gallery control.
- DetailScreen1: By using this screen, we can view the details or information of a specific record.
- EditScreen1: This screen contains an edit form where we can edit or modify any particular item in the app.
Additionally, in the app, there is a command bar that shows various options like:
- Back = You can simply click this back button to return to the home page.
- Undo and Redo = You can undo or redo single or multiple typing operations using the Undo and Redo functions. Still, you must always undo or redo operations in the exact same order that you did or undid them.
- Paste = By using this option, you can paste your copied items into the app.
- Insert = By using this insert option, you can add any Power Apps input controls (like Text label, Edit form, Text input, etc.) into the app.
- Add data = Use this option if you add any data connectors or tables to the app.
- New screen = If you want to add any type of screen, then use this option.
- Theme = You can use various themes by using this option.
- Background color = By using this option, you can choose any background color for the app.
- Settings = Here, you can see all the app details (Name, Description, App icon, etc.). Also, you can modify it.
- More (…) = Once you will click on this More commands option, then you can able to see Collections, Variables, etc.
- Share = Using this sharing option, you can let other people utilize the app you’ve made.
- App checker = You can check the app by using this option.
- Comments = Use this option if you want to provide the app with any feedback.
- Preview the app= Using Ctrl+F5 or this Preview button, you can see a preview of the application.
- Save = You can save the app by using this button.
- Publish = Similarly, you can publish the app by using this Publish button or using Ctrl+Shift+P.
Also Read: How to Export Dataverse Table to Excel
Save Power Apps Canvas App
- Before using this app or sharing it with others, you’ll probably want to make some modifications. The recommended approach is to save your work thus far before continuing.
- The canvas app will ask you for the app name when you save it for the first time. Your app’s version will be saved in the specific app environment. Click Save after entering the app’s name. Moreover, after saving the app, publish it.
- There are four additional options accessible when you expand the Save option, as follows:
- Save with version notes
- Save as
- Save and publish
- Download a copy
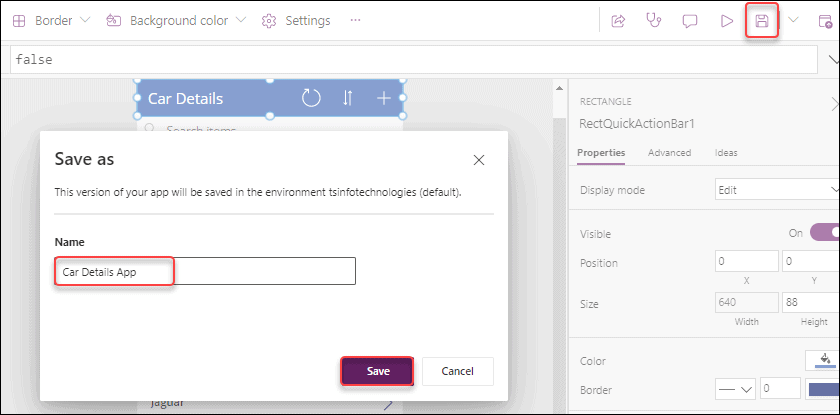
This is how to save the Power Apps Canvas app.
Check out: Power Apps Add Data to Dataverse Table
Various Screens in Power Apps Canvas App
There are three different types of screens that come with the app by default after it is created, as we have covered above. Now let’s start with one by one with descriptions.
BrowseScreen1:
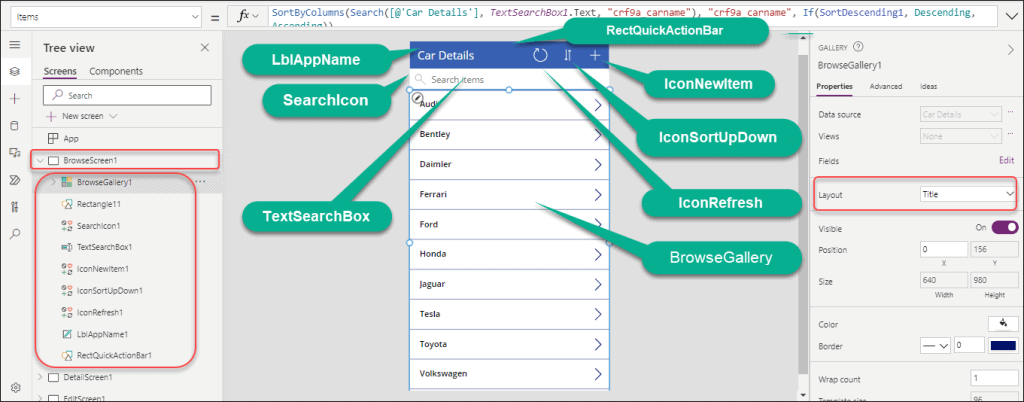
The first screen, often known as the main screen, is where users may browse, search, refresh, and sort items. All of the input controls available on this screen are shown below:
- BrowseGallery1 = This is a gallery control that holds all the table records or data.
- SearchIcon1 = When a user types an item’s name into the search box, this icon assists in locating any specific entries from the gallery.
- TextSearchBox1 = This is the name of the search field where a user can type the name of the item.
- IconNewItem1 = This icon makes it easier for you to add a new record to the gallery.
- IconSortUpDown1 = By using this icon, you can easily sort the gallery item either in ascending or descending order. For both orders, the same icon will be functional.
- IconRefresh1 = If you want to refresh the gallery, then this icon will help you to achieve it.
- LblAppName1 = This is the label control name where the title (Car Details) appears.
Furthermore, if you want to modify the gallery layout (like Title, Title and subtitle, etc.), you can use the Layout property under the Properties pane. You can use any property, such as Size, Color, Border, etc., in addition to layout properties if you want to give the gallery some design.
By default, the gallery’s Items property has the code below:
Items = SortByColumns(Search([@'Car Details'], TextSearchBox1.Text, "crf9a_carname"), "crf9a_carname", If(SortDescending1, Descending, Ascending))Where,
- Car Details = Dataverse table name
- crf9a_carname = Dataverse column name
Refer to the screenshot below.
Also read: How to create and use dataflow in Dataverse
DetailScreen1:
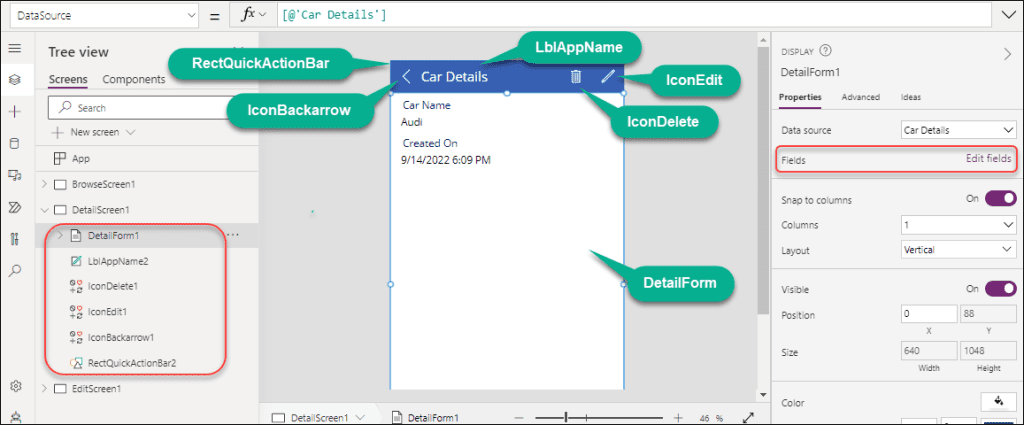
This second default screen shows all the data for a particular entry. All of the input options on this screen are represented below:
- DetailForm1 = This is the form name that displays all the details (like Car Name, Booking Date, Color, etc.) of a specific item.
- LblAppName2 = The label control name under which the title (Car Details) is shown is this.
- IconDelete1 = This delete icon will be useful if you wish to delete or remove that particular item from the gallery.
- IconEdit1 = Click on the pen symbol if you want to make any changes or modifications to the particular item. Then, make the necessary changes.
- IconBackArrow1 = Once you click on the back arrow symbol, it will redirect to the first or Browse screen.
Also, to design the detail form, you can use other properties like Columns, Layout, Size, Color, etc.
By default, the detail form has the table name below on its DataSource property:
DataSource = [@'Car Details']Where,
[@’Car Details’] = Dataverse Table Name
EditScreen1:
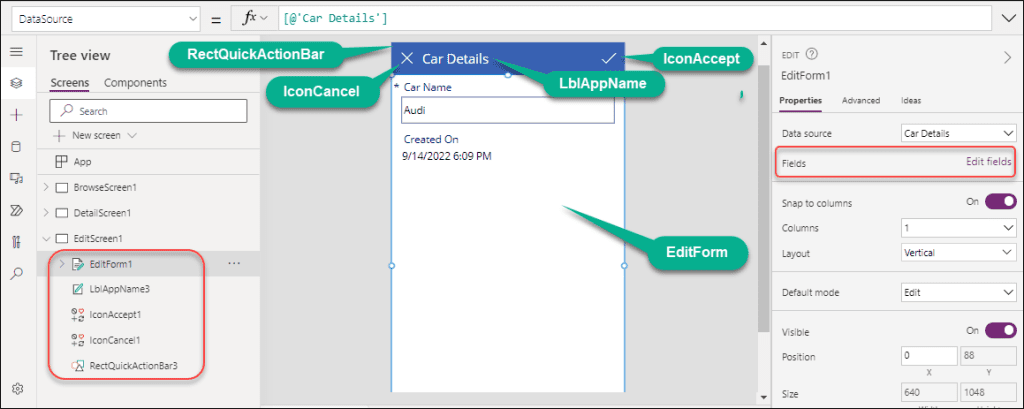
The last screen is called Edit Screen where a user can edit or modify the item information. Additionally, this screen only appears when we add a new item by selecting the Add icon (from the first screen). This screen contains all the below input controls:
- EditForm1 = This is the form name where you can edit or modify the item. Also, you can create a new item.
- LblAppName3 = This is the label control name where the title (Car Details) displays.
- IconAccept1 = Once the modification is done, you can click on the accept icon to save the item.
- IconCancel1 = It will reroute to the initial screen, called browse, when we click the Cancel icon.
Additionally, you can utilize other properties to build the edit form, such as Columns, Layout, Size, Color, etc.
Have a look: Dataverse Solution [Complete Tutorial]
Refresh Dataverse Table in Power Apps Canvas App
Here we will see how to refresh the dataverse table in the Power Apps Canvas app.
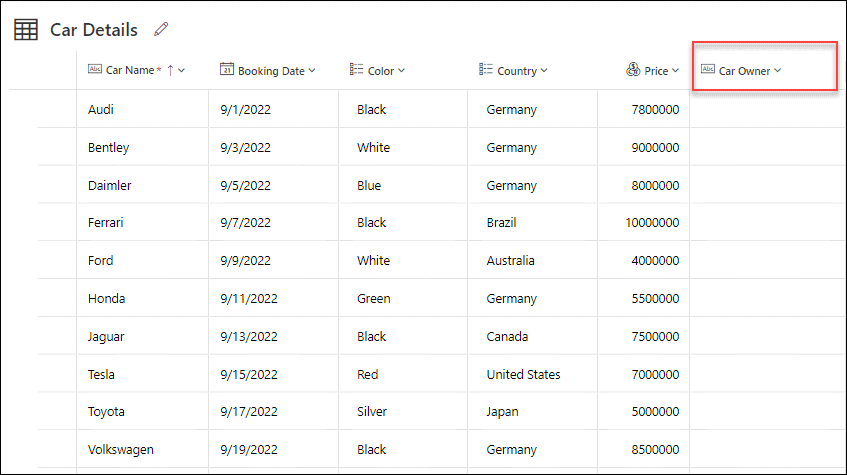
- The Dataverse table Car Details and its different fields may be seen in the screenshot below. Next, I want to expand the dataverse table by including a new column called “Car Owner” (Single line of text field).
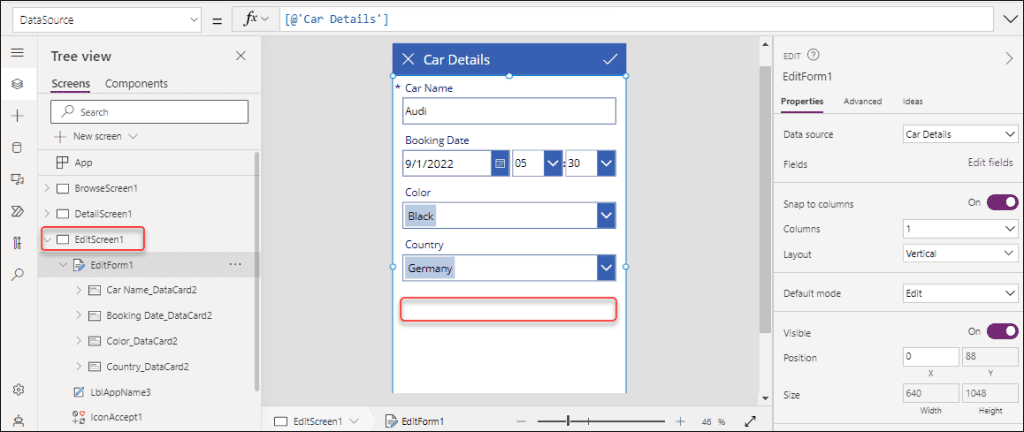
- Additionally, I would like to make this new Dataverse field (Car Owner) visible in the Power Apps Canvas app (Edit Screen). For the purpose of allowing the user to add this car owner field entry to the Power Apps form.
- The new field will appear at the bottom section in the screenshot below.
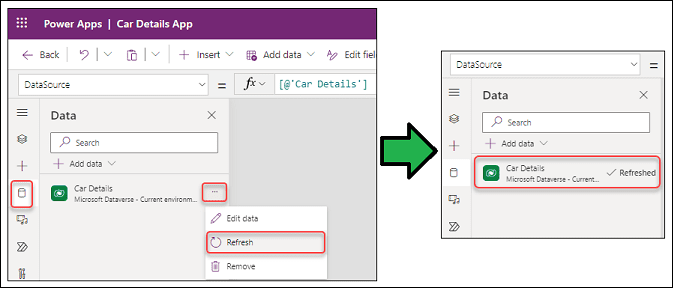
- We should first refresh the Dataverse connector in order to update a new dataverse field in the Power Apps Canvas app. If not, neither the app nor any field will be updated.
- To refresh the Dataverse connector, go to the Data section (from the left menu) -> click on the horizontal ellipses (…) over the connector -> click on Refresh as below. After a while, the specific dataverse connector will refresh.
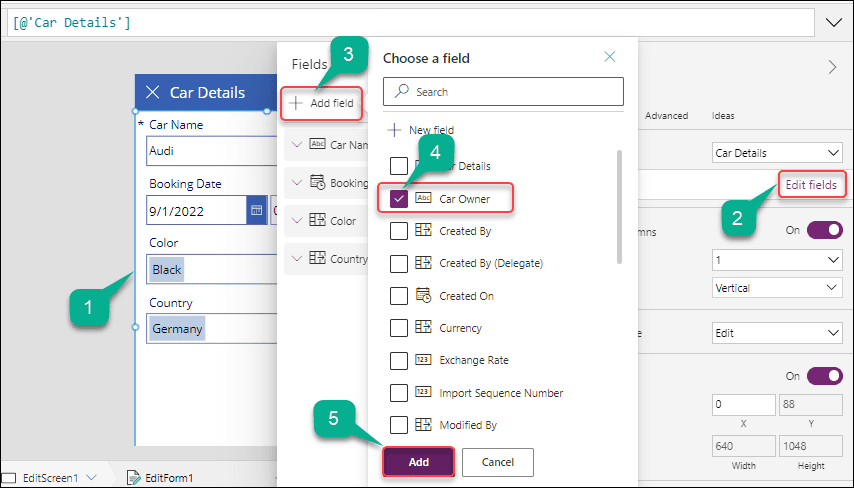
- Now we can insert the new field (Car Owner) into the Power Apps Form. Select the Edit form (under the Edit Screen) -> go to Edit fields from the Fields section (under Properties pane) -> + Add field -> select the Car Owner -> click on the Add button.
- The new field will appear as shown in the following image once it has been added to the Power Apps form. Now, a user can use this field to add an entry.
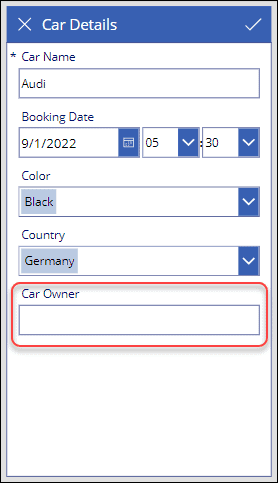
This is how to refresh the Dataverse table in Power Apps Canvas App.
Read: How to Create Dataverse File Field
Example:
In this scenario, we will create a new record in the app. Also, the new record will insert into the Dataverse table (Car Details). Follow the steps below to work around this.
- In order to add a new record to the dataverse table, first click the Add icon on the Bowse screen. Next, fill out the new form with all the information (like Car Name, Booking Date, Color, etc.). then press the Accept icon located at the form’s top.
- The browse screen will finally reroute, and you can notice that the new item has been added to the browse gallery as seen below.
- Additionally, if you click the next arrow icon next to the item, you may see this new record’s details.
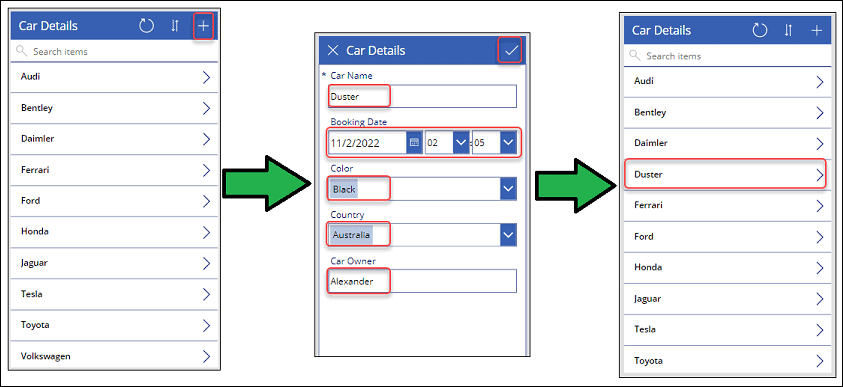
- Return to the specific Dataverse table to continue (Car Details). As shown in the image below, a new item (Duster) has been added to the list.

Furthermore, you may like some more below Dataverse tutorials:
- Power Apps Dataverse Choices [Complete Guide]
- Power Apps Dataverse Yes/No Field
- How To Get Row by ID From Dataverse Table
- Power Apps Different Home Screen Based On Different User
- How To Get Dataverse List Rows Count Using Power Automate
- How to Create Dataverse View
- How to Upload images to Dataverse from Power Apps
- Filter Dataverse Choice Column [With Various Examples]
- Dataverse Primary Name Column Autonumber
- Delete All Records From Dataverse Table [With Examples]
In this Dataverse tutorial, we learned how to get Data From Dataverse to Power Apps or how to create a Power Apps Canvas App With Data From Microsoft Dataverse. Also, we covered the topics below:
- How to save Power Apps Canvas App
- What are the various screens in Power Apps Canvas App
- How to refresh the Dataverse table in Power Apps Canvas App
I am Bijay a Microsoft MVP (10 times – My MVP Profile) in SharePoint and have more than 17 years of expertise in SharePoint Online Office 365, SharePoint subscription edition, and SharePoint 2019/2016/2013. Currently working in my own venture TSInfo Technologies a SharePoint development, consulting, and training company. I also run the popular SharePoint website EnjoySharePoint.com