Do you want to customize SharePoint list forms with PowerApps? I will explain, step by step, how to customize SharePoint Online list forms with Power Apps.
Sometimes, we are required to do conditional formatting, show hide columns, validations, etc, in a SharePoint list form. We can customize a SharePoint list form using Power Apps for these requirements.
Customize SharePoint List Forms with Power Apps
Here, I will show you step-by-step how to customize a list form using Power Apps in SharePoint.
Here, I have a SharePoint Online list with the below columns.
| Column Name | Datatype |
|---|---|
| Title (renamed to first name) | Single line of text |
| Last Name | Single line of text |
| Single line of text | |
| Mobile | Single line of text |
| Appointment Date and Time | Date and Time |
| Person to Meet | Person or group |
| Purpose of Meeting | Choice column (Personal, Official, Both, None) |
| Additional comments | Multiple lines of text |
The default SharePoint form looks like below:

Now, let us customize this SharePoint list forms with Power Apps. Follow the below steps:
1. Open the SharePoint Online list, then from the command bar, click on Integrate -> Power Apps -> Customize forms.

2. Now, it will open Power Apps, where you can see one form and phone layout form. In the form, you can see the columns or fields presented in the SharePoint list.
Note: If your SharePoint list has a Yes/No column type, then it might just show the Title column instead of all the SharePoint list columns. If you remove the Yes/No column from the SharePoint list and customize the form using Power Apps, then the form will render all the columns.

From the list navigation in Tree view, you can see the SharePointIntegration option; this indicates that it is a SharePoint form customized using Power Apps.
And when you click on this, you can see all the Actions and what SharePoint will do. Like
- OnNew -> NewForm(SharePointForm1)
- OnEdit -> EditForm(SharePointForm1)
- OnView -> ViewForm(SharePointForm1)
- OnSave -> SubmitForm(SharePointForm1)
- OnCancel -> ResetForm(SharePointForm1)

Change SharePoint list form screen size using Power Apps
3. To change the SharePoint list form screen size using Microsoft Power Apps, Click on the Settings option on the command bar. Then, in the Settings dialog box, click on Display -> Orientation -> Landscape. Then it will ask to “Change app orientation”, and click on Apply.

4. After this, you can see the SharePoint list form in the landscape orientation like below.

Change the layout of the SharePoint list form using Power Apps
5. By default, the list form appears as a one-column layout like the above. From the Properties -> from the Columns, choose 2, to make a two-column layout.

- The list form customized using Power Apps will be arranged in a two-column layout like the one below.

Add, Remove, or Reorder columns in the SharePoint list form
I will show you how to add, remove, or reorder columns in the SharePoint list form.
- Select the SharePointForm1 -> then from the Properties window, click on Edit fields under Data source.

- This will open the Fields options, where you can see all the fields presented in the Power Apps form.
- To reorder any column, click on the eclipse (…) and then use the Move up and Move down option.
- In the same way, if you want to remove a column in the list, click on the Remove button as shown in the form below.

- To add a new field to the list form, click on the + Add field, then choose a field from the list of fields presented in the SharePoint list. Select the column and then click on the Add button like below. Anytime you can add any columns to the Power Apps form.

- This will ask you to select the Control type based on the column’s data type.
- Once you add the column, the column will appear in the form at the end of the form.
Resize Column width in SharePoint list form using Power Apps
If you look at the form, each row has 2 columns, but you sometimes might require one column or field to appear in a row completely.
To do this, select the data card of the particular field, then drag it to the end like below.

Then, you can see the column or the field appearing in the entire row like below.

Also, we can reposition a column by implying dragging and dropping the particular column to the required position. Select the data card, and then from the drag icon, drag it to the required position.

Now, you can see the field is at the required position.

Rename field value in list form using Power Apps
You might be required to change the field name in the list form. For here, I want to rename the Title column to first name. From this:
- Select the data card, and then go to the advanced properties and click on “Unlock to change properties“. As long as the control is locked, you can change most of the properties.

- Then select the Datacardkey and then choose the Text properties. By default, it will be like the below:
Parent.DisplayNameChange it to like below:
"First Name"See the below screenshot.

This is how to change or rename a field name in a SharePoint form using Power Apps.
Change single line of text field to multiline text in Power Apps
When you customize a SharePoint list form using Power Apps, the multiline text field will appear as a single line of text. Follow the below steps to change the data type of a column using Power Apps.
- Select the data card, and then from the Properties, click on Edit. Then it will Fields dialog box.
- Then select the Control type, and choose the “Edit multi-line text” option like below.

- After this, the control will appear as a multiline textbox control.
Delete the attachment column from the SharePoint list form using Power Apps
Sometimes, we do not need the attachment column, and we want to remove the column from the SharePoint list form. And it is very easy to remove the column from this customized Power Apps list form.
Simply select the attachment column and then click on the Delete key from the keyboard. The attachment will be removed, and the fields will be rearranged.

Require field validation in list forms in Power Apps
If you want to make a field required in the SharePoint list form using Power Apps, follow the below steps:
- Select the data card that contains the field you want to make mandatory, then go to the advanced properties and make the Required property true. If the field is locked, then click on the “Unlock to change properties” button in the advanced properties to unlock the data card.

- Once the field becomes mandatory, a star (*) mark will appear near the column.
Conditionally make form fields mandatory in SharePoint list form using Power Apps
Let us check another example of SharePoint list form customizations using Power Apps. Here, I will show you how to conditionally make form fields mandatory in SharePoint list form using Power Apps. Here is an example:
- I want to make the “Additional Comments” field mandatory when the user selects the “Purpose of Meeting” as Official.
Here, select the “Additional Comments” column datacard, then select the Required properties and write the below formula in the formula bar like below:
Required = DataCardValue6.Selected.Value="Official"Here, DataCardValue6 is the name of the “Purpose of Meeting” control name.
You can see below when I publish the changes to SharePoint and try to add an item to SharePoint. It shows me the mandatory message when I choose the Purpose of Meeting as Official.

Show/hide columns based on condition in SharePoint list form using Power Apps
In the same as above, you can also show/hide columns based on conditions in a SharePoint list form using Power Apps.
I will show you the same example as above; I want to make the “Additional Comments” field visible when the user selects the “Purpose of Meeting” as Official, and the field will be hidden.
Here, select the “Additional Comments” column datacard, then select the Visible properties and write the below formula in the formula bar like below:
Visible = DataCardValue6.Selected.Value="Official"Here, DataCardValue6 is the name of the “Purpose of Meeting” control name.

Now, when you publish the form to SharePoint, you can see that the Additional comments field is not visible when I choose Personal from Purpose of Meeting.

When I choose Official from Purpose of Meeting, the Additional comments field is visible.

This is how to show or hide columns based on conditions in the SharePoint list form using Power Apps.
Save and Publish Power Apps customizations to the SharePoint list
Once you have done all the customization to the SharePoint list form using Power Apps, you can save and publish those changes to SharePoint.
Click on the Save or Publish icon in the top right corner of the command bar. Then it will show you the Publish dialog box; click on the Publish button like below.

Now, when a user adds an item to the SharePoint list, instead of the out-of-box SharePoint list form, the Power Apps form will open, and you can see all the customizations you have implemented.

Switch to the default SharePoint list form experience
If you want to switch to the default SharePoint list form experience, follow the steps below.
- Open the SharePoint list, click on the gear or settings icon, then click on List settings.
- Then click on Form settings, which is under General settings.
- Then, choose “Use the default SharePoint form” on the Form Settings page.

- Once you click on OK, the users will be able to use the out-of-box SharePoint list form.
Switch to Power Apps customized SharePoint list form
Once you customize the list form using Power Apps, the customizations will be there even if you use the default SharePoint form.
Anytime you can go back and switch back to the Power Apps customized list form. Go to the same SharePoint list form settings like the above steps and choose “Use a custom form created in Power Apps” like the above.

This is how to switch back to the Power Apps customized SharePoint list form.
I have also recorded a video on SharePoint list form customization using Power Apps. Check out below:
Conclusion
I hope you got an idea of how to customize a SharePoint list form using Power Apps. Here, I have explained step by step with examples of various SharePoint list form customizations using Microsoft Power Apps.
- Change SharePoint list form screen size using Power Apps
- Change the layout of the SharePoint list form using Power Apps
- Add, Remove, or Reorder columns in the SharePoint list form
- Resize Column width in SharePoint list form using Power Apps
- Rename field value in list form using Power Apps
- Change single line of text field to multiline text in Power Apps
- Delete the attachment column from the SharePoint list form using Power Apps
- Require field validation in list forms in Power Apps
- Conditionally make form fields mandatory in SharePoint list form using Power Apps
- Show/hide columns based on condition in SharePoint list form using Power Apps
- Save and Publish Power Apps customizations to the SharePoint list
- Switch to the default SharePoint list form experience
- Switch to Power Apps customized SharePoint list form
You may also like:
- Sort Dropdown Choices Alphabetically in Power Apps
- Power Apps Sort Distinct Filter
- Power Apps Modern Table Control
- Sort by Columns in Power Apps
- Create Empty Collection in Power Apps
I am Bijay a Microsoft MVP (10 times – My MVP Profile) in SharePoint and have more than 17 years of expertise in SharePoint Online Office 365, SharePoint subscription edition, and SharePoint 2019/2016/2013. Currently working in my own venture TSInfo Technologies a SharePoint development, consulting, and training company. I also run the popular SharePoint website EnjoySharePoint.com
Bijay, thank you for your very easy to follow content. Is it possible, when editing a SharePoint List Form, to direct the user to specific screens based on if the user selects New+ or Edit?
Thanks. Very good material.
I want to customize a Text field as follows:
Ex – When a new Item is created we see in the ‘Title’ field I find a note in the field “Enter a value here”. Is it possible to customize the field so that i see a note “Enter the name of the member”. Similarly in a Number field I see the note “Enter a number”. Instead can I customize it so that it reads as ” Enter a Serial number”. Can we do it through PowerApps or some other way.Please clarify.
Hi Viswanathan,
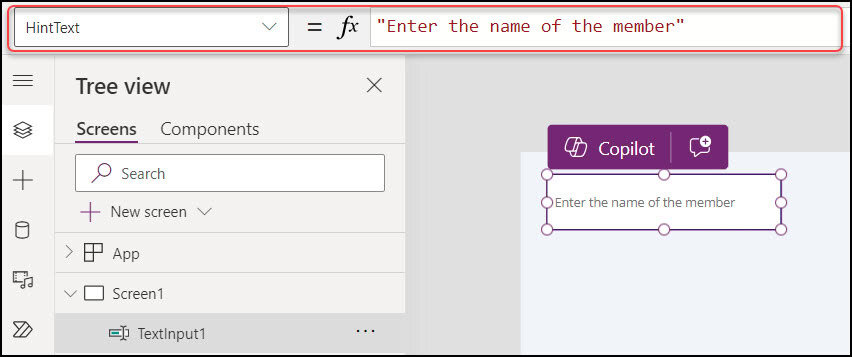
Yes, it is possible to display “Enter the name of the member” using the HintText property of the Text input control. Refer to the image below.