In this PowerApps Tutorial, We will discuss all the related topics about the Power Apps Calculate with a lot of examples. Below represents some of them:
- PowerApps calculate time difference
- PowerApps calculate total gallery
- Power Apps calculate working days
- Power Apps calculate distance
- PowerApps calculate sum of column
- Power Apps calculate percentage
- PowerApps calculate age
- Power Apps calculate days between dates
- PowerApps calculate number of days
- Power Apps calculate difference between dates
- PowerApps calculate average
- Power Apps calculate business days
- Power Apps calculate end of month
- PowerApps calculate hours
PowerApps calculate time difference
Hereby taking some different kinds of scenarios, We will see how to work with the PowerApps to calculate the time difference.
Example – 1:
In this topic, We will discuss how to Display the date difference in both hours and minutes in PowerApps.
- In the app, there will be two Date Picker controls (Start Date and End Date) where the user will select the specific dates.
- There are four Dropdown controls (for HOUR and MINUTE) where a user will select the Start Hours and End Hours including the Start and End Minutes.
- Now I would like to calculate the time difference in between both hours and minutes based upon the Start Date and End Date. Refer to the below screenshot.

- To achieve this, insert a Label control and apply the below formula on its Text property as:
Text = DateDiff(
    DtStartDate.SelectedDate + Time(
        Value(DDHour1.Selected.Value),
        Value(DDMin1.Selected.Value),
        0
    ),
    DtEndDate.SelectedDate + Time(
        Value(DDHour2.Selected.Value),
        Value(DDMin2.Selected.Value),
        0
    ),
    Hours
) & ":" & Mod(
    DateDiff(
        DtStartDate.SelectedDate + Time(
            Value(DDHour1.Selected.Value),
            Value(DDMin1.Selected.Value),
            0
        ),
        DtEndDate.SelectedDate + Time(
            Value(DDHour2.Selected.Value),
            Value(DDMin2.Selected.Value),
            0
        ),
        Minutes
    ),
    60
)
Where,
- DateDiff = The PowerApps DateDiff is a type of function that returns the difference between two date/time values and the output is a whole number of units.
- DtStartDate = This is the Date picker control name of the Start Date
- DtEndDate = This is the Date picker control name of the End Date
- DDHour1 = Dropdown Hour control name of the Start Date
- DDMin1 = Dropdown Minute control name of the Start Date
- DDHour2 = Dropdown Hour control name of the End Date
- DDMin2 = Dropdown Minute control name of the End Date
- Hours = PowerApps Hour function returns the hour component of a Date/Time value, ranging from 0 (12:00 AM) to 23 (11:00 PM).
- Minutes = PowerApps Minute function returns the minute component of a Date/Time value, ranging from 0 to 59.

- Save and Preview the. Select the Start Date and End Date including the Hour and Minute. Then the time difference result you will see in the label control.
Example – 2:
In this scenario, We will calculate the difference between the Hours or Minutes only.
Check out, PowerApps Twitter Connector
PowerApps calculate time difference in Hours
- In the below screenshot, you can see there will be two Time fields named Purchase Start Time and Purchase End Time (displaying in the PowerApps Edit form). Both the time fields (Single line of text data types) are retrieved from a SharePoint list called Book Purchase Info.
- Now I would like to calculate the difference between Hours in between the Purchase Start Time and Purchase End Time field. Go through the below screenshot.
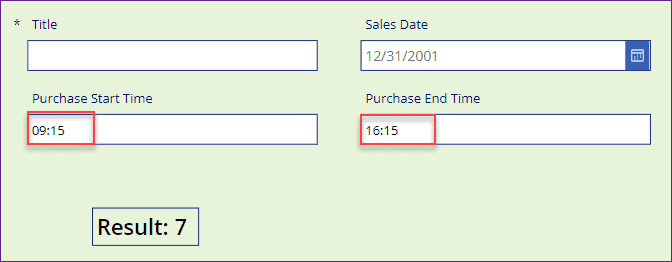
- To workaround with this, Insert a Label control and apply the below code on its Text propety as:
Text = "Result: " & DateDiff(
    DateTimeValue(DataCardValue10.Text),
    DateTimeValue(DataCardValue11.Text),
    Hours
)
Where,
- “Result: ” = It is a string that will display in the labe control
- DateTimeValue = PowerApps DateTimeValue is a function that helps to convert a date and time string (for example, “December 19, 2021 12:31 PM”) to a date/time value.
- DataCardValue10 = Purchase Start Time Data Card Name
- DataCardValue11 = Purchase End Time Data Card Name

- Save and Preview the app. Enter the time in both the time fields and the result (only Hours) you can view in the label control.
PowerApps calculate time difference in Minutes
- Next, we will calculate the time difference only minutes in between the Purchase Start Time and Purchase End Time field.
- Select the label control and set its Text property to the below code:
Text = "Result: " & DateDiff(
    DateTimeValue(DataCardValue10.Text),
    DateTimeValue(DataCardValue11.Text),
    Minutes
)
Refer to the below screenshot.

- Save and Preview the app. Enter the time in both the time fields and then the result (only Minutes) you can view in the label control.
Example – 3:
- This is another kind of scenario where I have used only two text input fields and a label control in the app.
- When a user will enter the time in the two input fields, then the result will display in the label control.
- Select the label control and apply the below formula on its Text property as:
Text = DateDiff(
    DateTimeValue(TextInput1.Text),
    DateTimeValue(TextInput2.Text),
    Hours
)
Where,
TextInput1, TextInput2 = Text input control name

- Save and preview the app. When you will enter the time to both the text fields, then the result will display in the label control as shown in the above screenshot.
- Similarly, if you want to calculate only the minutes, then to achieve this, you can also use the Split function. Apply the below code on the Label’s Text function.
Text = DateDiff(
    Time(
        Value(
            First(
                Split(
                    TextInput1.Text,
                    ":"
                )
            ).Result
        ),
        Value(
            Last(
                Split(
                    TextInput1.Text,
                    ":"
                )
            ).Result
        ),
        0
    ),
    Time(
        Value(
            First(
                Split(
                    TextInput2.Text,
                    ":"
                )
            ).Result
        ),
        Value(
            Last(
                Split(
                    TextInput2.Text,
                    ":"
                )
            ).Result
        ),
        0
    ),
    Minutes
)
Refer to the below screenshot.

This is how we can work with the PowerApps to calculate the time differences.
PowerApps calculate total gallery
Do you want to work with PowerApps to calculate the total gallery? Please go through the below-detailed tutorial:
PowerApps calculate working days or PowerApps calculate business day
In this topic, We will discuss the PowerApps Business Days Calculation (Exclude weekends and Holidays). Since it is very important though, to understand better, I will discuss this topic by giving a pretty simple scenario. Follow these below things to do so.
- Normally what happens is, mostly people are working in business days i.e. from Monday to Friday. So based upon these business days, we need calculate any events, any project live sessions etc.
- In this topic, We will calculate there are how many business days are between two given dates (Excluding the weekends i.e. Saturday and Sunday). Let’s take a simple scenario.
- In the app, there are two Date picker controls (Event Start Date and Event End Date). Also, there is a Label control that shows the calculation result of total business days. I have put all the controls in a PowerApps Container control.

- Normally, a user will select a start date and an end date, then it will calculate the total number of business days excluding the weekends.
- In the below scenario, I have entered the start date as “11/18/2021” and the end date as “11/30/2021“. It calculated and displayed the total business days result is “9“.

- To achieve this, we need to apply the below code on Label’s Text property as:
Text = 1 + ((DateDiff(
    dtEventStartDate.SelectedDate,
    dtEventEndDate.SelectedDate,
    Days
)) * 5 - ((Weekday(dtEventStartDate.SelectedDate) - Weekday(dtEventEndDate.SelectedDate))*2)) / 7 - Switch(
    Weekday(dtEventEndDate.SelectedDate),
    7,
    1,
    0
) - Switch(
    Weekday(dtEventStartDate.SelectedDate),
    1,
    1,
    0
)
Where,
- “1+“= If you mention “1+” at the first part of the formula, it specifies as the start of the first day and until the last day (that means it calculates 5days i.e. from Monday morning to Friday evening). If you do not want to take “1+” value, then it will return only 4 days i.e. from Tuesday to Friday.
- dtEventStartDate = Event start date picker control name
- dtEventEndDate = Event end date picker control name

- After all, there is another case you may face while you will work on this. Read the below instructions.
- The holidays are depends on the region or country basis. Every country has their own holidays. So for such type of things, there is no formula where we can direct subtract the holidays from the total business days.
- As an aternative, I have created a Holiday collection on the OnSelect property of the Date picker control (Event Start Date). And I will assign this collection into a Data table. So that you can easily see all the holidays.
OnSelect = ClearCollect(
    collectHoliday,
    {
        HolidayName: "New Year",
        HolidayDate: "01/01/2021"
    },
    {
        HolidayName: "Ganesh Chaturthi",
        HolidayDate: "09/10/2021"
    },
    {
        HolidayName: "Mahatma Gandhi's Jayanti",
        HolidayDate: "10/02/2021"
    },
    {
        HolidayName: "Dussehra",
        HolidayDate: "10/15/2021"
    },
    {
        HolidayName: "Prophet Mohammad's Birthday",
        HolidayDate: "10/19/2021"
    },
    {
        HolidayName: "Diwali",
        HolidayDate: "11/04/2021"
    },
    {
        HolidayName: "Christmas Day",
        HolidayDate: "12/25/2021"
    }
);
Where,
- collectHoliday = Collection name
- HolidayName, HolidayDate = These are the columns of the collection

- Now insert a Data table and specify the collection on its Items property as:
Items = collectHolidayWhere,
collectHoliday = Specify the created collection name
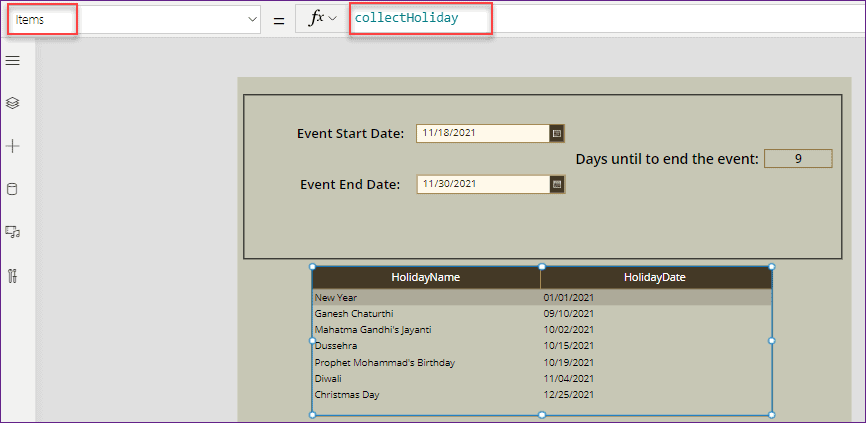
- Once you will select the date picker control (Event Start Date), then only the collection will create and it will appear in the data table control as shown below.
- For the reference purposes, I am doing all these things. If you do not want to show the data table in the app, then you can make the data table control as invisible.
- As in the below screenshot you can see, Event start date is 10/11/2021 and End date is 10/20/2021. It will calculate total business days including the Holidays of the specified year.
- As in the data table, there are total number of two holidays in between those specified date, so the result value is displaying as “6” in the label control.
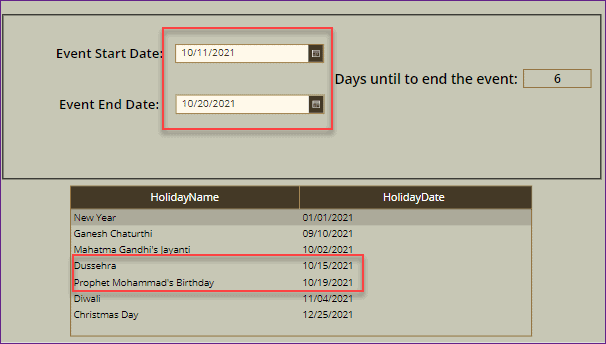
- For this what we need to do is, we need to subtract the specified dates and holiday dates from the total number of business days i.e. present in the below code. Just add this formula with a subtract (-) operator.
Text = - CountIf(collectHoliday, DateValue(HolidayDate)
>= dtEventStartDate.SelectedDate, DateValue(HolidayDate)
<= dtEventEndDate.SelectedDate)
Refer to the below screenshot.

This is how we can work with the PowerApps calculate business days.
Also, read, PowerApps Timer Control: How to use
PowerApps calculate distance
Do you want to calculate the distance in PowerApps? Follow the below simple scenario.
- In the below screen, I have two text input controls, one Button control and a Label control. A user will enter the Source Place and the Destination Place in the two text boxes.
- Once the user will click on the Click Me button, then it will calculate the total distance (in Miles) of both the places and then the result will display in the Label control as shown in the below screenshot.
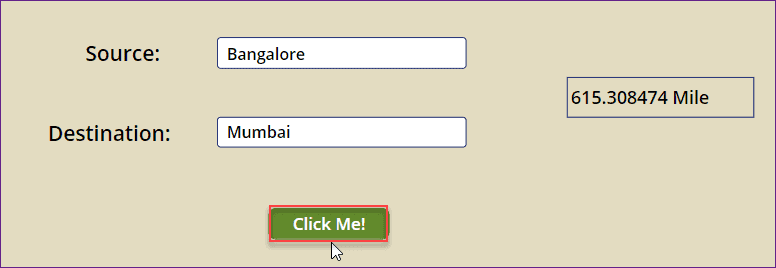
- To achieve this, you need to connect a BingMaps connector to the app.
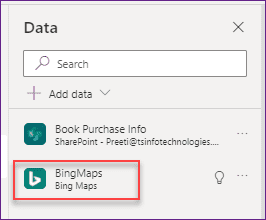
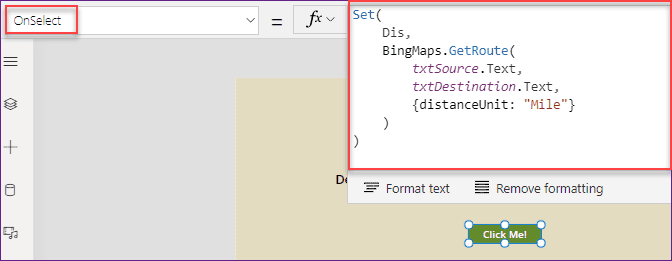
- Next, select the Button (Click Me!) and set the below code on its Onselect property as:
OnSelect = Set(
    Dis,
    BingMaps.GetRoute(
        txtSource.Text,
        txtDestination.Text,
        {distanceUnit: "Mile"}
    )
)
Where,
- Dis = Variable name
- txtSource = It is a Text input control where the user will enter the source place
- txtDestination = It is a Text input control where the user will enter the destination place
- Now select the label control and apply the below formula on its Text property as:
Text = Dis.travelDistance & " " & Dis.distanceUnit
This is how to work with the PowerApps to calculate distance.
Read Build a Calculator in Power Apps
PowerApps calculate sum of column
Are you aware that what the PowerApps Sum function is, its syntax, and how to calculate the sum of field values in PowerApps?
To know all the details about the PowerApps Sum function, you can refer to the below complete tutorial:
PowerApps calculate percentage
Next comes how we can calculate any value to its percentage in PowerApps. Go through the below different kinds of scenarios, so that you can better understand.
Example – 1:
- In this example, there will be one Text input control and a Label control as shown below. When a user will enter any number in the text box, then it will calculate and display its percentage value in the specified label control.
- For example, In the below screen, I have entered a number as 0.7 in the text box, then the percentage value has displayed as 70% in the label control.

- To achieve this, Change the Format property of the Text input control to Number (Properties -> Format -> Number).

- Next, select the Label control and apply the below code on its Text property as:
Text = Text(
    txtValue.Text * 100,
    "[$-en-US]0%"
)
Where,
txtValue = Text input control name

This is one of the ways where you can calculate the percentage in PowerApps.
Example – 2:
- The below screenshot represents a PowerApps Edit form where all the fields are retrieved from a SharePoint List named Products.
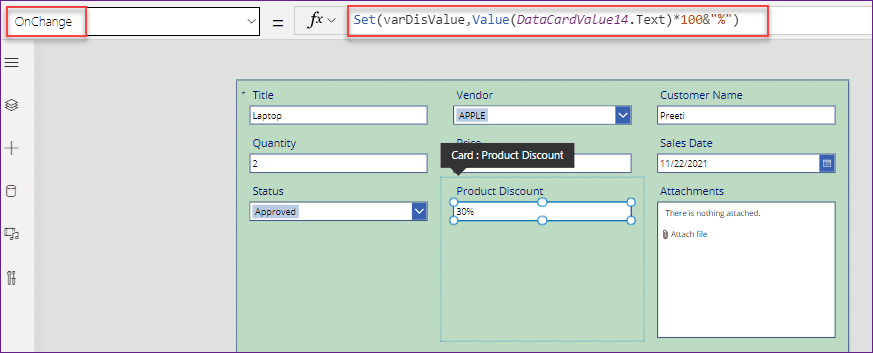
- This SharePoint List has a Number field called Product Discount. So whenever I am entering a number as 0.3, then it just looks terrible in the form. Instead of this, I would like to display as 30% in the form. Refer to the below screenshot.

- To workaround with this, select the Text input field of the Product Discount Data Card and apply the below code on its OnChange property as:
OnChange = Set(
    varDisValue,
    Value(DataCardValue14.Text) * 100 & "%"
)
Where,
- varDisValue = Specify a variable name
- DataCardValue14 = This is the Number field from the SharePoint List
- Now set the specified variable on the Product Discount Data Card Text box’s Default property as:
Default = varDisValue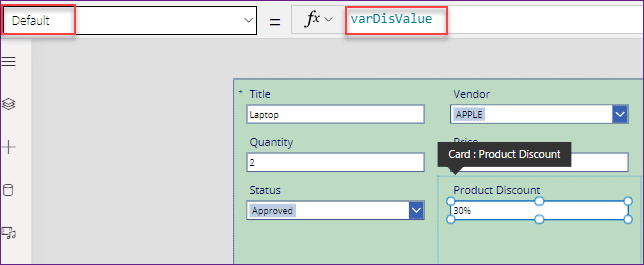
- Once it is done, save and preview the app. Enter a decimal number in the Product Discount field. Once you will out of the field, you can see the decimal number has been converted into a percentage value as shown in the above figure.
Example – 3:
- In this scenario, We will see how we can calculate the percentage value in a Button control and as well as in a Data table control. When a user will press the button, then the percentage value will create and the result will display in a Data table control.
- In the Data table control, there will be Book and its Price. Now I would like to calculate its Percentage based upon the Book Price as shown below.

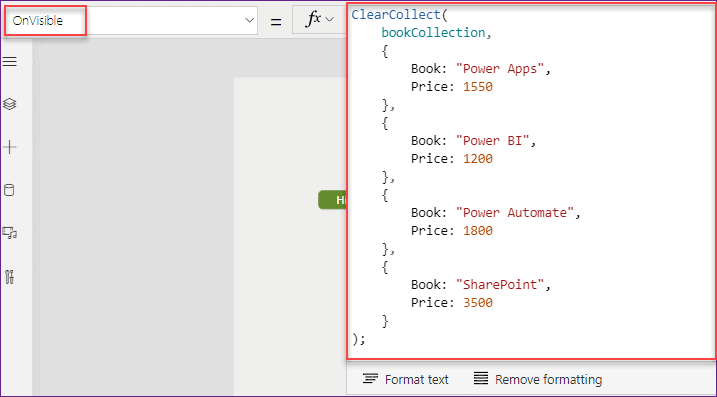
- To workaround with this, we need to create a Collection where you can store the Book Details (Book name and Price). I have created this collection on Screen’s OnVisible property as:
OnVisible = ClearCollect(
    bookCollection,
    {
        Book: "Power Apps",
        Price: 1550
    },
    {
        Book: "Power BI",
        Price: 1200
    },
    {
        Book: "Power Automate",
        Price: 1800
    },
    {
        Book: "SharePoint",
        Price: 3500
    }
);
Where,
- bookCollection = Collection name
- Book, Price = These are the headers of the collection
- “Power Apps”, “Power BI”, and so on= These are the values that will present under the Book column
- 1550, 1200, and so on = These are the values that will present under the Price column
- Next, insert a Button input (Hit Me!) and set the below code on its OnSelect property as:
OnSelect = ClearCollect(
    bookPercentage,
    AddColumns(
        bookCollection,
        "Percentage",
        Text(
            Price / Sum(
                bookCollection,
                Price
            ) * 100,
            "[$-en-US]0.0%"
        )
    )
);
Where,
- bookPercentage = Create a new collection where you can add a new column to display the percentage value
- AddColumns = PowerApps AddColumns function helps to add a column to a table. To know more details about this function, click on this link: PowerApps AddColumns Function with Examples
- bookCollection = This is the created collection name
- “Percentage” = Specify a new column name that you want to add in the collection
- Price = Specify the collection header name based upon you want to calculate the percentage

- At last, Select the Data table control -> Go to Properties pane -> Add the Data source to the created percentage collection name (bookPercentage).
- Select the Edit fields from the Fields section -> click on +Add field -> add all the collection fields. Once you will add hose columns, you can see the percentage values in the data table control.

This is how you can work with PowerApps to calculate the percentage.
Read PowerApps: Create a navigation menu using the Gallery Control
PowerApps calculate age
Do you want to calculate the age in PowerApps? Yes, you can calculate it by using PowerApps. Follow the below simple example.
- In this example, there will be a date picker control. A user will select any date (let’s say his/her birthday date) and the result will display in the label control.
- The age will be calculated automatically by using Today’s Date and the Birthday Date input from the Calendar.
- To achieve this, Below I will use two different formulas as:
Formula – 1:
Select the Label control and apply the below formula on its Text property as:
Text = "Age: " & DateDiff(
    dtSelectDate.SelectedDate,
    Today(),
    Years
)
Where,
- “Age: ” = This is the string that I want to display in the label control
- dtSelectDate = Name of the Date Picker control
Also, you can refer to the below screenshot.

Formula – 2:
In the same way, select the Label control and set the below code on its Text property as:
Text = "Age: " & If(
    DateDiff(
        Today(),
        Date(
            Year(Now()),
            Month(dtSelectDate),
            Day(dtSelectDate)
        )
    ) <= 0,
    DateDiff(
        dtSelectDate,
        Today(),
        Years
    ),
    DateDiff(
        dtSelectDate,
        Today(),
        Years
    ) - 1
)
Where,
dtSelectDate = Specify the date picker control name

This is how to calculate the age in PowerApps.
PowerApps calculate days between dates
Here we will see how to work with PowerApps to calculate days between dates. Refer to the below different examples.
Example – 1:
- In the first scenario, there is a total of three Label controls. One Label control is used to display the Start Date, another one is used to display the End Date (the date should be in “mm/dd/yyyy” format).
- The third label control will help you to calculate and display the total days between these two dates.
- In the below screenshot, the Start Date is 11/18/2021 and the End Date is 11/25/2021. As the total days in between these two dates is 7, so the output you can see in the label control as shown below.

- Select the Result Label control and apply the below formula on its Text property as:
Text = "Total no. of Days: " & DateDiff(
    DateTimeValue(lblStartDate.Text),
    DateTimeValue(lblEndDate.Text),
    Days
)
Where,
- lblStartDate = Start Date Label control name
- lblEndDate = End Date Label control name

Example – 2:
- Suppose in some cases you want to display the total number of Hours, Minutes, and Seconds in between the two Date picker controls (Activate Date and End Date). For this, we will use the PowerApps DateDiff function which will get the difference between two dates.
- The result will display in the label control as like the below screenshot.
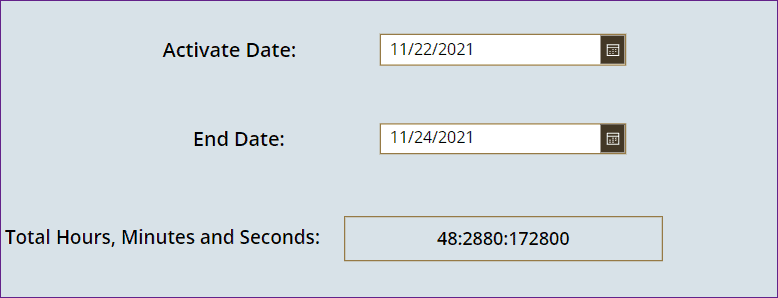
- To do this, apply the below code on Label’s Text property as:
Text = Concatenate(
    Text(
        DateDiff(
            dtActivateDate.SelectedDate,
            dtEndDate.SelectedDate,
            Hours
        )
    ),
    ":",
    Text(
        DateDiff(
            dtActivateDate.SelectedDate,
            dtEndDate.SelectedDate,
            Minutes
        )
    ),
    ":",
    Text(
        DateDiff(
            dtActivateDate.SelectedDate,
            dtEndDate.SelectedDate,
            Seconds
        )
    )
)
Where,
- dtActivateDate = Activate Date picker control name
- dtEndDate = End Date picker control name

- Once you will save and preview the app, you can view the result in the label control as shown above.
Example – 3:
- There are two Date picker controls named Submission Start Date and Submission End Date. A user will enter the start date and as well as the end date.
- The total number of days in between these two dates will calculate and the result will display in a Label control.
- Here in the below screenshot, the start date is 15th November and the end date is 23rd December, so the total number of days is 38.

- To workaround with this, select the label control and set the below code on its Text property as:
Text = "Total Number of Days: " & DateDiff(
    dtSubmissionStart.SelectedDate,
    dtSubmissionEnd.SelectedDate,
    Days
)
- Also, you can add the below logic to avoid the negative numbers if the Submission Start Date is after the Submission End Date.
Text = "Total Number of Days: " & If(
    DateDiff(
        dtSubmissionStart.SelectedDate,
        dtSubmissionEnd.SelectedDate,
        Days
    ) < 0,
    DateDiff(
        dtSubmissionStart.SelectedDate,
        dtSubmissionEnd.SelectedDate,
        Days
    ) * -1,
    DateDiff(
        dtSubmissionStart.SelectedDate,
        dtSubmissionEnd.SelectedDate,
        Days
    )
)
Refer to the below screenshot.

This is how to use PowerApps to calculate days between dates.
PowerApps calculate number of days
Here in this topic, We will discuss some of the formulae related to the PowerApps number of Days.
PowerApps get the Current Date
- To return the current date in PowerApps, you can use the PowerApps Today() function.
- In the app, insert a Label control and apply the Today function on its Text property as:
Text = Today()
- As today’s date is 25th November 2021, thats why in the label control its showing as 11/25/2021 (in mm/dd/yyyy format).
PowerApps get the Current Date and Time
- To get the current date and time in PowerApps, you can use the PowerApps Now() function.
- Apply this Now function on a Label’s Text property as:
Text = Now()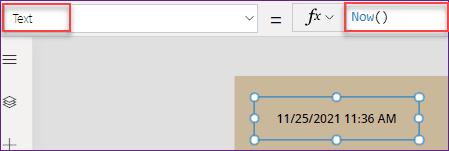
- This function always returns the current Date including the current time (with AM/PM) as shown in the above screenshot.
PowerApps get the start date of the current week
- Suppose you need to return the start date of the current week in PowerApps, then you can follow the below formula on Label’s Text property as:
Text = DateAdd(
    Now(),
    -(Weekday(
        Now(),
        StartOfWeek.MondayZero
    )),
    Days
)- Where,
- Weekday = This is a type of function that returns a number of the weekday
- StartOfWeek.MondayZero = It defines the output value 0 (Monday) through to 6 (Sunday).

- As my current week’s first Day is 22nd Nov, so it displays as 11/22/2021 including the time.
Get the date of the first day in the current month in PowerApps
- To return the date of the first day in the current month, you can set the below formula on the Label’s Text property as:
Text = Date(
    Year(Now()),
    Month(Now()),
    1
)- In the above code, the Date function returns a new date. As this function should expect three arguments that’s why I have specified the Year, Month, and Day.
- Here, I have specified the current Year and current Month and for the Day, I have put the value as 1.

Get the date of the last day in the current month in PowerApps
- Similarly, to return the date of the last day in the current month, you can set the below formula on the Label’s Text property as:
Text = DateAdd(
    DateAdd(
        Date(
            Year(Now()),
            Month(Now()),
            1
        ),
        1,
        Months
    ),
    -1,
    Days
)- Here in the above code, I have added 1 month to the first day of the current month, and then subtracted one day from the result.

- As my current month is November, that’s why in the label control, it is showing the result as 11/30/2021.
PowerApps calculate difference between dates
Do you want to calculate the difference between the current date i.e. TODAY() and the end date i.e. Sales Date within the PowerApps or in the SharePoint list? If so, then follow the below simple scenario.
- There is a SharePoint list named Book Purchase Info that consists of a Date column called Sales Date. Now I would like to calculate the difference between these dates (current date and sales date).
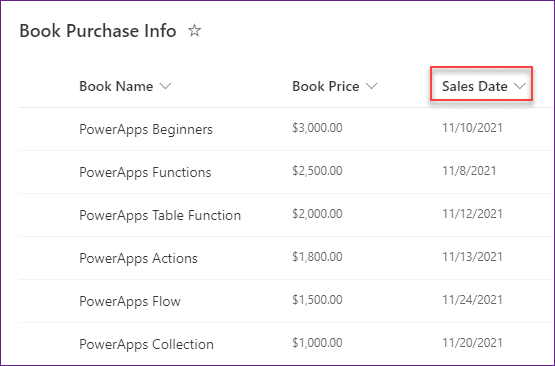
- To do so, take a Gallery control and add a label in the first section of the gallery. Set the Label’s Text property to the following code:
Text = "Total Days: " & If(
    DateDiff(
        Today(),
        ThisItem.'Sales Date',
        Days
    ) < 0,
    DateDiff(
        Today(),
        ThisItem.'Sales Date',
        Days
    ) * -1,
    DateDiff(
        Today(),
        ThisItem.'Sales Date',
        Days
    )
)
Where,
- ‘Total Days: ‘ = This specifies as a string that will display in the Label control
- ThisItem.’Sales Date’ = SharePoint Date column name

- Once you will save and preview the app, you can see the total difference between two dates (current date and sales date) in the gallery itself as in the above screenshot.
PowerApps calculate average
Suppose you want to calculate an average of some products in PowerApps and that product should come from a SharePoint List. For this, We will use the PowerApps Average function. Check out this scenario.
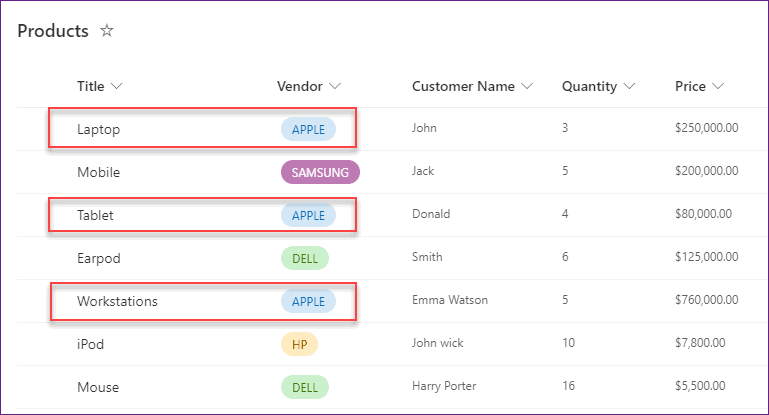
- I have a SharePoint list named Products. This list has some different types of columns with different data types as like below:
- Title = By default, this is a single line of text data type field
- Vendor = This is a Choice column
- Customer Name = This is a Single line of text data type
- Quantity = Number data type
- Price = Currency data type
- Next, in PowerApps, I would like to calculate the average number of quantity of the APPLE Vendor only.
- To achieve this, at first we will create a PowerApps Collection on screen’s OnVisible property (not only you can use screen’s OnVisible, but also you can use a Button’s OnSelect, App’s OnStart property) as:
OnVisible = ClearCollect(
    ProductsCollection,
    Products
)
Where,
- ProductsCollection = Collection name
- Products = SharePoint List name

- Insert a Label control and apply the below formula on its Text property as:
Text = "Total Average: " & Average(
    Filter(
        ProductsCollection,
        "APPLE" = Vendor.Value
    ),
    Quantity
)
Where,
- “Total Average: “ = Specify a text that will display in the label control
- Average = PowerApps Average function helps to calculate the average, or arithmetic mean, of its arguments.
- ProductsCollection = Specify the created collection name
- “APPLE” = Specify the vendor name for what you want to calculate the average value
- Vendor = SharePoint Choice column name
- Quantity = Provide the column name that you want to calculate the average value

- Now save and close the app. When you will reopen the app again, you can view the average caculated value in the label control as shown above.
- Everytime you will make any changes in the code, you need to save, close, and reopen the app.
This is how to work with the PowerApps calculate average function.
PowerApps calculate end of month
- In this topic, We will discuss how to work with the PowerApp date to the last day of the month. This means it will return the previous month’s last date in the app.
- For this, We need to set a variable on the screen’s OnVisible property i.e.
OnVisible = Set(varEnd,Date(2021,11,0))Where,
- varEnd = Variable name
- 2021,11,0 = If you want to specify the date as manually, then you can use the current year, month, and value as 0.

- Also, if you want to specify the date as dynamically, then apply the below code:
OnVisible = Set(
    varEnd,
    Date(
        Year(Now()),
        Month(Now()),
        0
    )
)
- After all, provide the created variable on Date picker’s DefaultDate property as:
DefaultDate = varEnd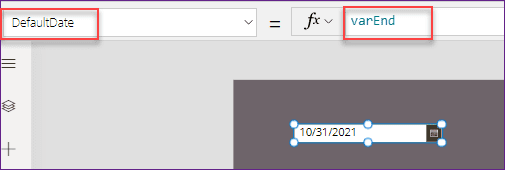
- Save, Publish, and Close the app. Once you will reopen the app again, you can see the last month’s end date in the date picker as in the above screenshot. As my current month is November, so it is retrieving the lst date of October i.e. 31st October.
PowerApps calculate hours
Do you want to calculate only hours in PowerApps? There are many ways you can try to achieve this thing. Apart from those, I will discuss with you one type of example.
- In the below topic, I have taken two Text input controls and a Label control. A user will enter the start time and the finish time daily in both the text boxes.
- Once the user will enter values, then the time will calculate and convert it to a hour value. For example, if I entered the start time and end time from 0900 to 1500, then it will show me as total of 3 hours of work in the label control.

- To achieve this thing, apply the below formula on the Label’s Text property as:
Text = "working time: " & DateDiff(
    Time(
        Value(
            Left(
                txtStartTime.Text,
                2
            )
        ),
        Value(
            Right(
                txtStartTime.Text,
                2
            )
        ),
        0
    ),
    Time(
        Value(
            Left(
                txtEndTime.Text,
                2
            )
        ),
        Value(
            Right(
                txtEndTime.Text,
                2
            )
        ),
        0
    ),
    Hours
)
Where,
- txtStartTime = Start time text input control name
- txtEndTime = End time text input control name
- Hours = To calculate the total number of hours, we will use Hours unit. Similarly, if you want to calculate the minute or day, then you can use those respective units as Minutes or Days.

- Once you will save and preview the app, you can see the result in the label control.
This is how to calculate hours in PowerApps.
Also, you may like these below PowerApps Tutorials:
- Power Apps Rating Control – How to use
- Power Apps Slider Control
- Power Apps Gallery Pagination
- Migrate PowerApps from one tenant to another
- Power Apps Export Import Control – How to use
- Power Apps PDF Viewer – Complete tutorial
- Power Apps Display SharePoint List Items – 5 Ways
- Power Apps List Box Control – Complete tutorial
- PowerApps Filter SharePoint List (21 Examples)
- Power Apps Image Control – How to use
- Power Apps GroupBy Function example
- Power Apps Audio and Video Control [Detailed tutorial]
- Power Apps Choices Function with Examples
In this PowerApps Tutorial, We discussed all the below related about the PowerApps Calculations as:
- PowerApps calculate time difference
- PowerApps calculate total gallery
- PowerApps calculate working days
- PowerApps calculate distance
- PowerApps calculate sum of column
- PowerApps calculate percentage
- PowerApps calculate age
- PowerApps calculate days between dates
- PowerApps calculate number of days
- PowerApps calculate difference between dates
- PowerApps calculate average
- PowerApps calculate business days
- PowerApps calculate end of month
- PowerApps calculate hours
I am Bijay a Microsoft MVP (10 times – My MVP Profile) in SharePoint and have more than 17 years of expertise in SharePoint Online Office 365, SharePoint subscription edition, and SharePoint 2019/2016/2013. Currently working in my own venture TSInfo Technologies a SharePoint development, consulting, and training company. I also run the popular SharePoint website EnjoySharePoint.com
Grams to Kgs,Pounds, Coverted Formula is possible
Actually I need Power apps IN examples: grams to kgs ,kg to pounds converted formula need
In the calculate business day parts, How i can get the holidays from Sharepoint’s list and load into “OnSelect” part?
what about differentiating nigth hours from day hours from the 2 day pickers? How can it be coded?