In this Power Apps Tutorial, I will explain everything related to the Power Apps GroupBy function and Power Apps Ungroup function and also their syntaxes.
Moreover, By taking simple scenarios, we will discuss the below topics which are related to the Power Apps GroupBy function. Such as:
- Power Apps GroupBy Multiple Columns
- Power Apps GroupBy Filter
- Power Apps GroupBy Sum | Power Apps GroupBy Aggregate Results
- Power Apps GroupBy SharePoint
- Power Apps GroupBy Gallery
- Power Apps GroupBy Count
- Power Apps GroupBy Choice
- Power Apps GroupBy LookUp
- Power Apps GroupBy Sort
Groupby in Power Apps
PowerApps GroupBy() function is used to return a table with records grouped based on the values in one or more columns.
Basically, you can use the Groupby PowerApps to group records, modify the table it returns, and then ungroup records by using the UnGroup function. However, if the original table contains blank records, the GroupBy function will not work.
Power Apps GroupBy Syntax:
GroupBy( Table, ColumnName1 [, ColumnName2, ... ], GroupColumnName )Where,
- Table = This is required to define a table to be grouped
- ColumnName= This is required. The column names in the Table by which to group records become columns in the resulting table
- GroupColumnName = Required. This is the column name for storing record data that is not in the ColumnName
Power Apps GroupBy Multiple Columns
I have a Power Apps collection named “colTravel” which contains the below fields/columns.
| TripTitle |
| Destination |
| TravelStartDate |
| TravelEndDate |
| Airline |
| EstimatedAirfare |
| Hotel |
| EstimatedHotelCost |
| Requestor |
| Approved |
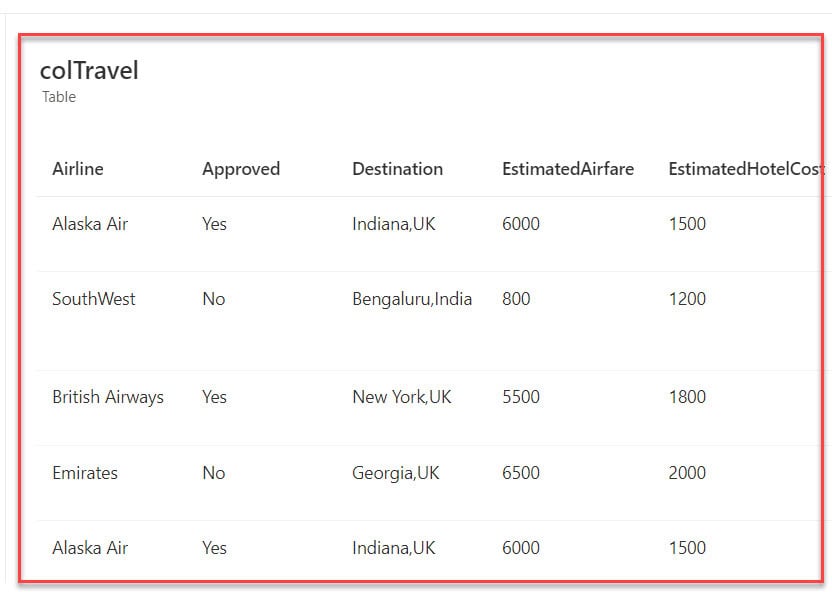
Now, I would like to create a nested table [colDestination] by grouping the two columns from the previous collection, such as Airline and Destination.
Output:
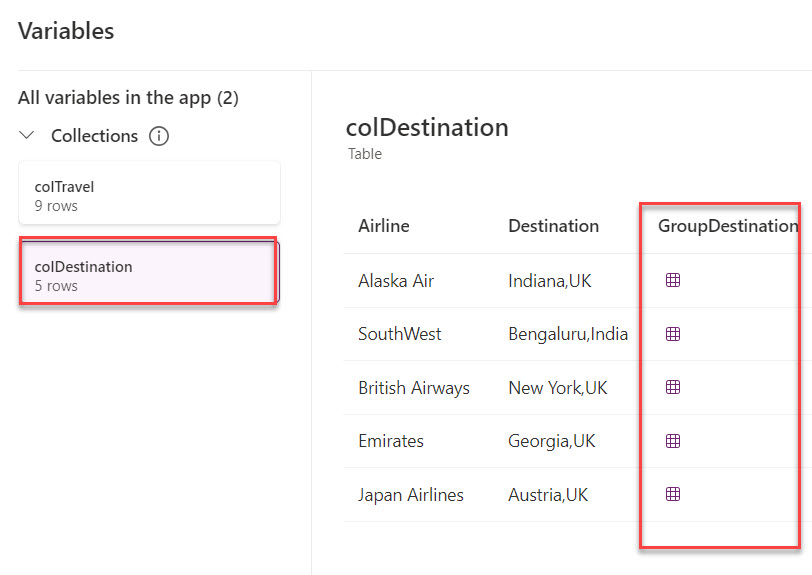
To work round this, follow the below steps. Such as:
1. To create a Power Apps collection, select the App object and set its OnStart property to the code below.
OnStart = ClearCollect(
    colTravel,
    {
        TripTitle: "Company anniversary trip",
        Destination: "Indiana,UK",
        TravelStartDate: "9/25/2023",
        TravelEndDate: "9/31/2023",
        Airline: "Alaska Air",
        EstimatedAirfare: 6000,
        Hotel: "Indiana Hotel",
        EstimatedHotelCost: 1500,
        Requestor: "Lidia Holloway",
        Approved: "Yes"
    },
    {
        TripTitle: "Research interviews",
        Destination: "Bengaluru,India",
        TravelStartDate: "10/15/2023",
        TravelEndDate: "10/20/2023",
        Airline: "SouthWest",
        EstimatedAirfare: 800,
        Hotel: "Hotel Royal Orchid Bangalore",
        EstimatedHotelCost: 1200,
        Requestor: "Lynne Robbins",
        Approved: "No"
    },
    {
        TripTitle: "Design sprint",
        Destination: "New York,UK",
        TravelStartDate: "11/22/2023",
        TravelEndDate: "11/28/2023",
        Airline: "British Airways",
        EstimatedAirfare: 5500,
        Hotel: "Hotel Mela Times Square",
        EstimatedHotelCost: 1800,
        Requestor: "Joni Sherman",
        Approved: "Yes"
    },
    {
        TripTitle: "Sales team conference",
        Destination: "Georgia,UK",
        TravelStartDate: "12/20/2023",
        TravelEndDate: "12/25/2023",
        Airline: "Emirates",
        EstimatedAirfare: 6500,
        Hotel: "Hotel grand",
        EstimatedHotelCost: 2000,
        Requestor: "Johanna Lorenz",
        Approved: "No"
    },
    {
        TripTitle: "Event and conference travel",
        Destination: "Indiana,UK",
        TravelStartDate: "12/15/2023",
        TravelEndDate: "12/18/2023",
        Airline: "Alaska Air",
        EstimatedAirfare: 6000,
        Hotel: "Indiana Hotel",
        EstimatedHotelCost: 1500,
        Requestor: "Lidia Holloway",
        Approved: "Yes"
    },
    {
        TripTitle: "Internal meetings and visiting offices",
        Destination: "Georgia,UK",
        TravelStartDate: "12/27/2023",
        TravelEndDate: "12/30/2023",
        Airline: "Emirates",
        EstimatedAirfare: 6500,
        Hotel: "Hotel grand",
        EstimatedHotelCost: 2000,
        Requestor: "Johanna Lorenz",
        Approved: "No"
    },
    {
        TripTitle: "Company retreats",
        Destination: "Bengaluru,India",
        TravelStartDate: "1/5/2024",
        TravelEndDate: "1/11/2024",
        Airline: "SouthWest",
        EstimatedAirfare: 800,
        Hotel: "Hotel Royal Orchid Bangalore",
        EstimatedHotelCost: 1200,
        Requestor: "Lynne Robbins",
        Approved: "No"
    },
    {
        TripTitle: "Client meetings",
        Destination: "Austria,UK",
        TravelStartDate: "1/20/2024",
        TravelEndDate: "1/27/2024",
        Airline: "Japan Airlines",
        EstimatedAirfare: 7500,
        Hotel: "Hotel Rand",
        EstimatedHotelCost: 1500,
        Requestor: "Johanna Lorenz",
        Approved: "No"
    },
    {
        TripTitle: "Transfers and offshore work",
        Destination: "New York,UK",
        TravelStartDate: "1/31/2024",
        TravelEndDate: "2/5/2024",
        Airline: "British Airways",
        EstimatedAirfare: 5500,
        Hotel: "Hotel Mela Times Square",
        EstimatedHotelCost: 1800,
        Requestor: "Joni Sherman",
        Approved: "Yes"
    }
)
Where,
- colTravel = Collection Name
- TripTitle, Destination, TravelStartDate … = Collection Headers/Columns
- “Company anniversary trip”, “Indiana,UK”… = Collection Values/Records
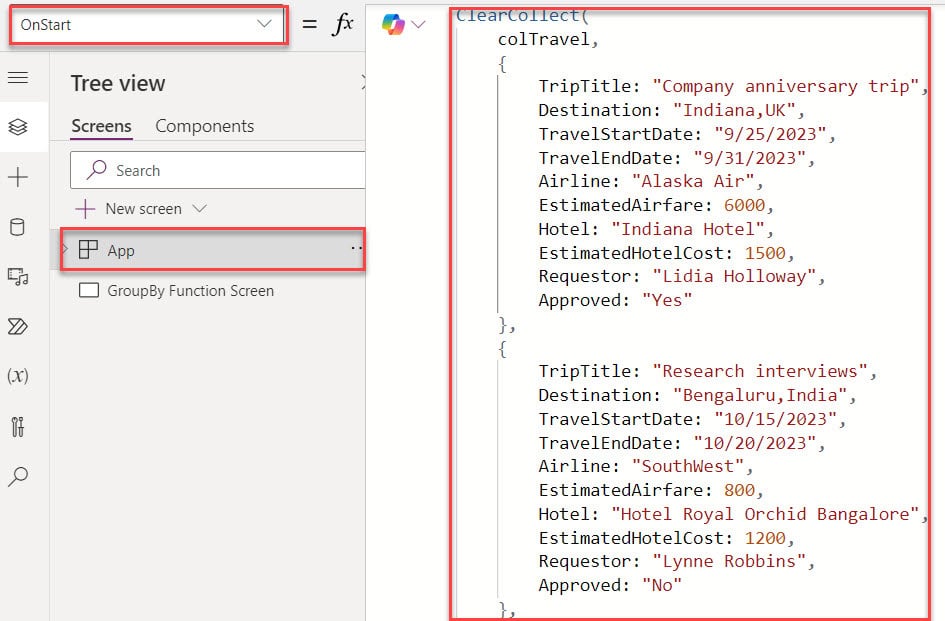
2. Also, if you want to see your created collection, click the View Table [Variables section (x) -> Collections] option and select the respective collection, as shown below.
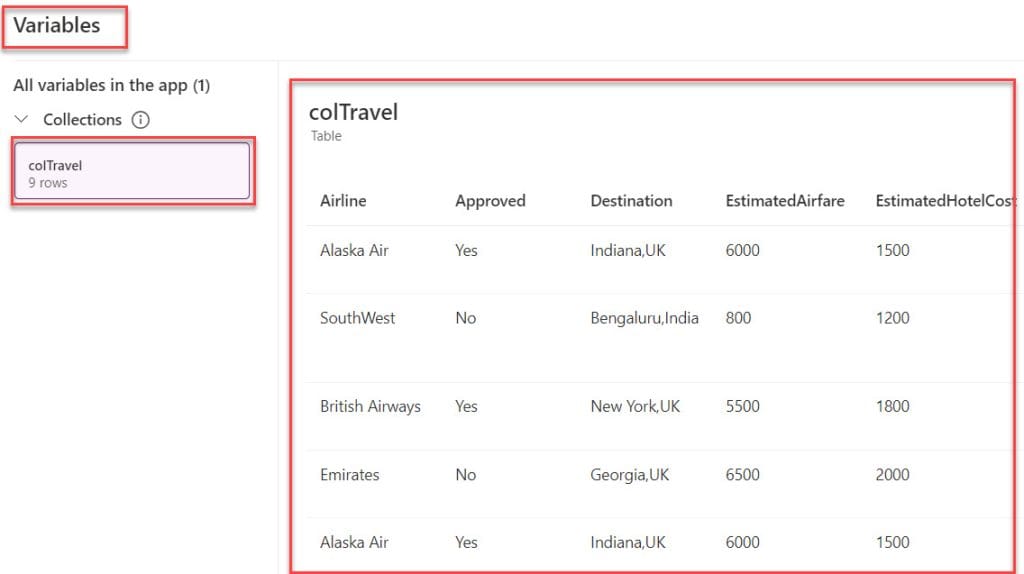
3. But here, we need to group the two columns into a single record and add a nested table to display the records in another collection (colDestination).
4. To do so, Add a Button control on the screen and set its OnSelect property to the code below:
OnSelect = ClearCollect(
    colDestination,
    GroupBy(
        colTravel,
        "Destination",
        "Airline",
        "GroupDestination"
    )
)
Where,
- colDestination = It is a second collection name
- colTravel = It is the first name of the Power Apps collection
- “Destination”, and “Airline” = These are the columns which we want to group
- “GroupDestination” = It is the name of the nested table
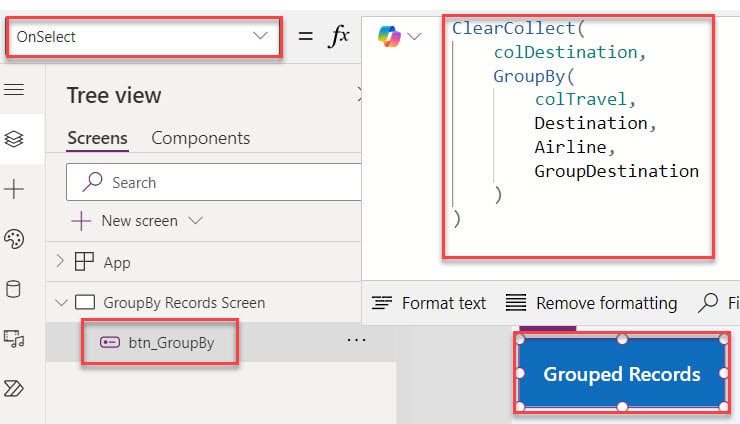
5. Finally, Save, Publish, and Preview the app. Once you click on the Button control, you will get another collection[GroupBy multiple columns].
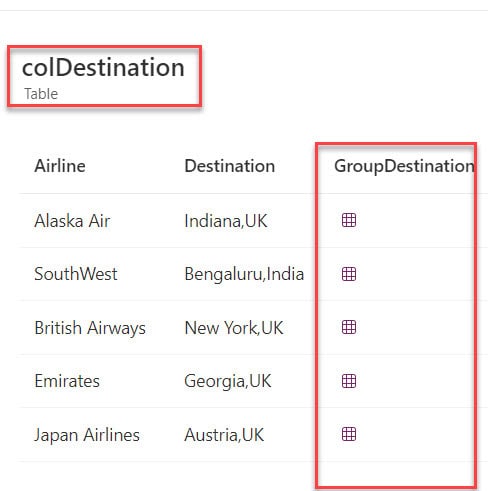
6. Once you click on any nested table [GroupDestination], you will get the grouped data with respected columns, as shown below.
This way, you can work with Power Apps GroupBy multiple columns.

Power Apps UnGroup Function
The Power Apps Ungroup function is directly opposite the GroupBy process. This function helps to break up separate records that were grouped together and returns a table.
Power Apps GroupBy and Ungroup functions do not modify a table; instead, they take a table as an argument and return a different table.
Power Apps UnGroup Syntax:
Ungroup( Table, GroupColumnName )Where,
- Table = This is required to specify a Table to be ungrouped
- GroupColumnName = This is also required. The column contains the record data setup with the GroupBy function
Example:
I have a Power Apps group collection, [colDestination]. In this collection, I have grouped the two columns, [Airline] and [Destination], into a single record, [GroupDestination].To do so, follow the below steps.
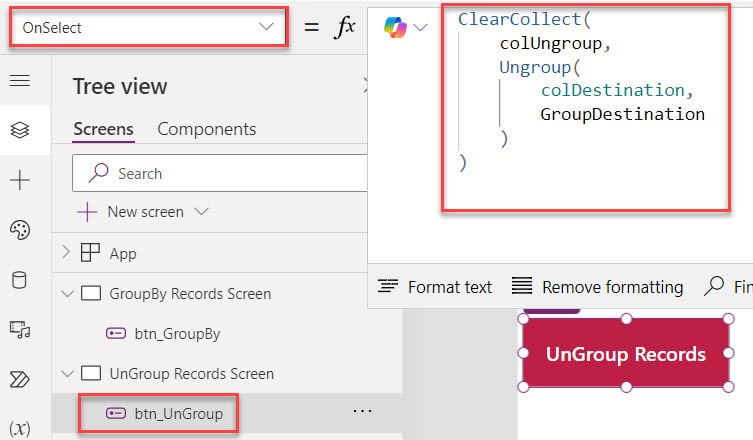
1. On the Power Apps Screen, insert a Button control and Set its OnSelect property to the code below.
OnSelct = ClearCollect(
    colUngroup,
    Ungroup(
        colDestination,
        GroupDestination
    )
)
2. Next, click on the button control to ungroup the collection records, as shown below.
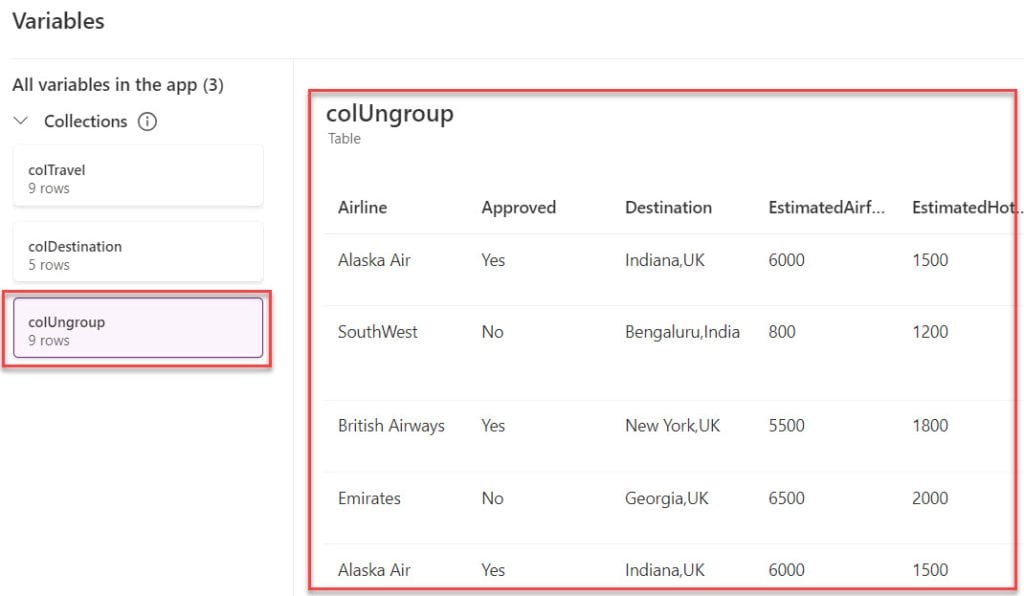
This way, you can ungroup the table of records using the Power Apps UnGroup function.
Power Apps GroupBy Filter
Next, I will show you how to work with the Power Apps GroupBy filter using a simple example.
Example:
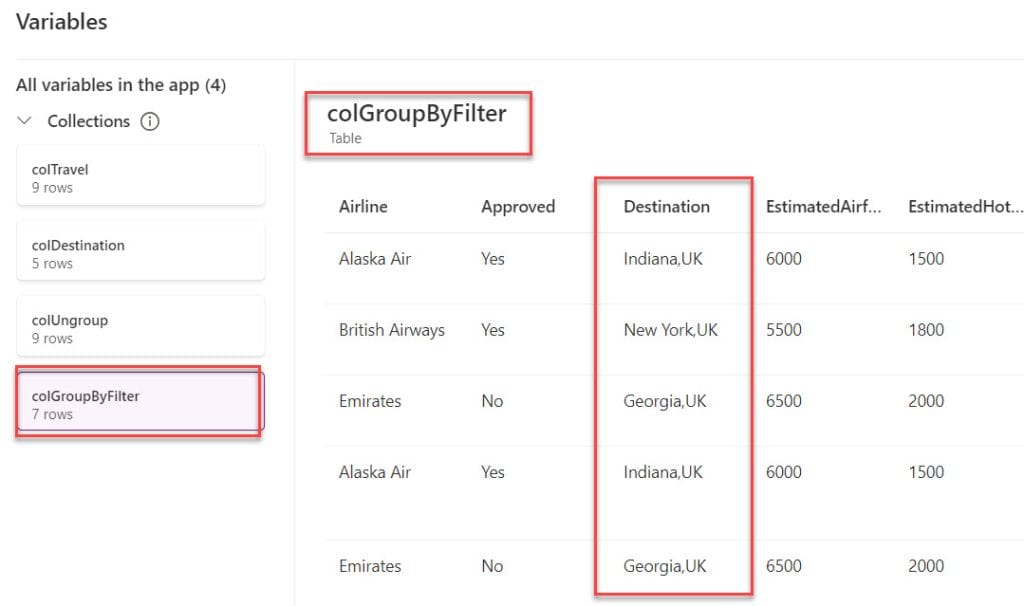
I have a Power Apps collection, [colTravel], with different records. However, I want to filter the country based on “UK” and create another collection, [colGroupByFilter], as shown below.
To achieve it, follow the below steps.
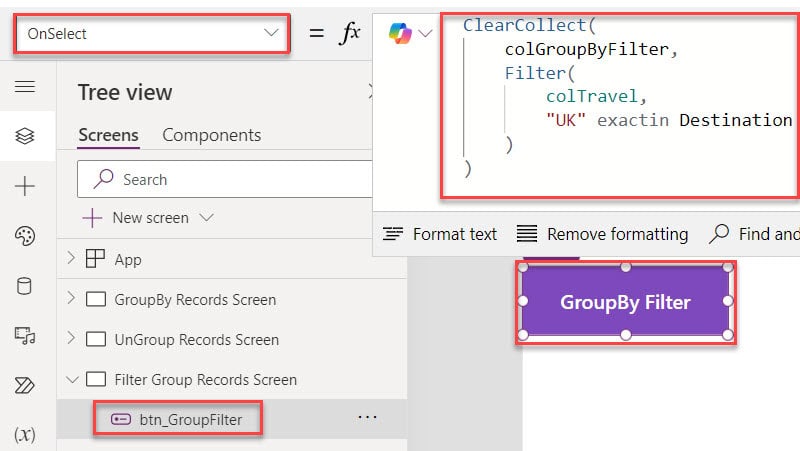
1. On the Power Apps Screen, insert a Button control and set its OnSelect property to the code below.
OnSelect = ClearCollect(
    colGroupByFilter,
    Filter(
        colTravel,
        "UK" exactin Destination
    )
)
2. Once you click on the button control, the collection grouped records will be filtered and display results on a new collection.
Output:
Power Apps GroupBy Sum | Power Apps GroupBy Aggregate Results
In this section, I will explain the Power Apps GroupBy sum or Power Apps GroupBy aggregate Results with a simple example.
I have a Power Apps collection [colGroupByFilter] which contains two number columns. Such as:
- EstimatedAirfare
- EstimatedHotelCost
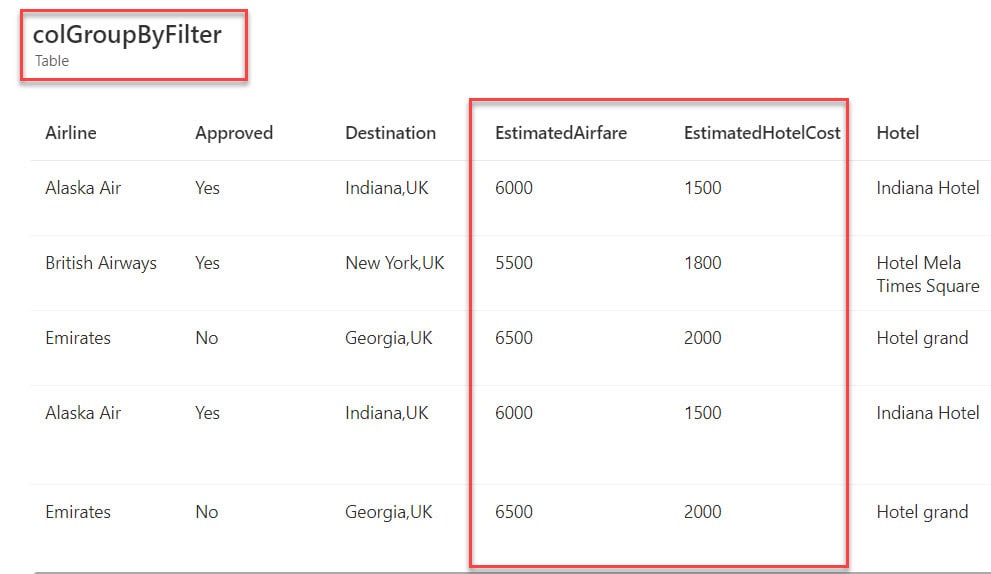
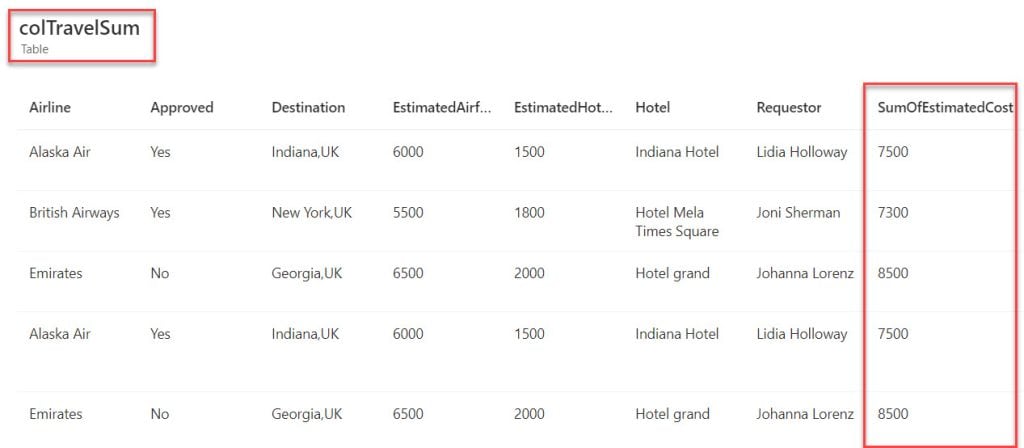
Now, I would like to sum up these two columns, and the result will be displayed in a new column, i.e., Sum of the Estimated Cost.
Output:
| EstimatedAirfare | EstimatedHotelCost | Sum of the Estimated Cost [Output] |
|---|---|---|
| 6000 | 1500 | 7500 |
| 5500 | 1800 | 7300 |
| 6500 | 2000 | 8500 |
| 6000 | 1500 | 7500 |
| 6500 | 2000 | 8500 |
To do so, follow the below steps. Such as:
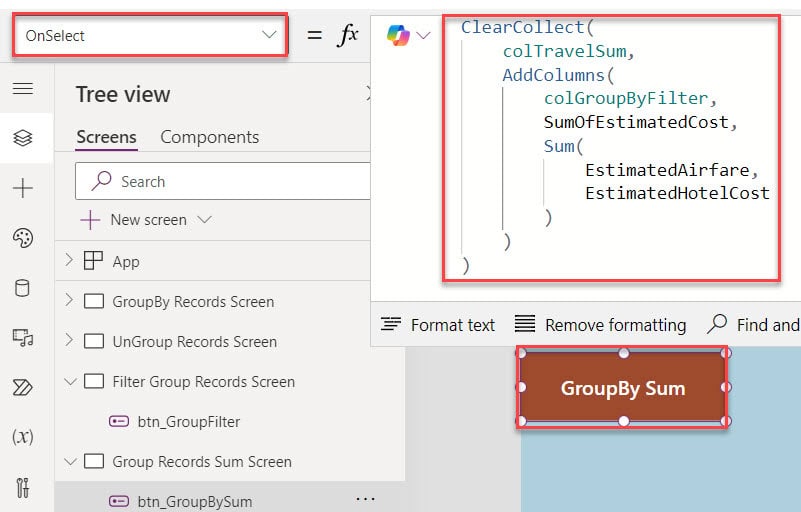
1. On the Power Apps Screen, insert a Button control and set its OnSelect property to the code below.
OnSelect = ClearCollect(
    colTravelSum,
    AddColumns(
        colGroupByFilter,
        SumOfEstimatedCost,
        Sum(
            EstimatedAirfare,
            EstimatedHotelCost
        )
    )
)
2. Once it is done, Preview the app. When the user clicks on the button control, the GroupBy sum result will be displayed in a new column [Sum of the Estimated Cost].
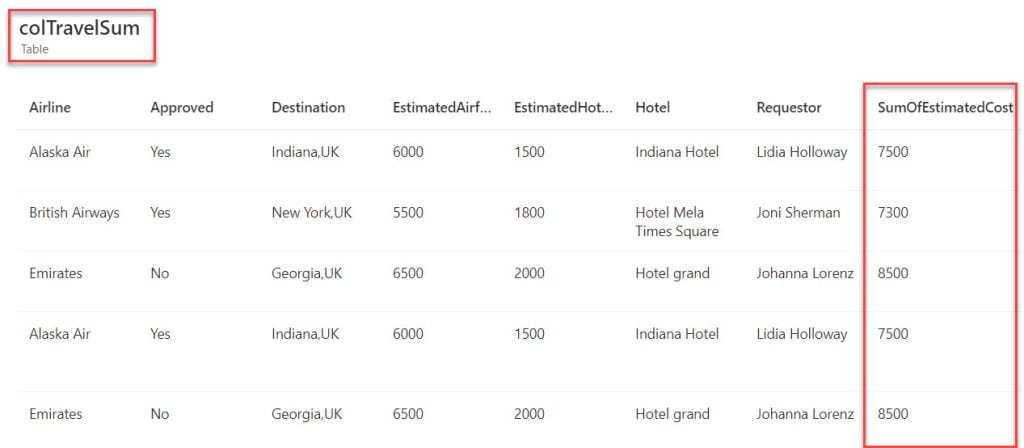
This is how we can work with the Power Apps GroupBy Sum.
Power Apps GroupBy SharePoint
Next, I will show you how to group the records in the Power Apps using a SharePoint Online list.
For example, I have a SharePoint list named “Expense Tracker” which contains the below fields.
| Column Name | Data Type |
| Expense Name | It is a default single line of text |
| Expense Type | Choice |
| Payment Date | Date and time |
| Amount | Number |
| Budget | Choice |
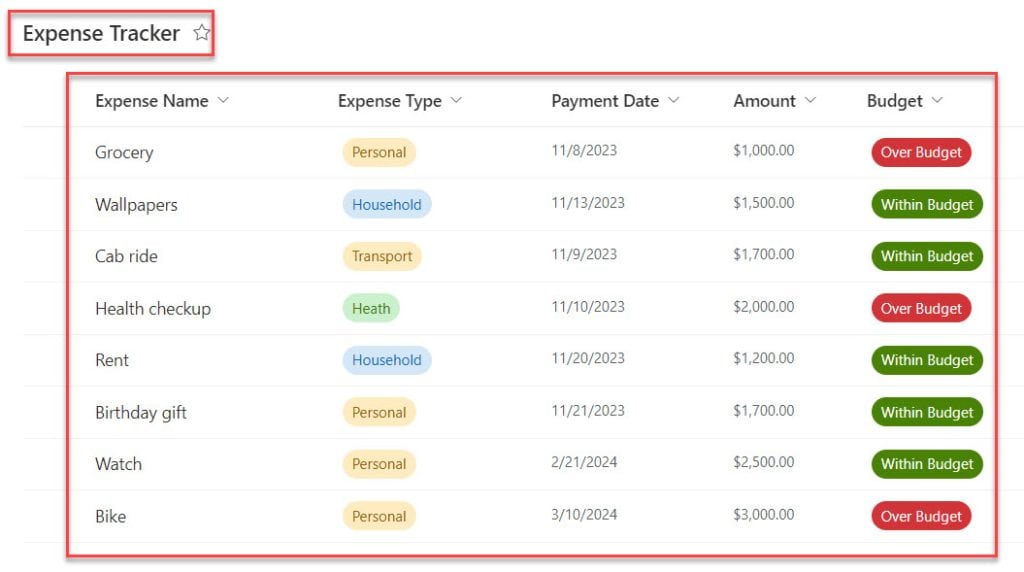
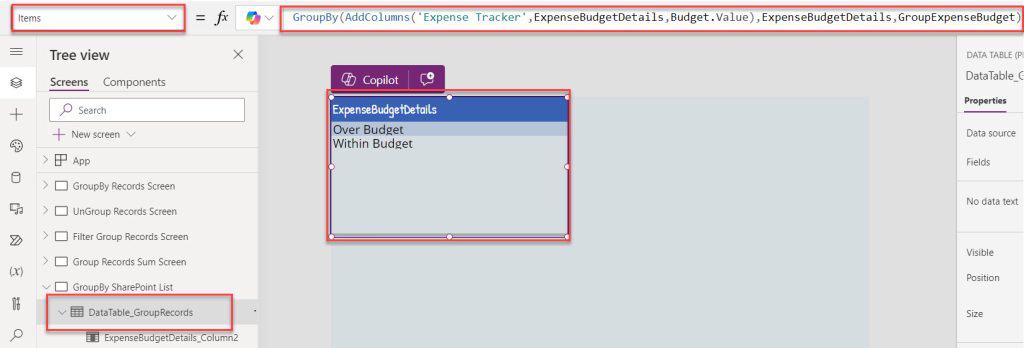
Now, I would like to group the SharePoint list records based on the choice field [Budget]. To do so, follow the below steps.
1. On the Power Apps Screen, insert a Data table and set its Items property to the code below.
Items = GroupBy(
    AddColumns(
        'Expense Tracker',
        ExpenseBudgetDetails,
        Budget.Value
    ),
    ExpenseBudgetDetails,
    GroupExpenseBudget
)
Where,
- ‘Expense Tracker’ = SharePoint Online list
- ExpenseBudgetDetails = New column name
- Budget = SharePoint list choice field
- GroupExpenseBudget = Group name
This way, you can work with the Power Apps GroupBy SharePoint.
Power Apps GroupBy Gallery
Suppose you want to group the records on the Power Apps gallery, follow the below steps.
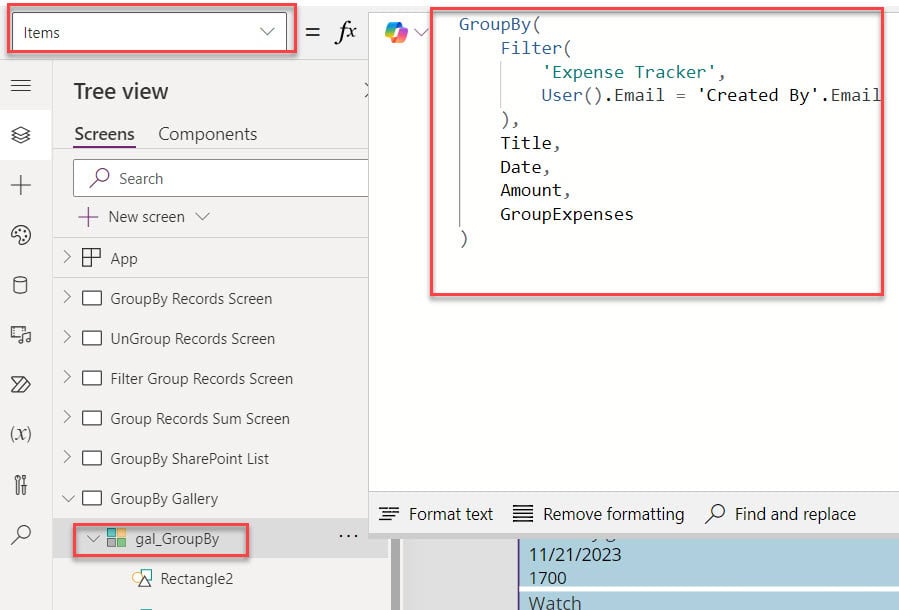
1. On the Power Apps Screen, insert a Gallery control and set its Items property to the code below.
Items = GroupBy(
    Filter(
        'Expense Tracker',
        User().Email = 'Created By'.Email
    ),
    Title,
    'Payment Date',
    Amount,
    GroupExpenses
)
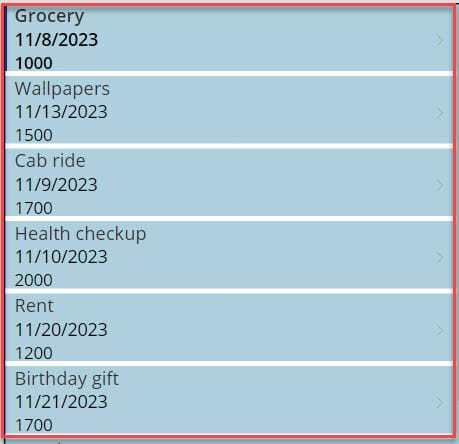
2. Now, Preview the app. The gallery displays a SharePoint list of grouped records, as shown below.
Power Apps GroupBy Count
In this example, I will show you how to work with the Power Apps GroupBy count. To do so, follow the below steps.
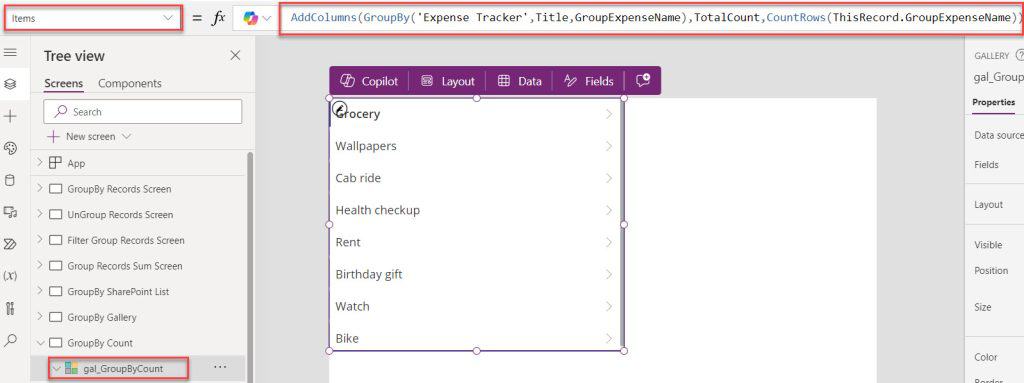
1. On the Power Apps Screen, insert a Gallery control and set its Items property as:
Items = AddColumns(
    GroupBy(
        'Expense Tracker',
        Title,
        GroupExpenseName
    ),
    TotalCount,
    CountRows(ThisRecord.GroupExpenseName)
)
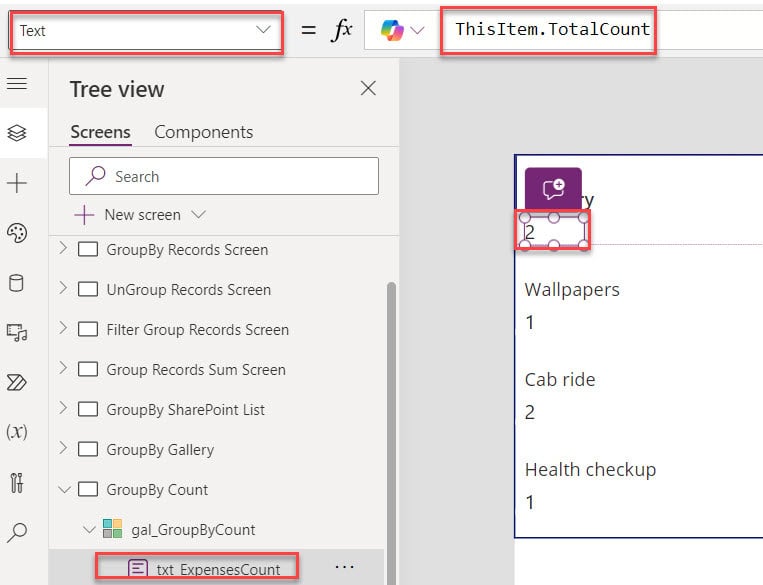
2. Now, insert a Text label inside the gallery and set its Text property to the code below.
Text = ThisItem.TotalCountThis way, you can work the Power Apps GroupBy count.
Power Apps GroupBy Choice
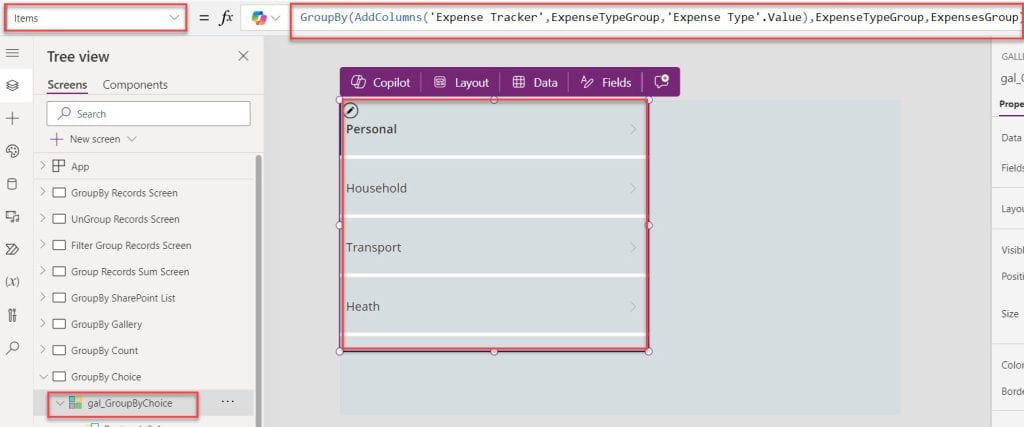
Similarly, if you want to group the SharePoint list records on the gallery control based on the choice column, follow the below steps.
1. On the Power Apps Screen, insert a Blank gallery control and set its Items property to the code.
Items = GroupBy(
    AddColumns(
        'Expense Tracker',
        ExpenseTypeGroup,
        'Expense Type'.Value
    ),
    ExpenseTypeGroup,
    ExpensesGroup
)
2. Now, insert a Text label inside the and set its Text property as:
Text = ThisItem.ExpenseTypeGroup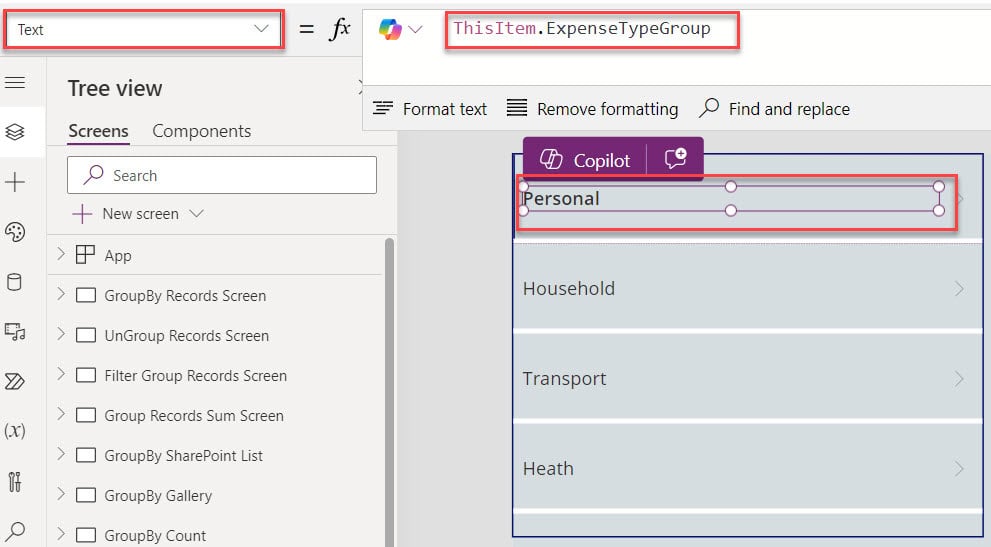
Power Apps GroupBy LookUp
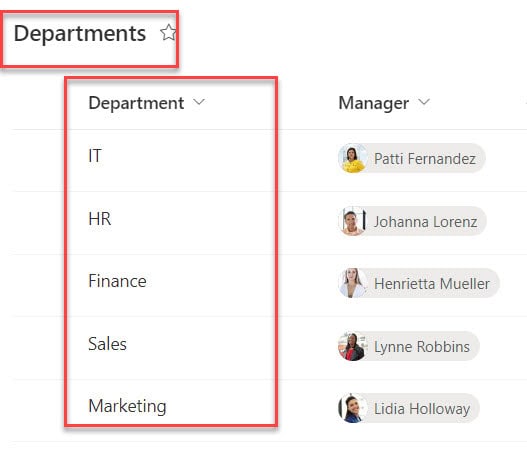
If you want to work with a group the SharePoint list records based on the LookUp column and displayed on the gallery control, follow the below example.
Source List [Departments]
Destination List [Employee Onboarding]
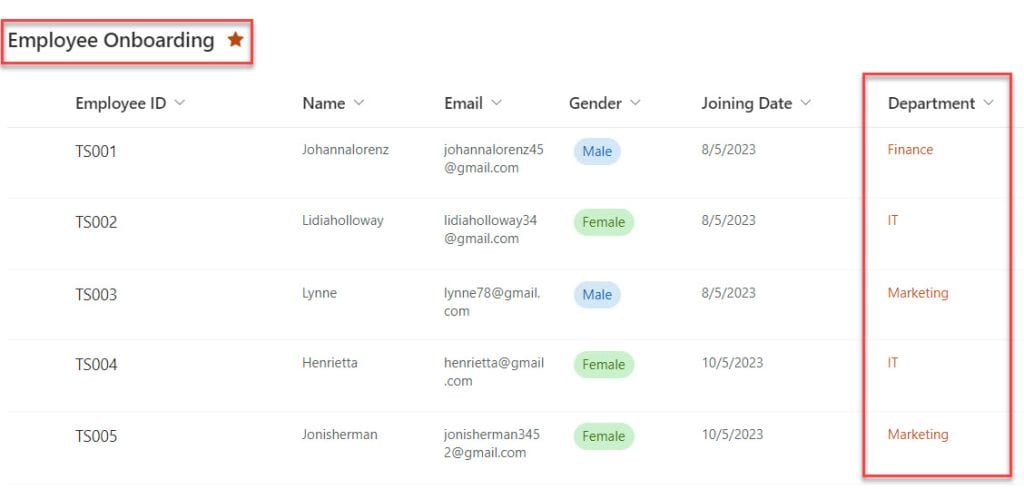
Now, I would like to group the SharePoint list [Employee Onboarding] records based on the LookUp column [Department]. To do so, insert a Gallery control and set its Items property as:
Items = GroupBy(
    AddColumns(
        'Employee Onboarding',
        Department_Name,
        Department.Value
    ),
    Department_Name,
    GroupDepartments
)
Now, insert a Text label inside the gallery and set its Text property as:
Text = ThisItem.Department_Name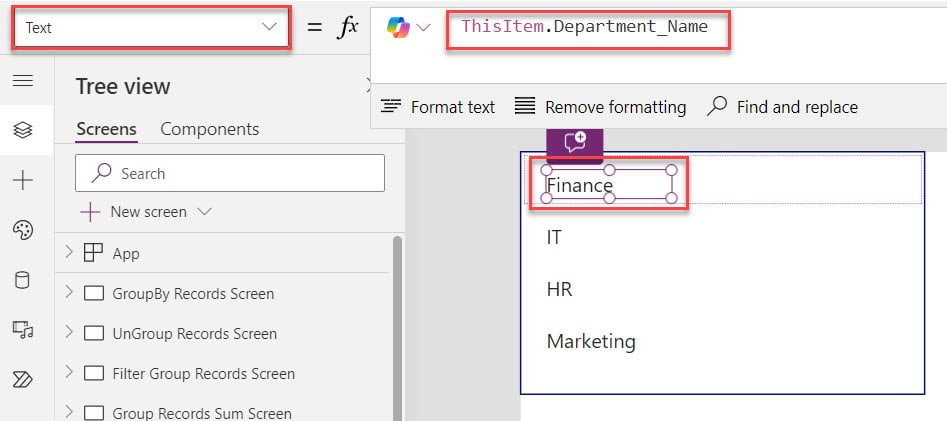
This way, you can work with the Power Apps GroupBy lookup.
Power Apps GroupBy Sort
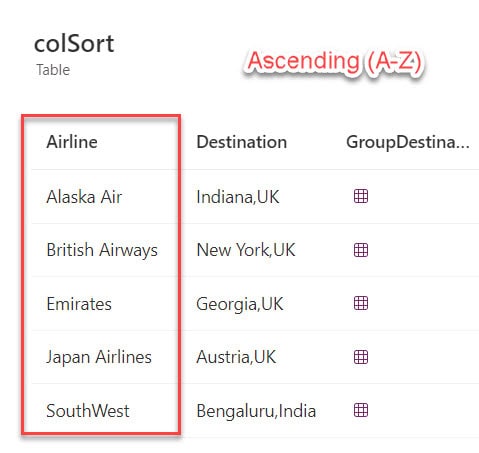
Finally, I will show you how to sort the Power Apps collection grouped records based on the Airline. To do so, insert a Button control and set its OnSelect property to the code below.
OnSelct = ClearCollect(
    colSort,
    Sort(
        colDestination,
        Airline,
        SortOrder.Ascending
    )
)
Once it is done, Preview the app. Once you click on the button control, It will sort and displays the collection grouped records, as shown below.
Output:
Some more Power Apps articles you may also like:
- Power Apps StartsWith and EndsWith Functions
- Power Apps AddColumns Function
- Power Apps If Statement Examples
- Power Apps Loading Spinner
- Power Apps Start Timer On Button Click
- Cascading Dropdown in Power Apps
This Power Apps tutorial explained Power Apps GroupBy Function, Power Apps UnGroup Function, Power Apps groupby multiple columns, and Power Apps groupby sum.
Also, we covered Power Apps groupby sharepoint, Power Apps groupby choice column, and powerapps groupby in gallery.
I am Bijay a Microsoft MVP (10 times – My MVP Profile) in SharePoint and have more than 17 years of expertise in SharePoint Online Office 365, SharePoint subscription edition, and SharePoint 2019/2016/2013. Currently working in my own venture TSInfo Technologies a SharePoint development, consulting, and training company. I also run the popular SharePoint website EnjoySharePoint.com
Hi, can u pls tell me How to group by multi select choice column values
Thank you for this post! It was exactly what I was looking for 👏👏👏
I am working on one of power app where I want to create dashboard. I have created one SharePoint list (DataforCRM) where I have three columns (Hname, HardwareStatus and created (default)
Thank you in advance for your time and comments.
Question : I want to show or reflect the most recent status by showing only the latest HardwareStatus”offline” entries, unless they are followed by an “online” entry. If an “online” entry is created, it should remove the “offline” entry from the gallery.
Gallery 1 : (shows both Online and Offline entries from Sharepoint List)
Gallery 2 : (It should only show Offline for recent or last entry where there is no subsequent Online entry for same HName
To test if there is no delay issue, I have two buttons to test it –
Button 1: “ColHardwareStatus”
Button 2 : “colUniqueHardwareStatus”
Power Apps Strucutre :
CountRows(
Distinct(
Filter(
DataforCRMApp,
HardwareStatus = “Offline” &&
Text(Created,”dd/mm/yyyy”) = Text(Today(),”dd/mm/yyyy”)
),
HName
)
ClearCollect(
colUniqueHardwareStatus,
AddColumns(
GroupBy(
Filter(
colHardwareStatusToday,
HardwareStatus = “Offline” &&
IsEmpty(
Filter(
colHardwareStatusToday, // Ensure to reference the correct collection if changed above
HName = ThisRecord.HName,
HardwareStatus = “Online”,
Created > ThisRecord.Created
)
)
),
HName,
AllEntries
),
LatestStatus, First(SortByColumns(ThisRecord.AllEntries, “Created”, SortOrder.Descending)).HardwareStatus,
LatestDateTime, First(SortByColumns(ThisRecord.AllEntries, “Created”, SortOrder.Descending)).Created
)
);
Timer button added to automate –
// Collect all relevant entries for the day
ClearCollect(
colHardwareStatusToday,
SortByColumns(
Filter(
DataforCRMApp,
Text(Created, “dd/mm/yyyy”) = Text(Today(), “dd/mm/yyyy”) &&
HName Blank() && HName “”,
(HardwareStatus = “Offline” || HardwareStatus = “Online”)
),
“Created”,
SortOrder.Descending
)
);
// Trigger the second timer after collection is updated
//UpdateContext({StartSecondTimer: true});
ClearCollect(
colUniqueHardwareStatus,
AddColumns(
GroupBy(
Filter(
colHardwareStatusToday,
HardwareStatus = “Offline” &&
IsEmpty(
Filter(
colHardwareStatusToday, // Ensure to reference the correct collection if changed above
HName = ThisRecord.HName,
HardwareStatus = “Online”,
Created > ThisRecord.Created
)
)
),
HName,
AllEntries
),
LatestStatus, First(SortByColumns(ThisRecord.AllEntries, “Created”, SortOrder.Descending)).HardwareStatus,
LatestDateTime, First(SortByColumns(ThisRecord.AllEntries, “Created”, SortOrder.Descending)).Created
)
);