In this Power Apps tutorial, We will discuss what is the use of image control in PowerApps, What are the Power Apps image control properties, and how a user can use it.
Also, By taking some simple scenarios, We will cover these below topics as:
- PowerApps add image control
- PowerApps upload image
- Power Apps image from URL
- PowerApps image gallery
- Power Apps image from SharePoint
- PowerApps add image to SharePoint list
- PowerApps reset image control
- Power Apps image control zoom
- PowerApps set image
- PowerApps image blank
- Power Apps image in circle
- PowerApps image carousel
- Power Apps image collection
- PowerApps hide image
- PowerApps dropdown with image
- Power Apps email image
- PowerApps image popup
- Power Apps image rotation
- PowerApps image to base64
- Power Apps image transparency on hover
- PowerApps change image based on value
- Power Apps HTML control image
- PowerApps image attachment
- PowerApps add image to button
- PowerApps image onselect
- PowerApps image controls missing
PowerApps Image Control
- PowerApps Image control is a type of control that helps to display an image or picture from any data source or a local file.
- Suppose if you insert one or multiple image controls into your app, then you can display individual images that are not part of any data set.
- For all external images, you can use HTTPS to ensure compatibility with modern browsers.
External images must be accessible without any authentication.
Read: How to use Power Apps for free
Power Apps image property
Below represents some of the important key properties of Power Apps Image control:
- AccessibleLabel = It specifies the label for screen readers.
- ApplyEXIFOrientation = It specifies whether to automatically apply the orientation specified in the EXIF data embedded with the image.
- AutoDisableOnSelect = It helps to automatically disable the control while the OnSelect behavior is executing.
- CalculateOriginalDimensions = It enables the OriginalHeight and OriginalWidth properties.
- FlipHorizontal = It specifies whether to flip the image horizontally before displaying it.
- FlipVertical = It specifies whether to flip the image vertically before displaying it.
- ImagePosition = It defines the position (Fill, Fit, Stretch, Tile, or Center) of an image in a screen or control if it isn’t the same size as the image.
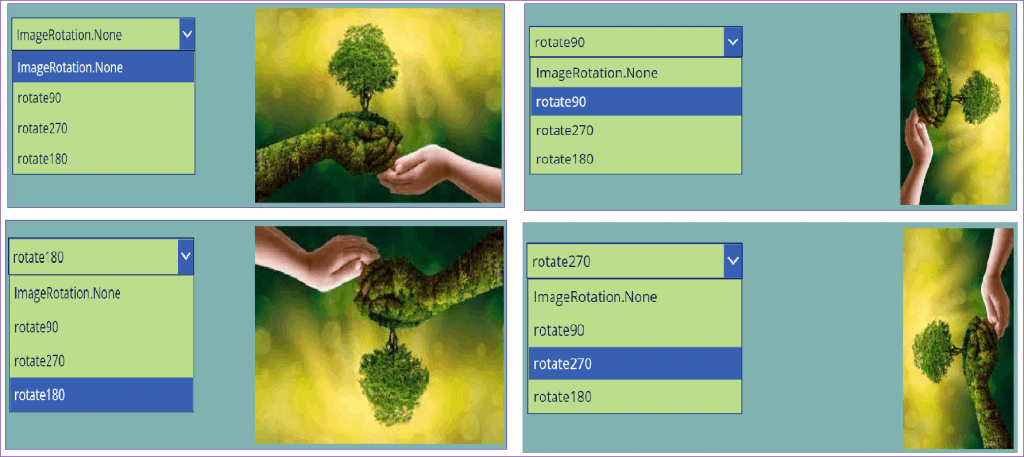
- ImageRotation = This specifies how to rotate the image before displaying it. Values can be none, clockwise (CW) 90 degrees, counter-clockwise (CCW) 90 degrees, and clockwise 180 degrees.
- OnSelect = When the user taps or clicks a control, It specifies how the app responds.
- OriginalHeight = It provides the original height of an image, enabled with the CalculateOriginalDimensions property.
- OriginalWidth = It provides the original width of an image, enabled with the CalculateOriginalDimensions property.
- Transparency = It defines the degree to which controls behind an image remain visible. Decimal values range from 0 to 1. Where 0 is opaque, 0.5 is semi-transparent and 1 is transparent.
- Visible = This helps to whether a control appears or is hidden.
Power Apps add image control
Next, we will see how to insert an image control in the PowerApps.
- On the PowerApps screen, Go to the Insert tab -> Media -> Select Image as shown below. Then the image control will appear on the screen.
- By default, the Image property of the image control will be SampleImage. You can upload any image by using this Image property.

Power Apps upload image
Once you added the image control in the app, you need to upload an image on that control. So that a user can see a picture over there. You can upload any image from any local file or data source.
Upload an image from a Media File
- Go to the File tab -> Click Media -> then Upload the image from your local system -> tap the Open button. Then the specific image will add to the Media section.
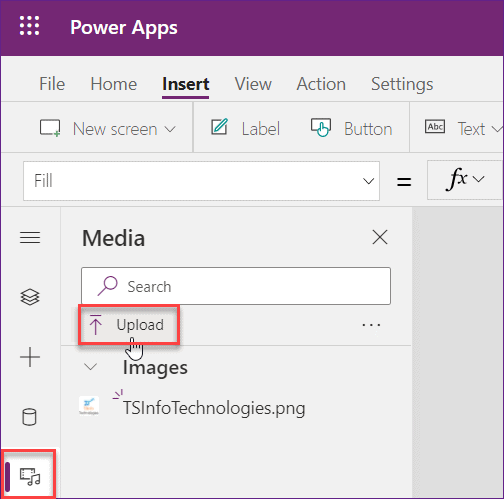
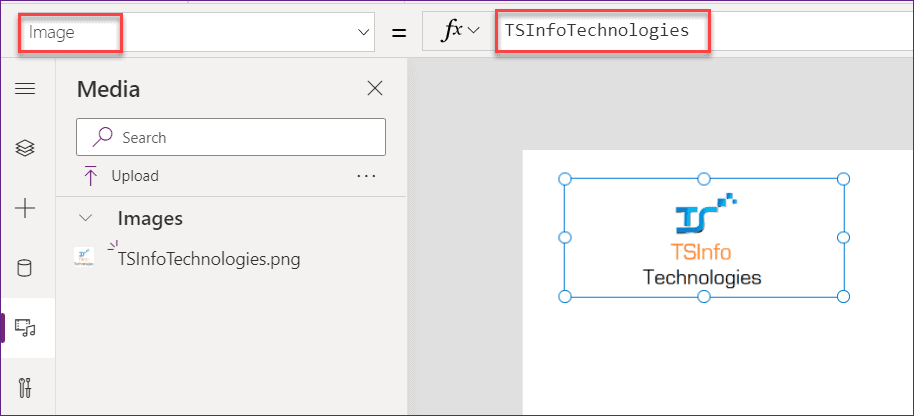
- Now insert an image control and set its Image property to the name of the fie that you have added currently.
- Also, you can directly click the name of the image (that you uploaded) and the image will appear on the screen.
Read Power Apps Display SharePoint List Items
Upload a set of images from a Data Source
Suppose you want to upload some set of images from a specific data source, then do the following things. In the below scenario, We will take a SharePoint Library as a Data source. Not only you can take a SharePoint List or Library, but also you can use the Excel spreadsheet.
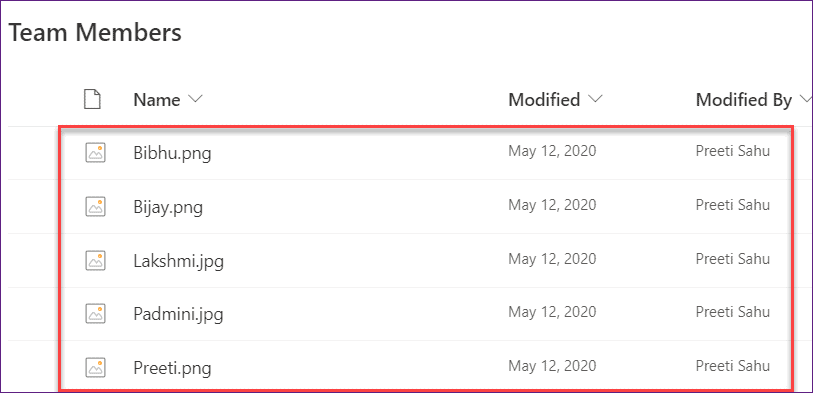
- The below screenshot represents the SharePoint Library (Team Members) that is having some images of team members. Here I would like to display all these member photos in the Power Apps Gallery control.
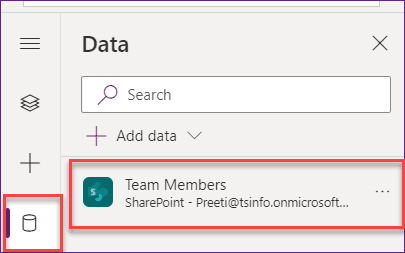
- On the PowerApps screen, first, you need to add this SharePoint List Data source. To do so, go to the View tab -> Select Data sources -> click on + Add data from the Data section -> Search SharePoint -> + Add a new or existing connection -> Connect to your specific SharePoint site -> Choose the specific SharePoint list or library (Team Members) -> Hit on the Connect button. Then the SharePoint list data source will add to the app.
- Now, Insert a Gallery control and make the gallery layout as “Image and Title“. Select the gallery and set its Items property to the specific SharePoint Library as:
Items = 'Team Members'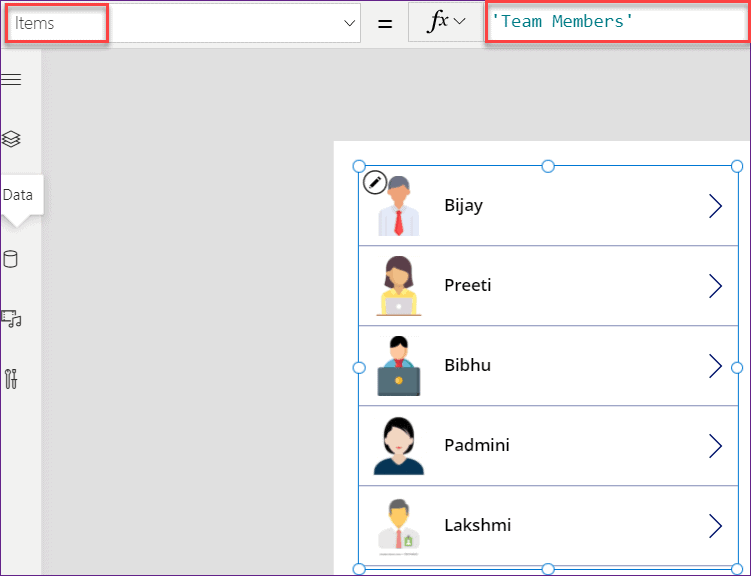
- Sometimes what happens when you are adding the data source directly to the gallery, then the image can not display in the image control (inside gallery). For that, you can select the image control and apply this below code to its Image property as:
Image = ThisItem.'Link to item'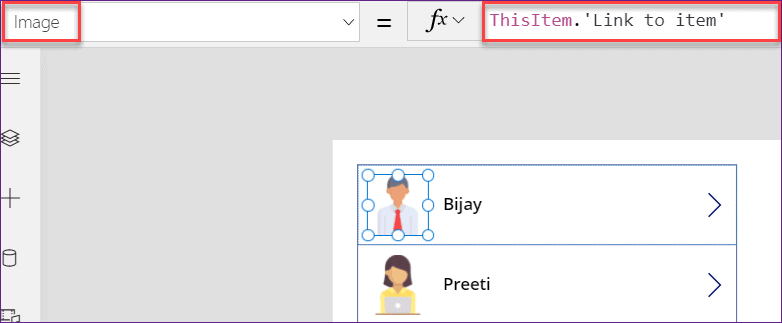
Once you will save and preview the app, you can see all the photos of team members as shown in the above screenshot.
PowerApps image from url
In PowerApps, Do you want to display the image by providing the image URL? Then follow these different scenarios.
Scenario – 1: (Display image by using the Web URL)
- This is so easy that you can put the web URL link to the image control and the image will appear on the PowerApps screen.
- You can put any image URL to the Image property of the image control and get the picture over there.
- While inserting the image URL to Image control, you just need to put the web URL within the inverted comma (” “). Refer to the below screenshot:

Scenario – 2: (Display image by using the SharePoint Hyperlink field)
Here we will see how we can get image from the SharePoint URL field and display it in a gallery control.
- I have a SharePoint List named Book Details. This list has one Hyperlink column i.e. Book Image URL as shown below.

- On the PowerApps screen, Insert a Vertical Gallery control (the layout must be included with the Image) and set its Items property to the specific SharePoint list data source.
Items = 'Book Details'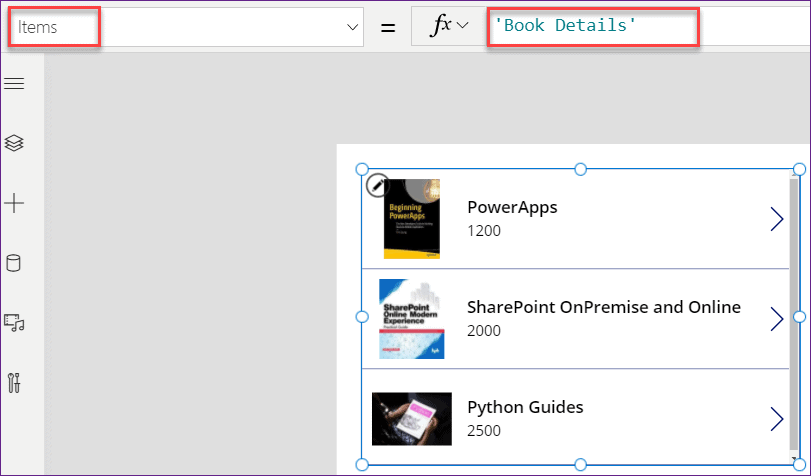
- Now select the Image control from the gallery and set this beow code to its Image property as:
Image = ThisItem.'Book Image URL'Where,
‘Book Image URL’ = SharePoint Hyperlink field
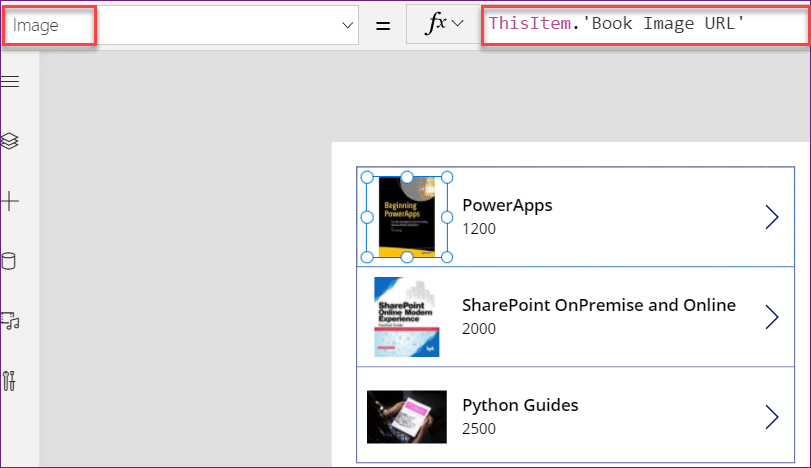
Once you will apply the above code to the image control, then the image will appear in the gallery control as shown in the above screenshot.
PowerApps image gallery
Do you want to display PowerApps images from a SharePoint Online library to a gallery control? There is a simple article that you can refer through this below link:
PowerApps image from SharePoint
Here we will discuss how we can get and display an image from SharePoint List or Library.
For this thing, I already have an article that helps to display images from a SharePoint Online library in PowerApps. Refer to the below link:
PowerApps add image to SharePoint list
Do you want to store or save the PowerApps image to your SharePoint List? To achieve this, please go through the below link:
Power Apps reset image control
- Suppose there is an image in your app and you want to reset or clear the image before uploading the new one. In this case, you can use the PowerApps Reset property.
- As there is no reset property in the Image control, so instead of that we can use a Picture control and use this reset property to clear the image.
- You can reset the image control in two different ways. Such as:
- By using Picture control’s Reset property:
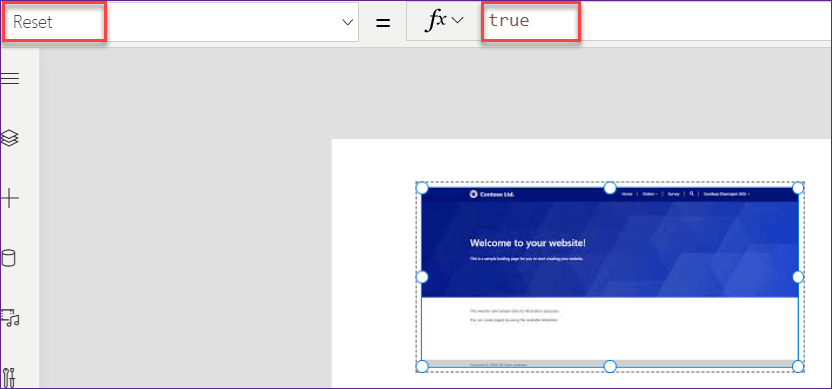
You can directly use the Reset property of the Picture control. Select the image control (of Add picture control) and set its Reset property to true as shown below.
2. By using a Button control:
Insert a Button input and rename it to ResetMediaButton. Select the image control and set its Reset property to the button name.
Reset = ResetMediaButton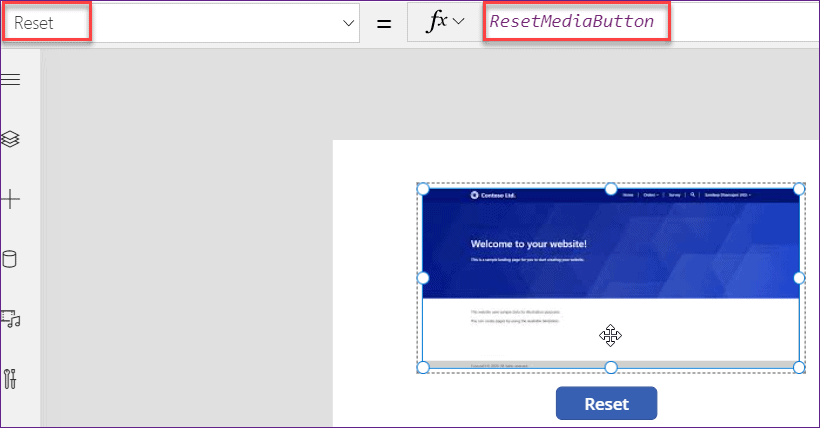
- Now Save and Publish the app. When you will click on the Reset button, then the previous image will clear and at the same time, you can upload a new image.

This is how to reset image control in PowerApps.
PowerApps image control zoom
Here we will see how to add a Zoom function to an image control in PowerApps. That means the PowerApps image should be Zoom in and Zoom out by the user selection. You can achieve this by using a Slider control. Follow the below example.
- Insert a Scrollable screen in your app. You can take any screen but why I told you to scrollable screen because you can scroll through the zoomed image.
- Inside the section (in the scrollable screen), add an Image control and a Slider control.
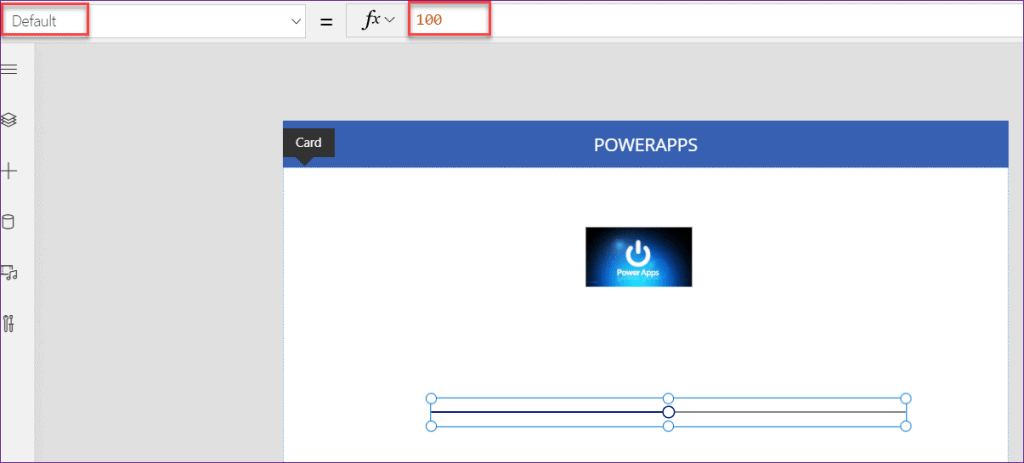
- Select the Slider control and set its Default property to 100.
- Similarly, again select the Slider and set its Min property to 0 and Max property to 200. So that you can consider the default as 100% of the size of the image.
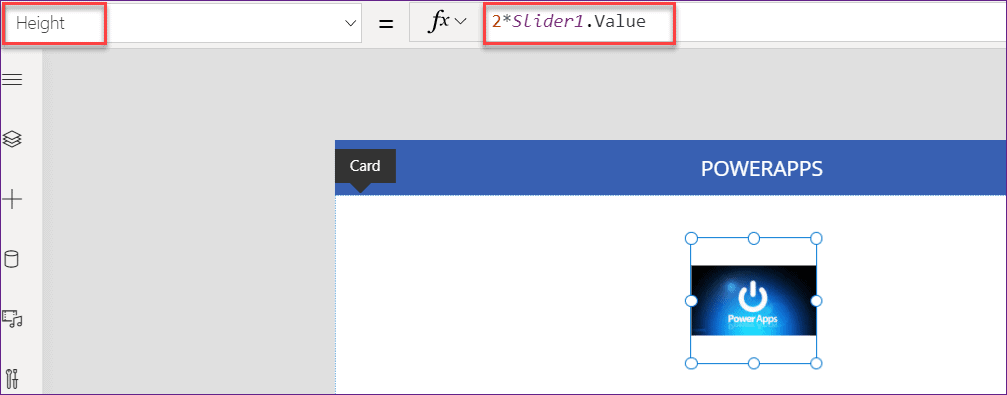
- Now, Select the Image control and set its Height and/or Width property as:
Height = 2*Slider1.Value
Width = 2*Slider1.Value
Where,
Slider1 = Slider control name
- Save and Preview the app. Drag the slider from left to right and right to left, then you can see the image will appear with the applied slider value selected by the user.

This is how to add zooming in Power Apps image control.
PowerApps set image
In this scenario, We will see how to set an image in PowerApps.
- In PowerApps, I have three images that are displaying in three different image controls. Now what I would like to do is, I want to display a new image every time the user taps a button.
- Let us assume, there are three images as img1, img2, and img3. Also, the app has a button input. It starts with img1 when the user clicks the button, again it goes to img2 when the user clicks the button again, and so on. When the image will be img3, then it goes back to img1 again. Follow these below steps to do so.
Step – 1:
At first, you need to create a PowerApps Collection for storing the images. Apply this below code to the App’s OnStart property as:
OnStart = ClearCollect(
    imagecollections,
    Img1.Image,
    Img2.Image,
    Img3.Image
)
Where,
- imagecollections = Collection name
- Img1, Img2, Img3 = Image control name (image should be there) (if you do not want to see these images on the screen, then you can toggle off the Visible property of each image control)

Step – 2:
Apply this below formula on Screen’s OnVisible property as:
OnVisible = Set(
    ImageIndex,
    1
);
Set(
    SelectedImage,
    Last(
        FirstN(
            imagecollections,
            ImageIndex
        )
    ).Url
)
Where,
- ImageIndex, SelectedImage = Variable name
- imagecollections = Collection name

Step – 3:
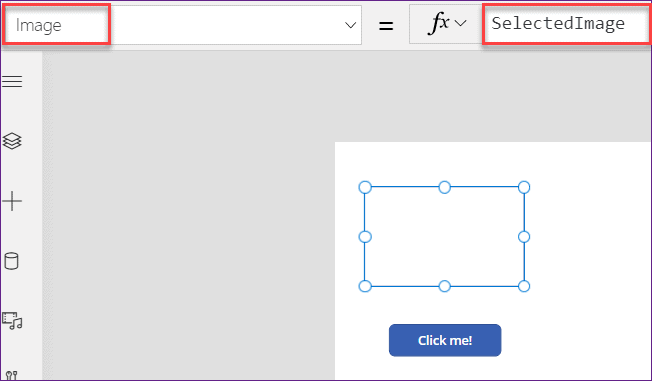
Select the Button control (Click me!) and set this below code on its OnSelect property as:
OnSelect = If(
    ImageIndex = CountRows(imagecollections),
    Set(
        ImageIndex,
        1
    ),
    Set(
        ImageIndex,
        ImageIndex + 1
    )
);
Set(
    SelectedImage,
    Last(
        FirstN(
            imagecollections,
            ImageIndex
        )
    ).Url
)
Refer to the below screenshot.

Step – 4:
Insert an Image control (where the images will appear every time the user clicks on the button) and set its Image property as:
Image = SelectedImageWhere the SelectedImage is the specified variable name.
Step – 5:
Now Save, Publish and Close the app. Reopen the app again. When you will reopen it, you can see the image control will appear with the first image. Once you will click the button, then the image will change to the second image and so on.
PowerApps image blank
How can you determine if a Power Apps image control is empty? Refer to this simple example to understand better.
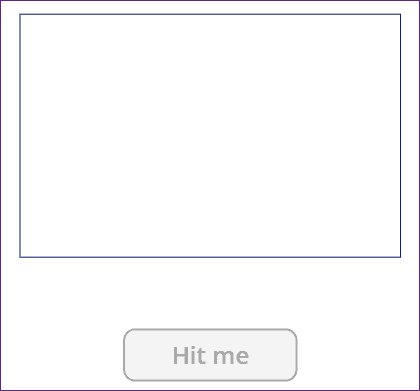
- In this example, I have an image control and as well as a Button control. I want to disable the PowerApps button if no pictures have been selected yet. It’s very simple.
- Just select the Button control and apply this below formula on its DisplayMode property as:
DisplayMode = If(
    IsBlank(Image7.Image),
    DisplayMode.Disabled,
    DisplayMode.Edit
)
Where,
Image7 = Image control name. If there is no image in the image control, then the button will be in disable mode.

- Save and Preview the app. Make the image control as None, then you can see the button will be in disable mode as like the below screenshot.
PowerApps image in circle
Do you want to display any PowerApps image on a circle basis? Do this thing by using the below instructions.
- On the PowerApps screen, there is a Gallery control that is having with some images and its Titles. All the images are retrieved from the SharePoint Library.
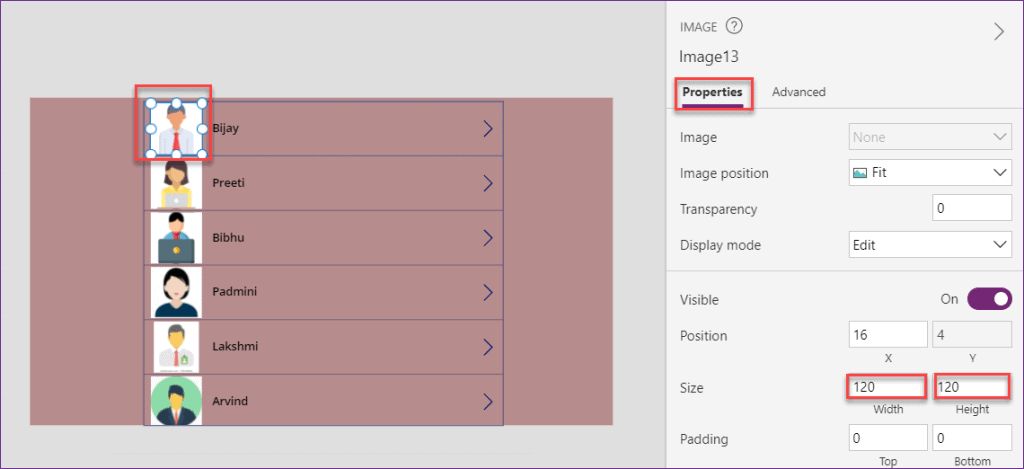
- Now what I want to do is, I would like to display all the images on a circular basis. By default, the images are appearing on a rectangular basis but I need to make them circular.
- Select the image control from the gallery and make its Width and Height property equal value (you can set the number as per your requirement). As in the below screenshot, you can see the Size is 120 in both Width and Height property.
- Now you need to set all the radius property of the image control. There are four radius property of the image control:
- RadiusBottomLeft
- RadiusBottomRight
- RadiusTopLeft
- RadiusTopRight
- Select each radius property (these above four property) of the image control and apply this below code as:
RadiusBottomLeft = Image13.Height
RadiusBottomRight = Image13.Height
RadiusTopLeft = Image13.Height
RadiusTopRight = Image13.Height
Where,
Image13 = Image control name from the gallery

- Once you have applied the same formula to all the radius property, then Save and Preview the app. You can see in the gallery control, all the images will appear on a circular basis as in the below screenshot.

This is how we can display image in circle in Power Apps.
PowerApps image carousel
While a PowerApps user working with the PowerApps Image control, he/she may want to provide some more designs to the image depends upon their requirements. Though the Image Carousel or slider is one of them.
As the image slider is a common thing to all, they may require to see some more images within a single image control. A user can slide the images (next or previous) by using the navigation icons. Refer to the below instructions to do so.
- Add or upload the images into the PowerApps Media that you want to display in the image slider. You can browse the images from your local system and upload each one with its name.
- On the PowerApps screen, Insert an Image control (Rename it if necessary).
- Add the navigation arrow icons (to choose the next or previous image) or navigation bubbles.
- Now to make the images as a carousel or slider, you can make a collection with the images and then keep a pointer to current.
- At first, apply this below formula on Screen’s OnVisible property as:
OnVisible = Collect(
    imgList,
    {
        img: Pandas,
        order: 1
    },
    {
        img: Penguins,
        order: 2
    },
    {
        img: Zebras,
        order: 3
    }
);
UpdateContext({currentImg: 1})
Where,
- imgList = Collection name
- img, order = Header of the collection
- Pandas, Penguins, Zebras = Image names that you have uploaded in the PowerApps Media. You can upload the number of images that you want to show in the slider
- currentImg = Context variable name

- Select the image control and apply this below code to its Image property as:
Image = LookUp(imgList,order=currentImg).img
- Select the Next arrow navigation icon (>) and apply this below code to its OnSelect property as:
OnSelect = UpdateContext(
    {
        currentImg: If(
            currentImg = Max(
                imgList,
                order
            ),
            1,
            currentImg + 1
        )
    }
)
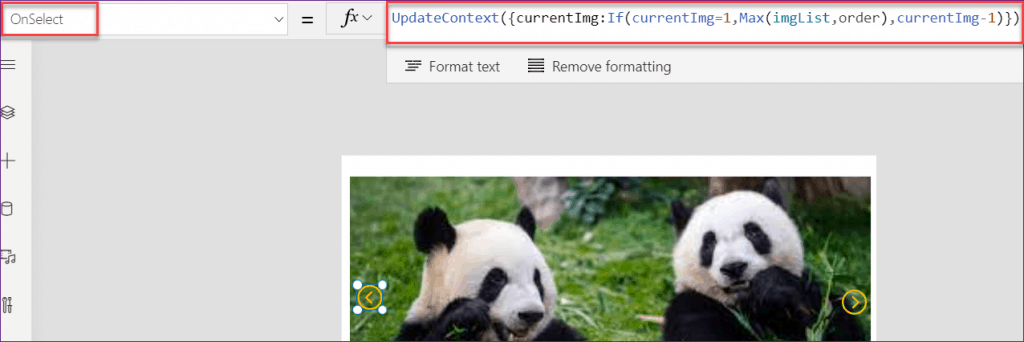
- Select the Previous arrow navigation icon (<) and apply this below code to its OnSelect property as:
OnSelect = UpdateContext(
    {
        currentImg: If(
            currentImg = 1,
            Max(
                imgList,
                order
            ),
            currentImg - 1
        )
    }
)
- Thats it for this PowerApps image carousel. Now just Save and Publish the app. Reopen the app again. You can see the image control will appear with the first image.
- When you will click on the Next navigation icon, then it will go to the next image. Similarly, when you will click on the Previous navigation icon, then it will go to the previous image.

This is an example of Power Apps image carousel or slider.
PowerApps image collection
Do you want to store the images in a PowerApps Collection and use it somewhere? Refer to these below simple steps to do so.
Step – 1:
Add or upload some images (that you want to display in gallery control or any other control) to the PowerApps Media gallery. Rename the images properly before uploading them.
Step – 2:
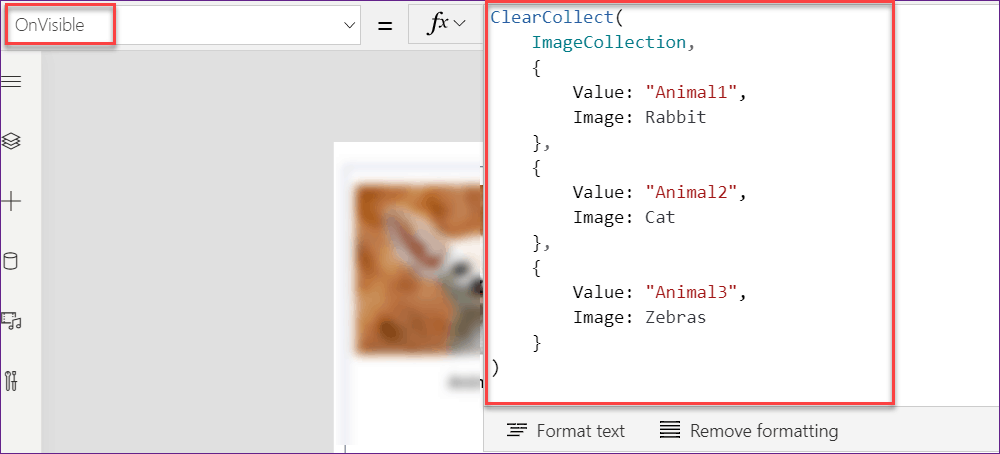
Create an image collection on the app. Apply this below formula on Screen’s OnVisible property as: (also, you can apply the code on App’s OnStart property)
OnVisible = ClearCollect(
    ImageCollection,
    {
        Value: "Animal1",
        Image: Rabbit
    },
    {
        Value: "Animal2",
        Image: Cat
    },
    {
        Value: "Animal3",
        Image: Zebras
    }
)
Where,
- ImageCollection = Collection name
- Value, Image = Header of the collection
- Rabbit, Cat, Zebras = Image names that you have uploaded in the media gallery
Step – 3:
- Insert a blank horizontal Gallery control and set its Items property to the created Collection name i.e. ImageCollection.
- Make the gallery Layout as Title and subtitle.
- Select the image control from the gallery and set its Image property as:
Image = ThisItem.Image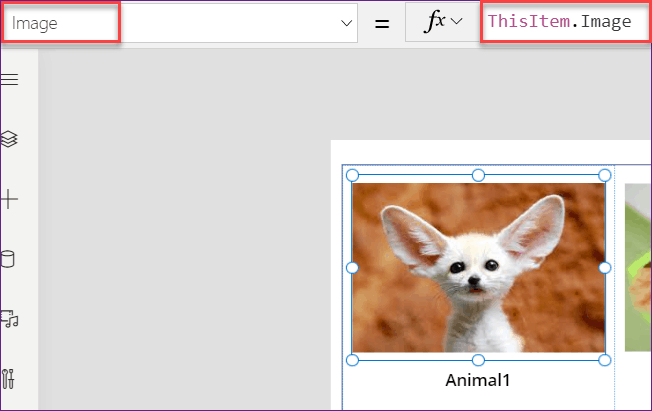
- Select the Label control (Title) from the gallery and set its Text property as:
Text = ThisItem.Value- Now Save, Publish and close the app. Reopen the app again, You can see all the images will appear in the gallery control as like the below screenshot.

This is how we can work with the Power Apps image collection.
PowerApps hide image
Here we will see how we can hide the image control in PowerApps. I will explain two different scenarios so that you can understand them better.
Scenario – 1:
So in this scenario, I would like to make a picture visible when the button is pressed. Below is my requirement:
- I have an image control called Flowers. I want to hide this image.
- The image will visible only when the button is pressed which is called Click me.
- Go to the Screen’s OnVisible property and set a variable like below code:
OnVisible = Set(varimageview,false)Where,
varimageview = Variable name and I set its value as false

2. Select the Image control and this variable on its Visible property as:
Visible = varimageview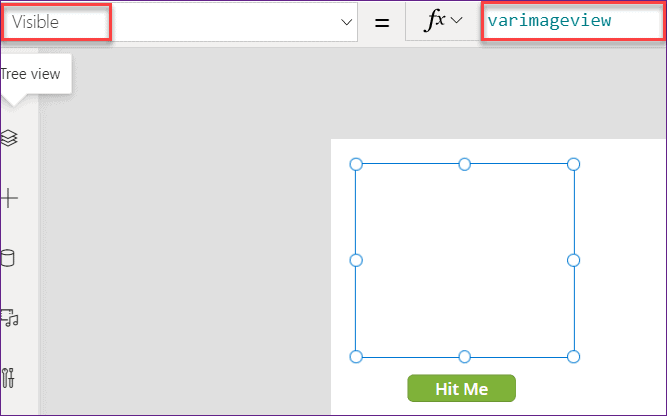
3. Next, Select the Button control (Hit Me) and apply this below code on its OnSelect property as:
Onselect = Set(varimageview, true)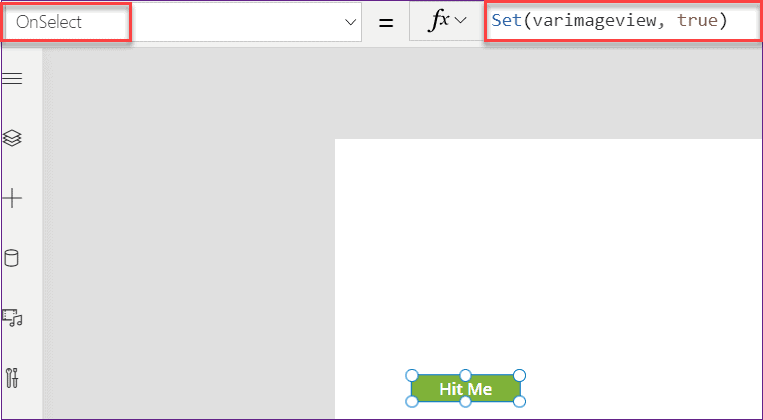
4. Save and Preview the app. When you will click on the button (Hit Me), you can see the specific image will appear in the image control as shown below.

Scenario – 2:
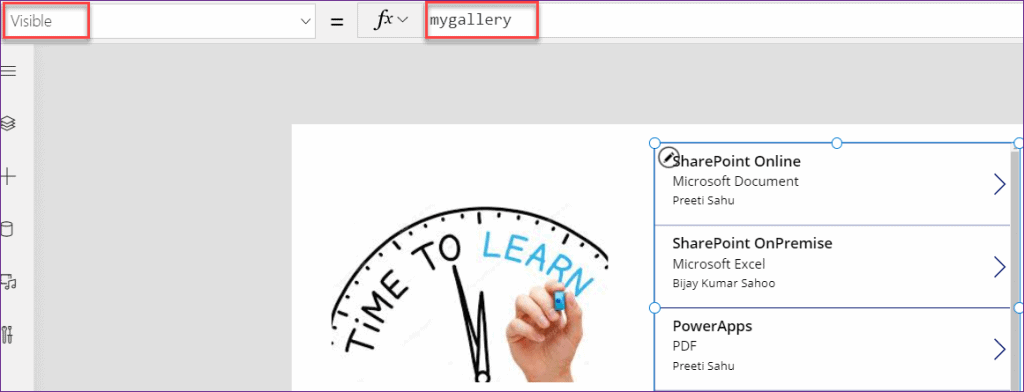
- I have an Image control (having with an image) and a Gallery control (the data retrieved from a SharePoint Library).
- Now what I want to do is, when a user will click or tap the image, then the gallery will appear on the screen. Again when the user will click on the image, then the gallery will disappear, and so on. The PowerApps screen looks like the below screenshot.

- To work with this, First of all, Select the gallery control and set a variable on its Visible property as:
Visible = mygalleryWhere,
mygallery = Specify a variable name. You can set any name as per your choice.
- Go to the PowerApps screen (where the gallery control is present) and apply this below code on its OnVisible property as:
OnVisible = UpdateContext ({mygallery: false})Where,
mygallery = specified variable name

- Next, Select the image control and set its OnSelect property to this below formula as:
OnSelect = UpdateContext ({mygallery: !mygallery})- The above code specifies when you will click on the image, it will trigger action as True or False to make the gallery is visible or not.
- Here, “!“defines negative or reverse something. This is the perfect formula for toggling something.
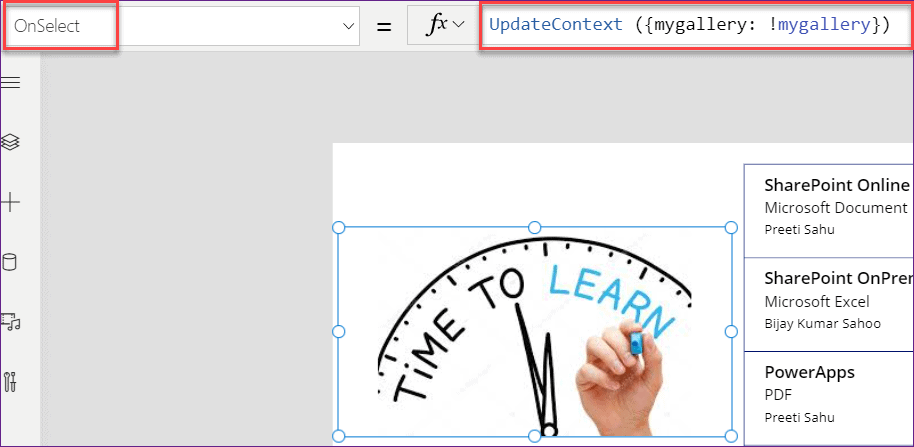
- Now Save and Preview the app. Click the image, then you can see the gallery will appear. Again click on the image, then you can see the gallery will disappear from the screen and so on.
PowerApps dropdown with image
While working with the Power Apps Dropdown control, you may think that instead of any text, can we put any image or any object in a dropdown or not.
Coming to the answer, in my opinion, yes you can put images directly in the dropdown control. But alternatively, you can give the reference to the dropdown with image control. Refer to these below examples.
Example – 1: (Display image from PowerApps Dropdown control value)
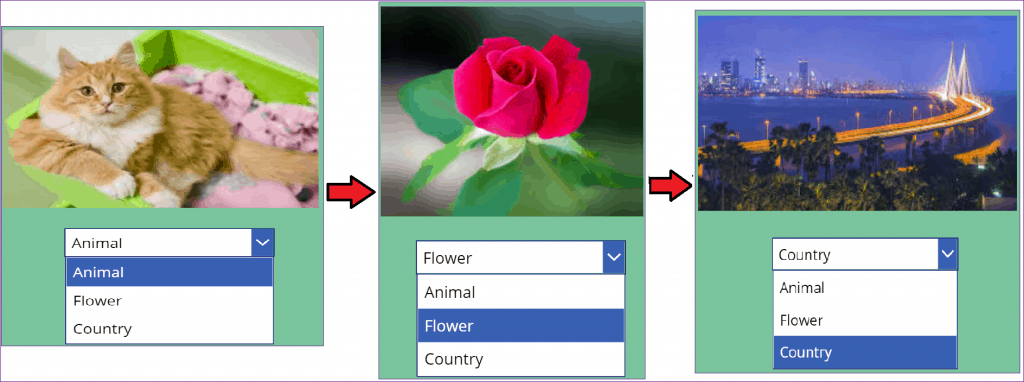
- In this example, I have an Image control and as well as a Dropdown control on my PowerApps screen. What I would like to do is, When a user will click any choice value from the dropdown control, then that specific related image will appear on the image control.
- Suppose, the user will choose the value as Animal (from the dropdown control), then the image control will appear with an animal as shown below.

- The dropdown control is having with these below values on its Items property as:
Items = ["Animal","Flower","Country"]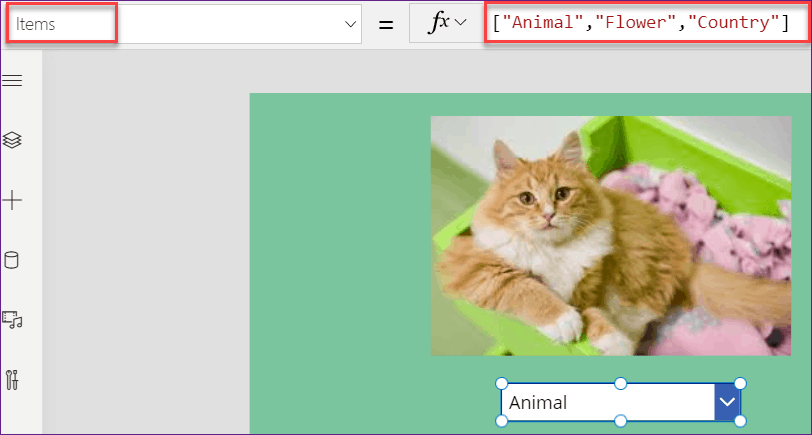
- Next, Select the image control and apply this below formula on its Image property as:
Image = Switch(
    Dropdown1.Selected.Value,
    "Animal",
    Cat,
    "Flower",
    Flower,
    "Country",
    India
)
Where,
- Dropdown1 = Specify the dropdown control name
- “Animal”, “Flower”, “Country” = These are the choice values from the dropdown control (mention the correct value as it should match with the Dropdown values)
- Cat, Flower, India = These are the image control names that are uploaded by using the media gallery

- Now save and preview the app. Select one and each value from the dropdown control, then you can see that specific picture in the image control as I have shown in the below screenshot.
Example – 2: (Display image from SharePoint Library)
- I have a SharePoint Document Library named Image Library. This library has these below columns (by default):
- Name
- Modified
- Modified By
- Also, it contains some images (images uploaded from the local system) as shown below.

- On the PowerApps screen, I have a Dropdown control and image control. Here, I want to display the images from the SharePoint Library based upon the Name field.
- At first, Select the Dropdown control and set its Items property as:
Items = 'Image Library'.NameWhere,
- ‘Image Library’ = SharePoint Library name
- Name = Default column of the library
When you will use this above code, then the values will display in the dropdown control.
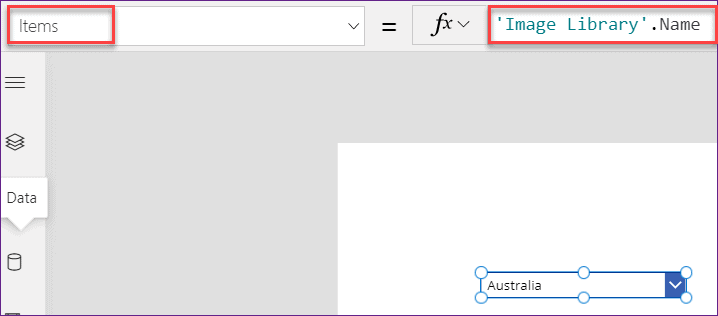
- Next, Select the image control and apply this below formula on its Image property as:
Image = LookUp(
    'Image Library',
    Name = Dropdown2.Selected.Name,
    Thumbnail.Large
)
Where,
- Name = This field specifies from the library
- Dropdown2 = Dropdown control name
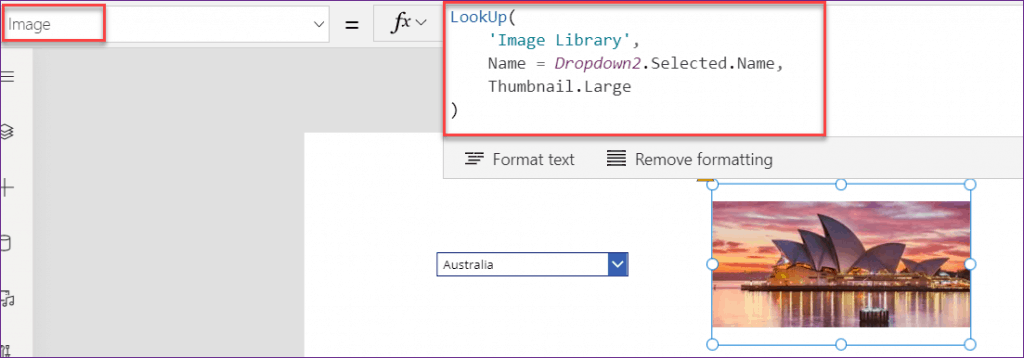
- Now Save and Preview the app. When you will select Australia from the Dropdown control, then the image control will appear with the Australia picture. Similarly, if you will select India, then you will get the India picture as like the below screenshot.

PowerApps email image
Suppose you want to send an email with a picture or image attachment on it. So that the user will receive the email with that related picture. Refer to these below steps that you can do it easily.
Step – 1:
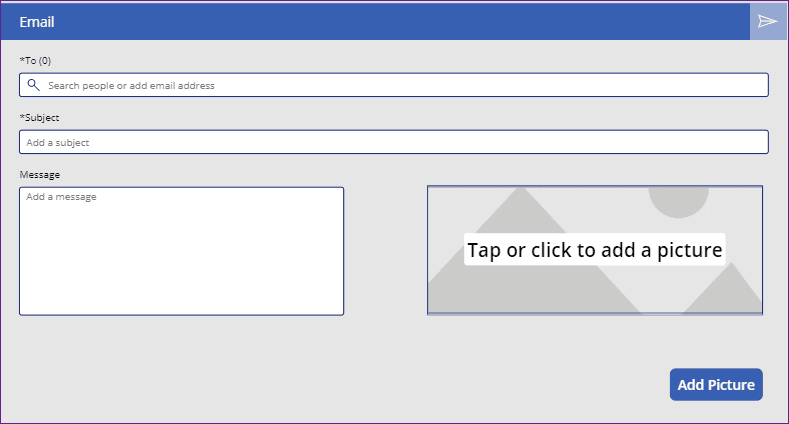
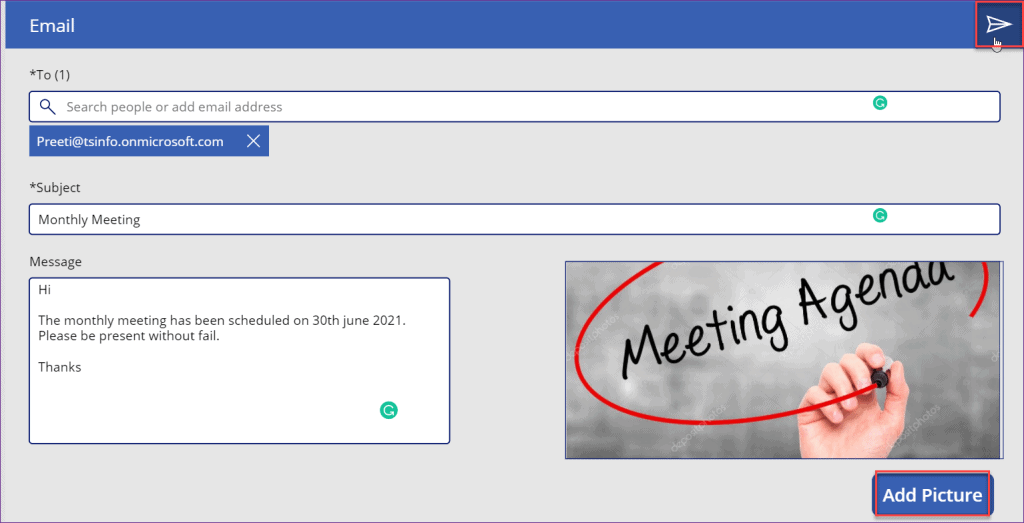
- On the PowerApps, Take an Email screen. When you will add a Powerapps Email screen, by default, the screen will appear with these below fields:
- To: Specify to whom you want to send the email
- Subject: Provide the Subject line for the email
- Message: Enter the message that you want to send
- Now Insert an Add picture control at the side of the Message box (resize the width and add)
- Also, add a Button control (that will help you to add the picture in the email) and rename it to Add Picture as like the below screenshot.
Step – 2:
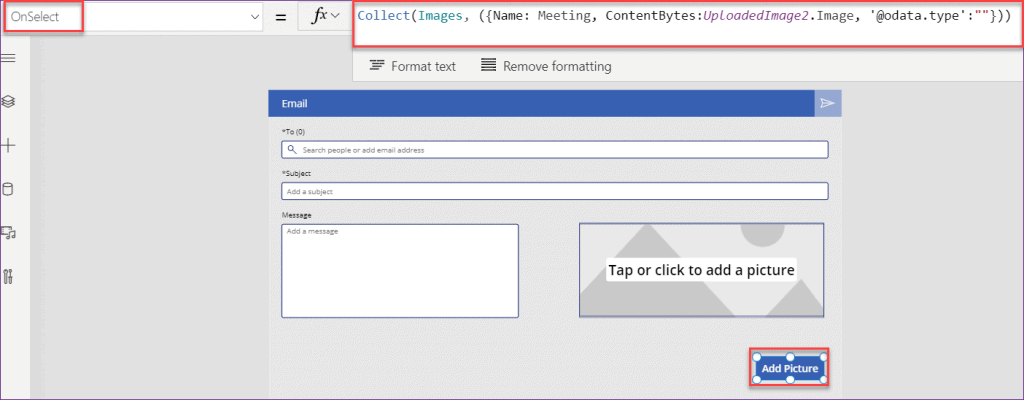
- Select the button input (Add Picture) and apply this below formula on its OnSelect property as:
OnSelect = Collect(
    Images,
    ({
        Name: Meeting,
        ContentBytes: UploadedImage2.Image,
        '@odata.type': ""
    })
)
Where,
- Images = Collection name
- Name, ContentBytes = Header of the collection
- Meeting = Image name (You can upload the image in the media gallery and use it)
- UploadedImage2 = Image control name (from the add picture control)
Step – 3:
- Next, select the Send icon and just add the image attachment in the specified code on its OnSelect property. The code should be like below:
OnSelect = /*Create semicolon separated list of people to email, send the email, reset subject & message fields*/
Set(
    _emailRecipientString,
    Concat(
        MyPeople,
        Mail & ";"
    )
);
Office365Outlook.SendEmail(
    _emailRecipientString,
    TextEmailSubject1.Text,
    TextEmailMessage1.Text,
    {
        Attachments: Images,
        Importance: "Normal"
    }
);
Reset(TextEmailSubject1);
Reset(TextEmailMessage1);
Clear(MyPeople)
Where,
Images = Collection name that you have created before

Step – 4:
- That’s it to do. Now Save and Preview the app. First, upload a picture from your local system and click on the Add Picture button to add the image to the collection.
- Next, Enter the rest important fields (To, Subject and Message) and tap on the Send icon to send the email.
Step – 5:
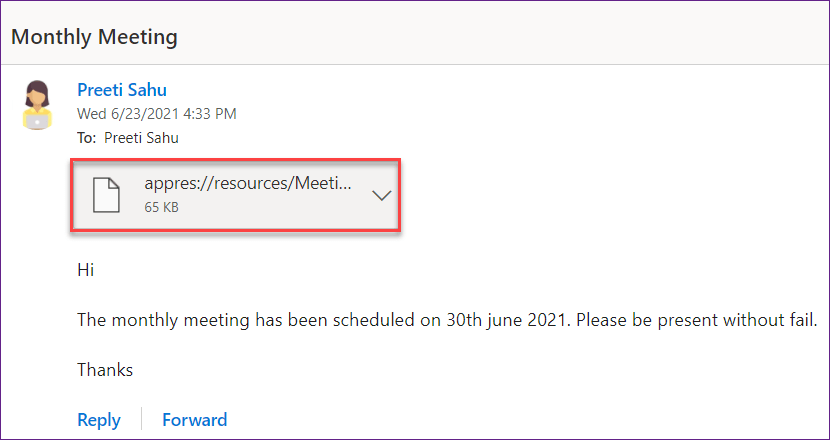
- Open your Email or Outlook (of that specific person that you mentioned in the email), you can get an email like the below screenshot. You can view the image once you will download it.
PowerApps image popup
PowerApps Image Popup means, the image will display when a user will select something in the app. Lets take a simple scenario.
- There is a SharePoint List named Gadget Details. This list has some different type of columns as:
- Gadget Name = By default, this is a Title column. I just renamed it to Gadget Name.
- Brand = This is a choice column.
- Gadget Number = Single line of text data type column
- ImageLink = Hyperlink data type column where only the image link can be stored
Below screenshot represents the list and some records.

- On the PowerApps screen, there is a Data table (records are retrieved from the specific SharePoint list) and image control.
- Now I would like to pop up the specific image when a user will click on the link or item from the data table. Suppose the user will click on the Laptop, then the laptop picture will appear in the image control as shown below.

- To do this, Select the image control and set its Image property to this below code as:
Image = DataTable1.Selected.ImageLinkWhere,
- DataTable1= Data table name
- ImageLink = Hyperlink column from the SharePoint list

- Save and Preview the app. Select any of the links from the table, then you can see the image control will appear with that specific related image.
PowerApps image rotation
- In your requirement, maybe there is an image and you want to rotate that depends upon your choice. To rotate the image, PowerApps provides a property called ImageRotation to the image control.
- In this ImageRotation property, there are some rotation parameter or degree that helps you to rotate the image in that manner. Below are the parameters:
- ImageRotation.None = If you will select this one, then the image will appear with normal position or the image will note rotate. By default, it will be None.
- ImageRotation.Rotate180 = If you will select this one, then the image will appear at 180 degrees.
- ImageRotation.Rotate270 = If you will select this one, then the image will appear at 270 degrees.
- ImageRotation.Rotate90 = If you will select this one, then the image will appear at 90 degrees.
- From the above parameters, whatever you will provide, then the image will rotate with that specific degree. But it may take some time that you need to change this rotation property repeatedly each and every time.
- That means suppose you want to rotate the image at 90 degrees, so you will go to the ImageRotation property and change it to Rotate90. Similarly, again if you want to rotate the image as 180 degrees, then you have to do the process. To avoid this, I will prefer this simple tested scenario that works perfectly for me.
- Insert a Dropdown control and set its Items property as:
Items = ["ImageRotation.None","rotate90","rotate270","rotate180"]
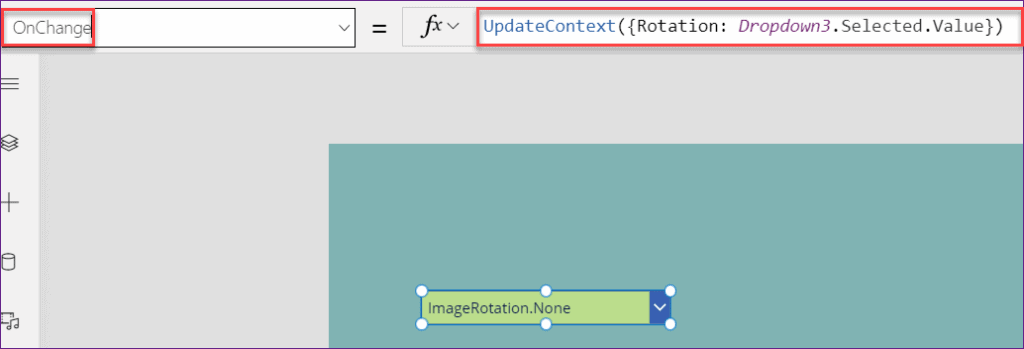
- Next, Select the OnChange property of the dropdown control and apply this below code:
OnChange = UpdateContext({Rotation: Dropdown3.Selected.Value})Where,
- Rotation = Context variable name
- Dropdown3 = Dropdown control name
- Add an Image control and set a picture by using the Image property. Select the image control and set the created variable on its ImageRotation property as:
ImageRotation = Rotation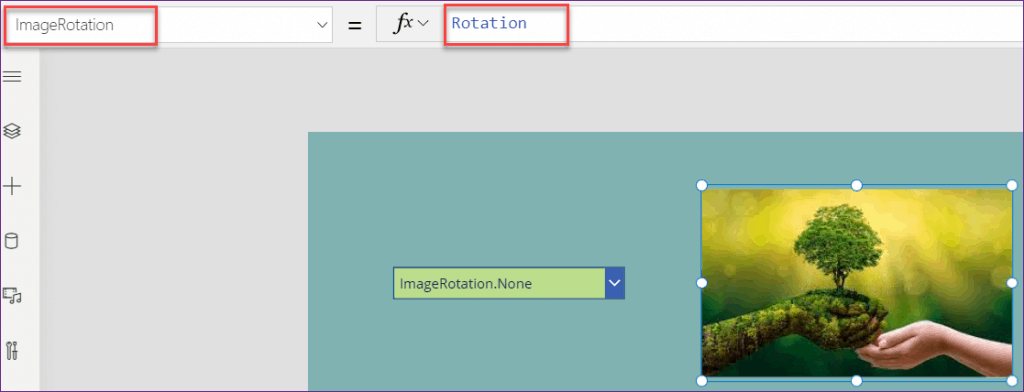
- Now Save and Preview the app. Once you will select each and every parameter from the dropdown, then you can see the image will rotate depends on the user-selected degree as shown below.
PowerApps image to base64
Suppose a user wants to save the Pen input image as base 64 format. Then in that case we can use the Powerapps JSON functionality. This helps to save the pen input image in a JSON format asking the JSON function to include Binary Data.
- To save the pen input image in a JSON format asking the JSON function to include Binary Data:
Set( PenVar, JSON( PenInput1.Image,JSONFormat.IncludeBinaryData ) );- Next, strip the save JSON from the JSON format to only leave the 64 Bit encoded image.
Set( PenInput64Bit, Mid(PenVar, 24,Len(PenVar) - 24 ) );- Then post the raw image data to a Microsoft Flow function:
Sign_to_Sharepoint.Run(PenInput64Bit)
- Now, in the Microsoft Flow then add the pen input image as an Email Attachment, Onedrive file, Sharepoint file, etc. by using base64ToBinary functionality to convert it into the needed Binary format:
base64ToBinary(triggerBody()['PenInput64Bit'])To know more details about the Pen control, you can refer to this below article:
Also, if you want to save the PowerApps captured image in a SharePoint List, then follow this article:
Save captured image in SharePoint
PowerApps image transparency on hover
- Microsoft PowerApps provides a property to image control called Transparency. By default, this property will be 0, which means there is no transparency to the image control. When you will give the Transparency value as 1, then the image will totally disappear from the screen.
- On the other hand, there are some image properties that will help you to provide the hover on the image. Those properties are:
- Disabled color = When the image will be in disable mode, then the specified color will appear.
- Hover color = When you will hover over the image, then the image will appear with the specified color.
- Pressed color = When you will click or press the image, then the image will appear with the specified color.
Rather than this, I would like to show an example that how you can work with Power Apps image transparency on hover.
- On the PowerApps screen, first, upload some images that you want to work with. (via the File menu -> Upload in the Media Gallery)
- Insert a Horizontal Gallery control (with the Title and subtitle Layout)
- Remove the other two text labels except for the image control.
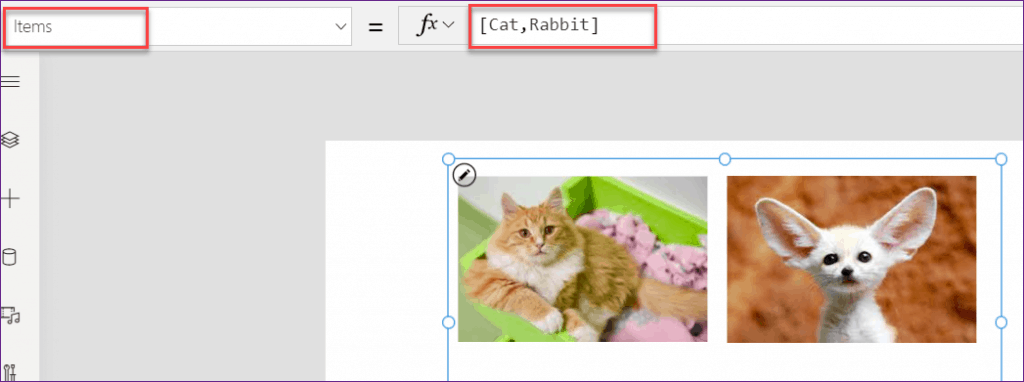
- Select the Gallery control and set its Items property as:
Items = [Cat,Rabbit]Where,
Cat, Rabbit = Image names that are uploaded in the media gallery
- Next, Select the image control inside the gallery and set its Image property as:
Image = ThisItem.Value
- Resize (Height and Width) the gallery or image, so that all images would fit.
- Now, at last, Select the gallery control and set its Transition property as:
Transition = Transition.Pop
- Save and Preview the app. Hover your cursor on the image, you can see the image will pop with hover.
PowerApps change image based on value
Here we will see how to change the PowerApps image based on a value. Lets take a scenario.
- There is a SharePoint Document library named TSInfo Documents. This library has some different types of columns including a Choice column named Status.
- This status field has two choice values as Approved and Rejected as shown below.

- On the PowerApps screen, there is a Gallery control and the records are retrieved from the SharePoint Library (TSInfo Documents).
- Select the image control from the gallery and set its Image property as:
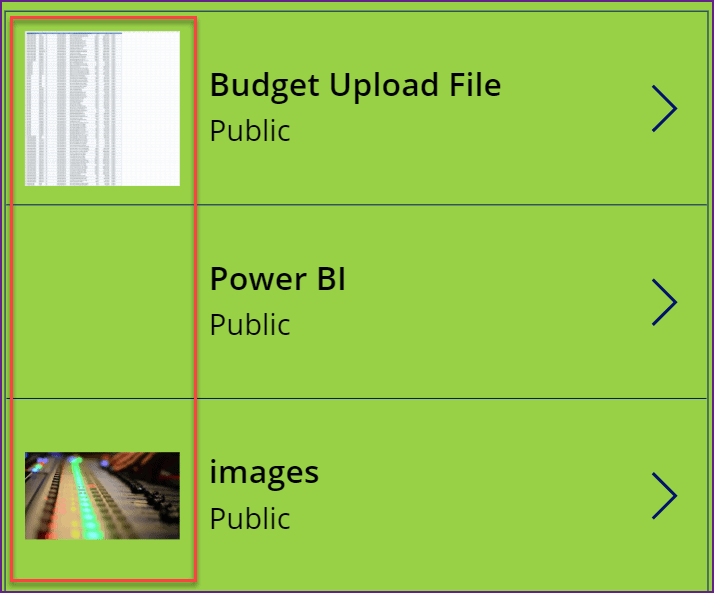
Image = ThisItem.Thumbnail.Large- Now what I want to do is, the gallery will display only the images those documents are approved from the list. The Image property of the image control is:
Image = ThisItem.Thumbnail.Large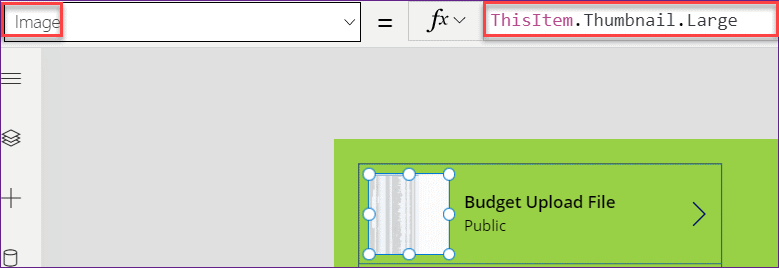
- Next, again select the image control and set the below formula to its Visible property as:
Visible = If(ThisItem.Status.Value="Approved",true,false)Where,
- Status = SharePoint Choice field
- Approved = Specify the choice value

- Save and Preview the app. You can see the images will appear those status has been approved and the images will disppear those status has been rejected as like the below screenshot.
Important Points:
- If it is a Text type field, then set the Visible property of the Image control as:
If(ThisItem.Approved="Yes",true,false)
2. If it is a Yes or No type field, then set the Visible property of the Image control as:
If(ThisItem.Approved=true,true,false)
3. If it is a Choice type field and its choice is “Yes” and “No“, then set the Visible property of the Image control as:
If(ThisItem.Approved.Value="Yes",true,false)4. If it is a Choice type field and its choice is “true” and “false“, then set the Visible property of the Image control as:
If(ThisItem.Approved.Value="true",true,false)PowerApps html control image
- Do you ever think to display a picture in an HTML Text control? Yes, maybe you have been working on this. But some PowerApps beginners, may aware of this thing that whether they can show an image by using HTML text control.
- So coming to this point is, yes, you can definitely put a picture in an HTML text control and display it on your PowerApps screen.
- To add an image into HTML Text control, it supports the tag together with the image URL.
- While adding an image to the HTM Text control, you would need to configure the image source of the img Label. For example,
<img src="data:image/png;base64, iVBORw0KGgoAAAANSUhEUgAAAAUA
AAAFCAYAAACNbyblAAAAHElEQVQI12P4//8/w38GIAXDIBKE0DHxgljNBAAO
9TXL0Y4OHwAAAABJRU5ErkJggg==" alt="Red dot" />Example:
On the PowerApps screen, Insert a HTML text control (Insert -> Text -> HTML text). Select the control and apply this below formula on its HTMLText property as:
HTMLText = "Show your <b><font color=green>HTML</font></b> text here.
<img src=""https://encrypted-tbn0.gstatic.com/images?q=tbn:ANd9GcSOo129hKGPPjR8hKHaNMrEAK7KQ-_Uojqfhg&usqp=CAU""
alt=""Testing"" width=""500"" height=""300"">"
Refer to this below screenshot.
NOTE:
Whenever you are using the img tag within the HTMLText control, you need to add double quotes twice where it needs a double quote.

- While working with PowerApps Substitute function and with a SharePoint Wiki Library, you can use this below code:
Substitute(ThisPage.'Wiki Content', "<img src=""", "<img src=""https://yourdomain.sharepoint.com")- There is another important point that I want to share here is, Many of us think that whether there is any way to upload an image into media in PowerApps and use that image in the HTML text. Or also can this be used with an image in SharePoint?
- So coming to the answer is, there is no direct way to achieve this. But alternatively, what you can do is, you need to convert your images into a base64 format, then put them as like below
<imgsrc='data:image/png;base64,[base64data]'>- They will not show on the app but when you send it in an email or convert it to pdf it will be there. this does mess with your HTML format as the string of base64 is so long it pushes around your columns however it is just visual on the email or pdf it comes through perfectly.
- Let’s discuss one simple scenario where the customer wanted to see a preview of the PDF. thus I made two HTML controls and referenced image URLs as a source in one control and put the base64 images in the other hidden HTML control. on the button selected, the user would send the HTML base64 Control and not the one they were actually seeing.
- I used Flow to fetch the signatures from email and convert them to base64 then write them to SharePoint. I then used collections to fetch the data I needed and populated the HTML file with the client signature. You can refer to the below article for more details:
- Read PowerApps Signature
PowerApps image attachment
In this scenario, We will see how to work with PowerApps image attachment. Lets take a simple scenario.
- The below screenshot represents a SharePoint List named Customer Care Report Details. This list has some different types of columns. Among them, one column is there named Images with multi-line of text data type (where the image will store with a JSON Format).

- On the PowerApps screen, there is an Edit form where the form fields are retrieved from the specified SharePoint list. Also, there will be a Submit button to save the records in the SharePoint List.
- Now, Insert an Add picture control as like below. Select the Add media control and apply this below formula on its OnChange property as:
OnChange = Collect(
    ImageCollect,
    Substitute(
        JSON(
            UploadedImage4.Image,
            JSONFormat.IncludeBinaryData
        ),
        """",
        ""
    )
)
Where,
- ImageCollect = Collection name
- UploadedImage4 = Image control name (from Add picture control)

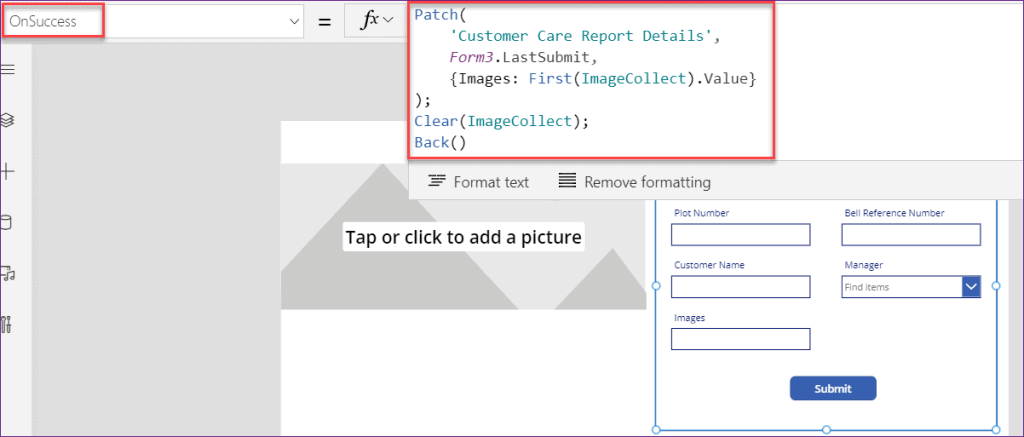
- Next, we need to patch the image to the edit form. Select the edit form and set its OnSuccess property as:
OnSuccess = Patch(
    'Customer Care Report Details',
    Form3.LastSubmit,
    {Images: First(ImageCollect).Value}
);
Clear(ImageCollect);
Back()
Where,
- ‘Customer Care Report Details’ = SharePoint List name
- Form3 = Edit form name
- Images = SharePoint Multiline text column
- ImageCollect = Collection name
Refer to the below screenshot.
- Now save and publish the app. Upload a picture from your local system. Also, enter field values in the form (except the Images field). Leave the Images field blank.
- Click on the Submit button in the form as shown below.

- Now go to the existing SharePoint List (Customer Care Report Details) and refresh it. Then you can see the new record has been created as like the below screenshot. And also, the Images field will appear in the JSON format.

- Also, if you want to learn more about PowerApps Attachment control and how to upload an attachment to the SharePoint list/library, then refer to the below article:
PowerApps add image to button
In Power Apps, Do you want to make an image clickable that will look like a button? Follow this simple example.
- In my PowerApps screen, I have a call icon. Now I would like to make it clickable to navigate back to the home menu.
- That means, when a user comes over the picture, it will feel like the user clicks a real button.
- To do so, select the call icon (you can take any icon or any button) and set these below properties to the specified below code as:
BorderColor = RGBA(0, 0, 0, 0)
BorderThickness = 2
HoverBorderColor = Red- You can specify the BorderThickness and HoverBorderColor as per your choice

- Save and preview the app. Once you will hover over the call icon, you can see the icon will appear as clickable, and also it will work with the provided function by the user.
- This means, if you want to navigate the screen when a user will click on it, then you can apply the formula on its OnSelect property and make it done.
PowerApps image onselect
- Suppose in the PowerApps screen, there is an image gallery. The gallery is having some pictures as like the below screenshot.
- Now what I want to do is, When a user will click on the image, then the image background or the background fill will change with the given color code.
- To do this, Select the image gallery control and apply this below formula on its TemplateFill property as:
TemplateFill = If(
    ThisItem.IsSelected,
    ColorFade(
        LightPink,
        75%
    ),
    White
)
You can refer to the below screenshot.
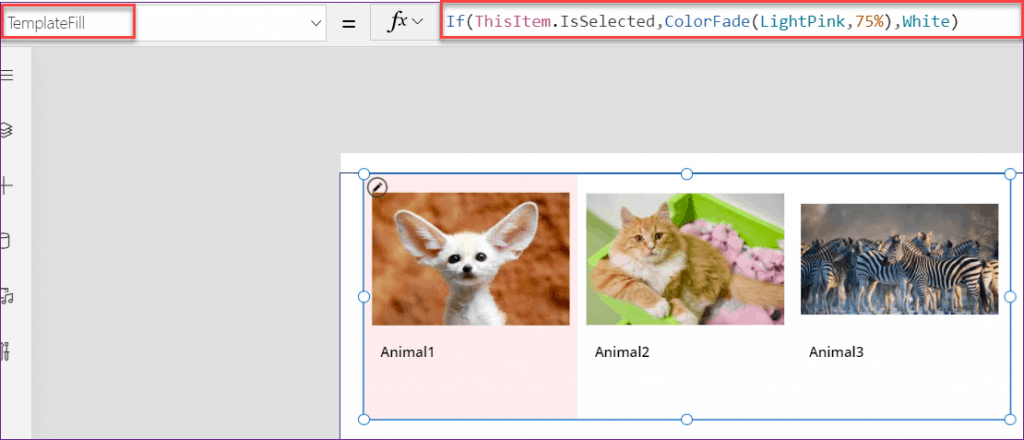
- Save and Preview the app. Select or click any image from the gallery, you can see the selected image background will change to a light pink color and the rest images will appear with a white color background.
PowerApps image controls missing
- In many cases, the most common thing that happens is, the SharePoint Picture field is not showing in the PowerApps. Lets me share more details.
- I have a SharePoint list with a picture field. For each item in the list, I added a hyperlink in the picture field that points to a picture stored in the “pictures” library in SharePoint.
Problem:
But the issue is, When I added this field to my Power Apps in Gallery and Form using an Image Control, they don’t show up anymore. Also the pictures never showed up in mobiles (both Android and iOS).
Solution:
Few important points you need to remember while working on this:
- Please make sure the image files are not removed from your specific SharePoint Document Library, and the file name is not changed.
- You need to sure the URL Link you typed within the Picture field is pointed to the proper image file in your SP Library.
- Also, you can remove the SP List connection from your app, re-add a new connection to your SP List from your canvas app, check if the issue is solved.
- The most important thing you should know is, the images will not show on any Mobile device. actually, it is a known issue with image files stored in SP Site — Pictures that need authentication on SharePoint are not supported yet on Mobile devices. This issue has not been fixed within the canvas app.
- There is an alternate solution that you can use. you can consider adding a Text type column (called “FileName”) in your SP List to store the image file name (e.g. Picture.jpg, the corresponding image file is hosted in your SP Library).
- Then within your canvas app, add a connection to your SP Library as the data source. Within the Gallery, set the Image property of the Image control to the following:
Image = LookUp(YourSPLibrary, 'File name with extension' = ThisItem.FileName).'Thumbnail ({Thumbnail})'.Medium- Once you will apply the above code, you could display the image in Gallery within your PC and Mobile device.
Also, you may like these below Power Apps tutorials:
- Power Apps GroupBy Function example
- Power Apps Audio and Video Control [Detailed tutorial]
- Power Apps Choices Function with Examples
- Power Apps Button OnSelect [Complete Tutorial]
- PowerApps repeating table
- How to Create Tabbed Forms in PowerApps for SharePoint List
- PowerApps Count Function with Examples
- PowerApps CountIf Function with Examples
- PowerApps CountRows function with Examples
- PowerApps CheckBox – How to use
- PowerApps LastSubmit() with Examples
- PowerApps First, FirstN, Last, and LastN function with examples
- PowerApps if statement with examples
In this Power Apps tutorial, We discussed what is the use of image control in PowerApps, What are the PowerApps’ image control properties, and how a user can use it.
Also, By taking some simple scenarios, We covered these below topics as:
- PowerApps add image control
- PowerApps upload image
- PowerApps image from url
- PowerApps image gallery
- PowerApps image from SharePoint
- PowerApps add image to SharePoint list
- PowerApps reset image control
- PowerApps image control zoom
- PowerApps set image
- PowerApps image blank
- PowerApps image in circle
- PowerApps image carousel
- PowerApps image collection
- PowerApps hide image
- PowerApps dropdown with image
- PowerApps email image
- PowerApps image popup
- PowerApps image rotation
- PowerApps image to base64
- PowerApps image transparency on hover
- PowerApps change image based on value
- PowerApps html control image
- PowerApps image attachment
- PowerApps add image to button
- PowerApps image onselect
- PowerApps image controls missing
I am Bijay a Microsoft MVP (10 times – My MVP Profile) in SharePoint and have more than 17 years of expertise in SharePoint Online Office 365, SharePoint subscription edition, and SharePoint 2019/2016/2013. Currently working in my own venture TSInfo Technologies a SharePoint development, consulting, and training company. I also run the popular SharePoint website EnjoySharePoint.com