I will show you here how to use the Power Apps countif function with various examples. I will also explain, the Power Apps CountIf multiple conditions.
Last, I will show you the Power Apps CountIf function with a SharePoint Online list and the Power Apps CountIf delegation.
Power Apps CountIf
- PowerApps CountIf function helps to count the total number of items or records in a table that are true (for a logical formula).
- If you use CountIf functions with filters, there will be a 50K delegation limit.
- If you need a precise count and expect the result to be under the aggregate limit, you can bypass the cached count via CountIf(<Data Source>, True).
Power Apps CountIf Syntax
Here, we will see the PowerApps counif syntax:
CountIf(Table, LogicalFormula)Where,
- CountIf() = This Power Apps CountIf function counts the number of records in a table that are true for a logical formula
- Table = It is required. Specify the table that you need to count all the records within it
- LogicalFormula = This is also required. Specify the formula to evaluate each record of the table. Records that return true for this formula are counted. The formula can reference columns of the table
Power Apps CountIf Function
Now, we will discuss how to use powerapps countif function with various examples.
Example -1:
I have a Power Apps collection named “colProducts” and this collection contains the below fields.
| Column Name | Data Type |
| ProductName | Text |
| Manufacturer | Choice |
| PurchaseDate | Date and Time |
Refer to the below screenshot:
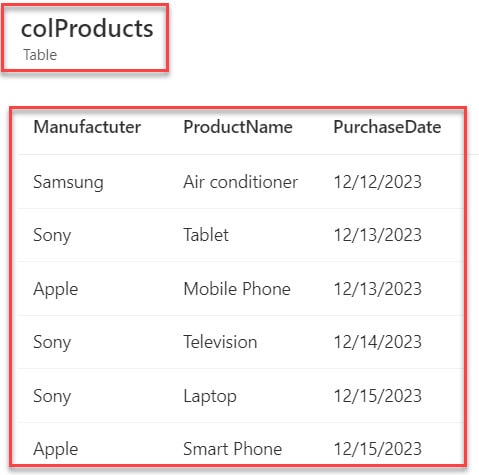
Now, I would like to count the total number of records based on the “Manufacturer”. If a user searches a manufacturer’s name in the text input, then it will count the total number of collection records and display the respective count number on the text label, as shown below

To achieve the above example, follow the below-mentioned steps. Such as:
1. To create a Power Apps collection, select the App object [From the left navigation] and set its OnStart property to the code below.
OnStart = ClearCollect(
    colProducts,
    {
        ProductName: "Air conditioner",
        Manufactuter: "Samsung",
        PurchaseDate: "12/15/2023"
    },
    {
        ProductName: "Tablet",
        Manufactuter: "Sony",
        PurchaseDate: "13/15/2023"
    },
    {
        ProductName: "Mobile Phone",
        Manufactuter: "Apple",
        PurchaseDate: "14/15/2023"
    },
    {
        ProductName: "Television",
        Manufactuter: "Sony",
        PurchaseDate: "14/15/2023"
    },
    {
        ProductName: "Laptop",
        Manufactuter: "Sony",
        PurchaseDate: "14/15/2023"
    },
    {
        ProductName: "Smart Phone",
        Manufactuter: "Apple",
        PurchaseDate: "15/15/2023"
    },
    {
        ProductName: "Watch",
        Manufactuter: "Sony",
        PurchaseDate: "15/15/2023"
    },
    {
        ProductName: "Office Chair",
        Manufactuter: "Apple",
        PurchaseDate: "15/15/2023"
    }
)
Where,
- colProducts = Power Apps Collection Name
- ProductName, Manufacturer, PurchaseDate = Collection Headers/Columns
- “Air Conditioner”, “Samsung”, “12/15/2023” = Collection Records/Rows
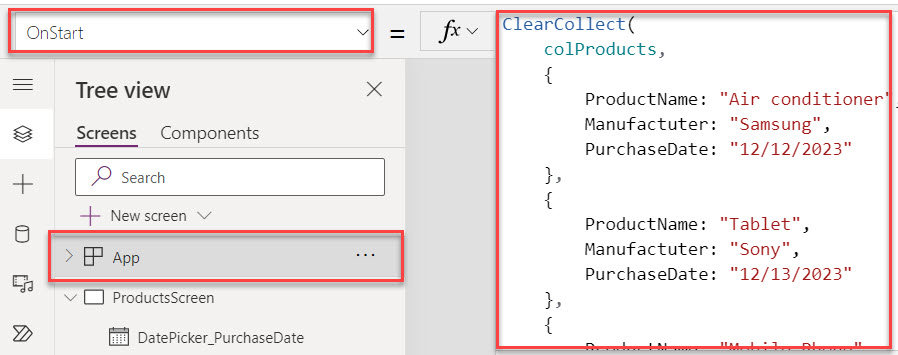
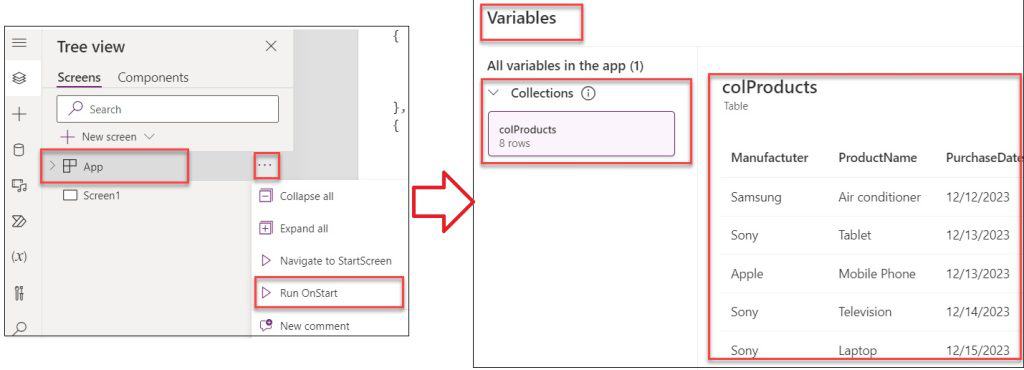
2. To get the created collection, just click on the App’s Run OnStart option -> Go to the Variables section to find the collection as shown below.
3. Then, on the Power Apps Screen -> Insert a Text input control and set its Default property as:
Default = "Enter the Manufacture Name"4. Also, insert a Text label and set its Text property to the code below.
Text = CountIf(
    'colProducts',
    Find(
        TextInput_Manufacturer.Text,
        Manufacturer.
    ) > 0
)
Where,
- ‘colProducts’ = Power Apps Collection Name
- Find() = This Find() function looks for a string within another string and is case-sensitive
- TextInput_Manufacturer = Power Apps Text input Name
- Manufacturer = Power Apps Collection Name

5. Once your app is ready, Save, Publish, and Preview the app. When a user enters a manufacturer name in the text input control, the text label will display the number of records counted as in the screenshot below.

Example -2:
I will also take the above Power Apps collection [colProducts] for this example. Now, I want to count all the records based on the date picker control.
When the user selects a “Purchased Date” from the date picker control, the text label will display the collection records count based on the selected date.
Refer to the below screenshot:

To do so, follow the below steps.
1. On the Power Apps Screen -> Insert a Date picker control, and by default, we will get today’s date -> Insert a Text label and set its Text property to the code below.
Text = "Total Count of Records based upon the DatePicker: " & CountIf(
    'colProducts',
    StartsWith(
        Text(
            DatePicker_PurchaseDate.SelectedDate,
            "[$-de]dd/MM/yyyy"
        ),
        Text(
            'PurchaseDate',
            "[$-de]dd/MM/yyyy"
        )
    )
)
Where,
- StartsWith() = This StartsWith() function tests whether one text string begins with another.
- Text() = This function formats a number or a date/time value based on a predefined date/time format, which you specify by using the DateTimeFormat enumeration
- DatePicker_PurchaseDate = Power Apps Date picker Name
- ‘PurchaseDate’ = Collection Field Name

2. Save, Publish, and Preview the app. When the user selects a “Purchased Date” from the date picker control, the text label will display the collection records count based on the selected date, as shown below.

This is how to use the Power Apps CountIf function.
Power Apps countif SharePoint list
In this section, we will discuss the Power Apps countif SharePoint list with a simple scenario:
Scenario:
I have a SharePoint Online list named “Expenses Tracker” and this list contains the below fields.
| Column Name | Data Type |
| Item | It is a default single line of text |
| Expense Type | Choice |
| Budget | Choice |
| Payment Date | Date and time |
| Amount | Currency |
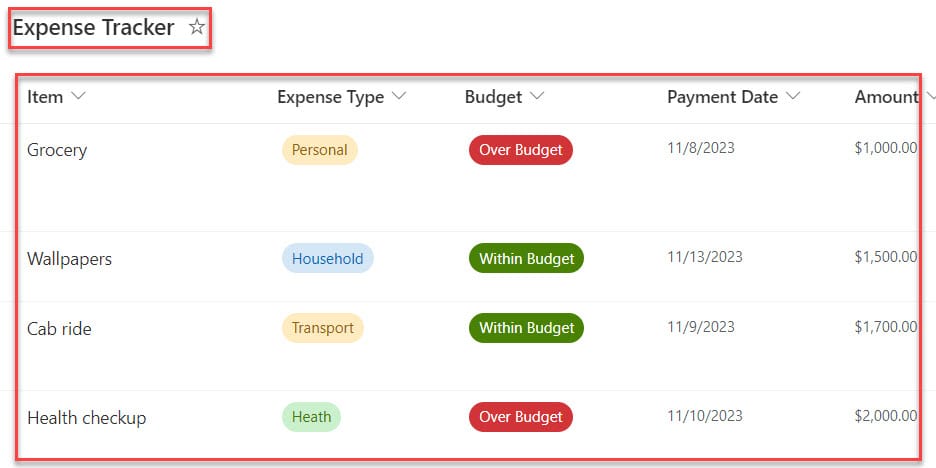
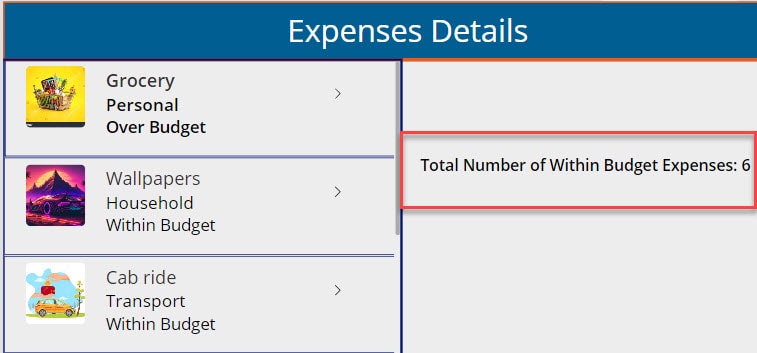
In Power Apps, there is a Gallery control and a Text label control. Now I would like to count the total number of expenses based on the “Within Budget” and the result will be displayed in the label control.
Refer to the below screenshot:
To do so, follow the below steps.
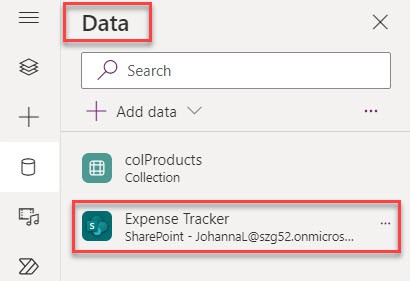
1. On the Power Apps app, connect the respective SharePoint list [Expense Tracker] like below.
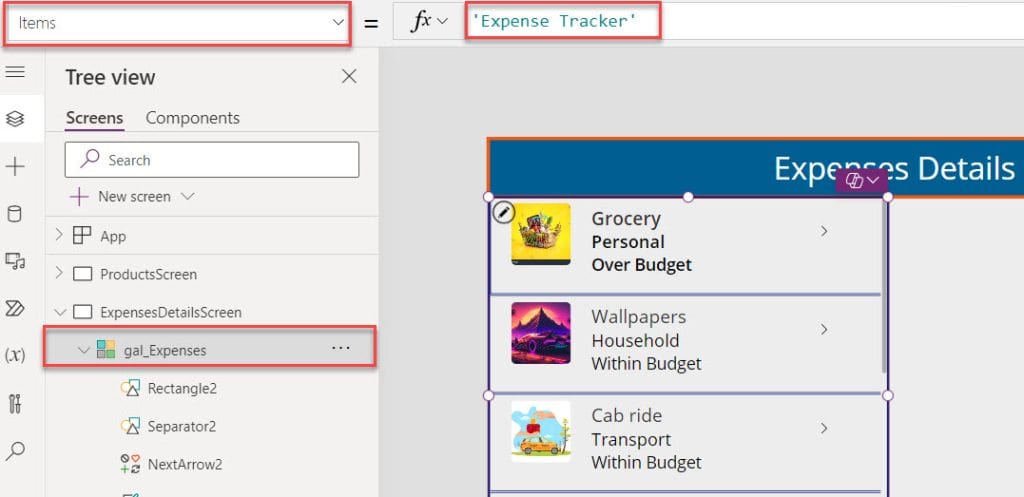
2. Then, on the Power Apps Screen -> Insert a Gallery control and set its Items property to the code below.
Items = 'Expense Tracker'Where,
- ‘Expense Tracker’ = SharePoint Online List
3. Next, insert a Text label control and set its Text property to the code below.
Text =  "Total Number of Within Budget Expenses: " & CountRows(
    Filter(
        'Expense Tracker',
        Budget.Value = "With in Budget"
    )
)
Where,
- “Total Number of Within Budget Expenses = This is the text that I want to display in the label control
- ‘Expense Tracker’ = SharePoint List Name
- Budget = SharePoint Choice Field Name
- “Within Budget” = Specify the value that we count

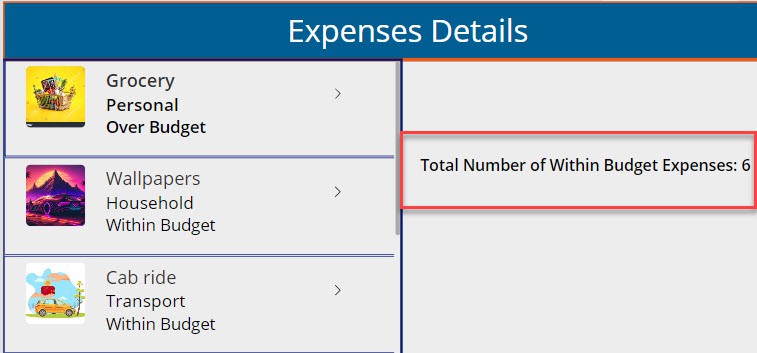
4. Save, Publish, and Preview the app. The text label displays the total number of “Within Budget” expenses as shown below.
This is all about the Power Apps countif SharePoint list.
Power Apps countif Multiple Conditions
Here, we will discuss the Power Apps countif multiple conditions with a simple example.
Example:
I will also take the above SharePoint Online list [Expense Tracker] for this example.
In Power Apps, there is a Gallery control and a Text label control. Now, I want to count the number of expenses based on the multiple conditions [If the expenses are in ‘Within Budget‘ and ‘Expense Type‘ then, the text label will display the respective records] as shown below.
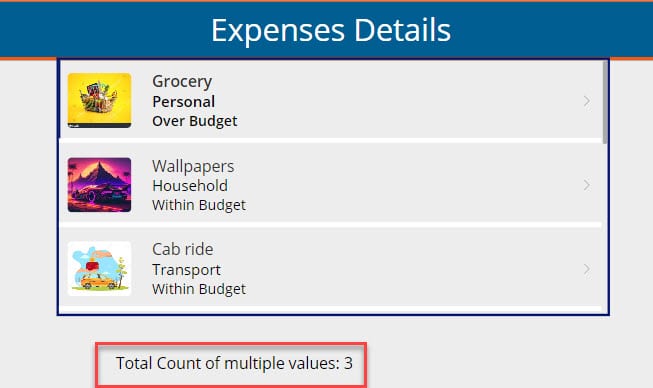
To achieve it, follow the below-mentioned steps.
1. On the Power Apps Screen -> Insert a Gallery control and set its Items property as:
Items = 'Expense Tracker'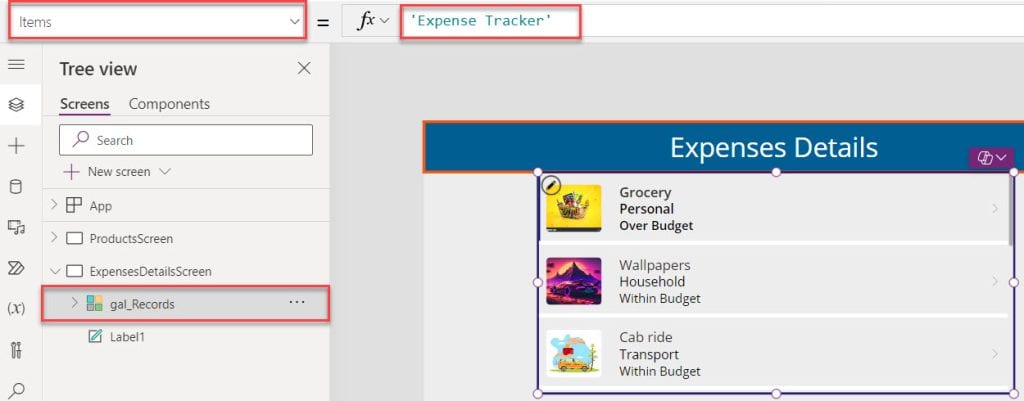
2. Then, insert a Text label and set its Text property to the code below.
Text = "Total Count of multiple values: " & CountIf (
    'Expense Tracker',
    Budget.Value = "Within Budget" && ExpenseType.Value = "Personal"
)
Where,
- “Total Count of multiple values = This is the text that will be displayed in the label control
- Budget and ExpenseType = SharePoint Choice Fields
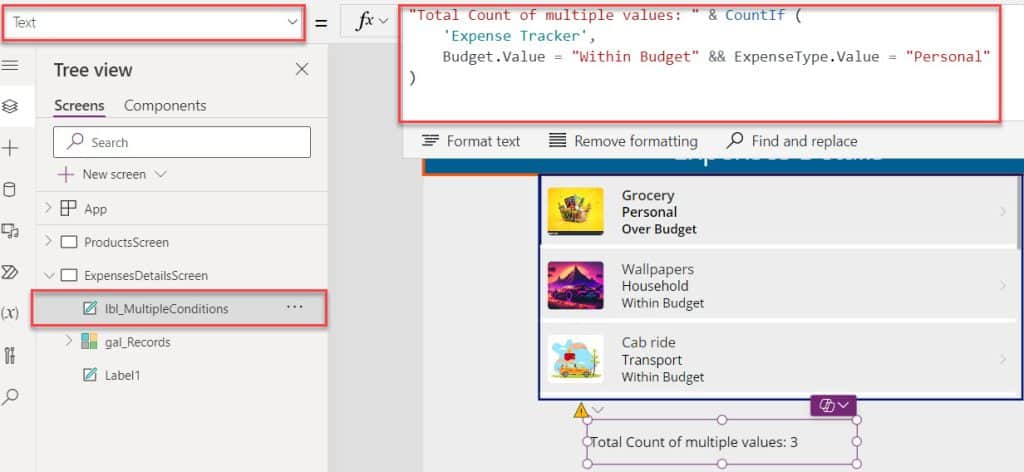
3. Save, Publish, and Preview the app. The text label will display the number of count records from a SharePoint list based on the multiple conditions, as in the screenshot below.
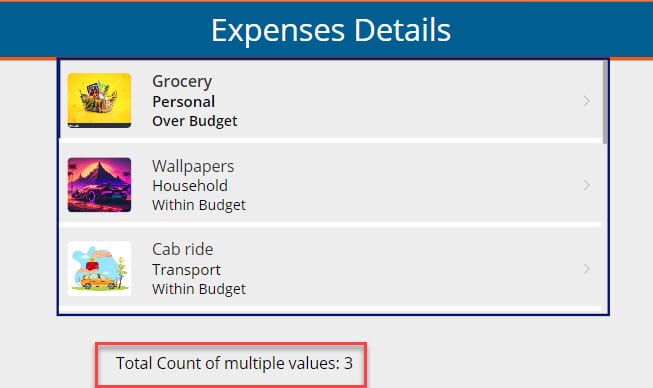
This is how to use the Power Apps countif multiple conditions.
Power Apps Countif Delegation
In the last, we will discuss the Power Apps countif delegation.
- Suppose in your data source, there is a total of 5000 items or records. Here, I want to display all the items (from the Data source) on the PowerApps screen.
- However, there is a limitation in the PowerApps app, where it always returns only 500 items (from the data source). This is known as PowerApps Delegation.
- When you create a PowerApps application, most of the time, you can see there will be a warning sign on the formula if the function is not delegable. The warning message states: “Delegation warning: The “filter” part of this formula might not work correctly on large data sets.”
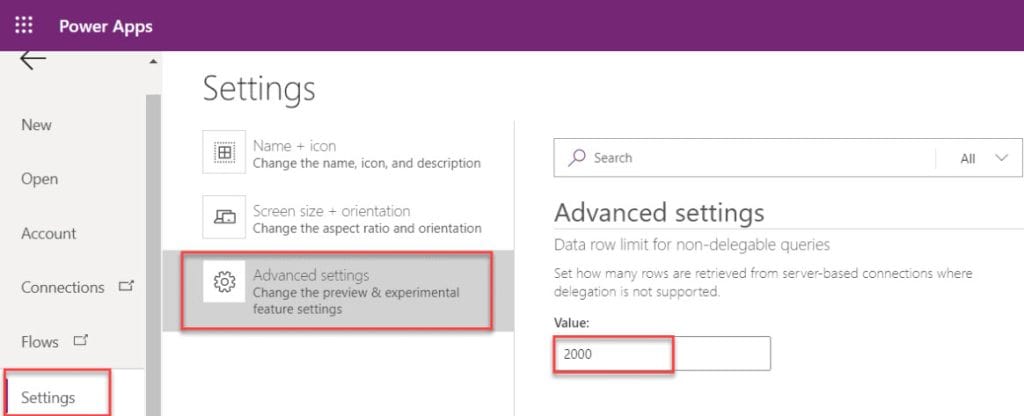
- Always remember that 500 is the PowerApps Default limit. We can extend this limitation from 500 to 2000 by using the following instructions:
- Open your PowerApps app
- Go to the File tab and then Settings
- Select on Advanced Settings
- Set the value to 2000 in the Data row limit for non-delegable queries
- In some cases, the 2000 record limit can satisfy the requirement. But most of the cases, also may not satisfy because maybe the data source has more than 2000 items (as in my data source it has 5000 records).
- So, in this case, We will do another thing, i.e., PowerApps Collection.
- If you will create a collection, then there will be no delegation limit and one collection can hold at most 10K items or records.
- At first, you need to save the data for collection. Let’s take an example. Set the below formula on the OnStart property of your app:
OnStart = ClearCollect(collectionname,SharePointlistname)Next, use this collection for your specific requirement as shown below.
CountRows(colletionname) or CountIf(Condition with the collection)This is all about the Power Apps countif delegation.
Conclusion
I trust this Power Apps tutorial taught in detail information about the Power Apps counif function, including:
- Power Apps countif SharePoint list
- Power Apps countif Multiple Conditions
- Power Apps Countif Delegation
You may also like:
- Power Apps Notify Function
- How to Get First Item in Power Apps Collection?
- Power Apps Save Collection to SharePoint List
- How to Increment Number in Power Apps Gallery?
I am Bijay a Microsoft MVP (10 times – My MVP Profile) in SharePoint and have more than 17 years of expertise in SharePoint Online Office 365, SharePoint subscription edition, and SharePoint 2019/2016/2013. Currently working in my own venture TSInfo Technologies a SharePoint development, consulting, and training company. I also run the popular SharePoint website EnjoySharePoint.com
Hi, I want to countrows from sharepoint list based on reported date. I am trying to create a line chart to show peaks and valleys of support tickets by day (last 30 days). So i want the chart to show, for example, 24-Jul-21 , there were 8 tickets, 25jul21, there were 22 tickets, 26Jul21, there were 12 tickets opened. eventually, i want to add another series for tickets closed on those days.
Can we use the same concept where in we need to count the rows in a gallery only if the one of the text input visisbilty is edit