Do you want to display value based on dropdown selected in Power Apps? In this Power Apps tutorial, I will explain how to hide fields based on conditions in Power Apps.
Here, we will discuss the Power Apps visible if the dropdown equals and how to show hide fields based on the Power Apps dropdown selection. Additionally, we will see the Power Apps hide field based on the dropdown control with real examples.
Power Apps Hide Fields Based on Condition
Let’s see how to work with the PowerApps hide fields based on the condition with various examples:
Example-1: PowerApps display value based on dropdown selected
In the first example, I will show you how to display value based on dropdown selected in Power Apps.
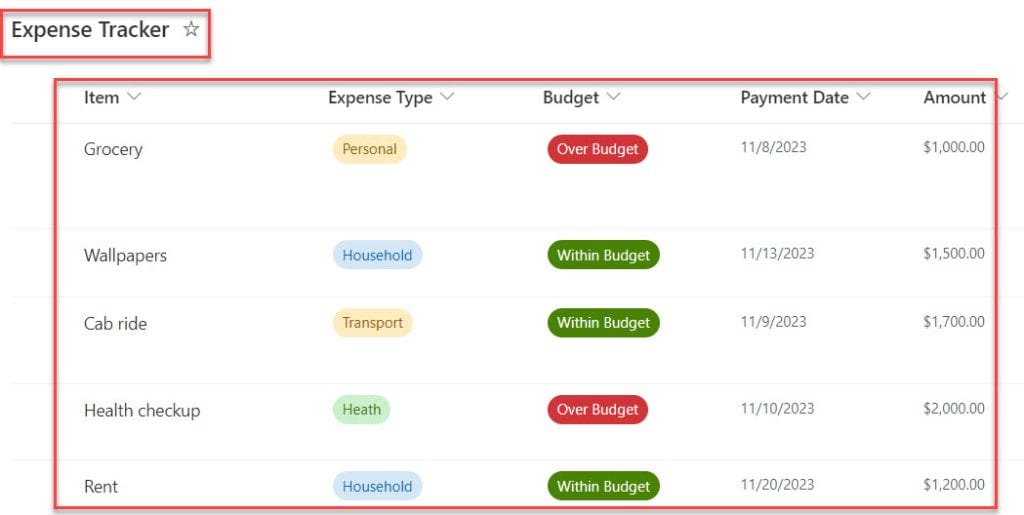
I have a SharePoint Online list named “Expense Tracker” and this list contains the below fields.
| Column Name | Data Type |
| Item | It is a default single line of text |
| Expense Type | Choice |
| Budget | Choice |
| Payment Date | Date and time |
| Amount | Currency |
Refer to the below screenshot:
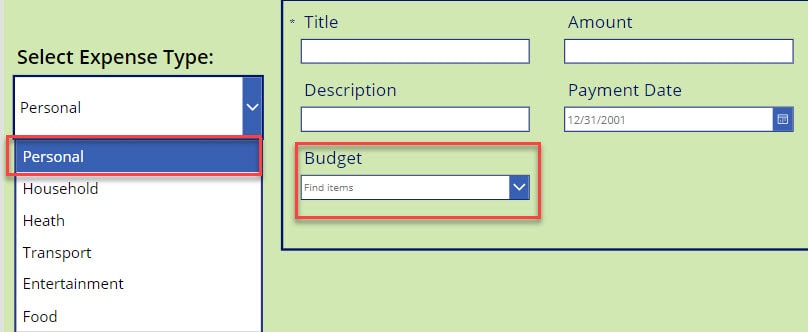
In Power Apps, there is a Dropdown control and an Edit form. Now, I would like to view the Budget field on an edit form based on the dropdown value selection [If the dropdown value equals “Personal” then, the budget field will be visible or else it will be in disable mode] as shown below.

To work around this, follow the below-mentioned steps. Such as:
1. Open Power Apps -> Create a Blank Canvas app and connect it to the respective SharePoint list [Expense Tracker] like below.

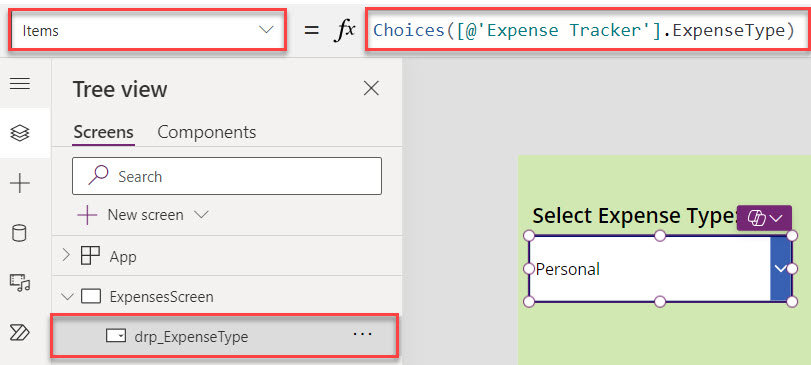
2. On the Power Apps Screen -> Insert a Dropdown control and set its Items property to the code below.
Items = Choices([@'Expense Tracker'].ExpenseType)Where,
- Choices() = This function uses the Choices function to provide a list of choices for your user to select from
- ‘Expense Tracker’ = SharePoint Online List
- ExpenseType = SharePoint List Choice Field
3. Next, insert an Edit form control and set its DataSource property as:
DataSource = 'Expense Tracker'4. To display the SharePoint list fields on the Edit form control, change the Default mode is “New” as in the screenshot below.
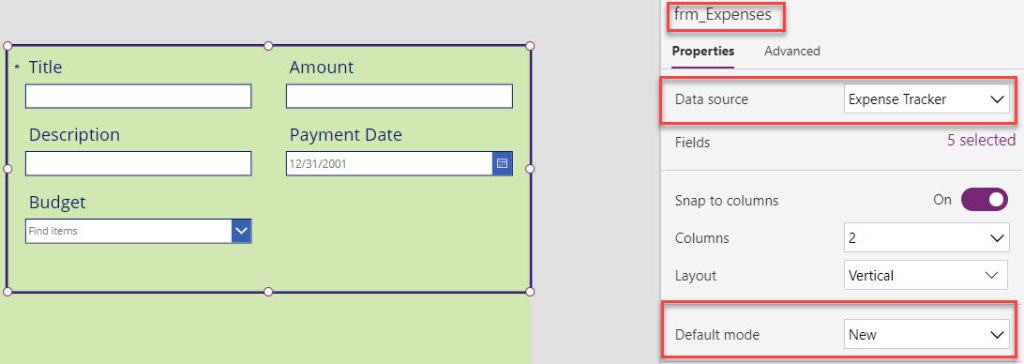
5. Once you select the list, all the fields will be added to the form automatically. Before using any fields, you need to unlock the data card first. You can add or remove the unnecessary fields from the edit form. Also, if you want to design the form, you can use properties like Form Color, Field Font Size, Field Font weight, etc.
6. Now, select the Budget_DataCard1 and set its Visible property to the code below.
Visible = If(
    drp_ExpenseType.Selected.Value = "Personal",
    true,
    false
)
Where,
- If() = This function is used to evaluate multiple unrelated conditions
- drp_ExpenseType = Power Apps Dropdown Control Name
- “Personal” = Value Name
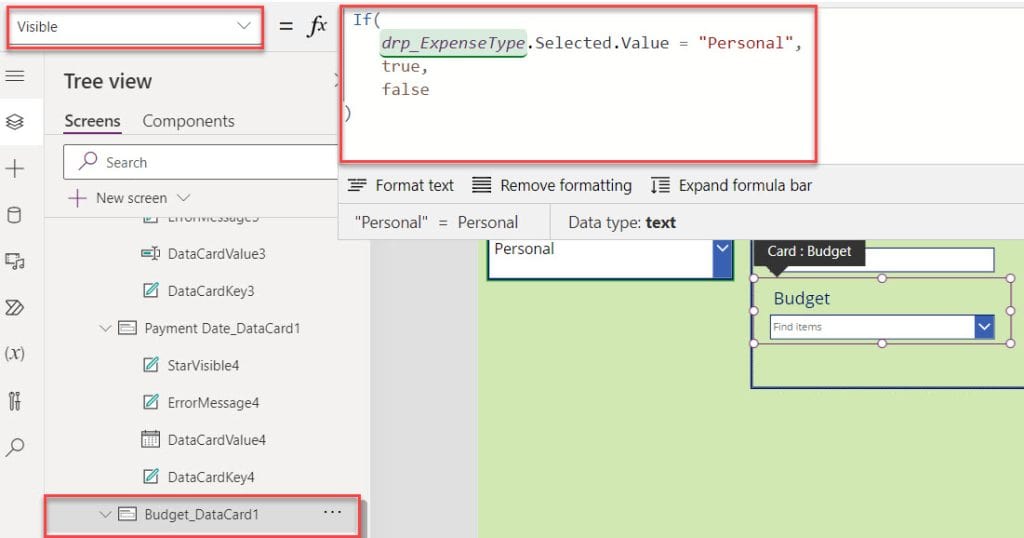
Once your app is ready, Save, Publish, and Preview the app. Whenever the user selects the dropdown value as “Personal” then only, the Budget Datacard will be visible or else it will be in disable mode like below.
Example-2: Show/Hide Button Based on Dropdown Value in Power Apps
In this example, I will show you how to show or hide a button control based on a dropdown value in Power Apps.
I will also take the above Edit form control [frm_Expenses] for this example. Now, I want to display the Button control based on the Dropdown control value [“Within Budget”] as shown below.

To achieve it, follow the below steps. Such as:
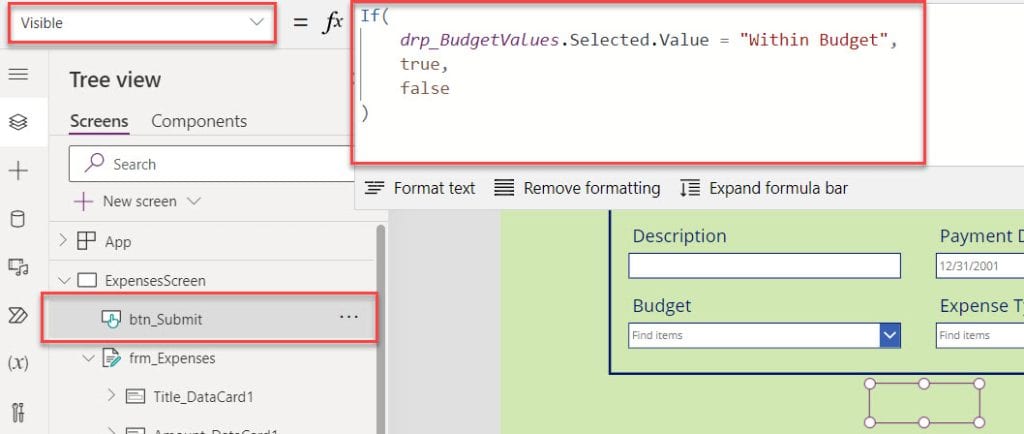
1. On the Power Apps Screen -> Insert the Button control under the edit form and set its Visible property to the code below.
Visible = If(
    drp_BudgetValues.Selected.Value = "Within Budget",
    true,
    false
)
Where,
- drp_BudgetValues = Power Apps Dropdown Name
- “Within Budget” = Dropdown Value
2. Now, select the button control and set its OnSelect property as:
OnSelect = SubmitForm(frm_Expenses)Where,
- SubmitForm() = This SubmitForm() function in the OnSelect property of a Button control to save any changes in a Form control to the data source
- frm_Expenses = Power Apps Gallery Name
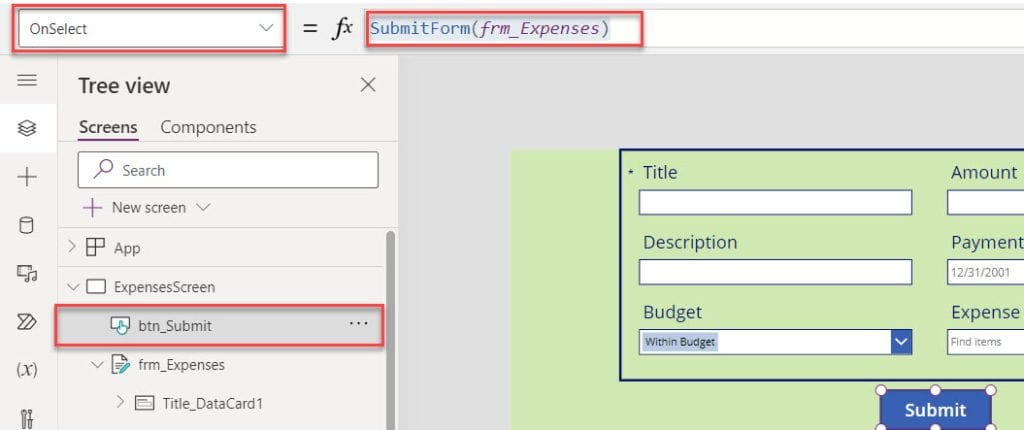
3. Save, Publish, and Preview the app. If the user selects the dropdown control value as “Within Budget” then, only the button control will be visible, or else it will be in the disable mode like below.

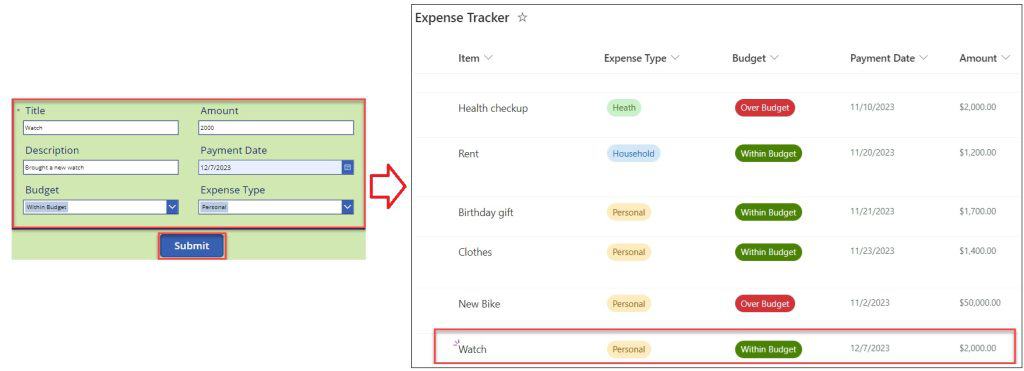
4. Once the new record is added in the edit form, click on the button control to submit the record into the SharePoint list as in the screenshot below.
This is all about the Power Apps hide fields based on the condition.
Show Hide Fields Based on Power Apps Dropdown Selection
Here, we will discuss the show/hide fields based on the power apps dropdown selection with a simple scenario:
Scenario:
I have a SharePoint Online list, i.e., [“Access Registers“] and this list contains the below fields.
| Column Name | Data Type |
| Employee Name | It is a default single line of text |
| Visitors Name | A single line of text |
| Visitors Contact Number | A single line of text |
| Department | Choice |
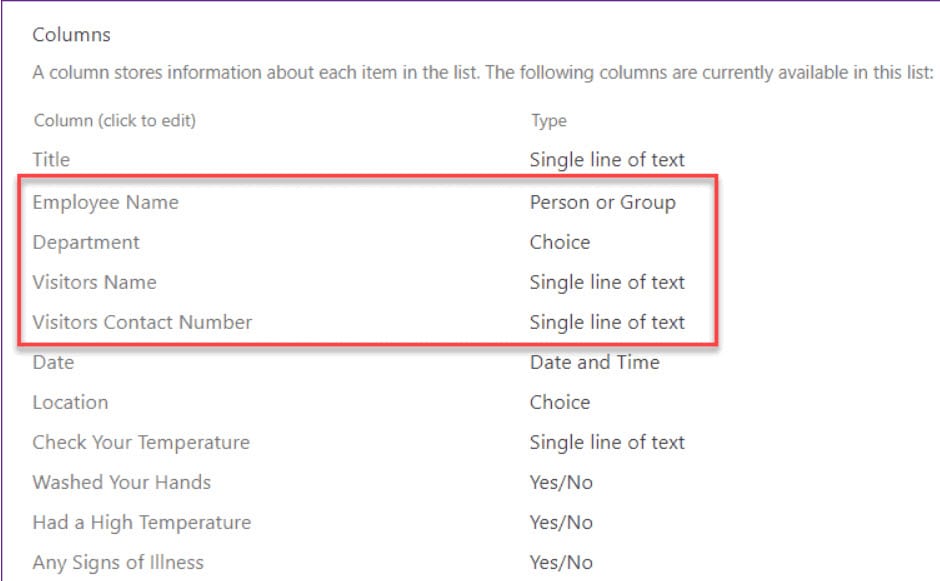
In the Department column, I have some choice options, i.e., [IT, HR, FINANCE, ADMIN, MARKETING, PURCHASING, VISITORS].
Based upon these choice options, I want to show or hide the Employee Name, Visitors Name, and Visitors Contact Number in a Power Apps Edit form.
When a user selects the Department value as Visitors, then the user can see only the Visitors Name and Visitors Contact Number. At the same time, the Employee Name column should be hidden.
Refer to the below screenshot:
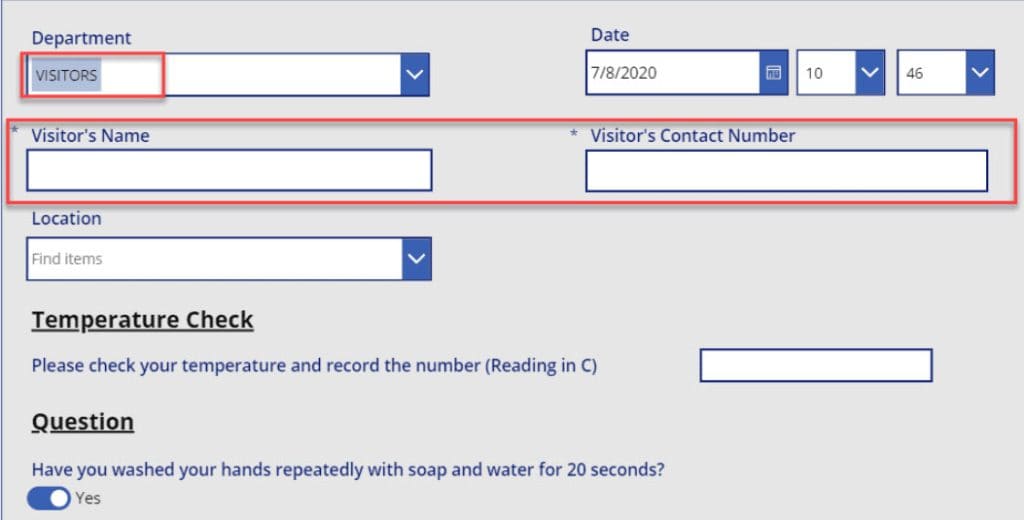
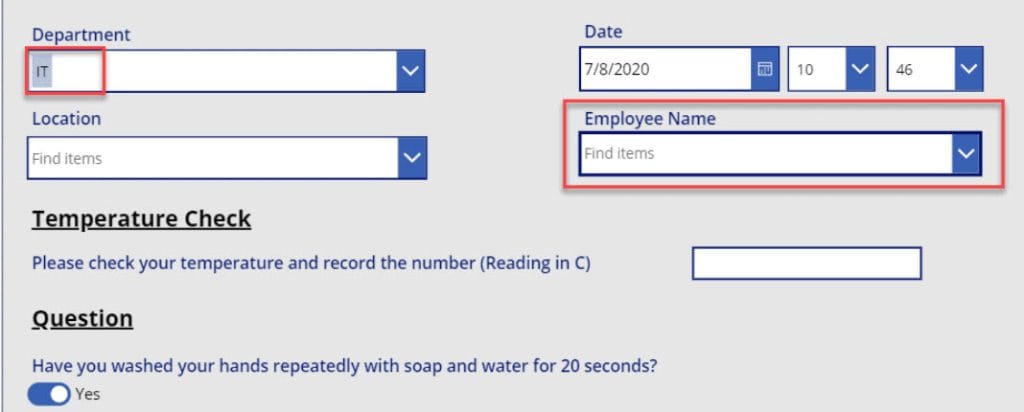
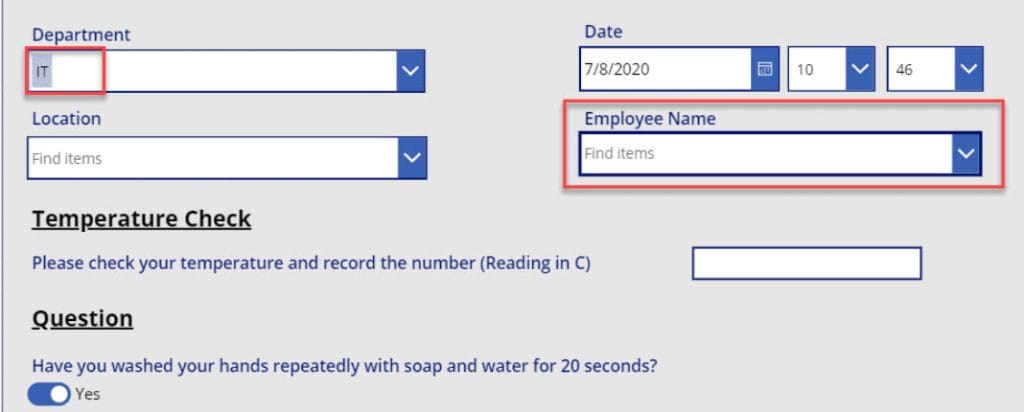
Also, Once you select any department value (Except “VISITORS”), you can see the “Employee Name” field, as shown in the screenshot below.
To achieve it, follow the below steps.
1. On the Power Apps Screen -> Insert an Edit form and set its Datasource as the respective SharePoint list. The Powerapps Edit form looks like the below screenshot:
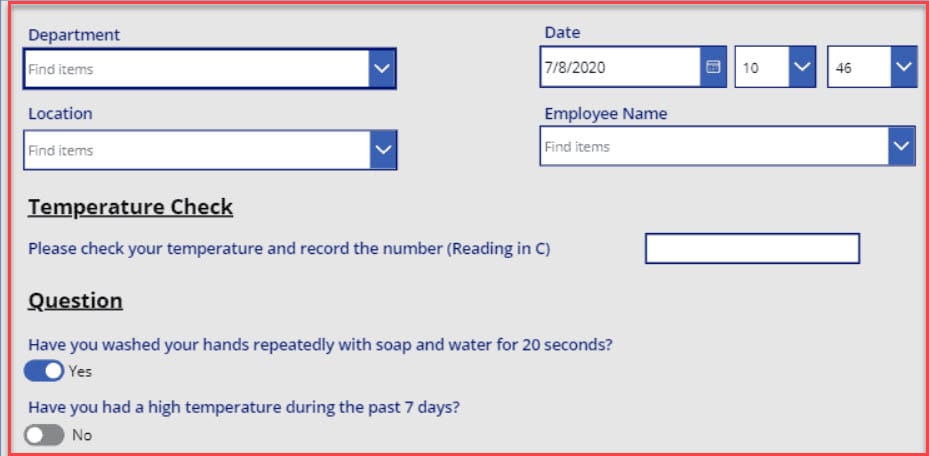
2. If you want to show the Employee Name field Data card, then select the Data card (Employee Name) and apply the below formula on its Visible property as:
Visible = If(
    drp_Departments.Selected.Value = "VISITORS",
    false,
    true
)
Where,
- drp_Departments = Power Apps Dropdown Name
- “VISITORS” = Dropdown Selected Value

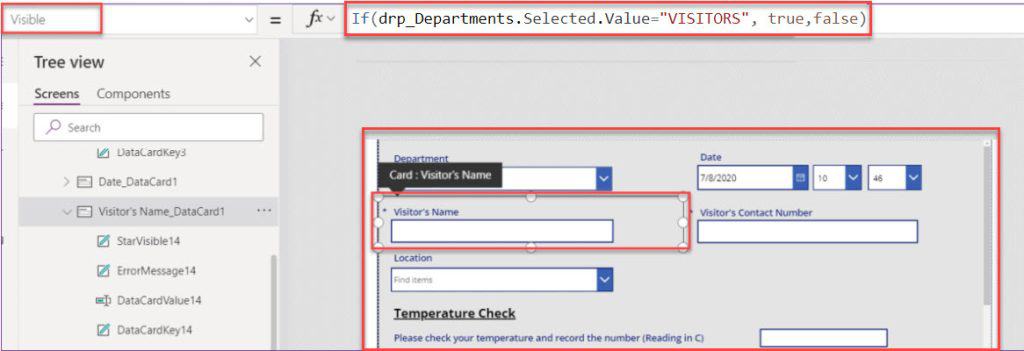
3. Similarly, If you want to display the Visitor’s Name and Visitor’s Contact Number Data card, then select the Data cards (Visitor’s Name and Visitor’s Contact Number) and apply the below formula on its Visible property to the code below.
Visible = Visible = If(
    drp_Departments.Selected.Value = "VISITORS",
    true,
    false
)
4. Save, Publish, and Preview the app. Once you select any department value (Except VISITORS), you can see the “Employee Name” field, as shown in the screenshot below.
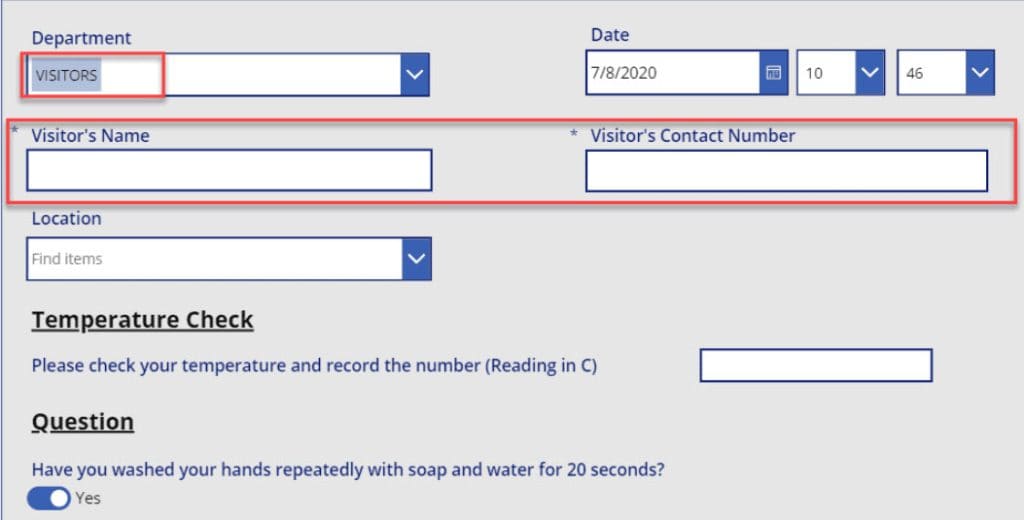
5. Similarly, Select the Department value as “VISITORS“. At the same time, you can see the “Visitors Name” and “Visitors Contact Number” fields as in the below screenshot.
This is all about the SharePoint show/hide list column based on dropdown selection.
Conclusion
This Microsoft Power Apps tutorial taught us all the information about the Power Apps hide fields based on the condition.
Here, we discussed the Power Apps visible if the dropdown equals and how to show hide fields based on the Power Apps dropdown selection. In the last, we also covered the Power Apps hide field based on the dropdown control with a simple example.
You may also like:
- How to Hide Top Navigation Bar in Power Apps
- Power Apps Show/Hide Button Based On The Current User
- Show/Hide fields in Power Apps based on yes or no
- How to Add a Blank Value to a Dropdown List in Power Apps?
I am Bijay a Microsoft MVP (10 times – My MVP Profile) in SharePoint and have more than 17 years of expertise in SharePoint Online Office 365, SharePoint subscription edition, and SharePoint 2019/2016/2013. Currently working in my own venture TSInfo Technologies a SharePoint development, consulting, and training company. I also run the popular SharePoint website EnjoySharePoint.com
Greeting Bijay Kumar –
I have tried your solution and for some reason I still get an error and the fields are invisible (for both Yes and No)
If(DataCardValue26.Selected.Value = “FPSO-Aseng”, “Alen Platform”, “Pico Basile”, “Luba Shorebase”, true)
Only the first information that is working, all the other information does not work. can someone help me? I would like the
You can use it like this:
If(DataCardValue26.Selected.Value = “FPSO-Aseng”, true, false) Or (DataCardValue26.Selected.Value = “Alen Platform”) Or (DataCardValue26.Selected.Value = “Pico Basile”) etc.
You Seperate it with the Or function ( || can also be used it is the same as Or)
what about multi select combo box?
ex: I have a combo box with 6 pie flavor options and Apple Pie and Blueberry Pie are both selected.
how to: Make Apple Pie Size text field and Blueberry Pie Size text field visible. If only Blueberry Pie is selected in combo box, hide Apple Pie Size text field and only show Blueberry Pie Size.
Hi! I don’t have any errors, but it doesn’t change or do anything when I select from the dropdown menu. The drop-down I have says yes or no, if you select yes you can see the next question, but if you select no, you will not be able to see it. This is what I use on the visible option:
Visible= If(ThisItem.’Manager Type’.Value =”Yes”,
false,
true
)