Are you interested in learning how to use a Power Apps collection GroupBy? In this Power Apps tutorial, I will explain everything related to the Power Apps collection GroupBy. Such as:
- Power Apps Collection UnGroup
- Power Apps Collection Filter GroupBy
- Working with Power Apps Collection Group Aggregate Results
Power Apps Collection GroupBy()
The Power Apps GroupBy() function is a useful tool to group records in a table based on values in one or more columns.
Moreover, we can group all the records into a single entry that could serve as a nested table within the Power Apps collection.
Power Apps GroupBy() Syntax:
GroupBy(Table, ColumnName1[ColumnName2, ... ], GroupColumnName)Where,
- Table = It is required, and it will be grouped
- ColumnName (s) = We can create a group based on the column names
- GroupColumnName = It stores the group records like a nested table
For example: I have two Power Apps collections, i.e., [colPatients] and [colDiseases], as in the screenshot below.
The first collection contains the below headers/columns.
| Column Name | Data Type |
| PatientID | Text |
| PatientName | Text |
| DateOfBirth | Date and time |
| Disease | Text |
| Doctor | Person |
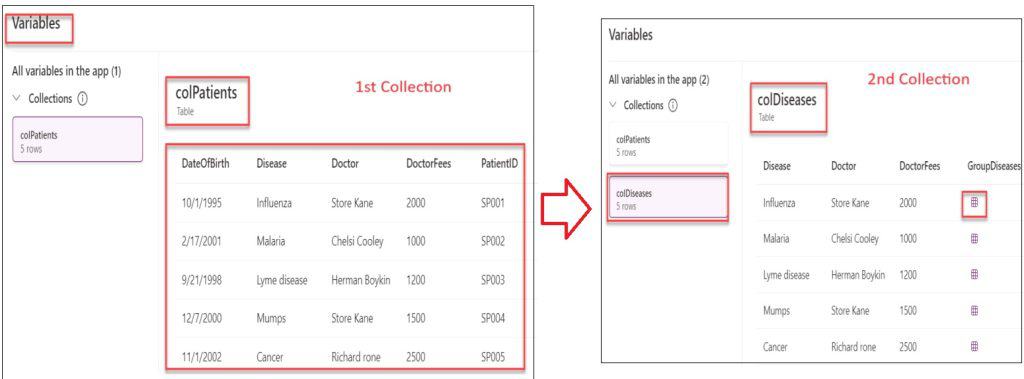
Once the nested table [GroupDiseases] is clicked, it will display the grouped records as shown below.

To work around this, follow the below-mentioned steps. Such as:
1. Open Power Apps with your credentials -> Create a Blank canvas app -> Select App object [From left navigation] and set its OnStart property to the code below.
OnStart = ClearCollect(
    colPatients,
    {
        PatientID: "SP001",
        PatientName: "Richard",
        DateOfBirth: "10/1/1995",
        Disease: "Influenza",
        Doctor: "Store Kane",
        DoctorFees: 2000,
        TotalFees: 5000
    },
    {
        PatientID: "SP002",
        PatientName: "Steven Rock",
        DateOfBirth: "2/17/2001",
        Disease: "Malaria",
        Doctor: "Chelsi Cooley",
        DoctorFees: 1000,
        TotalFees: 4000
    },
    {
        PatientID: "SP003",
        PatientName: "Lynee",
        DateOfBirth: "9/21/1998",
        Disease: "Lyme disease",
        Doctor: "Herman Boykin",
        DoctorFees: 1200,
        TotalFees: 4500
    },
    {
        PatientID: "SP004",
        PatientName: "Rosi Marky",
        DateOfBirth: "12/7/2000",
        Disease: "Malaria",
        Doctor: "Store Kane",
        DoctorFees: 1500,
        TotalFees: 5500
    },
    {
        PatientID: "SP005",
        PatientName: "Aaman Roy",
        DateOfBirth: "11/1/2002",
        Disease: "Malaria",
        Doctor: "Richard rone",
        DoctorFees: 2500,
        TotalFees: 5800
    }
)
Where,
- colPatients = Power Apps Collection Name
- PatientID, PatientName, DateOfBirth, etc… = Collection Headers/Columns
- “SP001”, “Richard”, “10/1/1995”, etc… = Collection Records/Rows
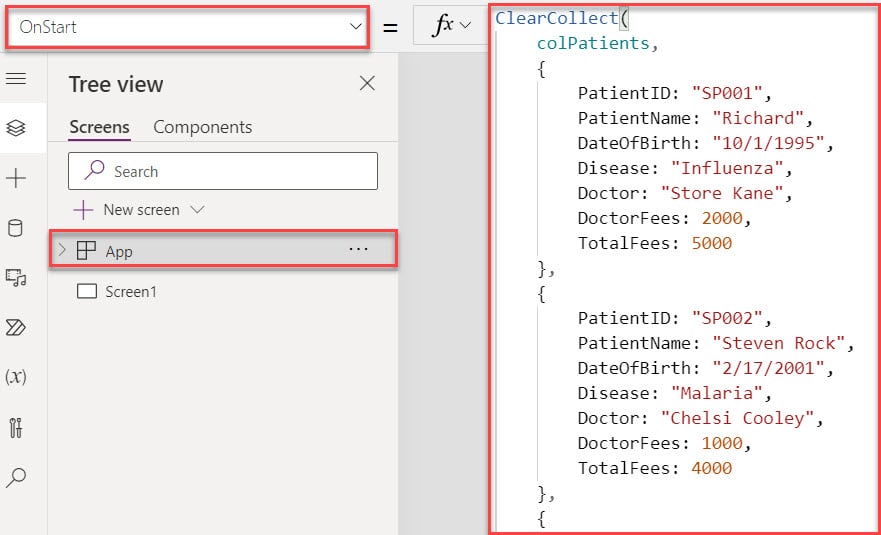
2. Next, click on the App more commands (…) option and click on the Run OnStart option to get our collection.
3. Then, go to the Variables section -> Expand Collections drop-down to find collections, as shown below.

4. Here, we need to group the two columns into a single record and add a nested table to display the records in another collection [colDiseases]. To do so, Add a Button control on the screen and set its OnSelect property to the code below:
OnSelect = ClearCollect(
    colDiseases,
    GroupBy(
        colPatients,
        "Disease",
        "Doctor",
        "DoctorFees",
        "GroupDiseases"
    )
)
Where,
- colDiseases = Collection name
- GroupBy = This function helps us to group the multiple records in a single record
- colPatients = Power Apps source collection
- “Disease”, “Doctor”, and “DoctorFees” = These are the columns which we want to group
- “GroupDiseases” = It is the name of the nested table

5. Now, Save, Publish, and Preview the app. When the user clicks on the Button control, the collection will added under the variable section.
6. Once you click on any nested table [GroupDiseases] you will get the grouped data with respected columns, as in the screenshot below.

This is all about how to use a GoupBy() function in the Power Apps collection.
Power Apps Collection Ungroup
Next, we will see how to use a Power Apps collection UnGroup with a simple example:
Example:
I will also take the same grouped collection [colDiseases] for this example. Now, Now, I want to create a collection [colDiseasesUnGroup] that ungroups the grouped record like below.

To achieve it, follow the below steps.
1. On the Power Apps Screen -> Insert a Button control and set its OnSelect property to the code below.
OnSelect = ClearCollect(
    colDiseasesUnGroup,
    Ungroup(
        colDiseases,
        "GroupDiseases"
    )
)
Where,
- colDiseasesUnGroup = Power Apps Collection Name
- Ungroup = This function returns a table to breaking the group records in a Power Apps collection
- colDiseases = It is the name of the collection [Source] that we want to ungroup
- “GroupDiseases” = It is the name of the group

2. Next, click on the button control to get the respective collection [colDisesaseUnGroup] under the variables section below.
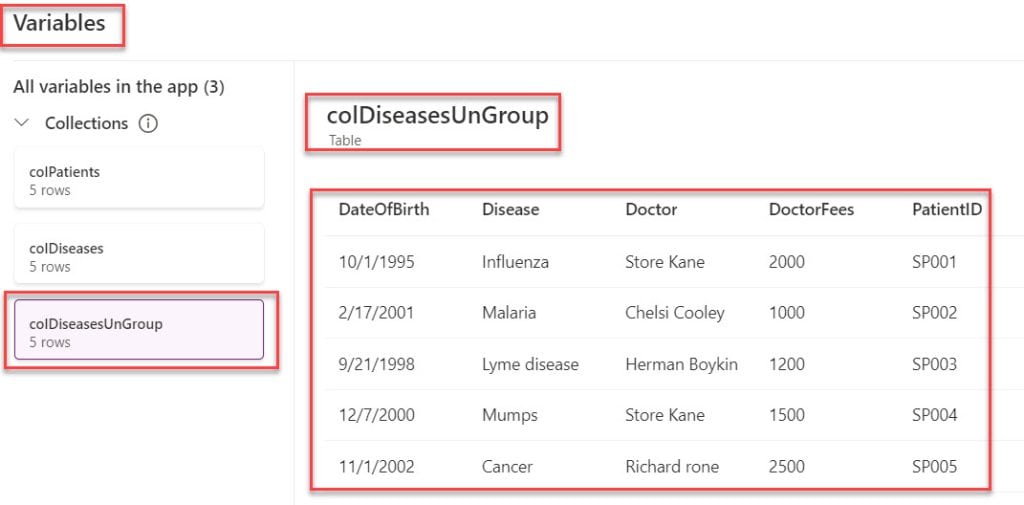
This is how to ungroup the group records from a Power Apps collection.
Power Apps Collection Filter GroupBy
Now, we will discuss filtering data on a Power Apps collection group record. Here, I will also take the same collection [colPatients].
Also, I have created another collection named “colDeseasesByFilter“. In this collection, I have different records. However, as shown below, I want to filter the “Disease” column based on a specific disease like “Malaria” as in the screenshot below.
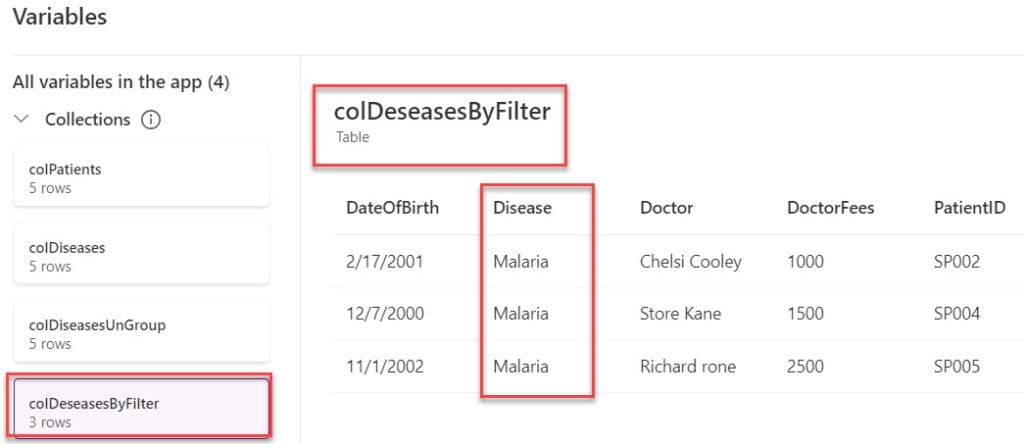
To do so, on the Power Apps Screen -> Add a Button control -> Set its OnSelect property to the code below.
OnSelect = ClearCollect(
    colDeseasesByFilter,
    Filter(
        colPatients,
        "Malaria" exactin Disease
    )
)
Where,
- colDeseasesByFilter = Name of the collection
- Filter() = This function is used to find a set of records that match one or more criteria
- colPatients = Power Apps Source Collection

Save, Publish, and Preview the app. When the user clicks on the button control, the filter collection will added under the variables section like below.
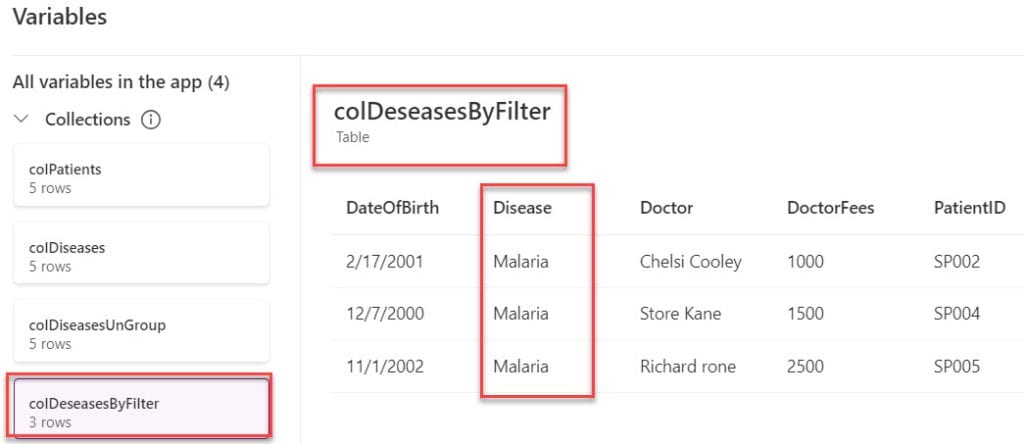
This is how to use a Power Apps collection filter GroupBy.
Power Apps Collection GroupBy Aggregate Results
In the last, I will show you how to get the Power Apps collection GroupBy aggregate results with a simple scenario:
Scenario:
I will also take the same Power Apps collection [colPatients] for this example. Now, I would like to sum up two columns, i.e., [DoctorFees, and MedicalFees], and the result will be displayed in a new column, i.e., [TotalFees].
Refer to the below screenshot:
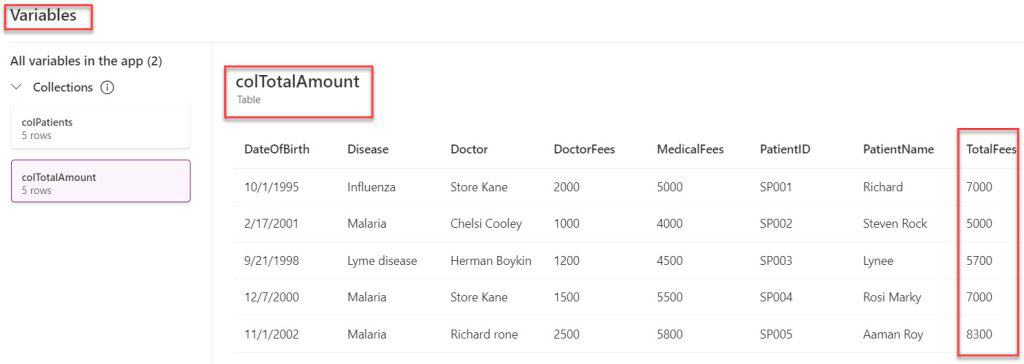
To do so, on the Power Apps Screen -> Insert a Button control and set its Items property as:
OnSelect = ClearCollect(
    colTotalAmount,
    AddColumns(
        colPatients,
        "TotalFees",
        Sum(
            DoctorFees,
            MedicalFees
        )
    )
)
where,
- colTotalAmount = Power Apps collection name
- AddColumns() = This function is to help us to create a new column for a table
- colPatients = Power Apps source collection
- “TotalFees” = Name of the new column
- Sum() = This function is used to calculate the sum arguments
- DoctorFees, and MedicalFees = These are the two columns that we want to calculate the sum

Once your app is ready, Save, Publish, and Preview the app. When the user clicks on the button control, the collection will added under the variables section with a new column, as shown below.
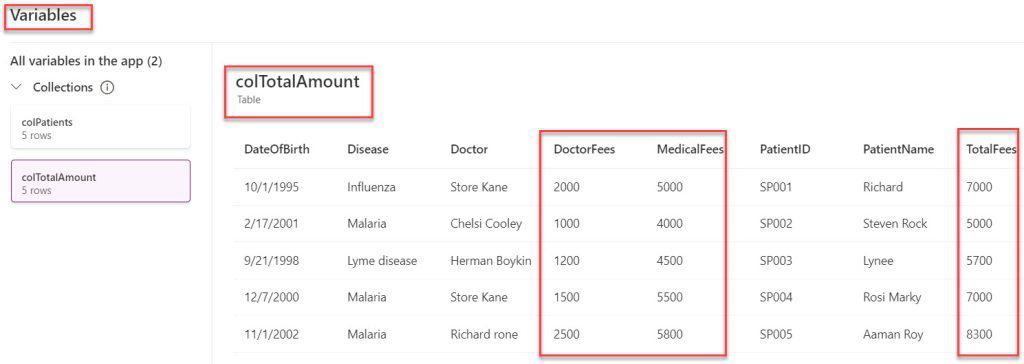
This is how to get a Power Apps collection group aggregate results.
Conclusion
I trust this Power Apps tutorial taught us all about the Power Apps collection GroupBy() function, and we saw ungroup the group record from a Power Apps collection using a Ungroup() function.
Also, we discussed how to filter group data on the Power Apps collection and how to get a Power Apps collection group aggregate results.
You may also like:
- Power Apps Save Collection to SharePoint List
- Count Rows in Power Apps Collection
- Display Power Apps Collection on Gallery
- Sort Power Apps Collection Alphabetically
I am Bijay a Microsoft MVP (10 times – My MVP Profile) in SharePoint and have more than 17 years of expertise in SharePoint Online Office 365, SharePoint subscription edition, and SharePoint 2019/2016/2013. Currently working in my own venture TSInfo Technologies a SharePoint development, consulting, and training company. I also run the popular SharePoint website EnjoySharePoint.com