Do you need to change true false to yes no in Power Automate? Then, this Power Automate tutorial will guide you to convert true to Yes and false to No in Power Automate in different ways with examples. I will also show you how to convert a boolean to a string in Power Automate.
Scenario:
The flow will trigger When an item is created in the SharePoint List, and an email will go to the Employees to check whether the details are correct or not.
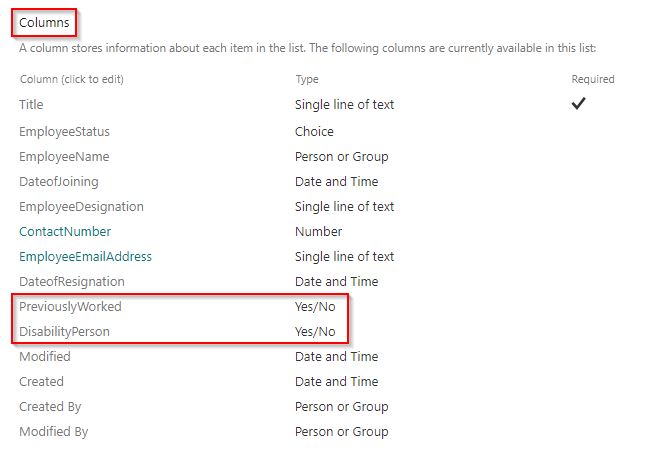
So, by default, when we get items from the SharePoint list for the Yes/No column data type, it returns the values as true or false. The screenshot below shows that the Yes/No column types (highlighted in red) are presented in my SharePoint list.
As per my requirement, I want to convert a boolean to a string and display the Yes/No fields in the email notification.
Now, we will create a flow to convert a boolean to a string using Power Automate.
Power Automate convert Boolean to String
Let us see how to convert a boolean to a string using Power Automate flow.
In this example, I am going to use the below SharePoint Employee list, consisting of different columns.

| Column Name | Column Data type |
| EmployeeID | default title column |
| EmployeeName | person or Group type |
| EmployeeDesignation | Text type |
| DateofJoining | Date type |
| EmployeeStatus | Choice type |
| ContactNumber | Number type |
| EmployeeEmailAddress | Text type |
| PreviouslyWorked | Yes/No type |
| Disablity Person | Yes/No type |
Step-1:
- Based on my requirement, the flow will trigger when an item is added to the SharePoint list. So create an automated cloud flow and choose the trigger as when an item is created.
- Expand the created trigger action and configure the required parameters.
- SharePoint Site Address – select the SharePoint site address
- List Name – I have selected my SharePoint list (Employee list)

Step-2:
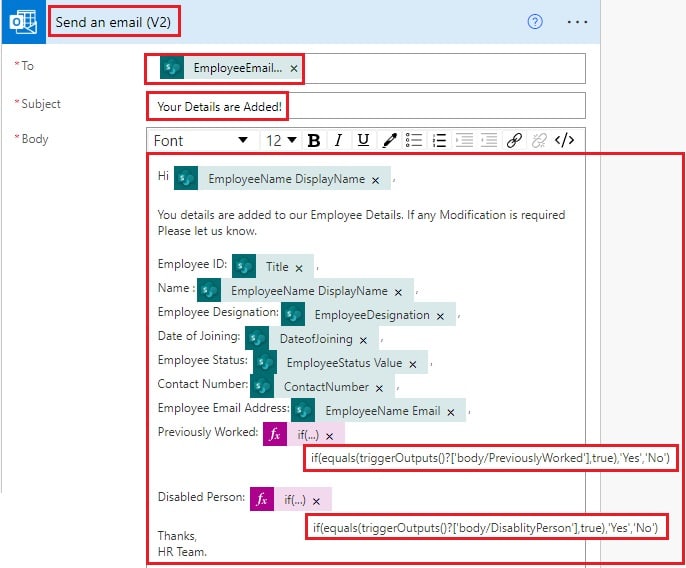
Select + new step and add a send email action from the action triggers. Provide the required parameters
- To – Pass the Employee email address from dynamic content values
- Subject – Enter the Subject of the mail
- Body – Provide the body of the mail
Here, if we directly pass the yes/no field from the dynamic content value, it returns the boolean value as true or false. So we will convert the boolean to a string and then send an email to the Employee to check whether the details are correct.
In my SharePoint list, I have two yes/no fields.
PreviouslyWorked (Yes/No type)
if(equals(triggerOutputs()?['body/PreviouslyWorked'],true),'Yes','No')where,
PreviouslyWorked = column internal name
Disability Person (Yes/No type)
if(equals(triggerOutputs()?['body/DisablityPerson'],true),'Yes','No')where,
DisablityPerson = column internal name
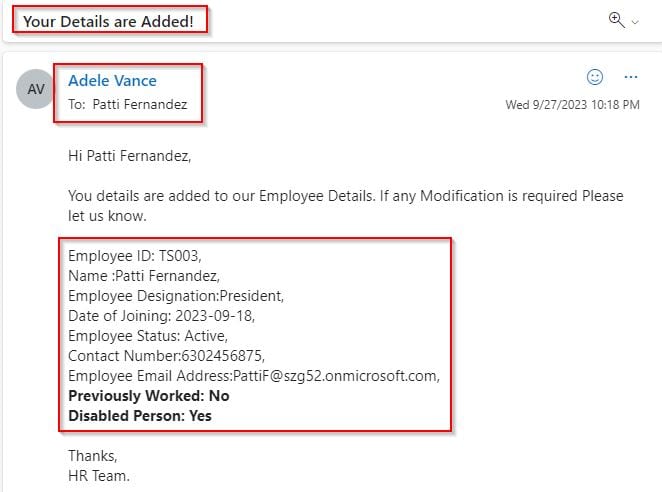
Save and Run the flow, The flow will trigger only when I add a new item to the SharePoint list. Here, I have added the highlighted list item

Once the flow runs successfully, now you can see that all the Yes/No fields will be converted from True/False values to Yes/No values, as shown below.
This is how to change true false to yes no using Power Automate flow.
Power Automate convert String to Boolean
Now, we will see how to convert String to Boolean using Power Automate flow.
We can convert yes no to a boolean using Power Automate flow in three ways. They are,
- Using If Function
- Bool function
- Condition action
Using If Function
Yes, we can easily convert the string to a boolean by using the if function in Power Automate flow. We are going to use this expression to get the string value, compare it with the required value, and finally return the corresponding boolean value.
If function syntax:
if(condition, true, false)Where the condition checks the string is Yes or No, If yes, then it returns true. If No, it returns false.
Step-1:
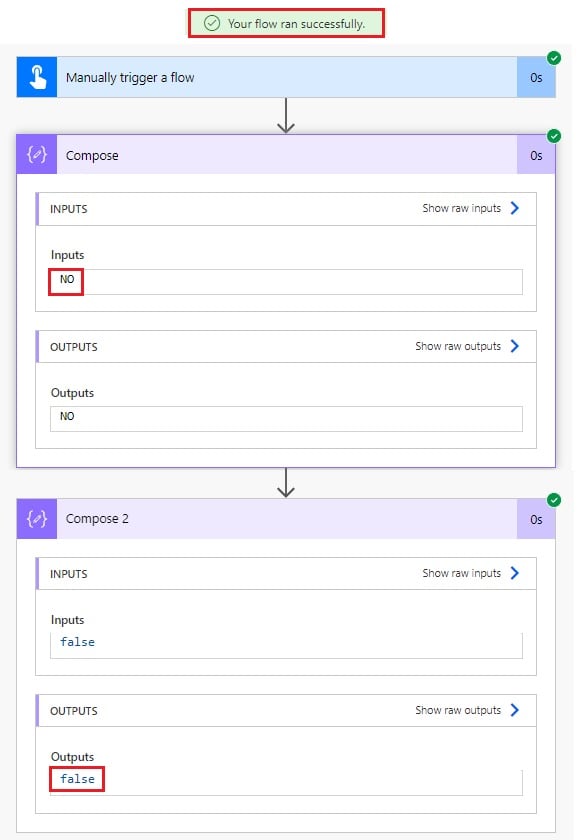
Create an instant cloud flow with a manual trigger, Add a new step, and choose the compose data operation from the action trigger. Manually pass the input value, here, I have passed the value as NO.

Step -2:
Add a new step, then select a compose data operation and pass the below expression.
- The equals function compares the value from the outputs of the compose action is equal to Yes. If yes, then the result is
trueif no it returnsfalse. - We are using the tolower() function to make the input value case-insensitive.
if(equals(toLower(outputs('Compose')),'yes'),true,false)
Save and Run the flow; once the flow runs successfully, like below, We can see that the string value no returns the boolean value false.
This is one way that we can convert String to Boolean using Power Automate flow.
Using Bool function
Here, we will see how to change yes no to true false using the bool function in Power Automate.
Step-1:
Similarly, choose the compose data operation from the action trigger in an instant cloud flow. Manually pass the input value, here, I have passed the value as Yes.

Step-2:
Select a compose data operation and pass the below expression.
- The bool function compares the value from the outputs of the compose action is equal to Yes. If yes, then the result is
trueelsefalse. - We are using tolower() function to make the input value case-insensitive.
bool(equals(toLower(outputs('Compose')),'yes'))
Save and Run the flow once the flow runs successfully, like below: We can see that the string value Yes returns the boolean value true.
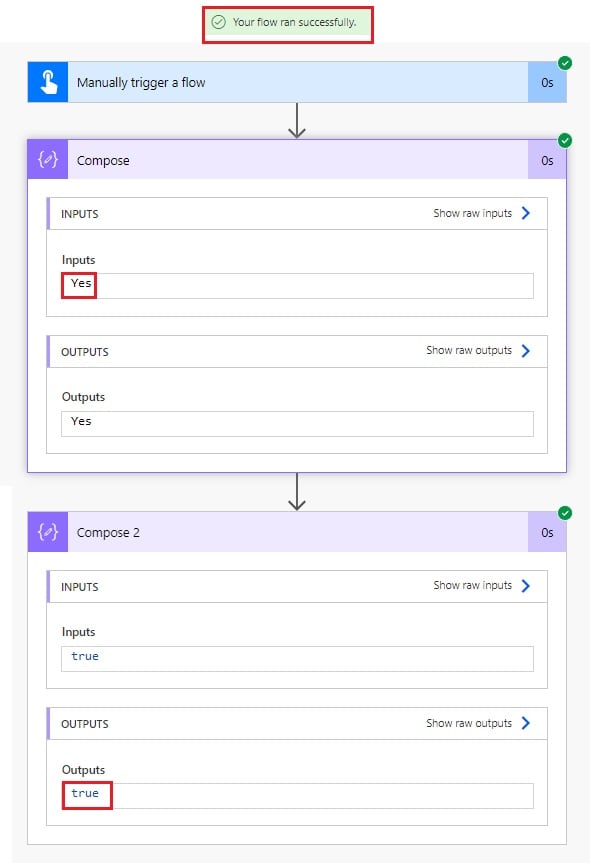
This is another way to convert String to Boolean in Power Automate flow.
Using Condition Action
Now we will learn how to change yes/no values to true or false by using condition action in Power Automate.
In this example, we are using condition action to avoid using functions or expressions in our flow. Now, we will see how we can do it.
Step-1:
Select instant cloud flow and choose the compose data operation from the action trigger. Manually pass the input value; here, I have passed the value as NO.

Step-2:
Add an Initialize variable action from the action trigger. Enter the variable name and choose the variable type as a string. Leave the value as empty. Later, we will use it in our flow to set a value to either true or false depending on the Condition action.

Step-3:
Select the condition action from the action control and check the condition if the output of the compose action is equal to no. We are using tolower() function to make the input value case-insensitive.
If the input value yes is equal to yes then it returns the boolean value true. Similarly, it checks the condition for in no is equal to yes and returns the boolean value as false.
If yes, select the set variable action, choose the initialized variable value from the dropdown, and pass the expression value as true.
If No, select the set variable action, choose the initialized variable value from the dropdown, and pass the expression value as false.
toLower(outputs('Compose')) is equal to yes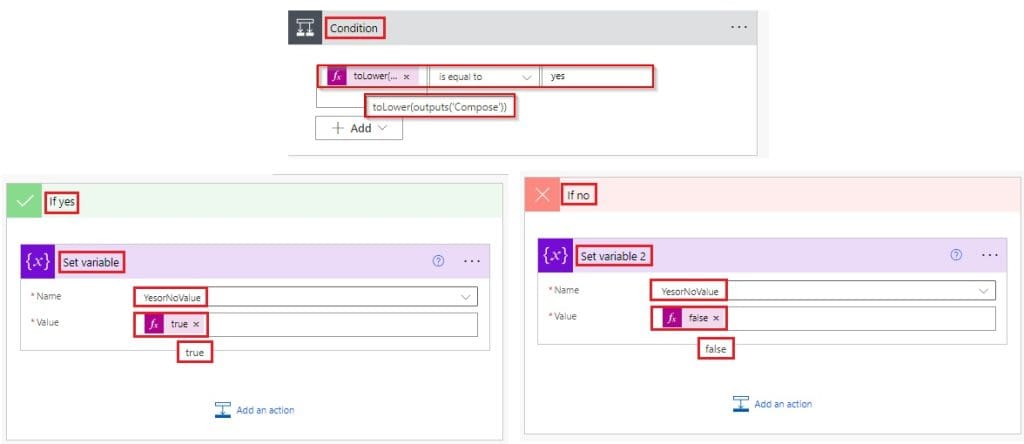
Save and Run the flow; once the flow checks, the condition runs successfully like below: We can see that the string value No returns the boolean value false.
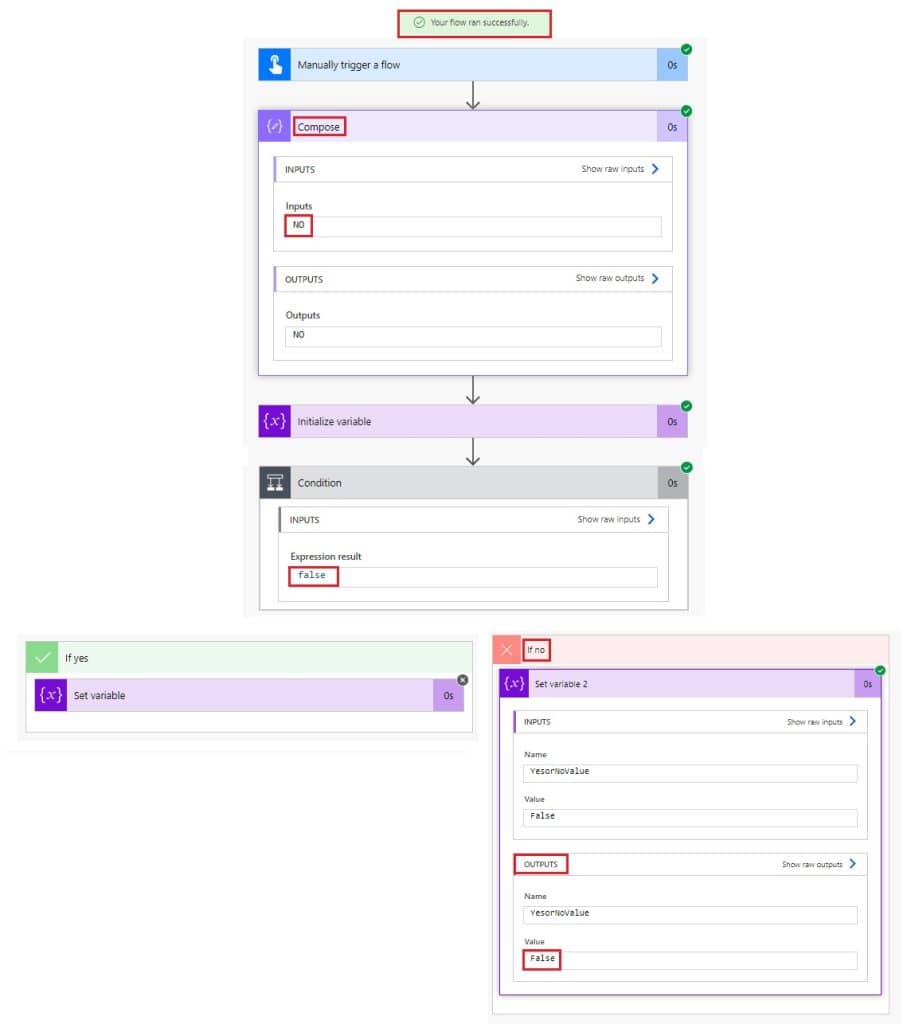
This is how to change yes/no values to true or false by using condition action to avoid expressions in Power Automate flow.
Conclusion
I hope you understand how to convert a boolean to a string and also how to convert a string to a boolean in Power Automate flow with a manual approach and a dynamic approach—also covered in different ways by using the if function and bool function and condition control to convert yes no to a boolean in a Power Automate flow.
You may like the following tutorials:
- Power Automate Delete all items in SharePoint list
- Power Automate convert time zone
- Power Automate Concatenate String
- Leave Request Approval Flow using Power Automate
I am Bijay a Microsoft MVP (10 times – My MVP Profile) in SharePoint and have more than 17 years of expertise in SharePoint Online Office 365, SharePoint subscription edition, and SharePoint 2019/2016/2013. Currently working in my own venture TSInfo Technologies a SharePoint development, consulting, and training company. I also run the popular SharePoint website EnjoySharePoint.com