While working with a Power Apps requirement, I needed to filter a Power Apps Data table control based on various SharePoint columns. Also, it’s quite easy to achieve this.
In this Power Apps article, I will explain to you how to filter data table in Power Apps using various scenarios like:
- Filter Power Apps Data table based on SharePoint Text column
- Filter Power Apps Data table based on SharePoint Choice column
- Filter Power Apps Data table based on SharePoint Multiple columns
- Filter Power Apps Data table based on ComboBox control
How to Filter Data table in Power Apps
So, let’s proceed with this one by one.
Example-1: (Filter Power Apps Data table based on SharePoint Text Column)
We will discuss filtering Power Apps data table control based on a SharePoint Text field.
The data table will filter and display the specific item information whenever a user searches for any device name in the search box.

To work around this, follow the steps below:
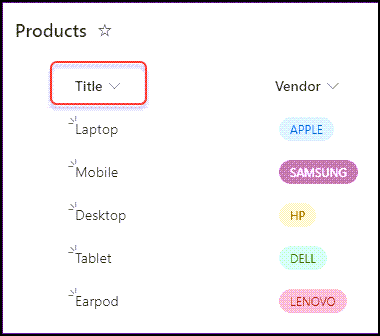
- Below is a SharePoint list called Products. This list contains two columns:
- Title = Single line of text
- Vendor = Choice [APPLE, SAMSUNG, HP, DELL, LENOVO]
- On the Power Apps screen, insert a Text input control where users can enter or search any Title like Mobile, Laptop, etc. Rename the text input control to txtSearchBox. Also, remove the text from its Default property.
- Insert a Data table control and set its Items property as:
Items = Filter(
    Products,
    Title = txtSearchBox.Text
)
Where,
- Products = SharePoint List name
- Title = Specify the SharePoint field name the user will search in the text box
- txtSearchBox = Text input control name
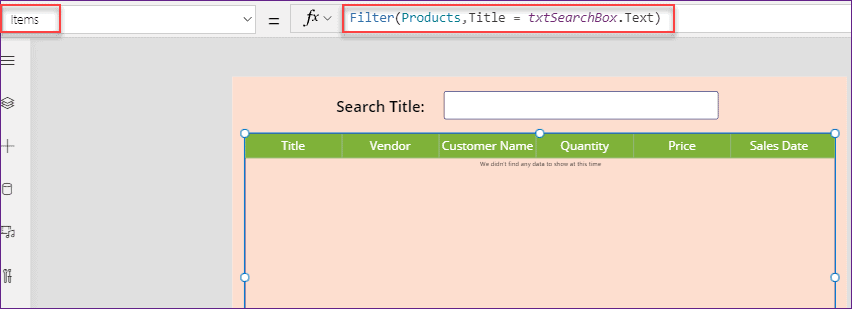
- Now save and publish the app. Search any title value (like Mobile) in the text box; then, the specific item details will be displayed in the data table.
Example-2: (Filter Power Apps Data table based on SharePoint Choice Column)
Next, we will discuss filtering Power Apps data table control based on a SharePoint choice column.
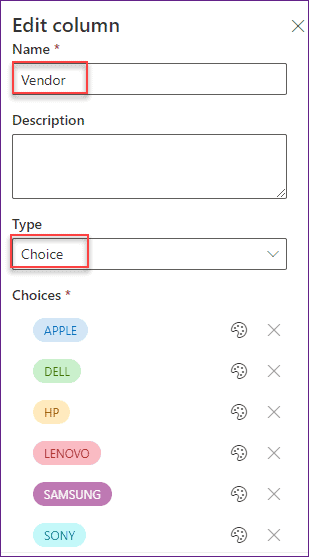
- As discussed in the SharePoint list [Products] above, there is a Vendor column with various choices, like APPLE, DELL, HP, LENOVO, etc.
- The data table will filter and show the specific vendor details when a user chooses a name [suppose DELL] from the dropdown menu, as shown below.
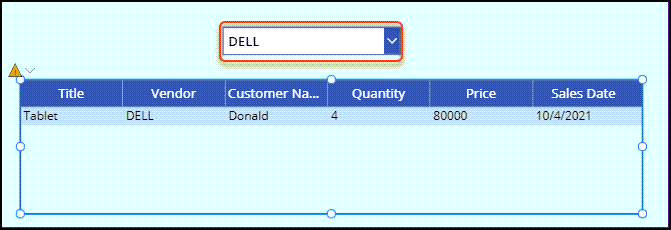
- To achieve this, insert a Power Apps Dropdown control and set its Items property as:
Items = Choices(Products.Vendor)Where,
Vendor = SharePoint Choice field

- Next, add a Data table and apply the code below on its Items property as:
Items = Filter(
    Products,
    Dropdown1.SelectedText.Value in Vendor.Value
)
Where,
Dropdown1 = Dropdown control name

- Save, publish, and preview the app. The vendor information will be filtered and displayed in the data table once you select a name from the dropdown menu.
Example-3: (Filter Power Apps Data table based on SharePoint Multiple Columns)
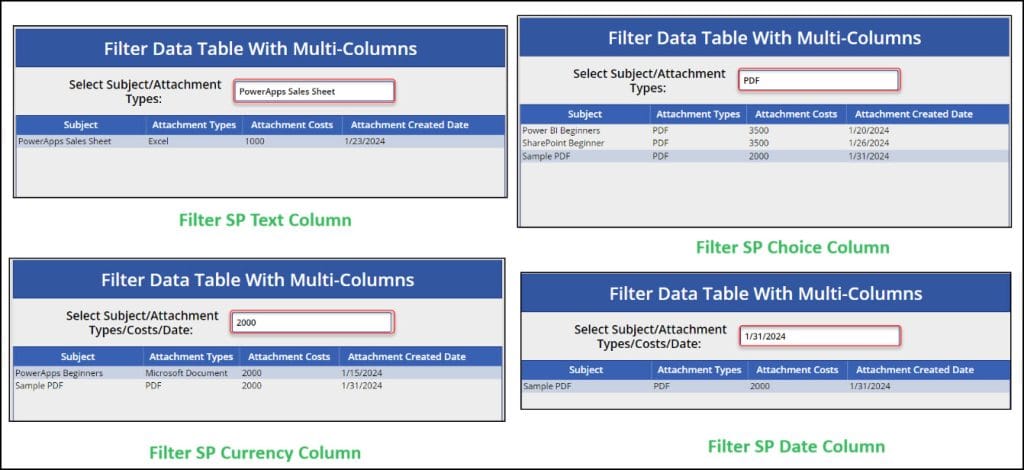
We can filter the Power Apps Data table control using multiple SharePoint columns [with different data types]. To do so, check this scenario below:
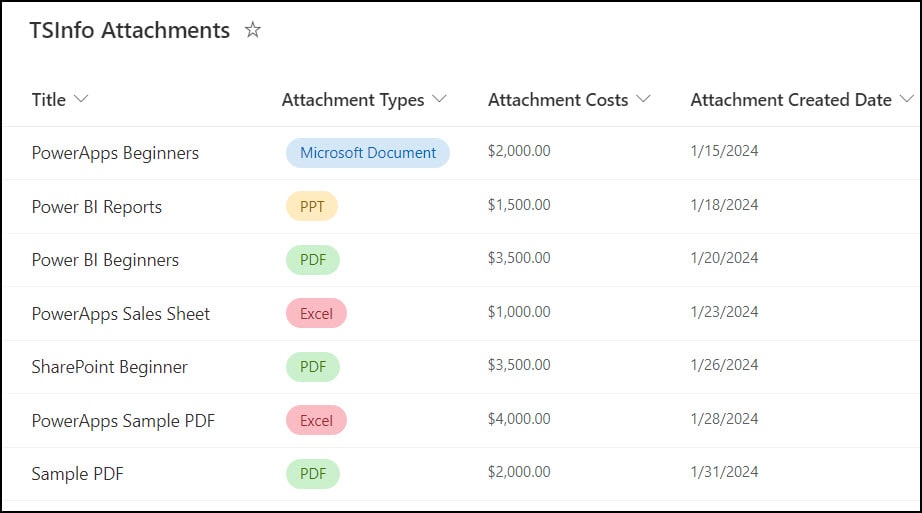
- There is a SharePoint list named TSInfo Attachments. This list has these many columns below with various data types:
| Column | Data type |
|---|---|
| Title | Single line of text |
| Attachment Types | Choice [PPT, PDF, Excel, Microsoft Document] |
| Attachment Costs | Currency |
| Attachment Created Date | Date and time |
- In Power Apps, there is a Text input and Data table control. A user will search for any text/item (from the Sharepoint list) in the search box; then the data table will filter accordingly.
- To achieve this, add a Data table control and set its Items property as:
Items = Search(
    AddColumns(
        'TSInfo Attachments',
        "AttachmentCreated",
        Text(
            'Attachment Created Date',
            DateTimeFormat.ShortDate
        ),
        "AttachmentType",
        'Attachment Types'.Value,
        "Attachment Cost",
        Text('Attachment Costs')
    ),
    txtSearchBox.Text,
    "Title",
    "AttachmentType",
    "Attachment Cost",
    "AttachmentCreated"
)
Where,
- “AttachmentCreated”, “AttachmentType”, “Attachment Cost” = New Column Names
- ‘Attachment Created Date’ = SharePoint Date column
- ‘Attachment Types’ = SharePoint Choice column
- ‘Attachment Costs’ = SharePoint Currency column

This way, we can filter the Power Apps Data table control with SharePoint multiple columns.
Example-4: (Filter Power Apps Data table based on ComboBox Control)
This example will discuss filtering Power Apps Data table control based on a Combo box control.
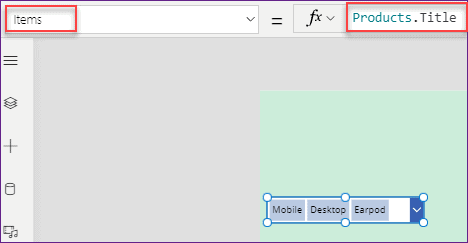
- The image below shows a Power Apps Combo box control with some items. A user can filter and view specific selected item details in the data table by selecting multiple items from the combo box.

For this example, I have taken the above SharePoint list named Products.
- On the Power Apps screen, add a Combo box control and set its Items property as: [Make sure its Multiselect option should be enabled]
Items = Products.TitleWhere,
Title = Specify the SharePoint column name the user selects from the combo box.
- Next, Insert a Data table and apply the below formula on its Items property:
Items = Filter(
    Products,
    Title in ComboBox1.SelectedItems
)
Where,
ComboBox1 = Combo box control name
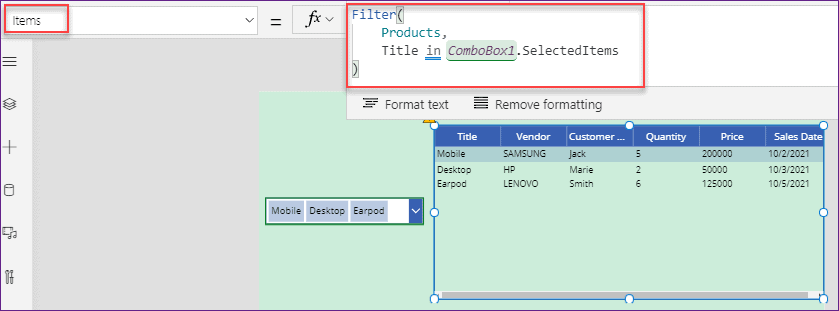
- Save, publish, and preview the app. Once you select one or more items in the combo box, the data table control will display the filtered result.
Conclusion
Now I hope you got some clarity on how to filter a Power Apps Data table control based on various scenarios like:
- How to filter Power Apps Data table based on SharePoint Text field
- Filtering Power Apps Data table based on SharePoint Choice field
- Filter Power Apps Data table based on SharePoint multiple columns
- Power Apps filter Data table based on ComboBox control
Also, you may like some more Power Apps tutorials:
- Power Apps Data Table URL
- Power Apps Data Table Conditional Formatting
- Add a Blank Value to a Dropdown List in Power App
- Power Apps Lookup SharePoint List
I am Bijay a Microsoft MVP (10 times – My MVP Profile) in SharePoint and have more than 17 years of expertise in SharePoint Online Office 365, SharePoint subscription edition, and SharePoint 2019/2016/2013. Currently working in my own venture TSInfo Technologies a SharePoint development, consulting, and training company. I also run the popular SharePoint website EnjoySharePoint.com