Are you new to Power Apps and waiting to learn how to add column in Power Apps Collection? No worries!
This Power Apps tutorial will teach all the information about Power Apps AddColumns() and how to add a column in the Power Apps collection.
Here, we will discuss how to add a column to an existing Power Apps collection or add a column from another Power Apps collection.
Power Apps AddColumns()
Power Apps AddColumns() function helps to add a column to a table or collections and a formula defines the values in that column.
Syntax:
AddColumns( Table, ColumnName1, Formula1 [, ColumnName2, Formula2, ... ] )Where,
- Table = Specify the Table to operate on.
- ColumnName(s) = It is Required. Provide the Name(s) of the column(s) to add. You must specify a string for this argument.
- Formula(s) = Specify the Formula(s) to evaluate for each record. The result is added as the value of the corresponding new column.
How to Add Column in Power Apps Collection
Now, we will see how to add a column in the Power Apps collection with a simple example.
Example:
I have a Power Apps collection named “colProductDetails” containing the below columns.
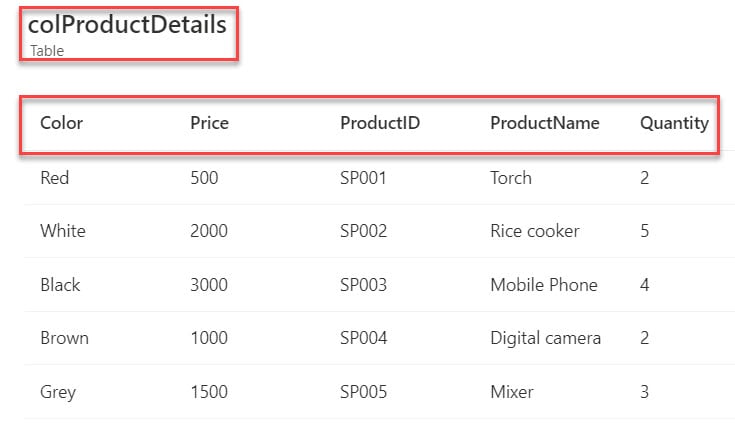
I would like to add a column [TotalAmount] in the collection using the AddColumns() function, as in the screenshot below.
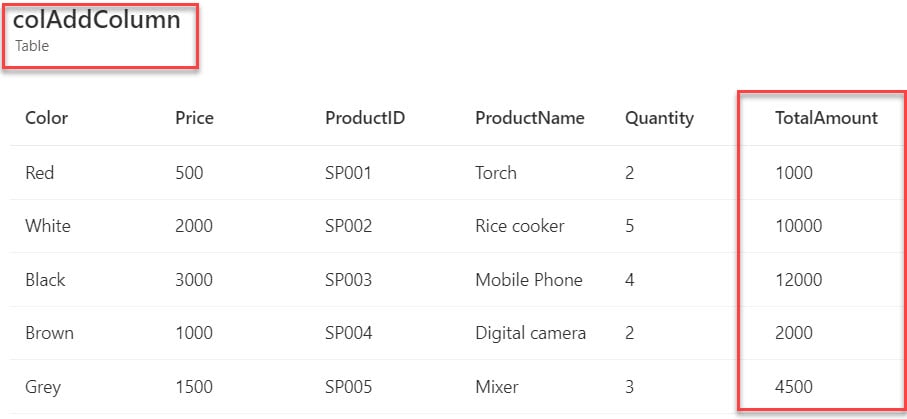
To work around this example, follow the below steps. Such as:
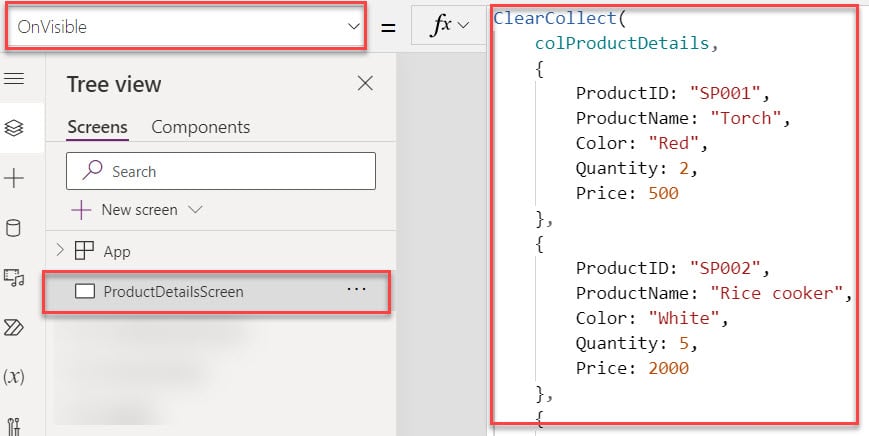
1. Create a Blank canvas app -> Select Power Apps Screen [ProductDetailsScreen] and set Its OnVisible property to the code below.
OnVisible = ClearCollect(
    colProductDetails,
    {
        ProductID: "SP001",
        ProductName: "Torch",
        Color: "Red",
        Quantity: 2,
        Price: 500
    },
    {
        ProductID: "SP002",
        ProductName: "Rice cooker",
        Color: "White",
        Quantity: 5,
        Price: 2000
    },
    {
        ProductID: "SP003",
        ProductName: "Mobile Phone",
        Color: "Black",
        Quantity: 4,
        Price: 3000
    },
    {
        ProductID: "SP004",
        ProductName: "Digital camera",
        Color: "Brown",
        Quantity: 2,
        Price: 1000
    },
    {
        ProductID: "SP005",
        ProductName: "Mixer",
        Color: "Grey",
        Quantity: 3,
        Price: 1500
    }
);
Where,
- colProductDetails = Power Apps Collection Name
- ProductID, ProductName, etc… = Collection Headers/Columns
- “SP001”, “Torch”, “Red”, etc… = Collection Records/Rows
2. I want to add another column in the collection using this source collection. To do so, use this collection in the Screen’s OnVisible property, as shown below.
OnVisible = ClearCollect(
    colAddColumn,
    AddColumns(
        colProductDetails,
        "TotalAmount",
        ThisRecord.Quantity * ThisRecord.Price
    )
)
Where,
- colAddColumn = New collection name
- AddColumns() = This function helps to add a column to a table or collections
- colProductDetails = Power Apps source collection
- “TotalAmount” = New column name
- ThisRecord.Quantity * ThisRecord.Price = We can multiply these two columns to get new column records

3. Save, Publish, and Reload the app to get this collection. Then, insert a Data table to display the Power Apps collection and set its Items property as:
Items = colAddColumn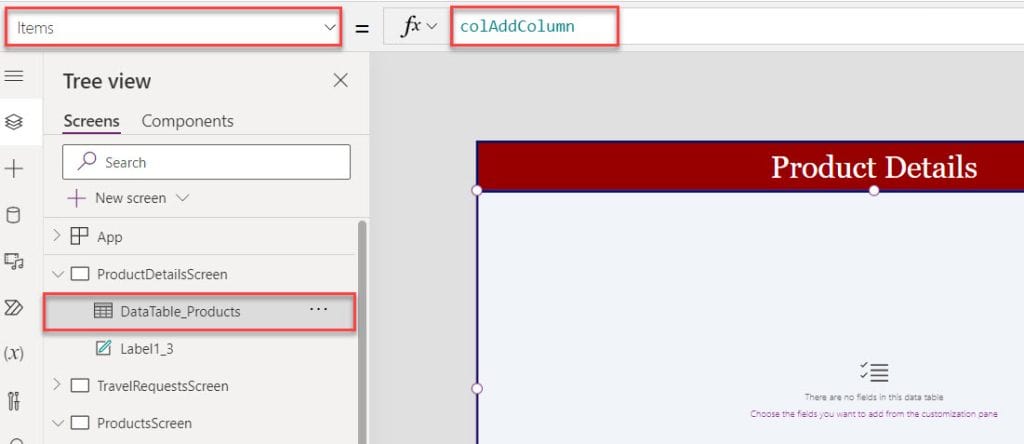
4. Next, to display the collection fields on a data table, click the Edit fields option, choose your respective fields, and click the Add button below.
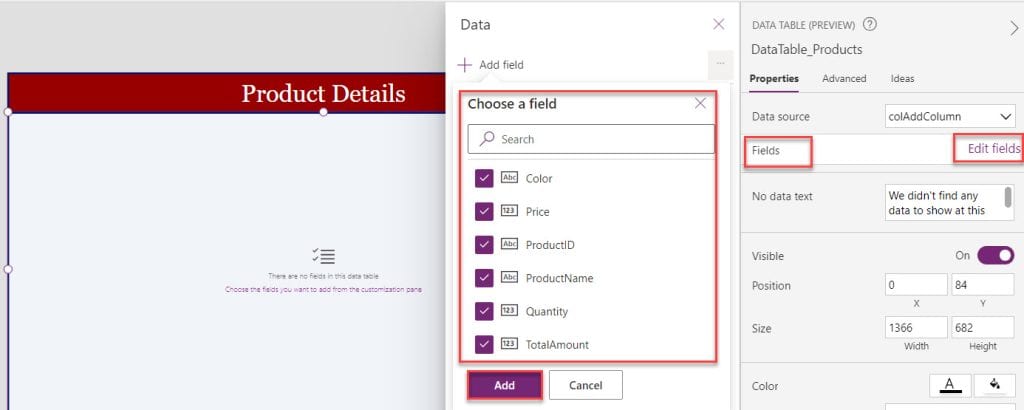
5. Once, you added collection fields, the data table will display all the records with respective columns.

6. If you want to find the final collection, go to the Variables section, click the Collections drop-down, and select a respective collection [colAddcolumn] like below.
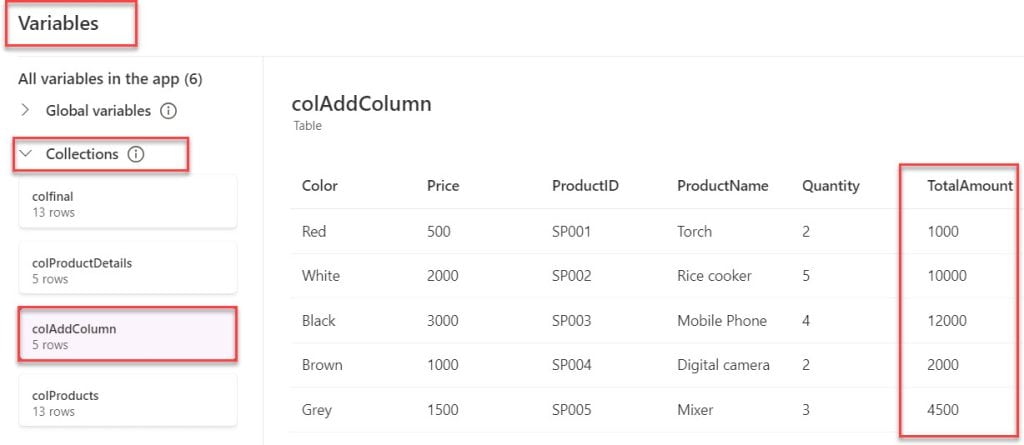
This is how to add a column in the Power Apps collection.
Add Column to Existing Power Apps Collection
Next, we will discuss how to add a column to an existing Power Apps collection or add a column from another Power Apps collection with a simple scenario:
Scenario:
I have two Power Apps Collections, i.e., colProductDetails and colProducts. The first collection [colProductDetails] has the below headers/columns:
- ProductID
- ProductName
- ProductColor
The second collection [colProducts] has the below columns:
- ProductID
- ProductPrice
Refer to the below screenshot:
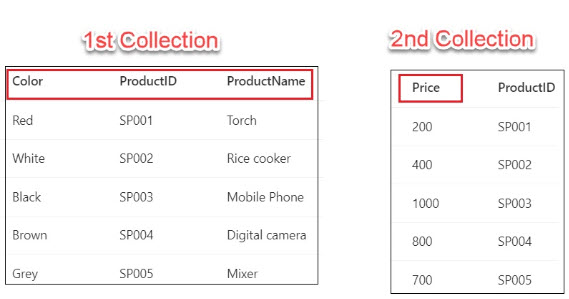
Now, I want to look up this Price column to the 1st collection, i.e. [colProductDetails], and the result will be stored in a new collection, i.e. [colFinal]. Refer to the table below:
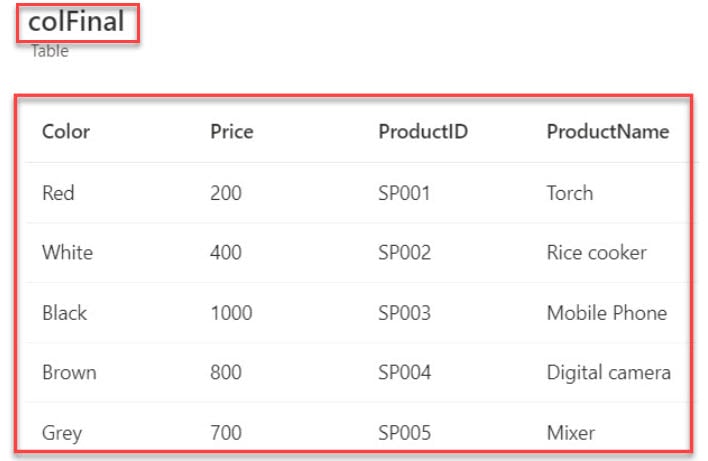
To achieve the above example, follow the below-mentioned steps. Such as:
1. Open the Power Apps app -> select the App (from the left navigation) and choose the OnStart property to create collections like the below:
OnStart = ClearCollect(colProductDetails,{ProductID:"SP001",ProductName:"Torch",Color:"Red"},{ProductID:"SP002",ProductName:"Rice cooker",Color:"White"},{ProductID:"SP003",ProductName:"Mobile Phone",Color:"Black"},{ProductID:"SP004",ProductName:"Digital camera",Color:"Brown"},{ProductID:"SP005",ProductName:"Mixer",Color:"Grey"});
ClearCollect(colProducts,{ProductID:"SP001",Price:200},{ProductID:"SP002",Price:400},{ProductID:"SP003",Price:1000},{ProductID:"SP004",Price:800},{ProductID:"SP005",Price:700})
Where,
- colProductDetails= Power Apps Collection Name
- colProducts = Second Collection Name

2. Next, click on the More commands (…) option and click on the Run OnStart option to get our collection.
3. Then, go to the Variables section (x) -> Select Collections drop-down to find collections, as shown below.
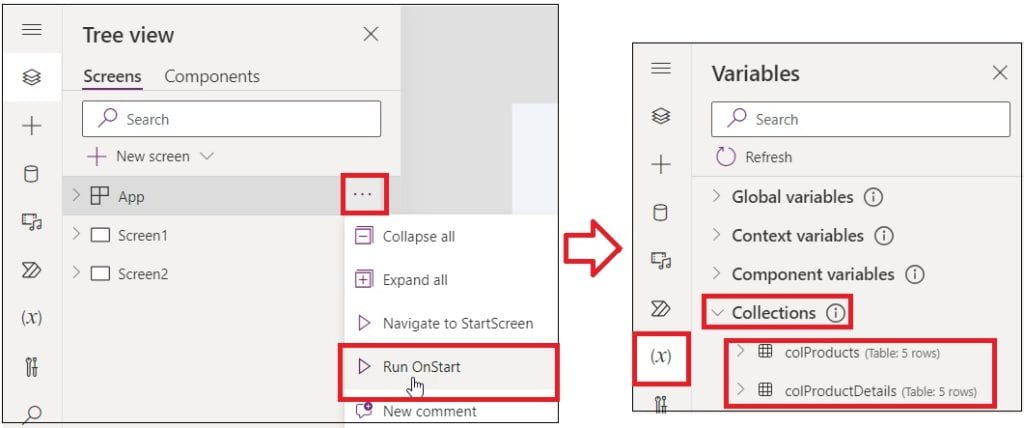
4. To see your created collections, click the View Table option and select the respective collection like below.

5. Here, we must add a column in the respective collection (colProductDetails) based on the lookup column in another collection (colProducts).
6. To do so, insert another screen -> add a Button control -> Set its OnSelect property to the code below:
OnSelect = ClearCollect(
    colFinal,
    AddColumns(
        colProductDetails,
        "Price",
        LookUp(
            colProducts,
            ProductID = colProductDetails[@ProductID],
            Price
        )
    )
)
Where,
- colFinal = You can set a collection to add a lookup column
- colProductDetails = It is 1st name of the Power Apps collection
- “Price” = This is the lookup column I want to add to the 1st collection
- LookUp = You can use this function to find a record matching one or more criteria
- colProducts = It is 2nd name of the Power Apps collection
- ProductID = This is a lookup column that we used in both collections

7. Then, insert a Data table and set its Items property as:
Items = colFinal8. Also, you can add some collection fields from the Edit fields option [from the Properties pane].

9. Now, click on the button control to display the records and especially, and we can get the price column from another collection, as in the screenshot below.
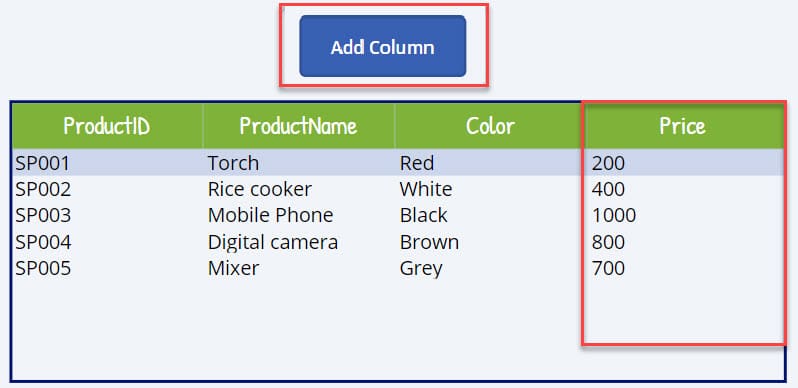
This is all about how to add a column to an existing Power Apps collection or add a column from another Power Apps collection.
Conclusion
I hope this Power Apps tutorial taught in detail information on how to add a column in the Power Apps collection.
Also, we discussed how to add a column to an existing Power Apps collection or add a column from another Power Apps collection.
Additionally, you may like some more Power Apps tutorials:
- Display Power Apps Collection on Gallery
- How to Sort Power Apps Collection Alphabetically
- Create Empty Collection in Power Apps
I am Bijay a Microsoft MVP (10 times – My MVP Profile) in SharePoint and have more than 17 years of expertise in SharePoint Online Office 365, SharePoint subscription edition, and SharePoint 2019/2016/2013. Currently working in my own venture TSInfo Technologies a SharePoint development, consulting, and training company. I also run the popular SharePoint website EnjoySharePoint.com