PowerShell is a powerful scripting language that enables administrators and developers to automate tasks, manage systems, and access data quickly and efficiently. Visual Studio Code (VS Code) is a popular code editor that supports various programming languages, including PowerShell. Combining PowerShell and VS Code provides a user-friendly scripting and debugging environment, making creating and maintaining scripts easier.
Running a PowerShell script in Visual Studio Code requires just a few steps. First, ensure that the PowerShell extension is installed, which provides a solid foundation for editing and debugging PowerShell scripts. Once the extension is in place, users can create, edit, and execute PowerShell scripts directly within the VS Code environment.
Using PowerShell in Visual Studio Code offers numerous advantages, such as syntax highlighting, integrated terminal, code execution with a single click or keyboard shortcut, and the powerful IntelliSense feature. This combination simplifies the PowerShell scripting process and empowers users with the necessary tools to create efficient, reliable, and readable scripts.
Setting Up Visual Studio Code for PowerShell
Installing Visual Studio Code
To begin, download and install Visual Studio Code on your computer. It is available for Windows, macOS, and Linux operating systems. Once you have completed the installation, launch Visual Studio Code to ensure it is running correctly.
Installing PowerShell Extension
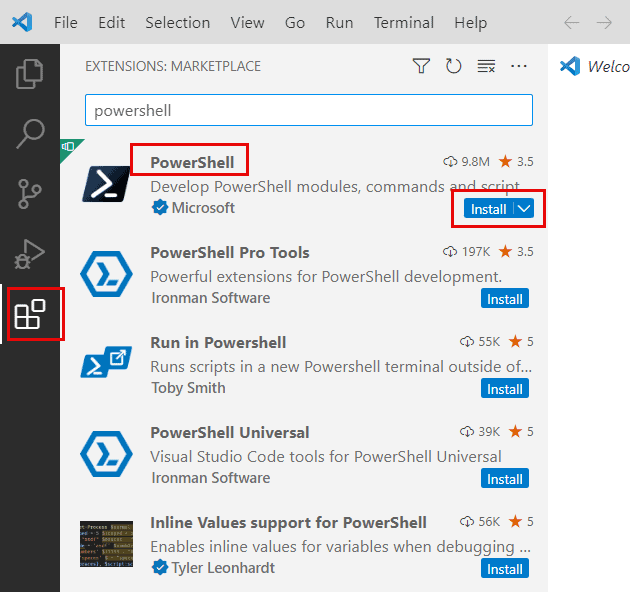
In order to run PowerShell scripts in Visual Studio Code, you need to install the PowerShell Extension. Follow these steps:
- Open Visual Studio Code.
- Click on the Extensions icon located on the left sidebar or use the keyboard shortcut
Ctrl+Shift+Xto open the Extensions view. - In the search box, type
PowerShell. The PowerShell extension should appear in the search results. - Click the Install button next to the extension.
Check out the screenshot below:

With the PowerShell extension installed, Visual Studio Code has now been set up to run PowerShell scripts. You’ll have access to features such as syntax highlighting, IntelliSense for cmdlets, debugging, and more. To learn more about PowerShell development in Visual Studio Code, check out this article on Using Visual Studio Code for PowerShell Development.
Running a PowerShell Script using Visual Studio Code
In this section, we will discuss how to create and execute a PowerShell script in Visual Studio Code (VSCode).
Creating a PowerShell Script
To start creating a PowerShell script in VSCode, follow these steps:
- Install VSCode: Download and install Visual Studio Code from the official website.
- Install the PowerShell Extension: Open VSCode, press
Ctrl+Shift+Xto open the Extensions view, search for “PowerShell”, and install the PowerShell extension. - Create a New File: Press
Ctrl+Nor go to File > New File to create a new file. - Save the File: Press
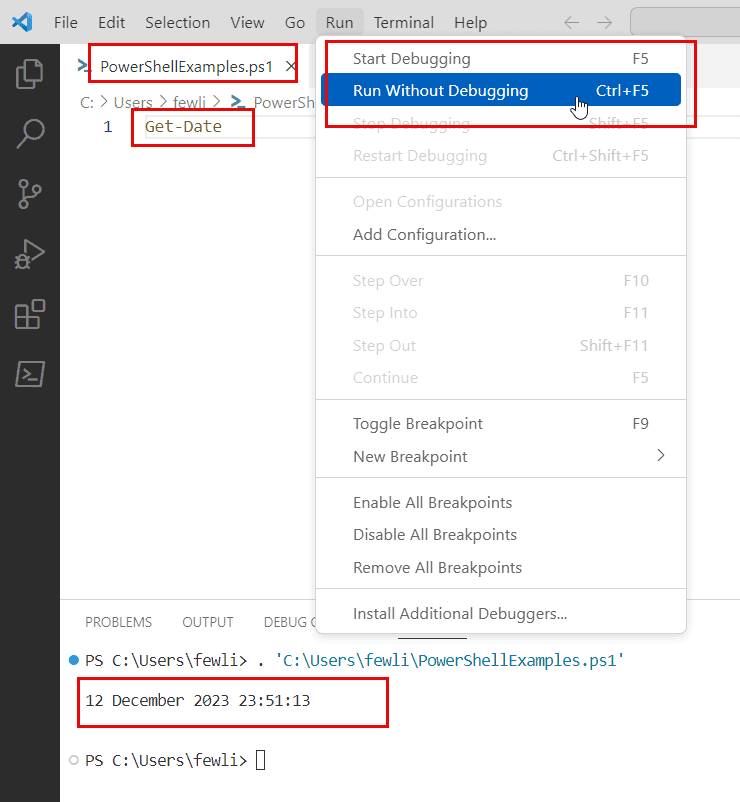
Ctrl+Sor go to File > Save As and choose a location to save the file. Name the file with a.ps1extension (e.g., PowerShellExamples.ps1), which denotes a PowerShell script.
Check out the screenshot below:

You can start writing the code now that you have created a PowerShell script. Use the features offered by the PowerShell extension, such as syntax highlighting, IntelliSense, and code snippets, to make scripting easier.
Executing the Script
Once you have written your PowerShell script, you can execute it in VSCode. There are two primary ways to run a PowerShell script in VSCode:
- F5 (Debug): Press
F5to start debugging the script. This will open the integrated terminal and allow you to step through the code, set breakpoints, and inspect variables. The PowerShell extension documentation provides detailed information on using the debugger. - Ctrl+F5: Run without debugging.
- F8 (Run Selection): If you just want to run a specific part of your script, you can highlight the code you want to execute and press
F8. This will run the selection in the integrated terminal.
By following these steps, you can create and execute a PowerShell script using Visual Studio Code, taking advantage of its powerful features to make the process more efficient and straightforward.
Configuring the PowerShell Environment
Setting Execution Policies
Before running PowerShell scripts in Visual Studio Code, it’s essential to configure the execution policy. The execution policy determines the level of security applied to the scripts. There are four main execution policy settings:
- Restricted: No scripts are allowed to execute. This is the default setting.
- AllSigned: Only scripts signed by a trusted publisher are allowed to run.
- RemoteSigned: Scripts created locally are allowed to run, while those from remote sources must be signed.
- Unrestricted: All scripts are allowed to execute regardless of their source.
To set the execution policy for the current user, open the integrated terminal in Visual Studio Code (press Ctrl + ~) and run the following command:
Set-ExecutionPolicy -Scope CurrentUser -ExecutionPolicy RemoteSignedThis command sets the execution policy to “RemoteSigned” for the current user. Replace “RemoteSigned” with the desired policy. Remember also to configure the settings for launching PowerShell in vscode.
Customizing the Integrated Console
Visual Studio Code offers a convenient integrated console for running PowerShell scripts. Users can customize the console to suit their preferences. For example, the Shell Launcher Extension in Visual Studio Code allows users to define keybinding shortcuts to open or switch between multiple shell instances.
To customize the integrated console, follow these steps:
- Install the Shell Launcher Extension by opening the Extensions view (
Ctrl + Shift + X), searching for “shell launcher,” and clicking “Install.” - Create a key binding by navigating to
File > Preferences > Keyboard Shortcuts, selecting “keybindings.json,” and adding the desired shortcut. An example shortcut might be:
{
  "key": "ctrl+shift+t",
  "command": "shellLauncher.launch"
}
For more in-depth customization, users can modify the settings of the PowerShell extension for Visual Studio Code. Options include changing the integrated console font, controlling script output formatting, and more. With a properly configured PowerShell environment, users can confidently develop and execute scripts within Visual Studio Code.
Troubleshooting Common Issues
Debugging Scripts
When working with PowerShell scripts in Visual Studio Code, it is common to encounter issues during debugging. To resolve such issues, set a breakpoint on the problematic line of code using F9. Launch the debugger by pressing F5.
Visual Studio Code provides an integrated debugging experience by offering variables, watch, and call stack views found on the left-hand side of the editor. Take advantage of these features to inspect your code and identify issues.
If you are new to debugging in Visual Studio Code, you can refer to this Visual Studio Code Debugging guide.
Handling Execution Errors
When running PowerShell scripts in Visual Studio Code, various errors may occur due to incorrect syntax or unexpected issues. To investigate and fix these errors, follow these steps:
- Examine error messages: Carefully read the error message displayed in the terminal. It often points to the problematic line of code or provides details on what went wrong.
- Use PSScriptAnalyzer: PSScriptAnalyzer is a built-in static analysis tool for PowerShell scripts in Visual Studio Code. Press CTRL+SHIFT+P, search for “PSScriptAnalyzer Rules,” and press Enter to configure the rules to identify problematic parts of the script.
- Check for known issues: Sometimes, Visual Studio Code may exhibit unexpected behavior, such as not running the current version of the script. Review Stack Overflow questions and the GitHub repository for the PowerShell extension to determine if a solution has already been suggested.
By following these steps and using the powerful features of Visual Studio Code and the PowerShell extension, you can efficiently troubleshoot common issues and improve your scripting experience.
Conclusion
Running PowerShell scripts in Visual Studio Code offers a streamlined and efficient way to leverage the capabilities of PowerShell within a powerful and versatile editor. You can greatly enhance your scripting and development workflow by installing the PowerShell extension, configuring your settings, and understanding the basics of running scripts within the VS Code environment.
Integrating PowerShell in Visual Studio Code provides a robust platform for writing, testing, and debugging PowerShell scripts, ultimately making your scripting tasks more manageable and productive. I hope you know how to run the PowerShell script using Visual Studio Code.
You may also like:
- How to loop through a PowerShell array
- How to create and use PowerShell ArrayList
- How to create an array in PowerShell from CSV file
- How to use PowerShell reference variable
I am Bijay a Microsoft MVP (10 times – My MVP Profile) in SharePoint and have more than 17 years of expertise in SharePoint Online Office 365, SharePoint subscription edition, and SharePoint 2019/2016/2013. Currently working in my own venture TSInfo Technologies a SharePoint development, consulting, and training company. I also run the popular SharePoint website EnjoySharePoint.com