Do you want to know about People Picker in Power Apps?
Well, in this Power Apps tutorial, I will show you how to create a People Picker in Power Apps? and also we will discuss everything related to Power Apps People Picker like:
- Create People Picker in Power Apps using Combo Box
- How to Create a People Picker in Power Apps Manually using the SharePoint list
Also, by taking some simple scenarios, I will show you how to work with PowerApps people picker.
Power Apps Combobox Office 365 Users
Usually, we use the Power Apps by connecting the SharePoint Data Source when working with them.
To display a Person field from the SharePoint list, we integrate a people picker column into the list and utilize it in our Power Apps Combo box, Form, Gallery control, and other components.
Therefore, we won’t be using any SharePoint data sources when we talk about people picker control in this Power Apps tutorial. We’ll use the Office 365 Users Data source connector to accomplish this.
The steps listed below must be followed to create the Power Apps Person field:
1. Sign in to Power Apps with valid Microsoft credentials.
2. Create a Blank Canvas app [+ Create -> Blank app -> Click Create under the Blank canvas app].
3. Provide the App name and choose any Format [Tablet/Phone]. Click on Create.
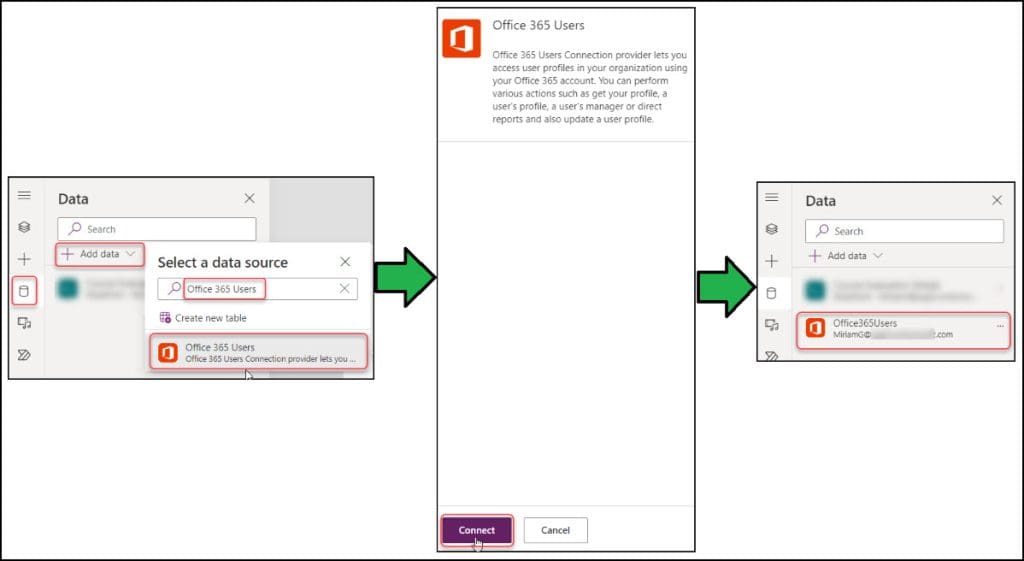
4. To connect the Office 365 Users connector, go to the Data tab -> + Add data -> Search Office 365 Users -> Select Office 365 Users -> Connect. Then, the specific connector has been added, like the picture below.
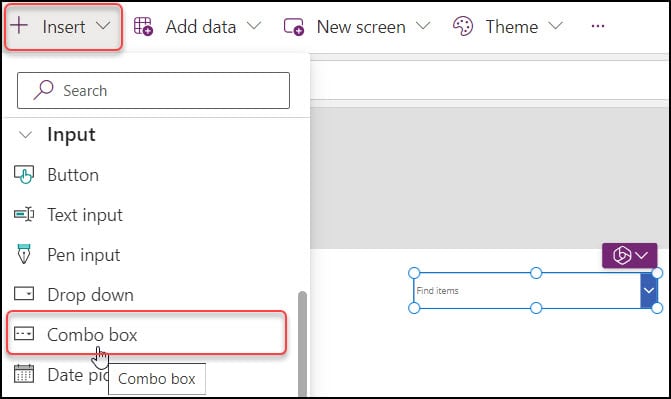
5. Now insert a Combo box in the Power Apps screen. Go to Insert tab -> Input -> Combo box.
6. Use the following formula on the Power Apps Combo box’s Items Properties to view all Office 365 users:
Items = Office365Users.SearchUser(
    {
        searchTerm: cmbUsers.SearchText,
        top: 5
    }
)
Where,
- SearchUser = It helps to retrieve search results of user profiles.
- searchTerm:cmbUsers.searchText = This defines to search the text inside the combo box. That means you need to search for the name of any user in the combo box.
- top:5 = When you explore the first letter of any user, it will help you to show the first or top 5 user display names that come under that first letter.
NOTE:
If you search for a name whose initial letter starts with “B“, just the top 10 user names that start with “B” will appear.

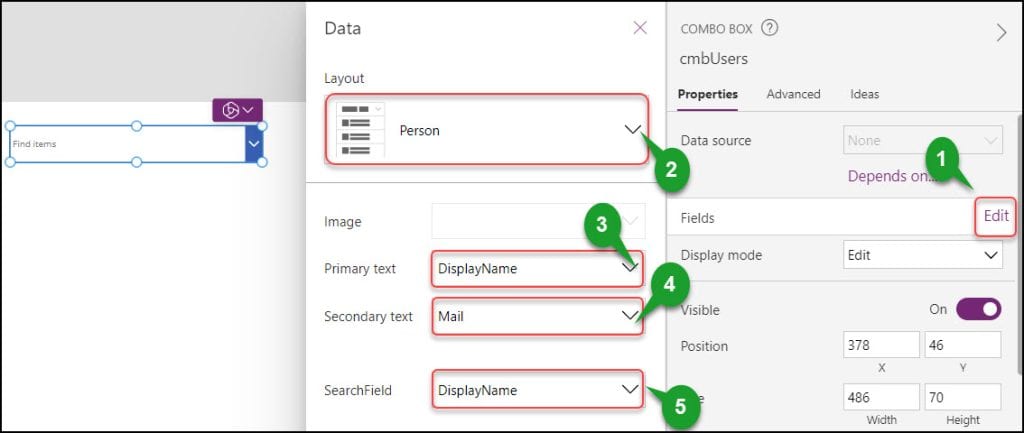
7. Next, select the Combo box control -> Go to the Properties tab -> Click Edit and select the below field details:
| Fields | Selection |
|---|---|
| Layout | Person |
| Primary text | DisplayName |
| Secondary text | |
| SearchField | DisplayName |
8. Finally, save, publish, and preview the app. If you expand the Combo box, all the top 5 users display names, and their emails will appear as shown below.
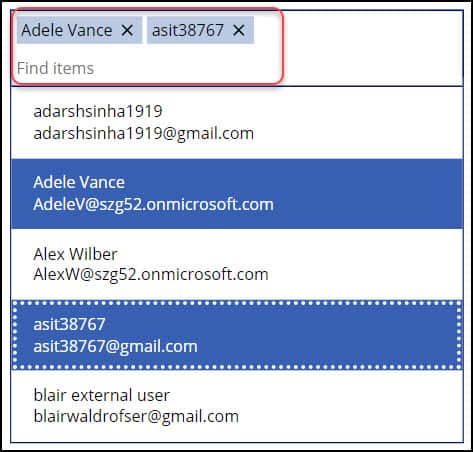
9. Suppose in the Powerapps combo box, you want to select more than one Office 365 user; then, you need to enable the multiple selections option.
Select the Combo box -> go to the Properties pane -> Enable the “Allow multiple selections” option as shown below.
10. To search for any user name inside a search text box, you must enable the search option.
Select the Combo box -> go to the Properties pane -> Enable the “Allow searching” option as shown below.

This is all about Power Apps Combobox Office 365 Users.
People Picker in Power Apps
To create Power Apps People Picker manually, follow the instructions below:
Set up a SharePoint List
Create a SharePoint list named Course Evaluation Details. You can also use any existing list that contains some Person columns.
This list has the columns below with various data types. Such as:
| Column | Datatype |
|---|---|
| Title | Single line of text |
| Course Description | Multiple lines of text |
| Single Instructor | Person or Group |
| Multi Instructors | Person or Group [Toggle on Allow multiple selections]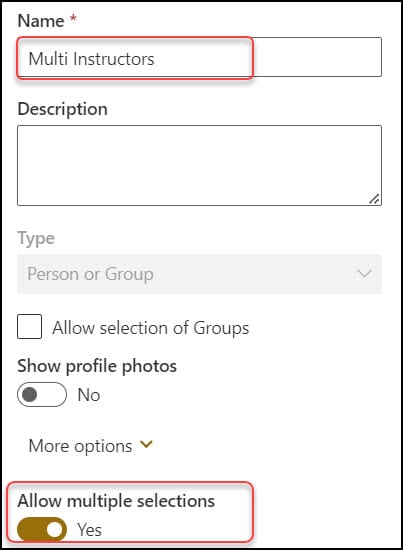 |
Refer to the image below.

Create Power Apps Blank Canvas app and Connect SharePoint List
1. Sign in to Power Apps with valid Microsoft credentials.
2. Create a Blank Canvas app [+ Create -> Blank app -> Click Create under the Blank canvas app].
3. Provide the App name and choose any Format [Tablet/Phone]. Click on Create.
4. To create the SharePoint list connection, go to the Data tab -> Add data -> Search SharePoint -> Select SharePoint.
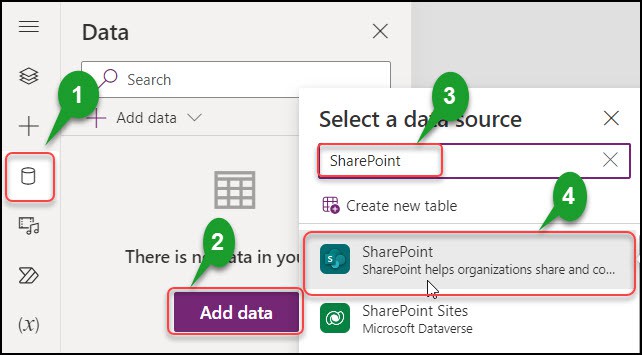
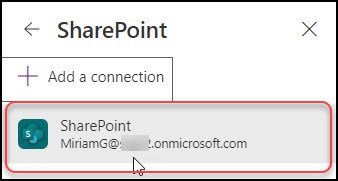
5. Add a new SharePoint connection or select the existing one.
6. Select the SharePoint site and choose the specific list. Click on Connect.
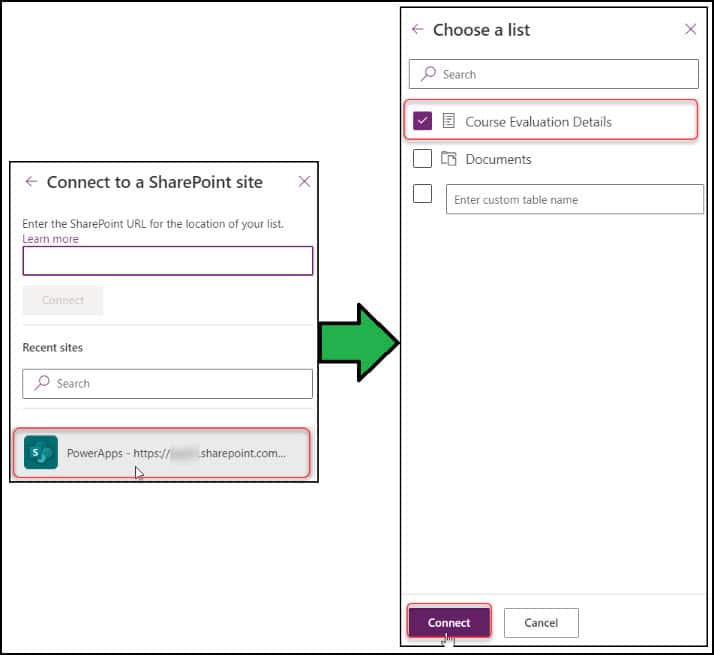
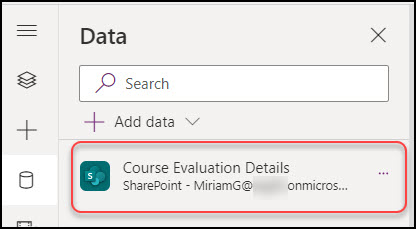
7. Now, the SharePoint connection has been done in the app, and it will look like the image below.
Create Power Apps Variables
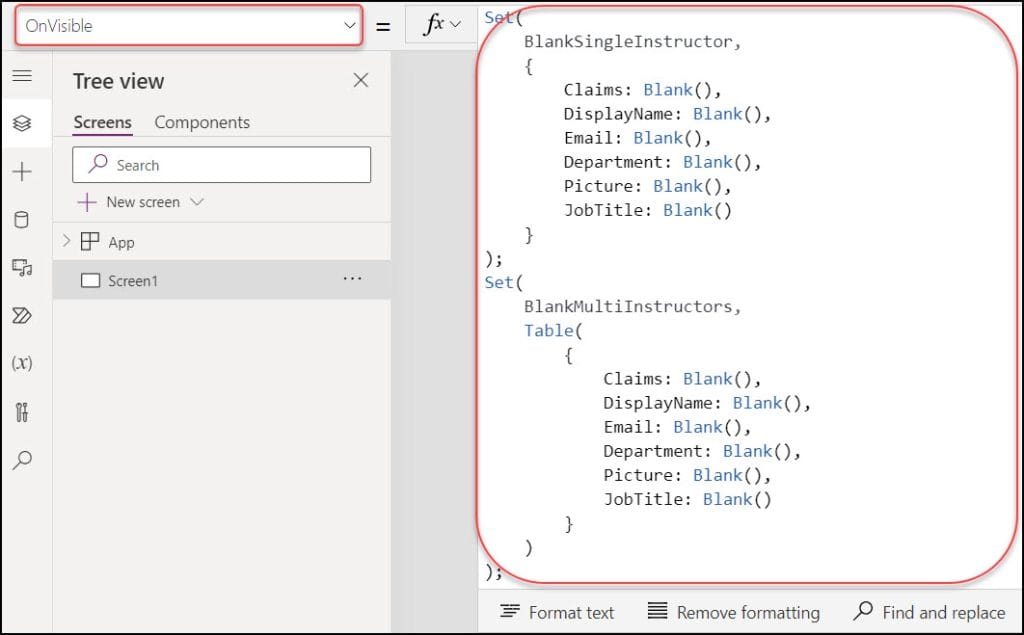
8. Next, we will create two blank global variables in Power Apps. The purpose of these is to empty the people picker column. Because of the differences between the two columns with single and multiple entries, two separate types of variables must be used.
Select the Power Apps Screen and set its OnVisible property to the code below:
OnVisible = Set(
    BlankSingleInstructor,
    {
        Claims: Blank(),
        DisplayName: Blank(),
        Email: Blank(),
        Department: Blank(),
        Picture: Blank(),
        JobTitle: Blank()
    }
);

Set(
    BlankMultiInstructors,
    Table(
        {
            Claims: Blank(),
            DisplayName: Blank(),
            Email: Blank(),
            Department: Blank(),
            Picture: Blank(),
            JobTitle: Blank()
        }
    )
);
Where,
- BlankSingleInstructor, BlankMultiInstructors = Variable Names
- Claims, DisplayName, Email, Department, Picture, JobTitle = Table headers
- Blank() = Power Apps Blank() function returns a blank value
9. To check the blank table, go to Variables [x] -> Expand Global variables -> Select a variable -> Click Ellipses […] -> View Table.

10. Come back to the Power Apps Screen and insert the controls and icons below:
| Text | Control | Name |
|---|---|---|
| Create Power Apps People Picker | Label | lblTitle |
| Single Person Icon | Person | IconSingleInstructor |
| Multi-Person Icon | People | IconMultiInstructors |
| Create Single Instructor | Button | btnCreateSingleInstructor |
| Create Multi Instructors | Button | btnUpdateSingleInstructor |
Also, you can design your app based on your needs. Refer to the screenshot below:

Now, we will create a people picker using these two Power Apps Buttons. So let’s do it one by one.
1. Create Single Instructor:
- Select the first button [Create Single Instructor] and apply the code below on its OnSelect property as:
OnSelect = Patch(
    'Course Evaluation Details',
    {
        Title: "Power Apps Beginners",
        'Course Description': "This course is used for Power Apps beginners",
        'Single Instructor': {
            Claims: "lidiah@szg52.onmicrosoft.com",
            DisplayName: "lidiah",
            Email: "lidiah@szg52.onmicrosoft.com",
            Department: Blank(),
            Picture: Blank(),
            JobTitle: Blank()
        }
    }
);

// Check if any errors when the item created
If(
    !IsEmpty(Errors('Course Evaluation Details')),
    Notify(
        "Failed to Create Instructor",
        NotificationType.Error
    ),
    Notify(
        "Instructor Created Successfully",
        NotificationType.Success
    );

)
Where,
- ‘Course Evaluation Details‘ = SharePoint List Name
- Title, ‘Course Description’= SharePoint Columns
- ‘Single Instructor‘ = SharePoint Person Column
- Claims, DisplayName, Email, and so on = People picker details
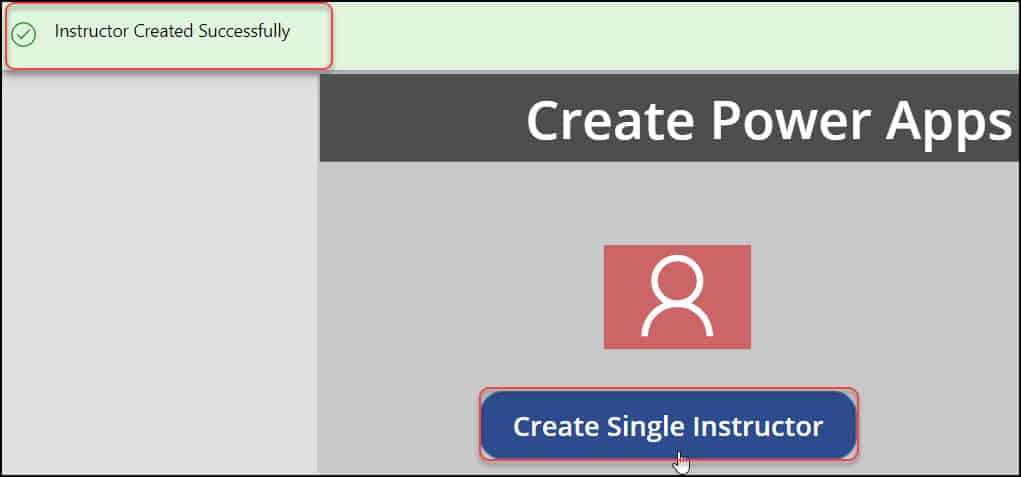
- Also, the above code specifies that if any error occurs while creating a new item, an error message will appear with a red ribbon at the top of the page.
- If no error occurs while creating a new item, the success message will appear with a green ribbon at the top of the page.

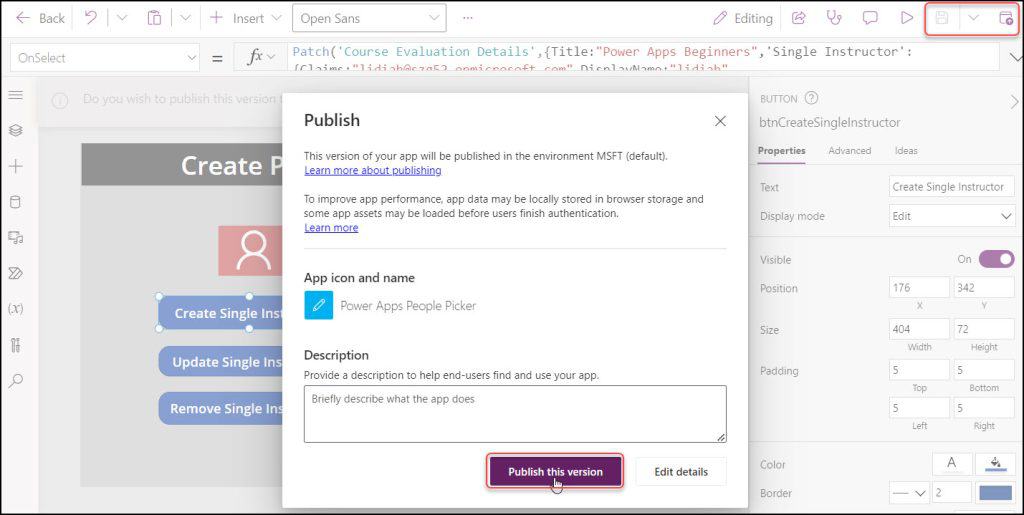
- Save and Publish the app. Click on the Publish this version.
- Preview or run [F5] the app.

- Tap the button, and the success notification will appear at the top [with green color] like below.
- Go to the specific SharePoint list and refresh it once. The new item has been added with the single instructor, as shown below.

2. Create Multi Instructors:
- To create multiple instructors, select the second button [Create Multi Instructors] and set its OnSelect property to the code below:
OnSelect = Patch(
    'Course Evaluation Details',
    {
        Title: "Power Apps UI",
        'Course Description': "We will learn how to work with UI in Power Apps",
        'Multi Instructors': Table(
            {
                Claims: "Miriam Graham@szg52.onmicrosoft.com",
                DisplayName: "Miriam",
                Email: "Miriam Graham@szg52.onmicrosoft.com",
                Department: Blank(),
                Picture: Blank(),
                JobTitle: Blank()
            },
            {
                Claims: "HenriettaM@szg52.onmicrosoft.com",
                DisplayName: "Henrietta",
                Email: "HenriettaM@szg52.onmicrosoft.com",
                Department: Blank(),
                Picture: Blank(),
                JobTitle: Blank()
            }
        )
    }
);

// Check if any errors when the item created
If(
    !IsEmpty(Errors('Course Evaluation Details')),
    Notify(
        "Failed to Create Multiple Instructors",
        NotificationType.Error
    ),
    Notify(
        "Multiple Instructors Created Successfully",
        NotificationType.Success
    );

)
Where,
Table() = This function creates a table in Power Apps

- Save, Publish, and Preview the app. Once you click the button, the multi-instructors will generate and display in the SharePoint list.

These are the ways to create a People Picker in Power Apps.
Conclusion
This Power Apps tutorial taught us how to create a People Picker in Power Apps Combo box control. Also, we learned How to Create a People Picker in Power Apps Manually using SharePoint list using different examples.
Additionally, you may like some more Power Apps tutorials:
- Power Apps Get Current User [Email, Profile, User ID, Department]
- Get users from Office 365 Group in PowerApps
- Submit Form to SharePoint List in Power Apps
I am Bijay a Microsoft MVP (10 times – My MVP Profile) in SharePoint and have more than 17 years of expertise in SharePoint Online Office 365, SharePoint subscription edition, and SharePoint 2019/2016/2013. Currently working in my own venture TSInfo Technologies a SharePoint development, consulting, and training company. I also run the popular SharePoint website EnjoySharePoint.com
Very well done blog! I just wanted to note that as soon as you add a filter to the combo box items formula, it doesn’t work.
Filter(Office365Users.SearchUser({searchTerm:ComboBox1.SearchText,top:10}), Upper(CompanyName) = “MYCOMPANY”)
Hello Bijay, very detailed and informative information. I have same kind of requirement. But how can I save the users(email, Name) from Gallery to the SharePoint List, I have to add all the gallery users in the People column of an item of SharePoint list. Can you please share this too ?
Hi Bijay, So far this is the best step by step guide I have found anywhere online. My question is, (cannot find this ANYWHERE), what is your formula to autopopulate text input box, based on another combo box-with people picker for that user’s manager? I cannot figure it out, been trying for a while. Help!!
Hi
I need help on the following: I have a person field that has multiple users in each cell. I was able to ungroup the user names in the combo box. I’m trying to implement Search or Filter by user names. And I do have a data set in the data table.
Thanks