Here is a complete guide to send an email with attachments from local folder using Power Automate. I have done the steps practically and can finally send emails with attachments from a local folder inside a flow. If you follow the exact steps, I am confident; it will work for you.
Here we will cover two examples: First, we will see how to send an email with a single attachment from a local folder, and secondly, we will see how to send an email with multiple attachments using Power Automate from the local folder.
Send an Email from Local Folder using Power Automate
Let us see how to send an email from a local folder using Power Automate flow.
To communicate with local folder from Power Automate, we must download and install on-premises data gateway software to access the data in a local system. We can install a gateway either in standard mode or personal mode.
Download and install an On-premises data gateway to the local system
Here I will show you how to install a standard gateway. Once the software is downloaded, Right click on it and choose Run as administrator; in the pop-up that will appear, Click Yes.
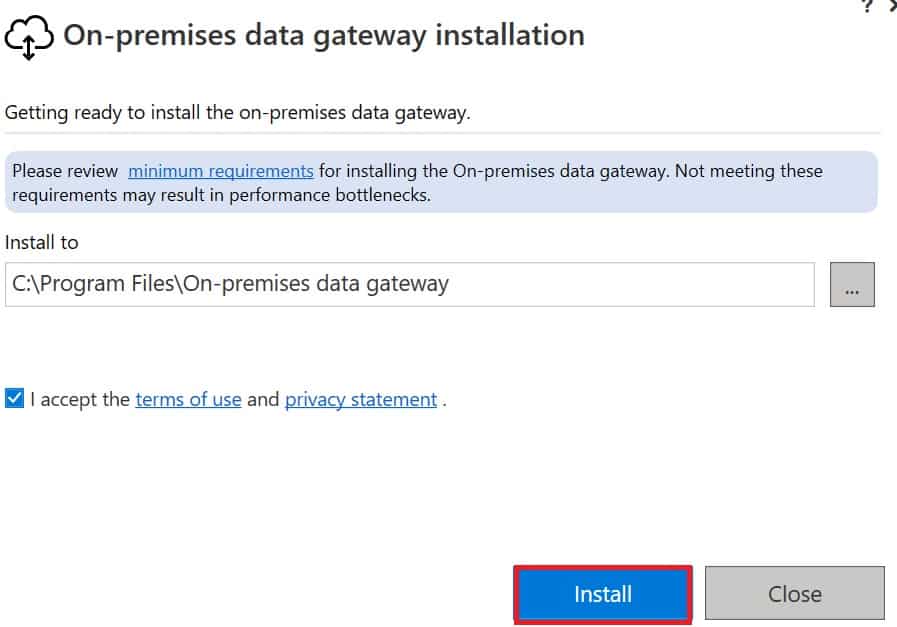
Now On-Premises data gateway installation window will open as below: Select the check icon and choose the install option.
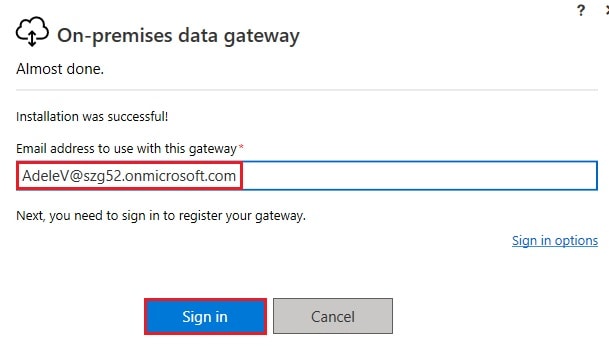
Once the installation is done, enter the email address to register, use the gateway, and click the Sign in option.
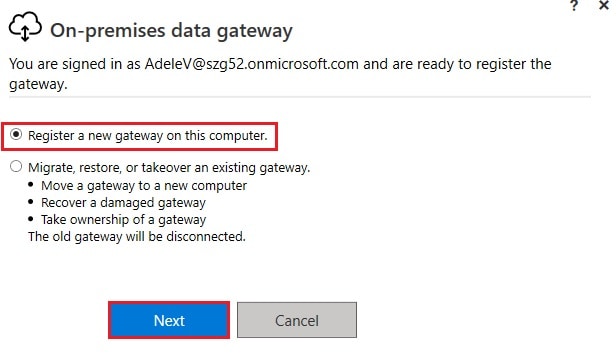
Select Register a new gateway on this computer option and click Next as shown below:
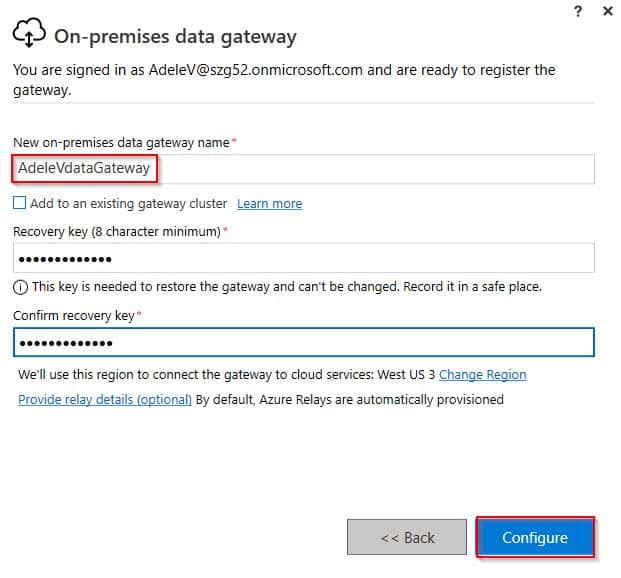
Then, Enter the New on-premises data gateway name; here, I have given the name as AdeleVdataGateway then add the recovery key and confirm the recovery key and click on the configure option. It takes some time to configure.
Once the configuration is done, we can see a status that The gateway is online and ready to use in our Power Automate flow. Select close.
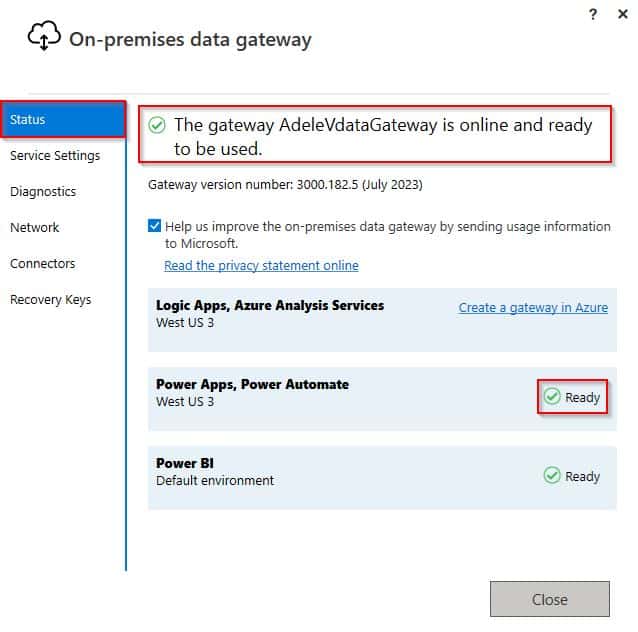
This is how to download and install an On-premises data gateway to the local system.
Now, we can create a flow to send email with an attachment from local folder.
Case-1: Send an email with a single attachment from a local folder using Power Automate
Now we will create a flow to send an email with a single attachment from a local folder using flow.
Scenario:
The flow triggers automatically when a file is created in a local folder. Later, using the Get file content, it retrieves the attachments and reads the file content. Finally, the Send an email (v2) action sends an email to the corresponding user in the Power Automate flow.
To achieve this, Follow the below steps:
Step-1:
Create a New Folder in the local system. Here I have created a Folder called Employee Documents.

Step-2:
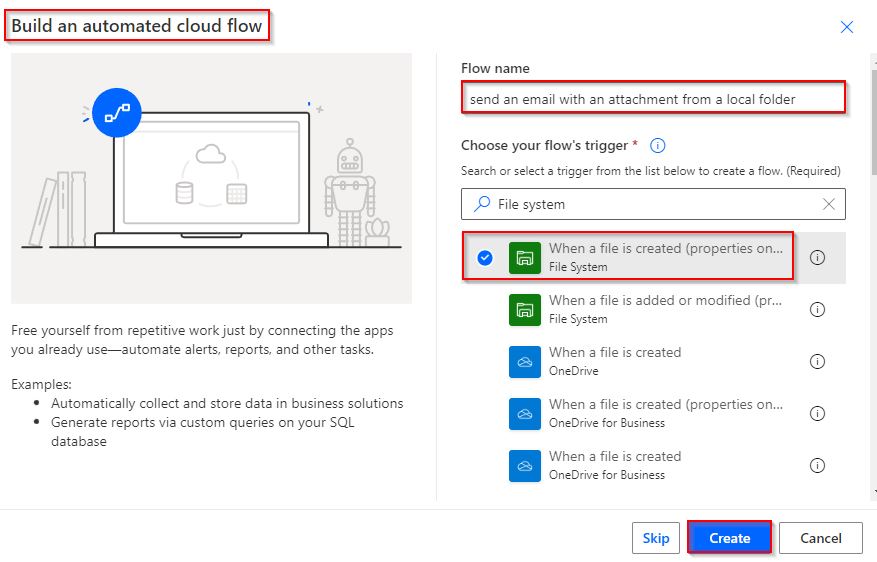
- Log in to Power Automate flow using the credentials, and select +Create -> Automate cloud flow,
- Search for File System and select When a file is created (Properties action only), and click on the Create option.
Step-3:
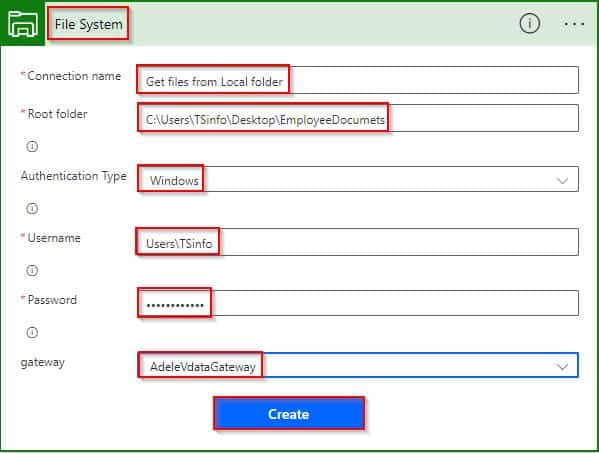
Expand the File system trigger, Provide the connection details below, and click the Create option.
- Connection Name: Enter the Name of the connection, here I gave the name Get files from Local folder.
- Root Folder: Provide the Path of the Local Folder
- Authentication Type: Based on the system type, I am using Windows, so by default, it returns the Authentication type as Windows.
- Username: Enter the Domain name and User name of the local system
- Password: Enter the Password credentials of the local system.
- gateway: In the Gateway option, select the Registered Gateway name from the dropdown. Here I have selected the registered Gateway called AdeleVdataGateway in the local system. Without Gateway, we cannot create a data connection.
- Once the connection is created, it automatically redirects to trigger action. Now select the File system folder from the Show picker, it ready the root folder path from the gateway connection.
- Also, we have the option to set the Number of files to return. By default, it is 10.

Step-4:
Add a Delay action from action triggers and set the count as 1 and the unit as minute, to create a file with content in the selected folder.

Step-5:
Select the next step and then choose Get file content to read all the contents presented in the file, pass the Id from the dynamic content value.

Step-6:
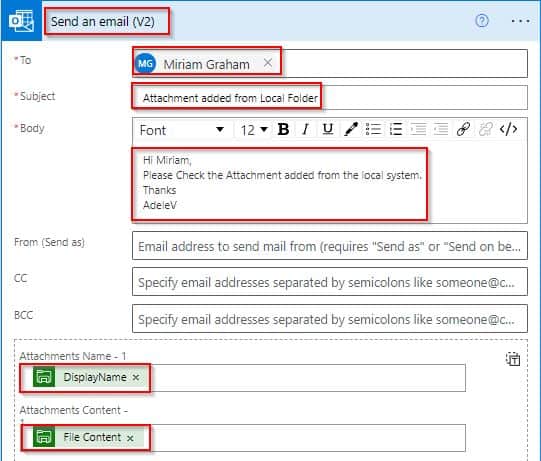
- Select Send an Email V2 outlook action from action triggers; enter the recipient’s email in the To field.
- Provide the Subject and Body of the mail. Expand Show Advanced options. In the Attachments Name, Pass the dynamic content value of the File Name. In the Attachment Content, pass the dynamic File content value.
Step-7:
- Save and run the flow by selecting the Run flow option. The flow will only trigger when a file is created in mentioned Local system Folder Path.
- So here, I have created one new text file called AdeleV Document in the Employee Documents folder.

Now our flow runs successfully like below:
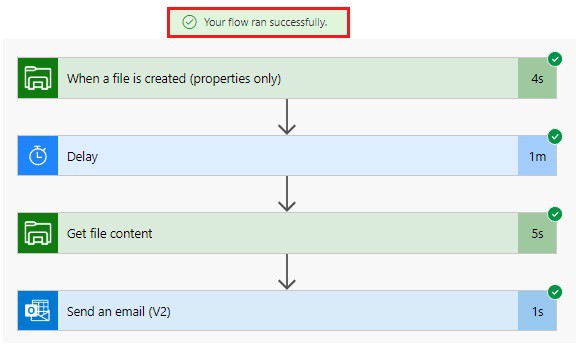
The mentioned user will get an email with a single attachment from the local system as shown below:
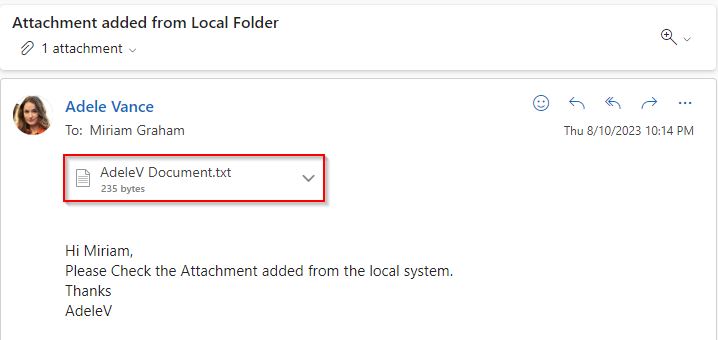
This is how to send an email with a single attachment from a Local folder using Flow.
Case-2: Send an email with Multiple attachments from a local folder using Power Automate
Here we will see how to send an email with Multiple attachments from a local folder using Flow.
Scenario:
The flow triggers automatically when a file is added or modified in a local folder; Initially, the List files in folder action gets all the files presented in the local folder. Later, using the Get File Content action, it retrieves the content of all attachments. And finally, by using Send an email (v2) action, it sends an email to the corresponding user in Powe Automate flow.
To achieve this, Follow the below steps:
Step-1:
Select the local folder to send the user all the files presented in the folder as email attachments. Here I am going to use the Employee Documents folder has 3 different types of attachments as highlighted below:

Step-2:
- Create a new flow by selecting +Create -> Automate cloud flow option.
- Search for File System, select When a file is added to modified (Properties action only), and click the Create option.
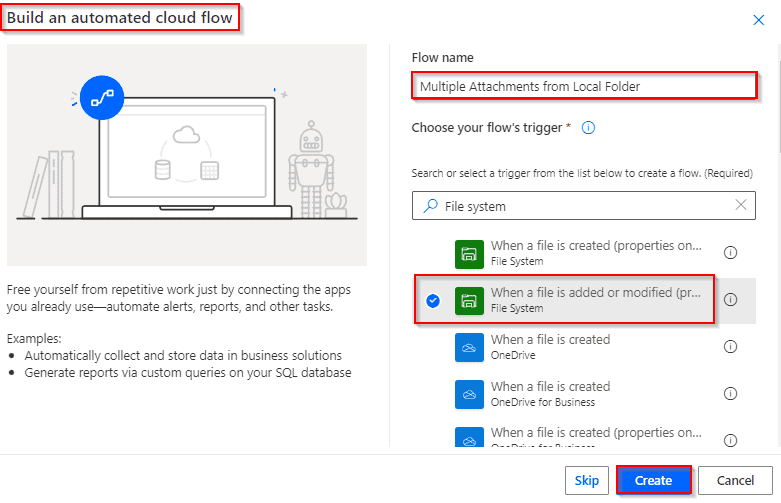
Step-3:
- Now it is not asking for a new gateway connection. It automatically selects the existing Gateway connection we created in the previous example and redirects to the trigger action.
- I’m also going to use the same Get file from the Local folder gateway connection. Now select the File system folder from the Show Picker, it ready the root folder path from the gateway connection.
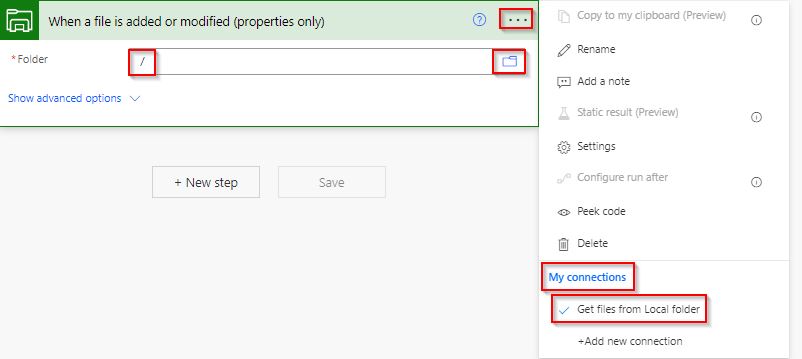
Step-4:
- Select the +new step and select initialize variable action; enter the variable name and choose the variable type as Array to save the attachments. Leave the Value field blank.
- Later we will use the initialized variable in our flow.

Step-5:
Add a Delay action from action triggers and set the count as 50 and the unit as seconds, to add a file with content or modify the existing file content in the selected folder.

Step-6:
Add a new step and choose List files in folder action. Select the File system folder from the Show Picker. It reads the folder path from the gateway connection.

Step-7:
- Choose the Get file content action, to read all the attachment’s content based on the ID. Pass the dynamic content Id value in the File section.
- It will automatically add Apply to each control to get the attachment content from the Local folder.
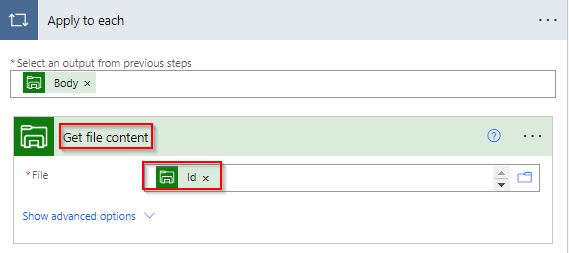
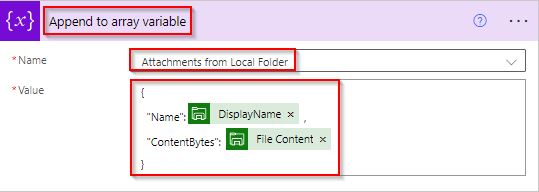
Click on the next step, select Append to array variable action, and select the initialized variable called Attachments from Local Folder (ie: Step-4:) from the dropdown. In the value field, pass the below JSON code.
{
  "Name":@{items('Apply_to_each')?['DisplayName']} ,
  "ContentBytes": @{body('Get_file_content')}
}
Step-9
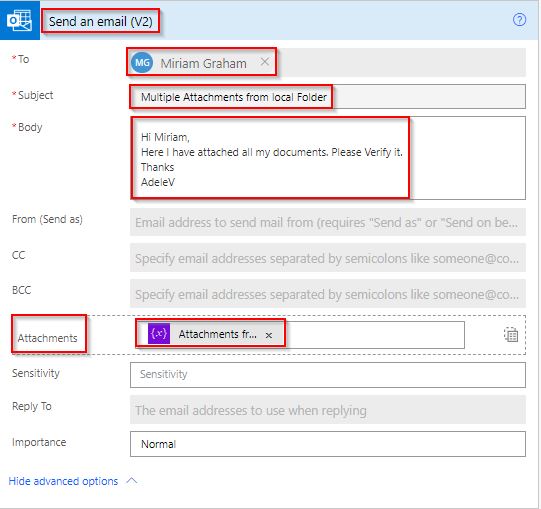
- Select Send an Email V2 outlook action from action triggers; enter the recipient’s email in the To field.
- Provide the Subject and Body of the mail. Expand Show Advanced options.
- In the attachment field, click on the icon to switch to the entire array of attachments. Pass the initialized Variable name from the dynamic content value that has all the attachments from the local folder.
Step-10:
Save and Run the flow by selecting the run flow option. Once the flow runs successfully, like below:
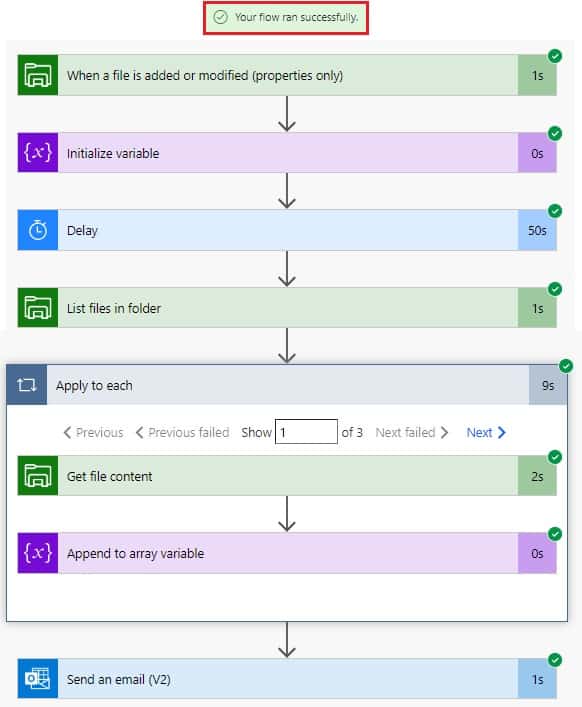
It gets all the 3 files presented in the Employee Documents folder in the Local system folder and sends an email with multiple attachments to the mentioned user.
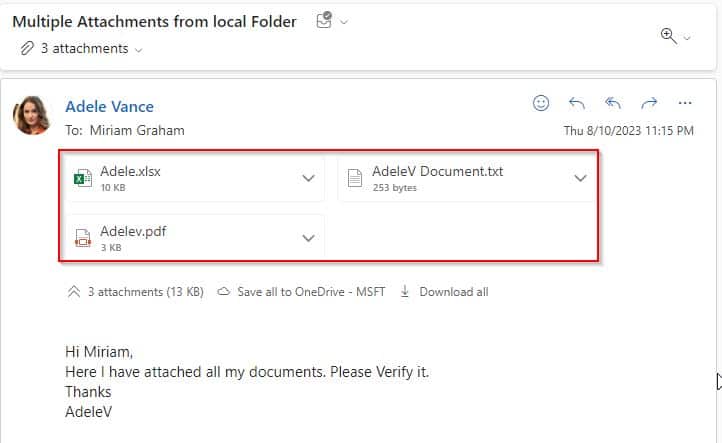
This is how to send an email with multiple attachments from a local folder using Power Automate or Microsoft Flow.
Conclusion
To send an email with attachments from the local folder using Power Automate, we must first install the on-premise data gateway. In this tutorial, I have explained how to install the On-premise gateway in Windows 11 laptop. And then, I explained how to send an email with single and multiple attachments from a local folder using Microsoft Power Automate.
You may also like:
- How to Send an Email with Attachments in Power Automate?
- Convert an array to a string using Power Automate
- Convert XML to SharePoint List using Power Automate
- How to send email from excel using Power automate?
I am Bijay a Microsoft MVP (10 times – My MVP Profile) in SharePoint and have more than 17 years of expertise in SharePoint Online Office 365, SharePoint subscription edition, and SharePoint 2019/2016/2013. Currently working in my own venture TSInfo Technologies a SharePoint development, consulting, and training company. I also run the popular SharePoint website EnjoySharePoint.com