In this Power Automate Desktop tutorial, we will see how to extract data from Word documents to Excel using Power Automate Desktop (PAD) automatically.
This tutorial will be very much helpful to you if you want to extract data from Word documents using Power Automate. Suppose you have a list of invoices, and you want to extract the invoice details like invoice name, number, price, invoice date, etc., from all the invoices automatically without doing it manually; then you can follow the complete tutorial. It will pick one invoice, extract all the details and add them into an Excel file. And then pick the next invoice.
For this particular example, I have taken a few order forms having the following fields:
- Order Number
- Name
- How did you hear about us?
- Delivery Method
- Delivery Date
- Biscuit Type:
- Order Quantity
All the order forms are inside a folder, and the PAD flow will extract the above information and add it to an Excel file. The Word file looks like the one below.
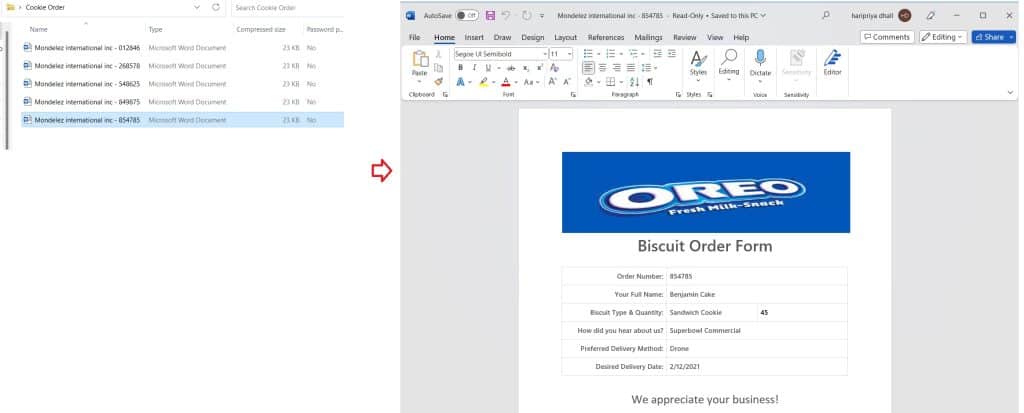
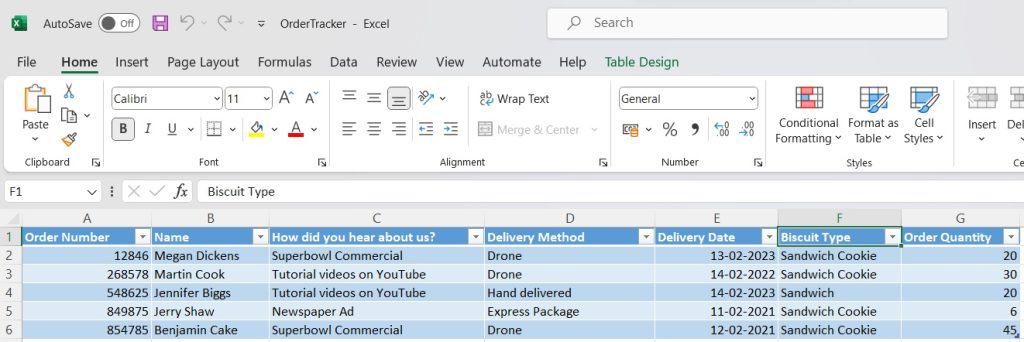
Here, we will loop through each file using For each loop in Power Automate Desktop. Then extract the data from Word and write it in the Excel file. The Excel file contains the following fields:
- Order Number
- Name
- How did you hear about us?
- Delivery Method
- Delivery Date
- Biscuit Type:
- Order Quantity

You will get the zip folder containing the Word and Excel files by the end of this tutorial.
Note
Both the Excel file and the above Folder are located in my local system.
By the end of this tutorial, you will get the zip folder of the Word and Excel files. Download both the Excel file and Word folder and unzip the folder.
Let’s create a flow that will extract data from Word to Excel using Power Automate.
Extract data from Word to Excel using Power Automate Desktop
Here we will see how to extract data from Word to Excel using Power Automate Desktop.
Before we will start creating the flow, you must have the Word files and Excel files like the above in your local system.
Step 1: Open Power Automate Desktop -> Click on +New flow. Then provide the flow name and click on Create.

Step 2: We will get all files in the folder, so expand the Folder section under Action. Then drag and drop the ‘Get files in folder‘ action to the workspace. Then provide the below information under ‘Select Parameter’:
- Folder: Select the folder path by clicking on the folder icon.
- File Filter: Here, we will get all files, so I will provide *.
Also, this will generate a variable for you i.e., Files. If you want files from Subfolder, then you can enable the option. Then click on Save.
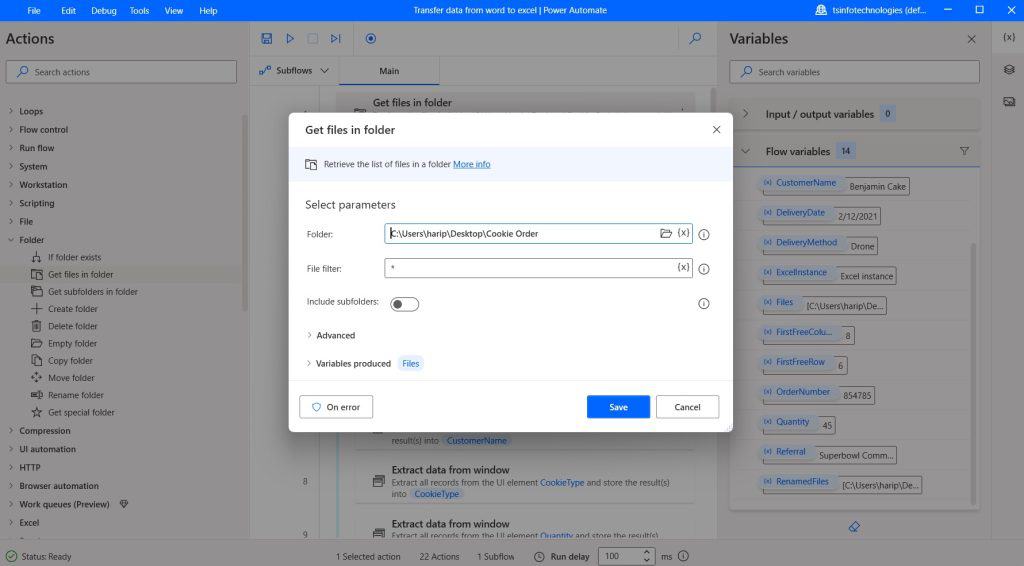
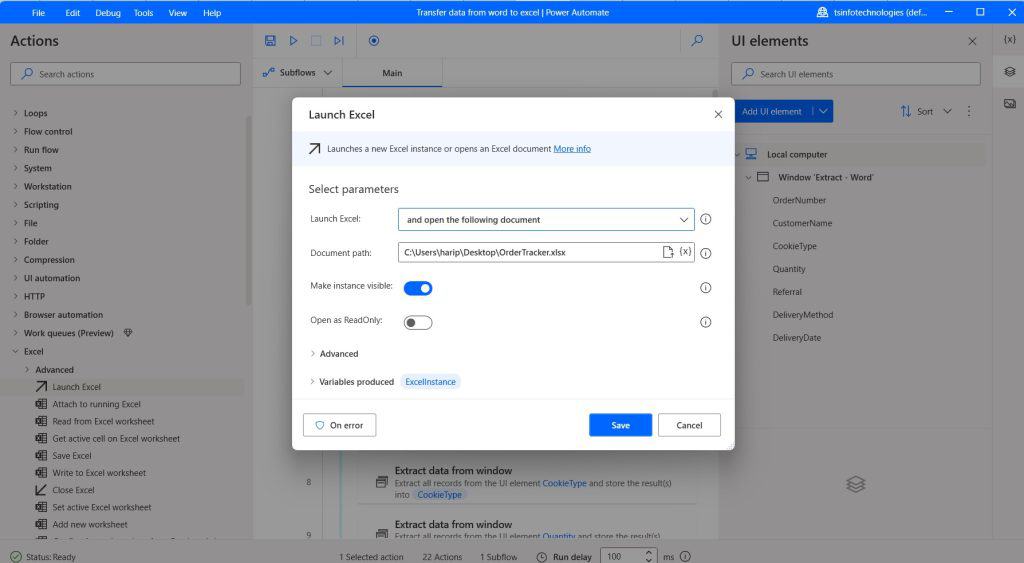
Step 3: Now we will add an action that will open an Excel file, so expand the ‘Excel’ section, under Action. Then drag and drop the ‘Launch Excel’ to the workspace. Then provide the below information under Select parameters:
- Launch Excel: As our Excel contains table and column names, select ‘and open the following document’ from the dropdown.
- Document path: Select the Document path of your Excel file.
Then enable the ‘Make instance visible’, so it will be visible to us when it gets launched. Also, it produced a variable called ‘ExcelInstance’. Then click on Save.
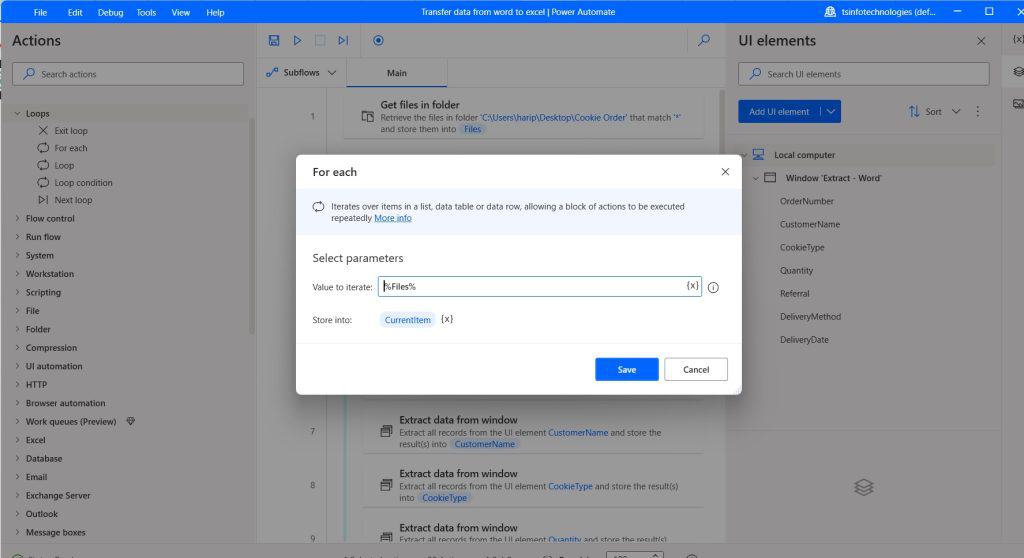
Step 4: Now we will loop through all files, so expand the Loop section, then drag and drop the ‘For each’ action. Then provide the below information:
- Value to iterate: Click on variable icon {x}, and select ‘Files’. Click on the Select button.
This will create a variable called CurrentItem, where the current file will store.
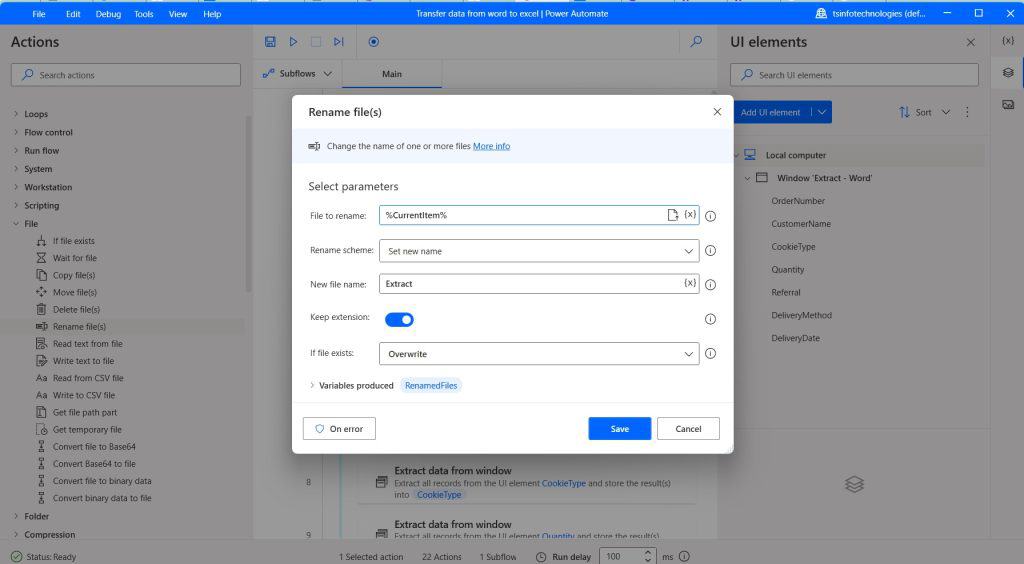
Step 5: Next, we will rename the file to ‘Extract’, so every time it will loop through each file it will rename to ‘Extract’, and it make us easier to get the data from the Word file.
So expand the File section, drag and drop the Rename File to Workspace inside the ‘For each’ loop. Then provide the below information
- File to rename: Click on variable icon {x}, select CurrentItem variable, and then click on the Select button.
- Rename Scheme: Select ‘Set new name’
- New File name: Provide the New File name as Extract.
- Keep extension: Enable Keep extension
- If file exists: Select Overwrite if the same file exists.
Now Open your Word file folder, copy a file, and paste into the same folder. Then rename the copied folder as ‘Extract’. After that, select -> right-click -> copy as the path. If it is unavailable in your local system, you can copy it in the ‘Properties’ option. After that, add the path to the notepad.

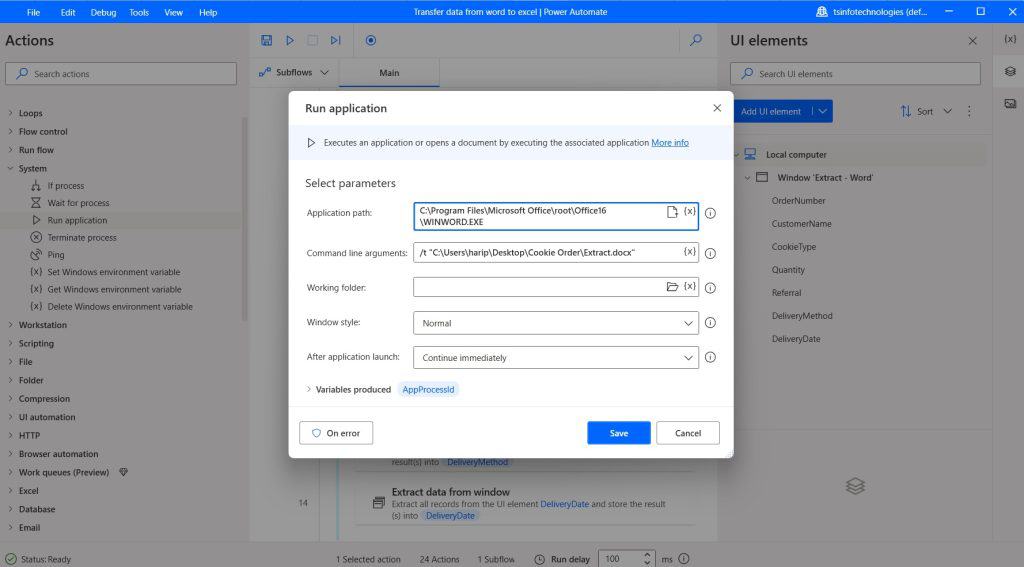
Step 6: Now we run a window application, i.e., Word App, where we will pass the argument as the above path. So, it will open the word with the file name renamed as ‘Extract’.
We need a Word Application path, so in the Search bar of the Start menu -> search for ‘Word’ -> then hover and right-click on select ‘Open File Location’.
So, it will navigate to ‘Shortcut of word app’. After that, right-click on the ‘Shortcut word app’ -> select Open File Location. Now you can see the Word application in this location ‘C:\Program Files\Microsoft Office\root\Office16’. Now right-click on the Word App, select the ‘Copy as Path’ option, and save it in the Notepad.
Now, expand the System section in PAD, then drag and drop the Run application action inside for each loop. Then provide the below information:
- Application path: Provide the application path of the Word app.
- Command line arguments: Provide the file path of the Word file we got in the last step.
This will generate a variable called ‘AppProccessId’.
Step 7: First, we need to add the UI element to extract the data from Word. So click on the UI elements icon and the Add UI element button.
After that, open the Word file renamed as Extract. Then you hover over each data we need to extract to Excel, and you can see the red box appear. To capture the data from Word, hover over the data -> then Ctrl + click like below. Now you can see the UI element is added to the Add UI element window.
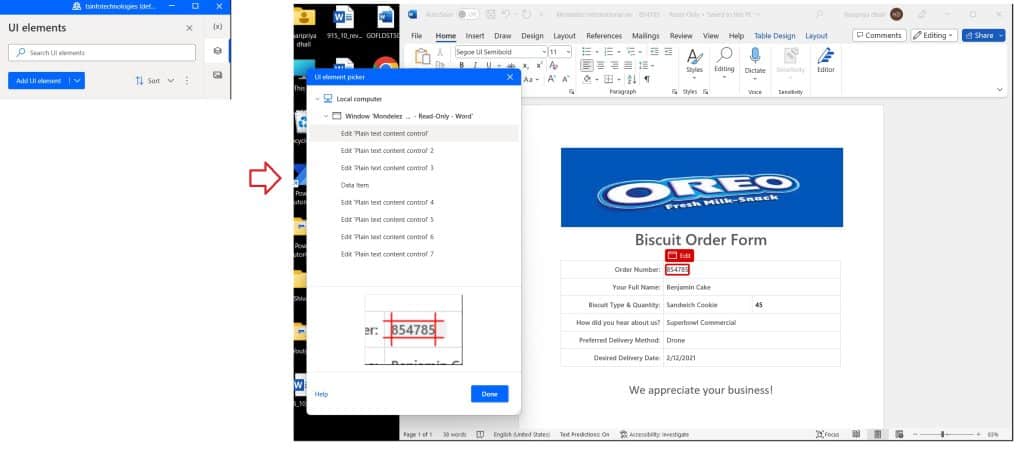
Similarly, you can capture all the data or Ui elements like above and then, click on Done.
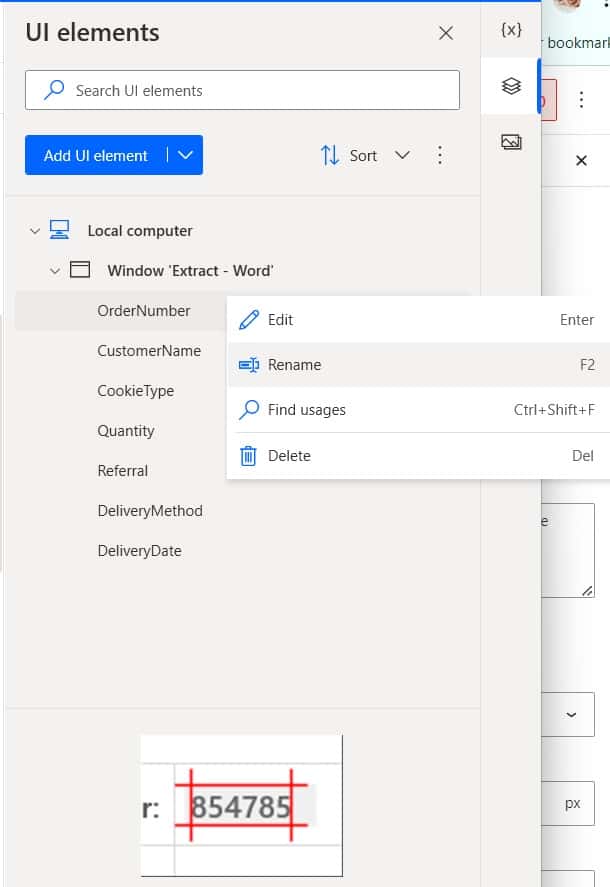
Now come back to the PAD, in the Ui element tab, you can see all UI elements; now rename the element like below. To rename the element, right-click and select Rename.
Now we will add an action to the flow, so it will extract data from Windows. So, expand the UI automation -> expand Data extraction -> drag and drop the Extract data from window action inside For each loop. Then provide the below information
- Window: Select the Order Number Ui element from the dropdown. Click on Select.
- Store extracted data element: Select ‘a variable’; we will store the Ui element value in a variable.
- Variable produced: Double-click on the variable and change the variable name to OrderNumeber.
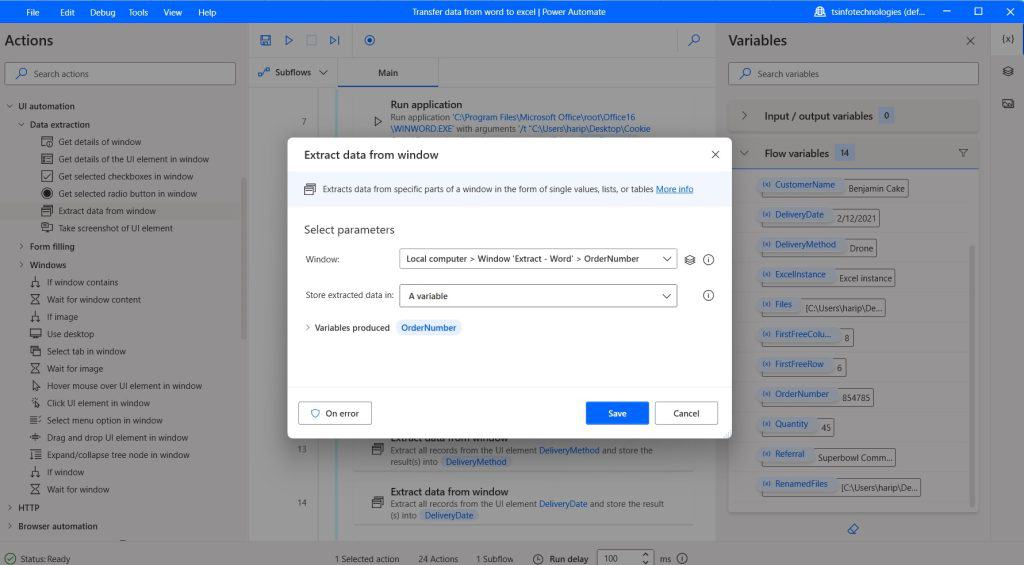
Similarly, to extract data from other Ui elements in a Word file, follow the above steps to get it.
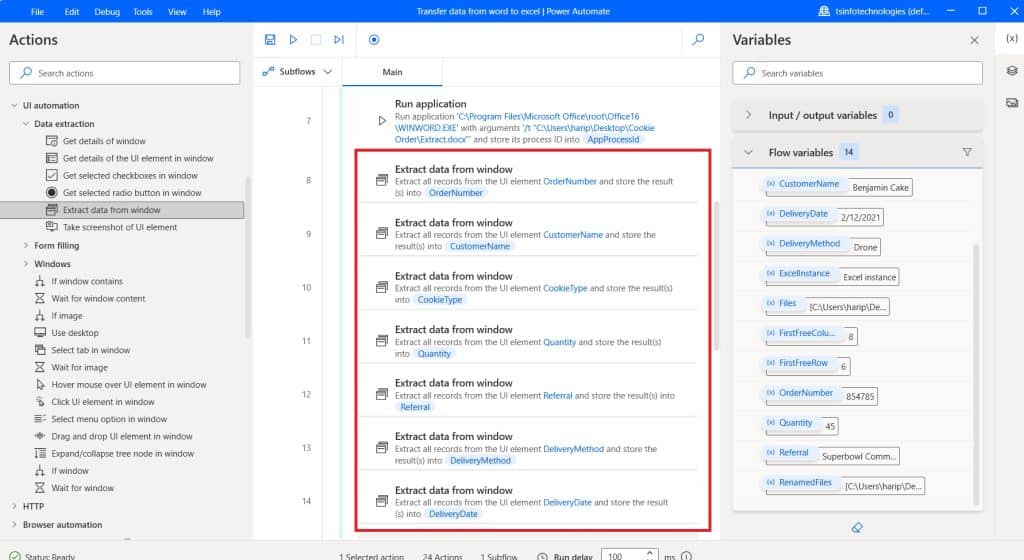
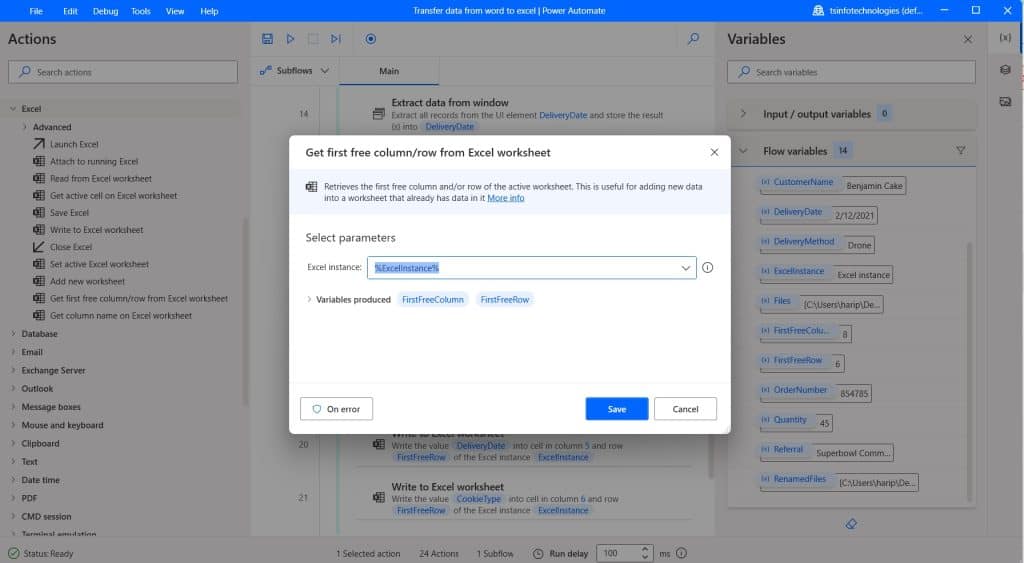
Step 8: Now we will get the first free row of the Excel worksheet, for this, expand the ‘Excel’ selection under ‘Action’. Then drag and drop the ‘Get first free column/row from Excel worksheet’ action inside the ‘For each’ action. Then provide the below information:
- Excel Instance: Provide the Excel variable i.e. ‘ExcelInstance’.
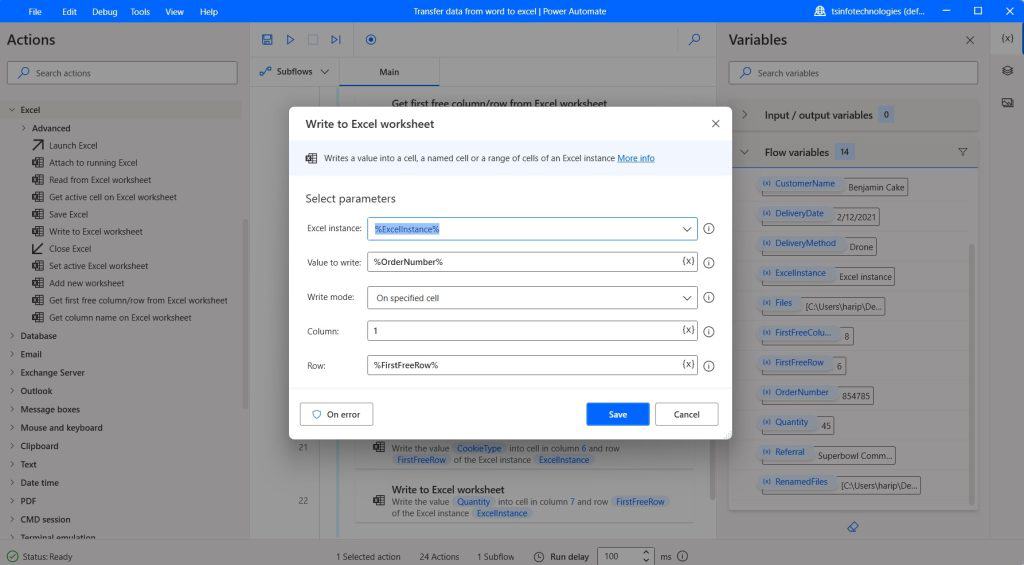
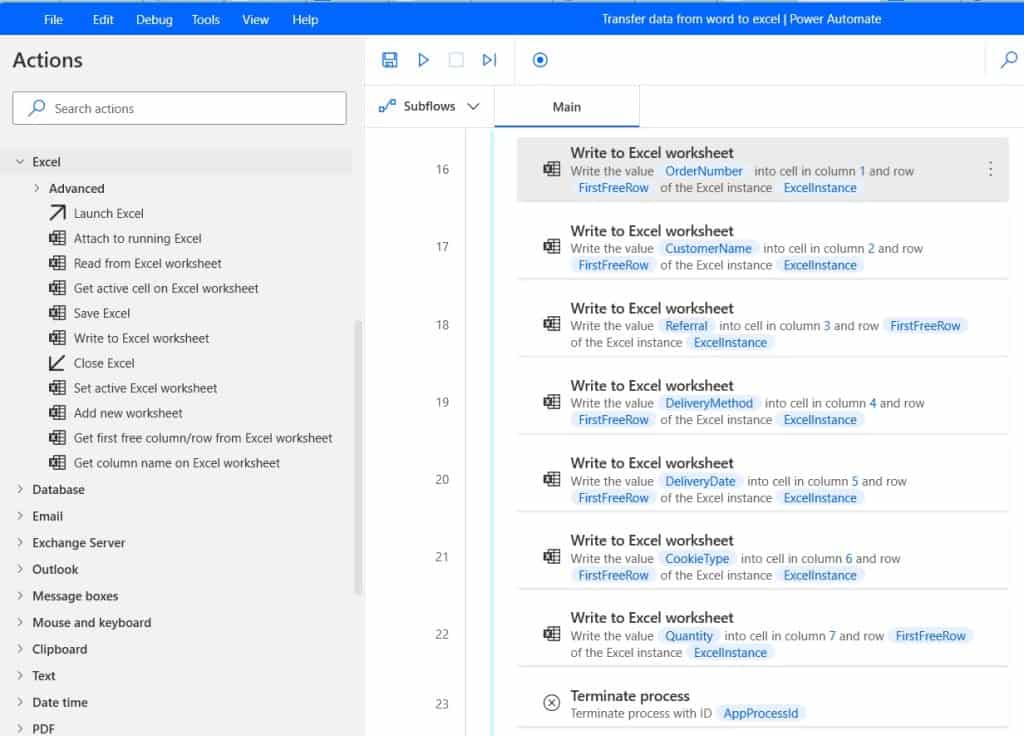
Step 9: Now we will write the data in Excel, for this, expand the ‘Excel’ section and then drag and drop the ‘Write to Excel worksheet’ action inside the For each action. Then provide the below information:
- Excel instance: Provide the ExcelInstance variable.
- Value to write: Provide the first value to write based on your Excel. In this case, OrderNumber is the first column value.
- Write mode: Select ‘ On specified cell’.
- Column: Provide column as 1.
- Row: Then select the variable ‘FirstFreeRow’
Similarly, we can add a ‘Write to Excel worksheet‘ action to write in the column in Excel. Then it will look like below.
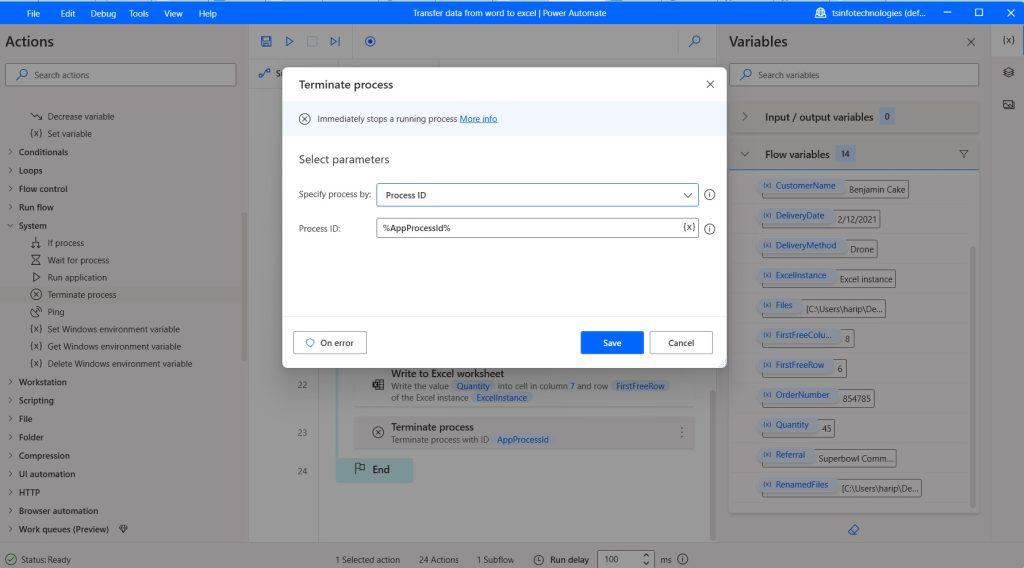
Step 10: Now, we will terminate the application, so, expand the ‘System’ section -> then drag and drop the Terminate process action inside For each loop. Then provide the below information:
- Specify process by: Selecting the Process ID from the drop-down.
- Process Id: Click on variable icon {x}, now select the ‘AppProcessId’ variable. Then click on Save.
Step 11: Now, save the flow, and click on the run button to run the flow. You can see flow run successfully and data extracted to Excel successfully.
This is how we can extract data from Word to Excel using PAD. You can use the Word folder and Excel file from here to follow the above steps.
Conclusion
In this Power Automate desktop tutorial, we saw how to extract data from Word documents to Excel using Power Automate Desktop (PAD).
You may also like:
- How to Send an Email with Attachments from Local Folder using Power Automate?
- How to count items in an array using Power Automate?
- Convert an array to a string using Power Automate
- List variables in Power Automate Desktop
- Data table in Power Automate Desktop
I am Bijay a Microsoft MVP (10 times – My MVP Profile) in SharePoint and have more than 17 years of expertise in SharePoint Online Office 365, SharePoint subscription edition, and SharePoint 2019/2016/2013. Currently working in my own venture TSInfo Technologies a SharePoint development, consulting, and training company. I also run the popular SharePoint website EnjoySharePoint.com