A data table in Power Automate Desktop comprises rows and columns that specify the position of each item distinctively. Data tables can be thought of as lists, with data rows as elements.
In this Power Automate Desktop, we will see how to create and manipulate the data in the table variable. So, here we will perform the below actions with the Data table variable in Power Automate Desktop.
- Create Data table
- Insert a row into a Data table
- Find or replace in the data table
- Update data table item
- Delete a row from a data table
How to create a data table in Power Automate Desktop
Here we will see how to create a data table in Power Automate Desktop.
So here in Power Automate Desktop, we will create an employee table containing employee information, i.e., Name, Age, and Department.
To do this, follow the below steps.
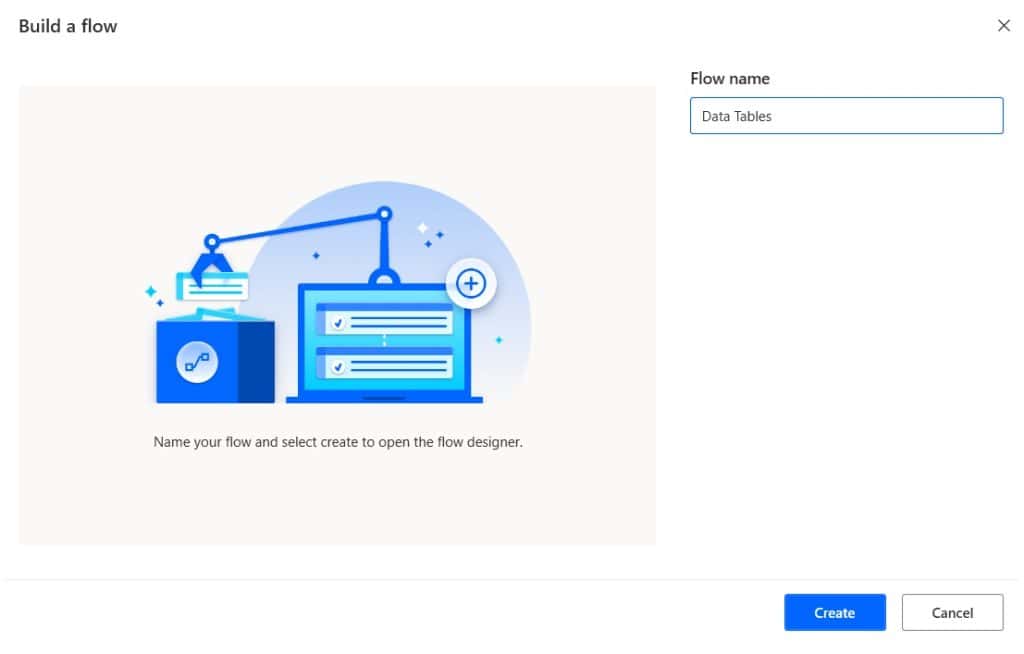
Step 1: Open Power Automate Desktop, click on +New flow -> then provide the flow name. Click on Create button.
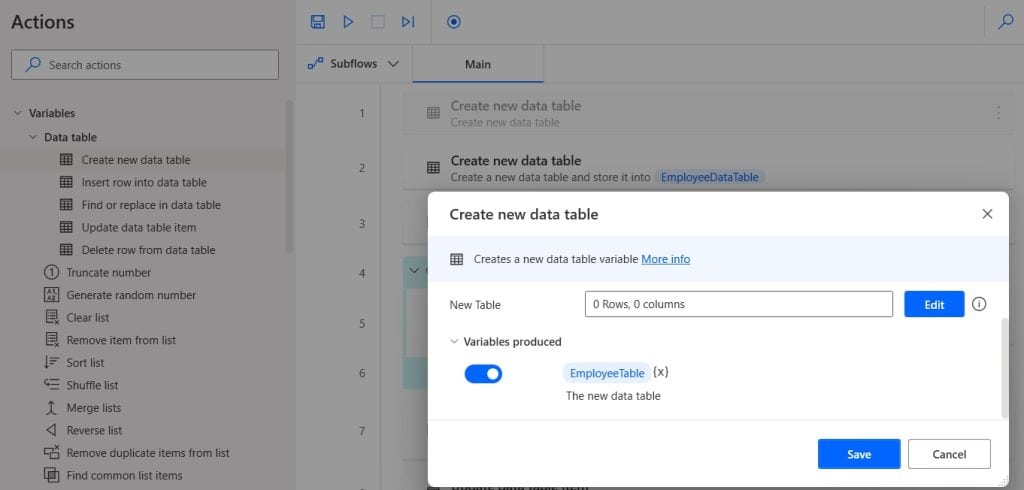
Step 2: Expand the Variable section -> expand the Data table section -> drag and drop the Create data table action to the Canvas area. Then provide the below information:
- Rename the variable to EmployeeTable.
- New Table: This table currently contains 0 columns and 0 rows, so click on Edit.
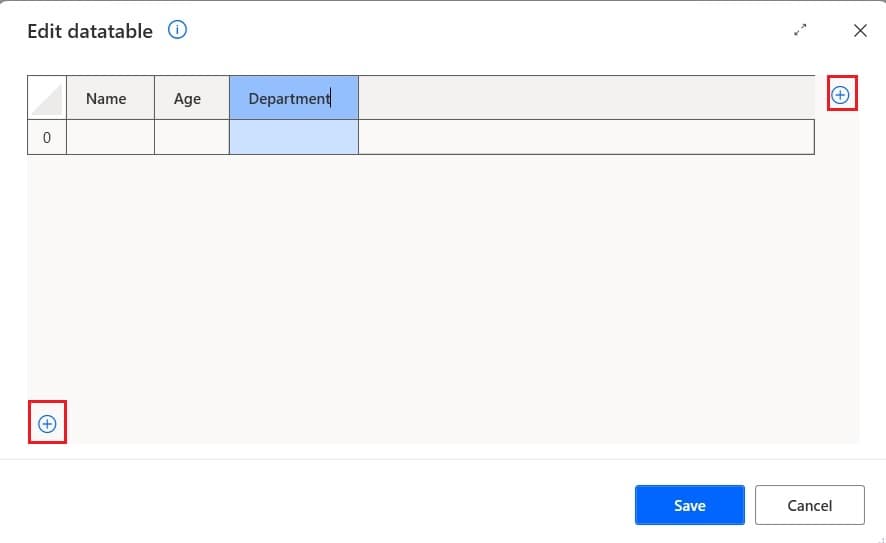
- Then by default, 2 columns are there, as we need 3 columns; for this, click on the + button on the top right side.
- Rename the column by double-clicking on it, to Name, Age, and Department.
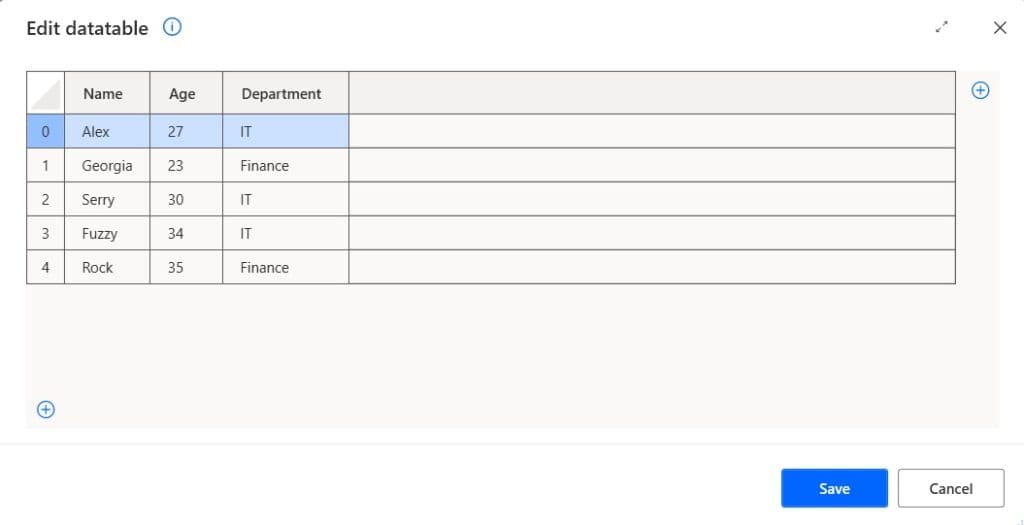
- Then provide the value to each column like below. To add a row to the table, click on the + icon on the bottom left.
After adding all the data to the table, click on Save. Now, your new table contains 3 columns and 5 rows. Then click on Save.
Now save the flow and run the flow by clicking on the Run button. On the right side under the Flow variable, right-click on the ‘Employee table’ variable -> click on View. You can see the output data table.
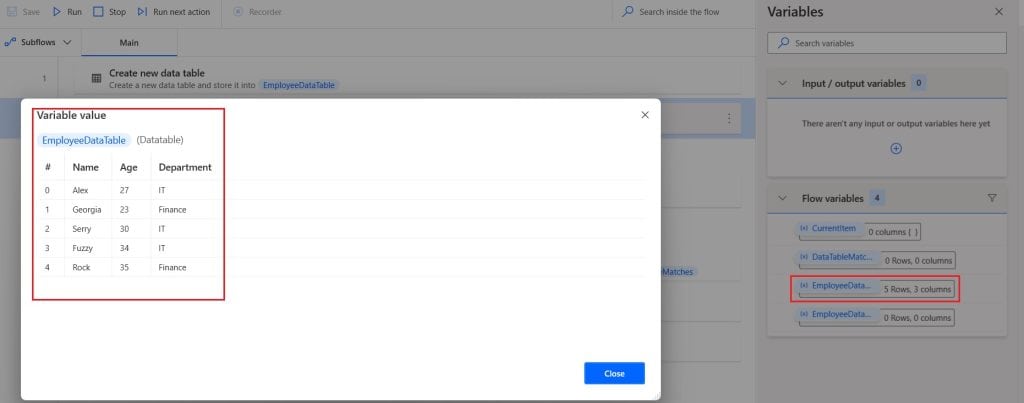
This is how to create a data table in Power Automate Desktop.
How to Insert a row into a Data table in Power Automate Desktop
Here we will see how to insert a row into a data table in Power Automate Desktop.
To insert the row in a data table, we will create another table ‘EmployeeTable2’, which contains the same column Name, Age, and Department with some data like below. So here, we will insert all the rows from EmployeeTable2 to EmployeeTable.
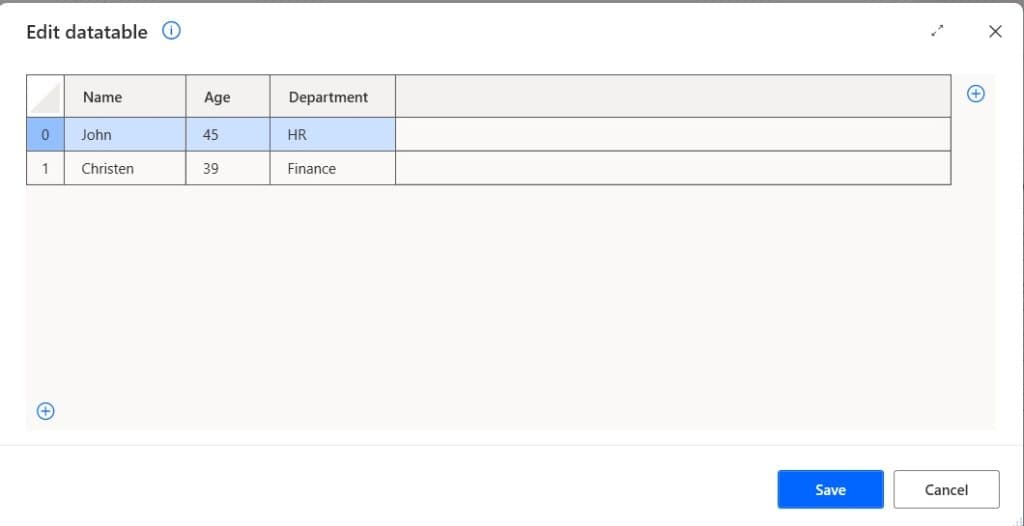
Note:
When you are inserting the row to the data table , the column count of list or data row must match to the column count in the data table.
Now follow the below steps to insert the row into the data table in Power Automate Desktop.
Step 1: As we have already created EmployeeTable, similarly create another data table i.e. EmployeeTable2. And add the data as shown in the above screenshot.
Step 2: We will add all rows to the data table, so here, we will use for each loop. So, expand the Loop section -> drag and drop the for each action to the Canvas area. Then provide the below information:
- Value to iterate: click on the variable icon {x}, select ‘EmployeeTable2’ and then click on save
- Store into: The current value/row will store in the variable ‘CurrentItem’. Then click on Save.
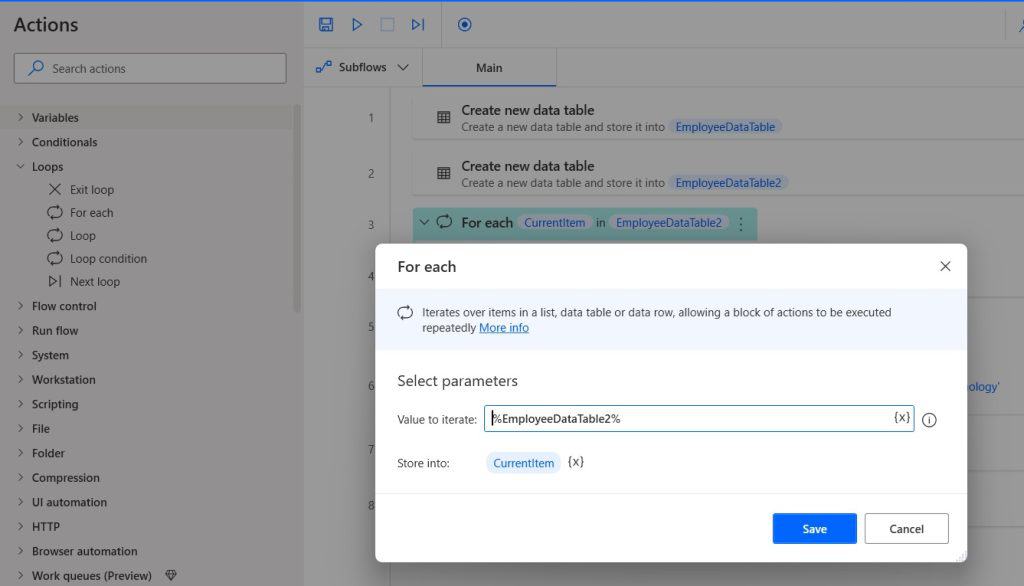
Step 3: Now we will insert the row into the table, so, expand the variable section -> expand the Data table section -> drag and drop the Insert row into a table action inside for each loop. Then provide the below information:
- Data Table: Click on the variable icon {x}, select ‘EmployeeTable’, and then click on save
- Into Location: Here, you can add data in between by using the ‘Before row index’, and we can add the row End of the data table. We will use the End of data table option.
- New value(s): click on the variable icon {x}, select ‘CurrentItem’, and then click on save.
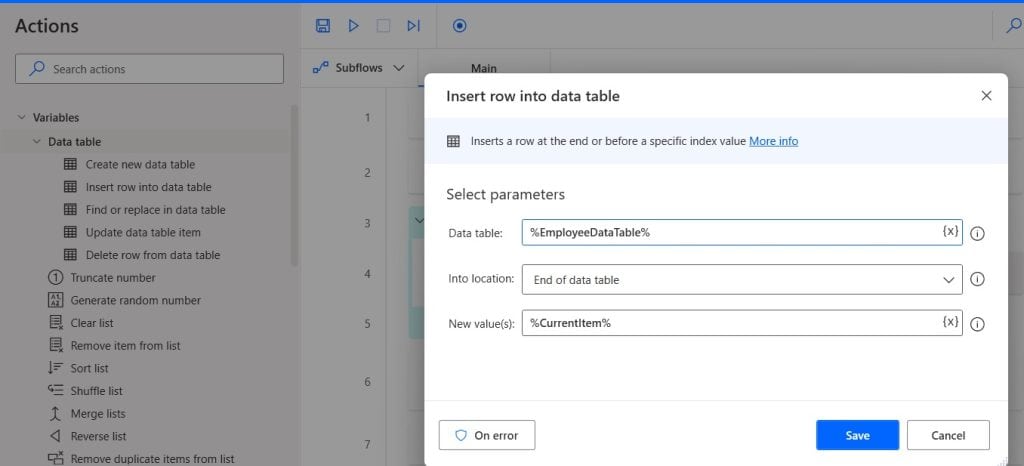
Step 4: Now save and run the flow by clicking on the Run button. On the right side, under the Flow variable, right-click on the ‘Employee table’ variable -> click on View. You can see the output data table.
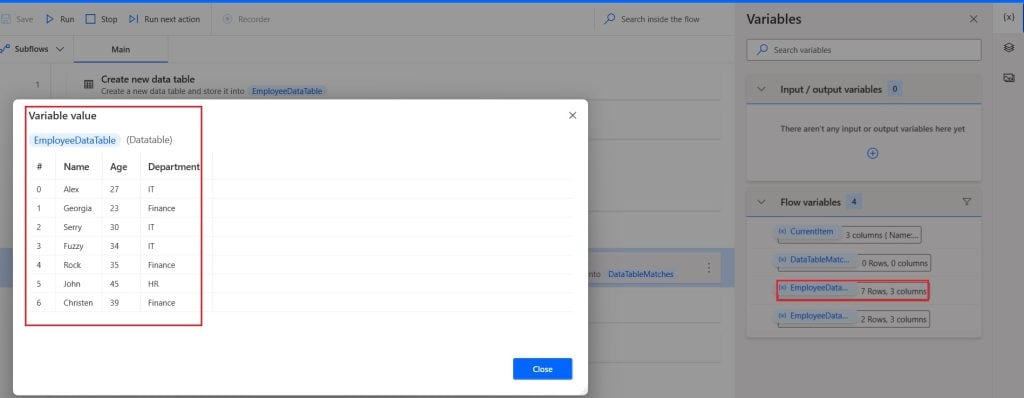
This is how we can insert the row to the data table in the Power Automate desktop.
Find or replace in data table using Power Automate Desktop
Here we will see how to find or replace data table using Power Automate Desktop.
For example, we will use the EmployeeTable, which we have created above, and here, we will search for text IT and replace it with Information Technology.
Step 1: Drag and drop the Find or replace in data table action to the canvas area after the create data table action. Then provide the below information:
- Data table: Click on the variable icon {x}, select ‘EmployeeTable’, and then click on save.
- Search mode: Here, it provides 2 options: ‘ Find’ and ‘Find and replace’; find will only find the value and return the address, like which row and column, and find and replace will find the text and replace the text with the required information. For this, we will use the Find and Replace options.
- Enable all matches.
- Text to find: Write the text to find in the data table.
- Text to replace with: Provide the text you want to replace.
- Search by: Select the search option ‘Everywhere’.
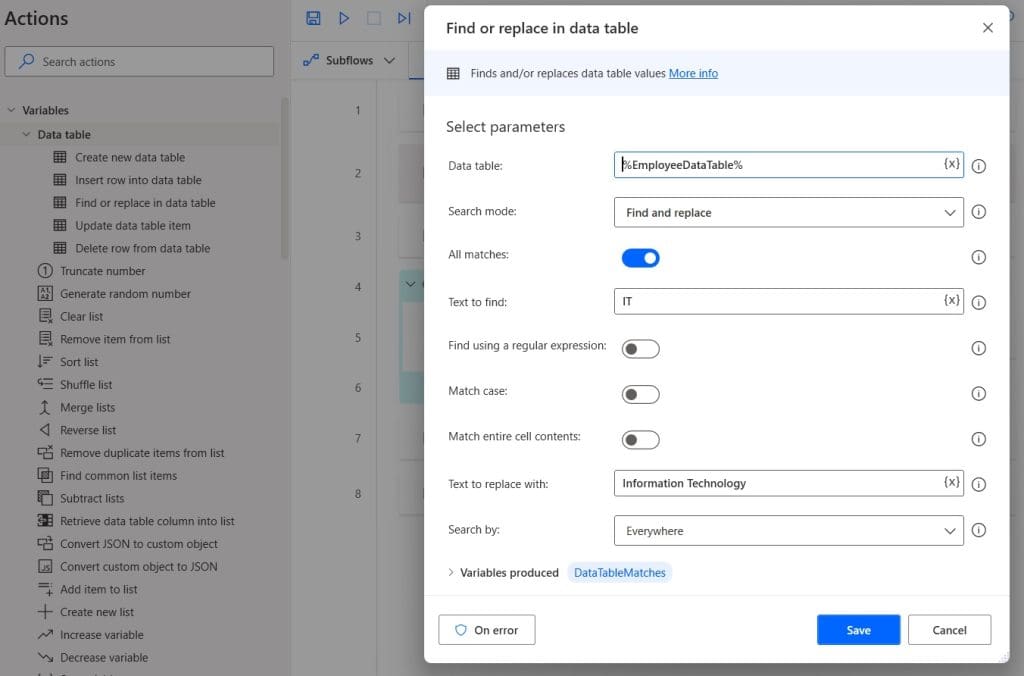
Step 2: Now save and run the flow by clicking on the Run button. On the right side under the Flow variable, right-click on the ‘Employee table’ variable -> click on View. You can see the output data table.
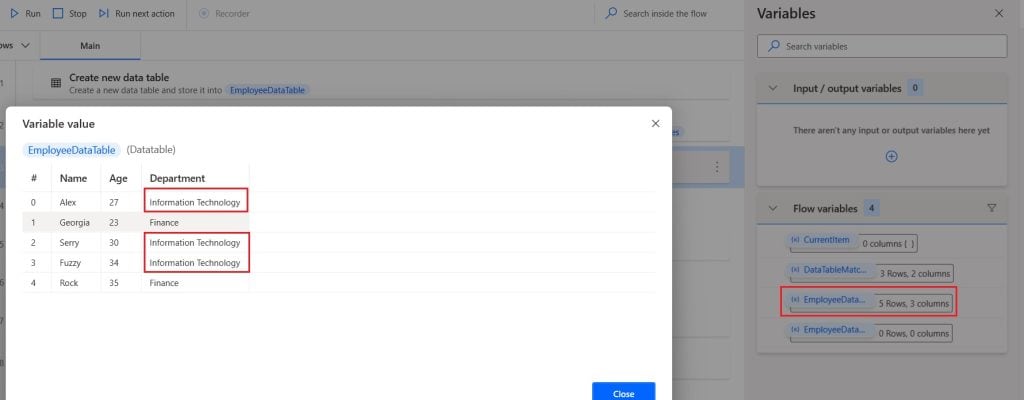
This is how we can find and replace in data tables using Power Automate Desktop.
Update data table item in Power Automate Desktop
Here we will see how to update the data table item in Power Automate Desktop.
We will use the EmployeeTable, here, we will update the value IT, from the first row and 3rd column (index=2) with Information Technology using the Update data table item action. Because the Update data table item action accepts the row item in the defined column
Step 1: After the ‘Create new data table’ action, then drag and drop the Update data table item action. Then provide the below information:
- Data table: Click on the variable icon {x}, select ‘EmployeeTable’, and then click on save
- Column: Provide column 2
- Row: Provide row as 0
- Value: Provide the new value as Information Technology.
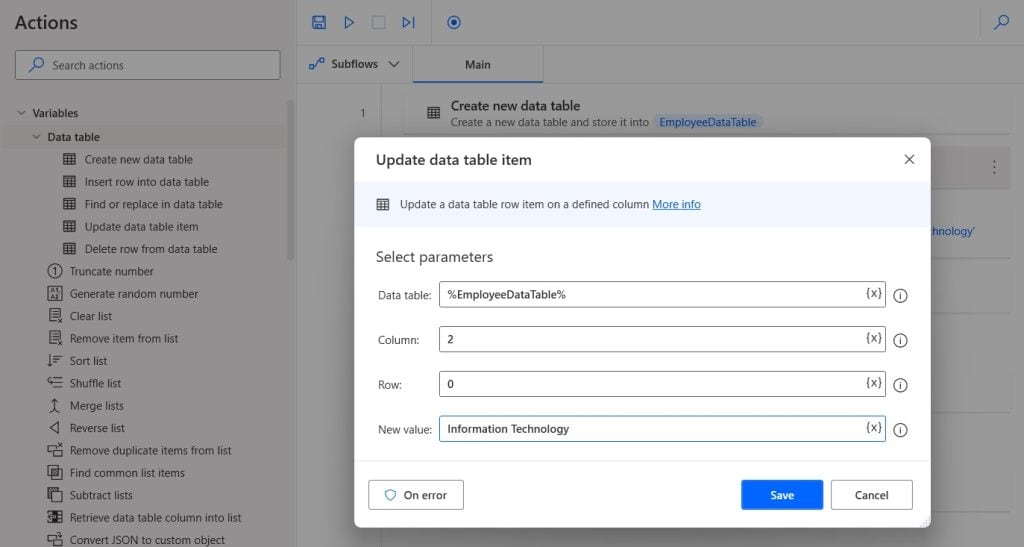
Step 2: Now save and run the flow by clicking on the Run button. On the right side under the Flow variable, right-click on the ‘Employee table’ variable -> click on View. You can see the output data table.
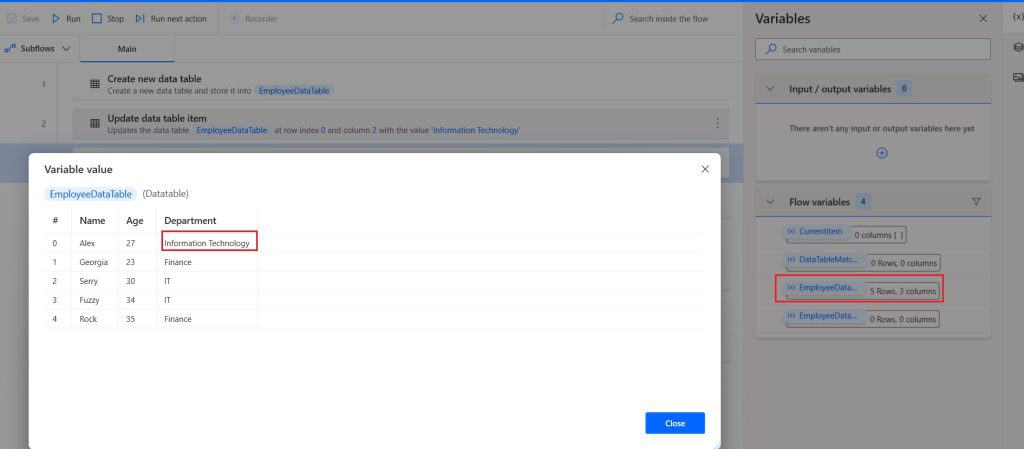
This is how to update the data table item in the Power Automate desktop.
Delete row from a data table in Power Automate Desktop
Here we will see how we can delete a row from the data table in Power Automate Desktop
For example, if we want to delete the 2nd row, then by using the row index, we can delete, i.e., 1 in the Delete row from a data table action.
Step 1: After the ‘Create new data table’ action, then drag and drop the Delete row from the data table action. Then provide the below information:
- Data table:Click on the variable icon {x}, select ‘EmployeeTable’, and then click on save
- Row index: As we will delete the last row, so the row index is 4.
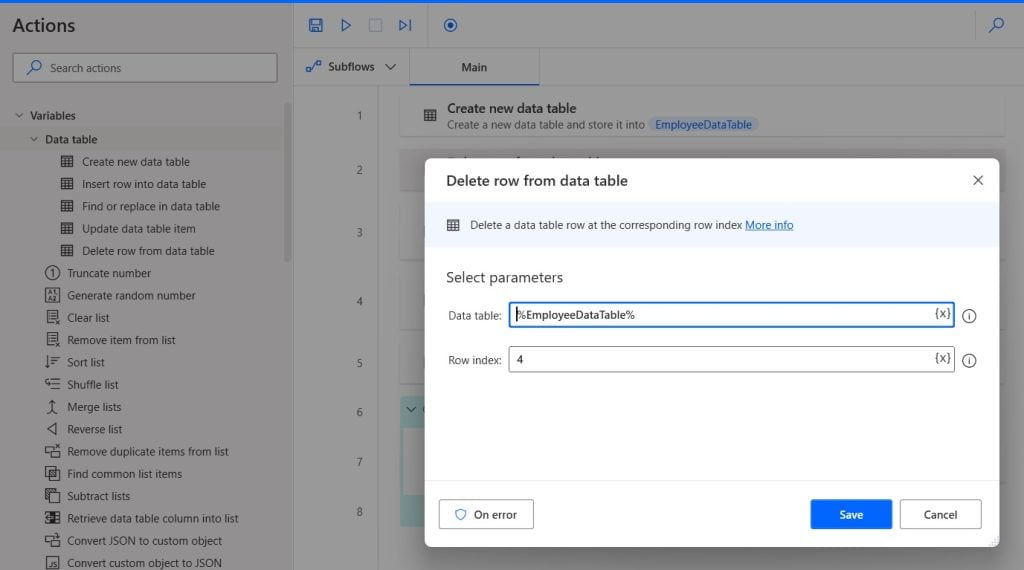
Step 2: Now save and run the flow by clicking on the Run button. On the right side, under the Flow variable, right-click on the ‘Employee table’ variable -> click on View. You can see the output data table.
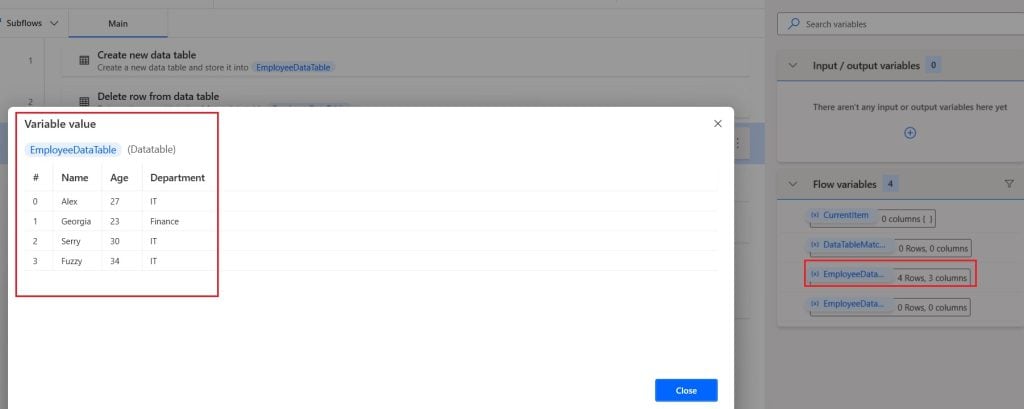
This is how to delete a row from the data table using Power Automate Desktop.
Conclusion
I hope you got an idea of the Data table in Power Automate Desktop. I have explained how to create a data table in Power Automate Desktop. Then I have shown how to do various operations like inserting data into a data table, updating values in the data table, deleting a row from the data table, and finding or replacing values in the data table using Power Automate Desktop.
You may also like:
- List variables in Power Automate Desktop
- Extract Data from Word Documents to Excel using Power Automate Desktop
- Power Automate Desktop loop through Excel rows
- Loop actions in Power Automate Desktop
- Merge Pdf files in Power Automate Desktop
I am Bijay a Microsoft MVP (10 times – My MVP Profile) in SharePoint and have more than 17 years of expertise in SharePoint Online Office 365, SharePoint subscription edition, and SharePoint 2019/2016/2013. Currently working in my own venture TSInfo Technologies a SharePoint development, consulting, and training company. I also run the popular SharePoint website EnjoySharePoint.com