In Power Automate desktop, a list variable stores a set of values or a set of general values that the index and values can access. The Merge list, Shuffle list, Clear list, Reverse list, and other actions are performed on the list.
This Power Automate Desktop tutorial is all about “List variables in Power Automate desktop”. So here we will cover the below List of variable actions.
- Create List
- Add an item to the list
- Remove Duplicate items in this list.
- Reverse items in the list
- Remove items from the list
- Sort items in the List
- Shuffle items in the List
- Clear List
- Find common items in the list
- Subtract List
- Merge Lists
Let’s start creating a Power Automate Desktop flow, that will create a List.
Create list variable using Power Automate Desktop
Here we will see how to create a list variable using Power Automate Desktop.
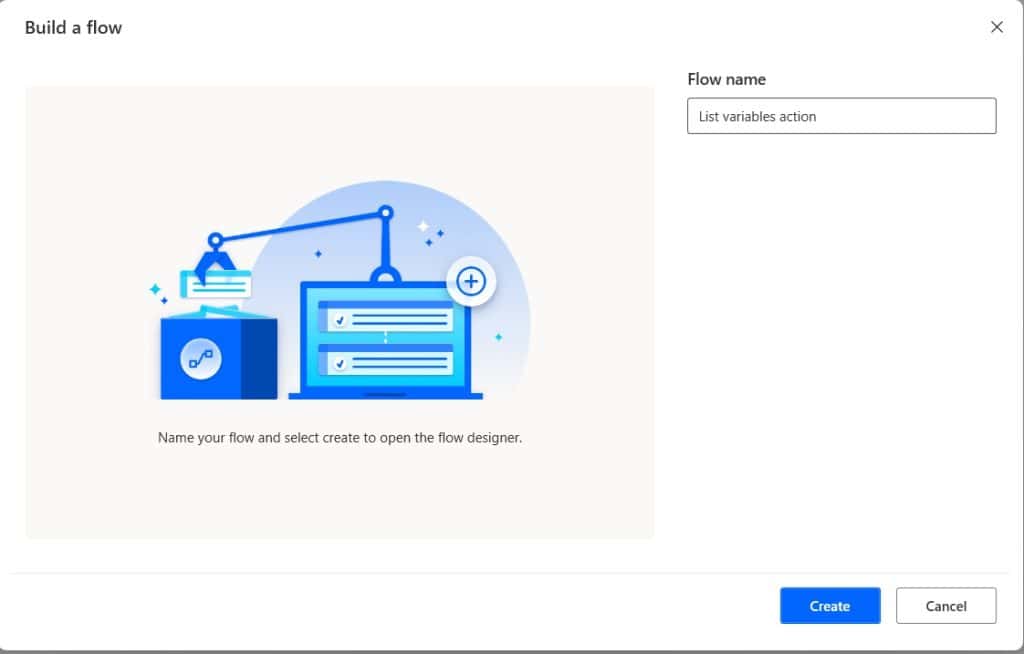
Step 1: Open Power Automate Desktop, click on +New flow -> provide the flow name. Click on Create.
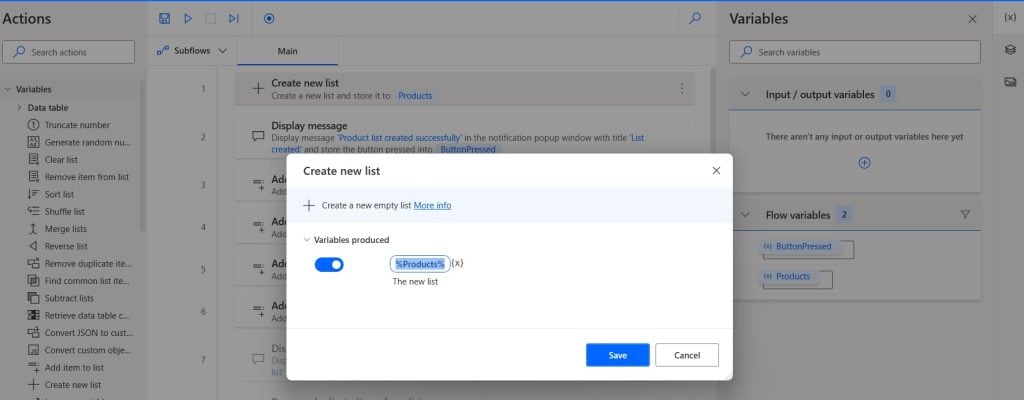
Step 2: Now we will create a List variable called Product, so, expand the variable section. Then drag and drop the Create new list action to Canvas and provide the below information:
- Now provide the new list name as Product, then click on Save.
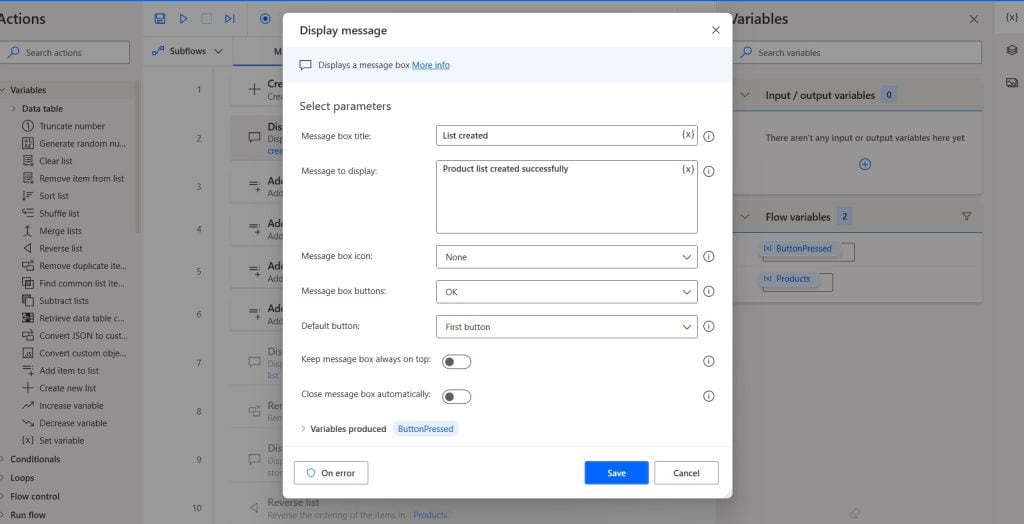
Step 3: Now, to display the product list created successfully we will use the display message action. So, expand the Message box section and then drag and drop the Display Message action to the canvas. Then provide the below information:
- Message box title: Provide the title like below.
- Message to display: Provide the message to display like below.
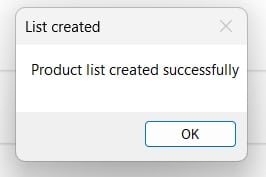
Now save the flow and run the flow; you can see the Message box pop up having the information ‘Product list created successfully’.
Add an item to the list in Power Automate Desktop
Here we will see how to add an item to the above Product List in Power Automate List.
As we have already created the Product List in the above section, so now we will add 4 items to this list. Then 4 items are ‘Godrej Tea’, Cadbury Dairy Milk, Tonned Milk, and Tonned Milk.
Expand the variable section, then drag and drop the ‘Add item to list ‘ action to canvas. Then provide the below information:
- Add item: Provide the item name ‘Godrej Tea’.
- Into List: Click on the variable icon {x} -> select Product, then click Save.
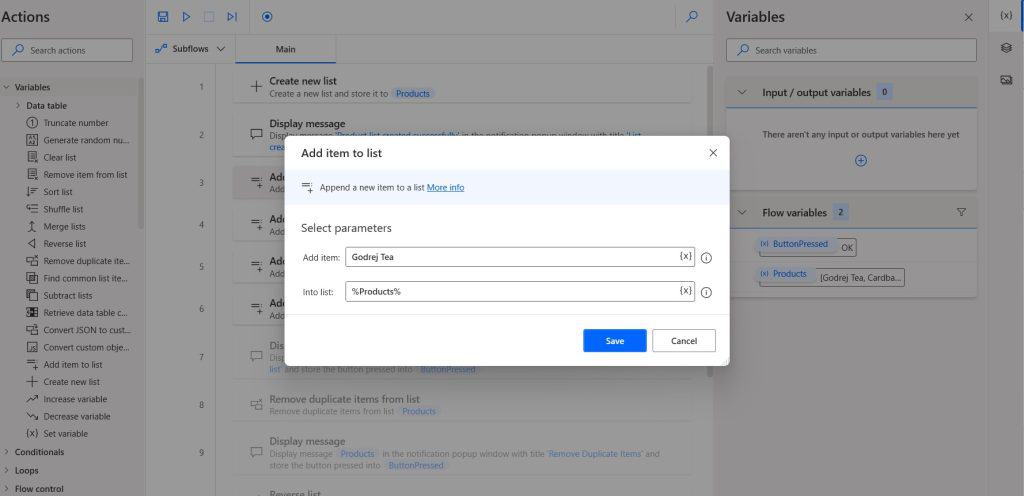
Similarly, we can add other items to the Product List, after that, we need to display a list of items. So, expand the Message box section and then drag and drop the Display Message action to the canvas. Then provide the below information:
- Message box title: Provide the title like below.
- Message to display: Provide the message to display like below.
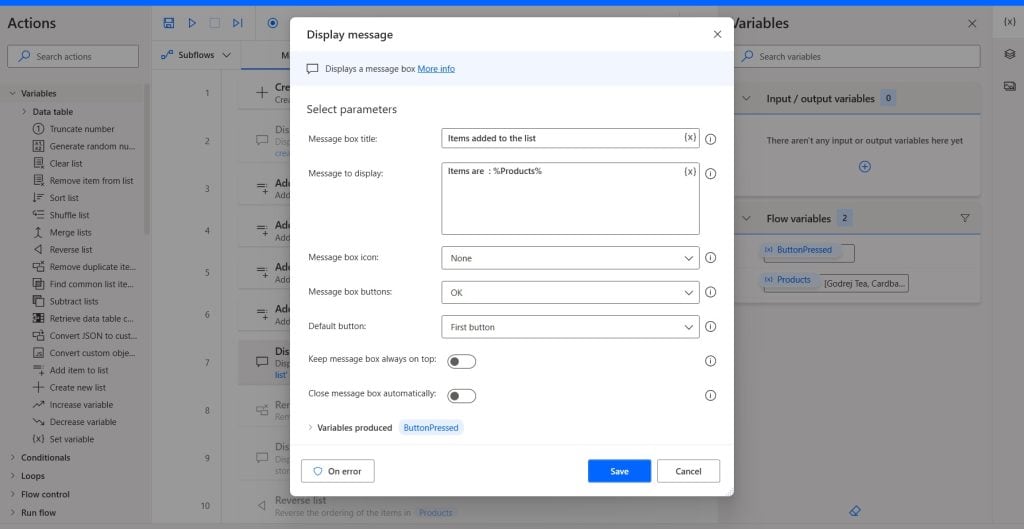
Now save the flow and run the flow; you can see the Message box pop up having the information ‘Product list created successfully’. So, click on ok.
Once items are added to the list, you can see the Message box will open and display all the items in the list.
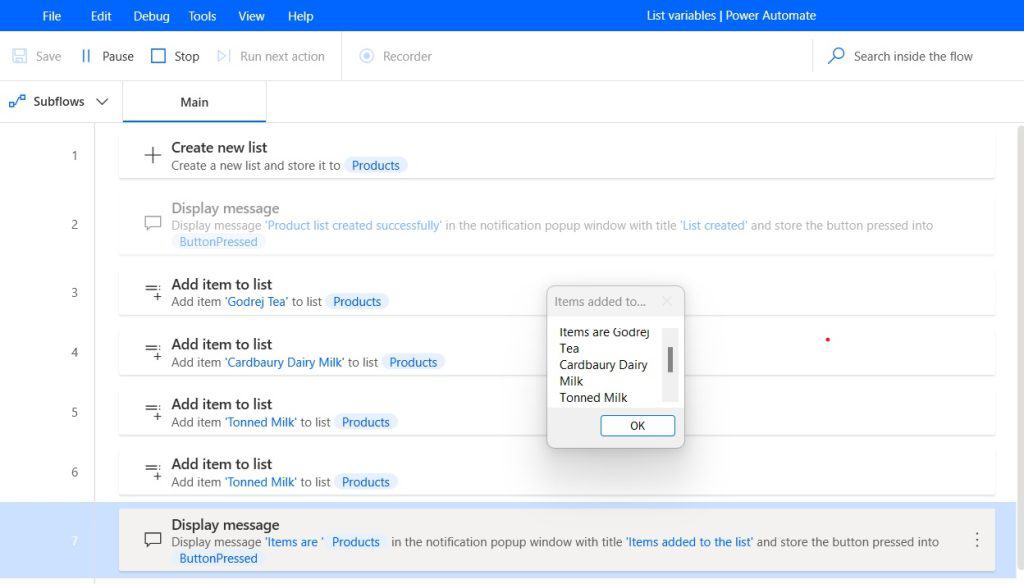
Remove Duplicate items in this list using Power Automate Desktop
Here we will see how to remove duplicate items from the above list in Power Automate Desktop.
The product list contains Godrej Tea, Cadbury Dairy Milk, Tonned Milk, and Tonned Milk. You can see the item ‘Tonned Milk’ are of two times, so we will remove the items, and the list contains: Godrej Tea, Cadbury Dairy Milk, and Tonned Milk.
For this expand the variable section, then drag and drop the Remove duplicate item from list action to canvas. Then provide the below information:
- List to remove duplicates item from: Click on the variable icon {x}, then select the Product variable, and click on Save.
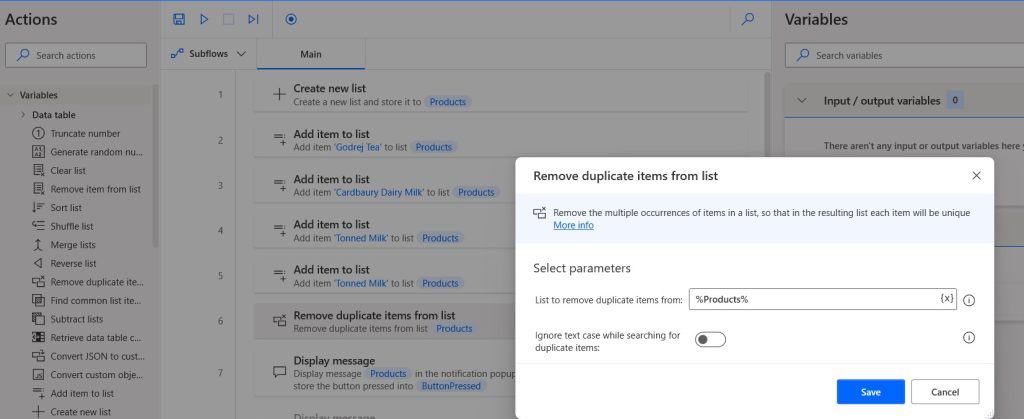
To display the result, we will add the display message action. So, expand the Message box section, and then drag and drop the Display Message action to the canvas. Then provide the below information
- Message box title: Provide the title like below.
- Message to display: Provide the message to display like below.
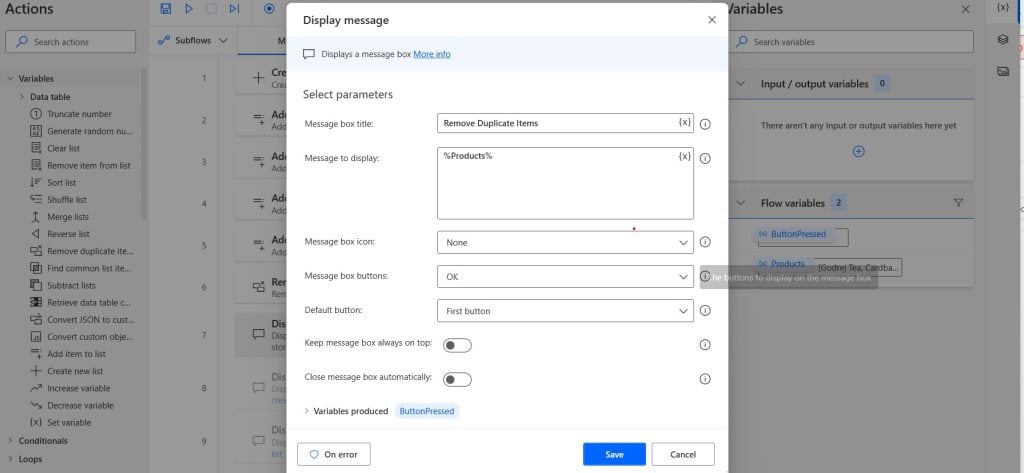
Now save the flow and run the flow, you can see the Message box pop up having the information ‘Product list created successfully’. So, click on ok.
Once items are added to the list, the Message box will open and display all the items in the list. Then you can see the duplicate items are removed from the List in Power Automate.
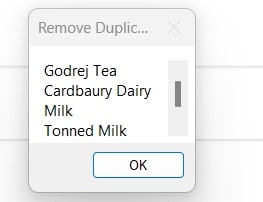
Reverse items from the list using Power Automate Desktop
Here we will see how to reverse items from the list using Power Automate Desktop.
As Product List, contains items such as Godrej Tea, Cadbaury Dairy Milk, and Tonned Milk, after reversing the items the result will be Tonned Milk, Cadbaury Dairy Milk, and Godrej Tea.
For this, expand the variable section, then drag and drop the Reverse items from the list action to canvas. Then provide the below information:
- List to reverse: Click on the variable icon {x} -> select the Product variable, and click on Save.
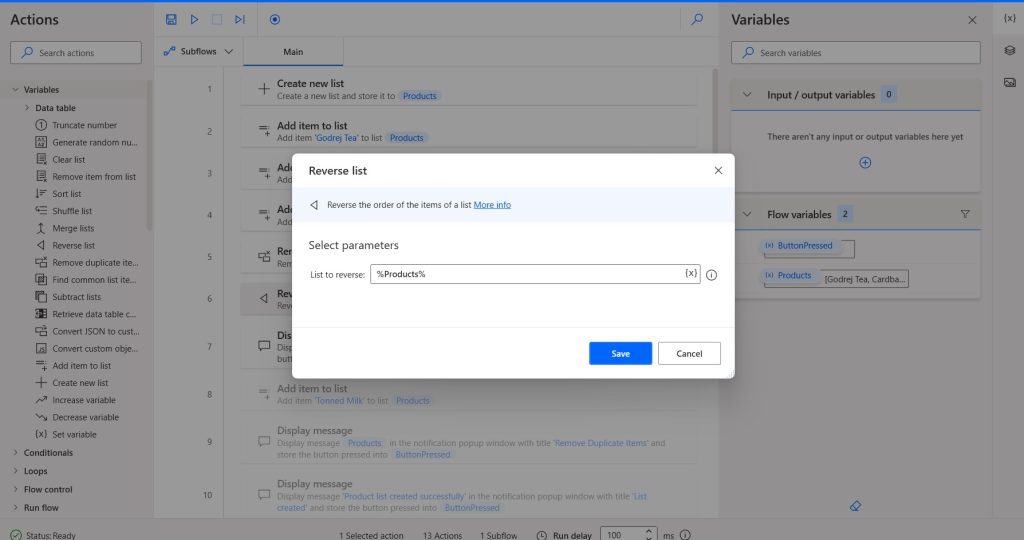
To display the result, we will add the display message action. So, expand the Message box section, and then drag and drop the Display Message action to the canvas. Then provide the below information
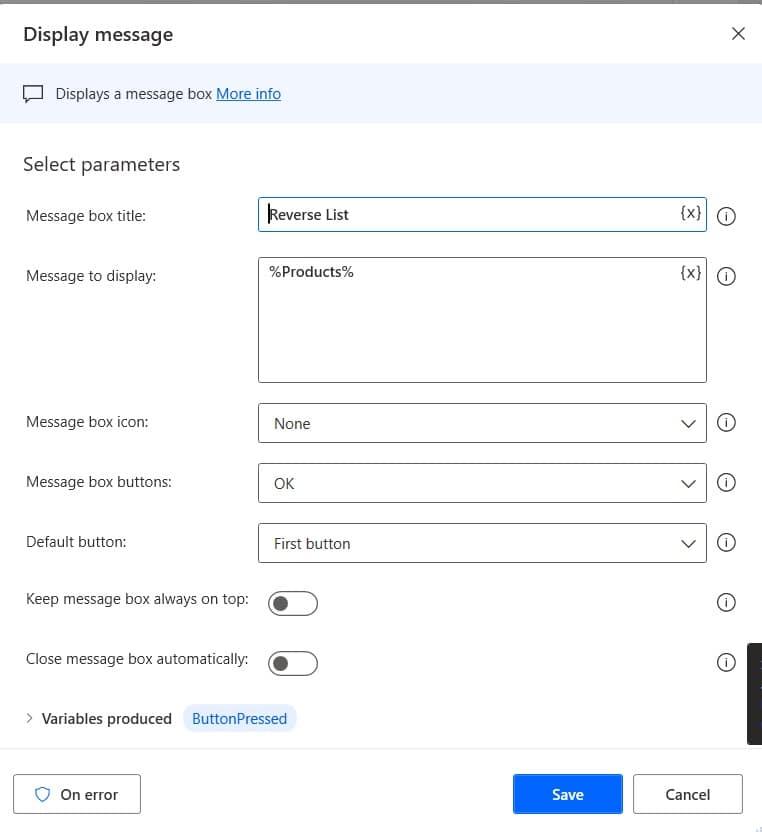
- Message box title: Provide the title like below.
- Message to display: Provide the message to display like below.
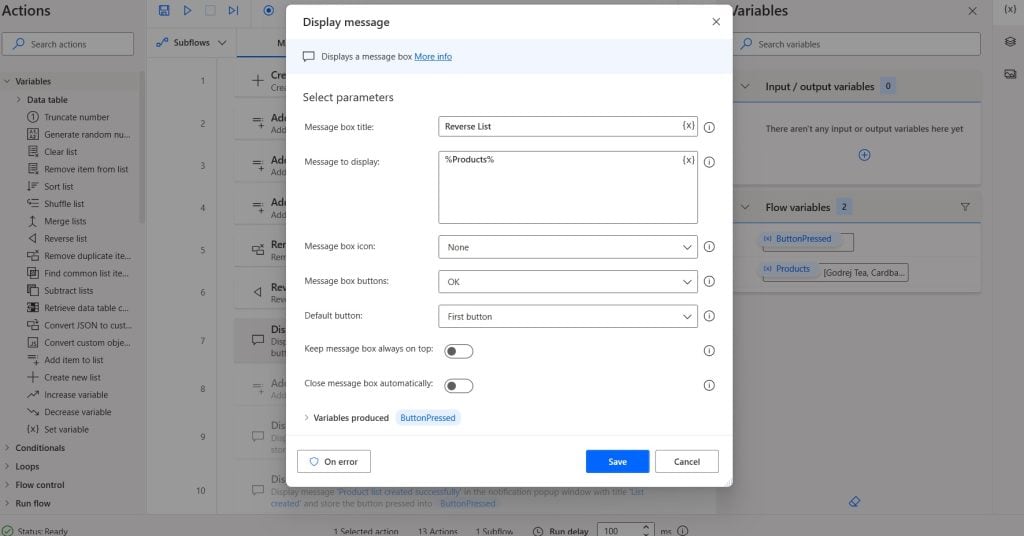
Now save the flow and run the flow, you can see the Message box popup displays the items that are reversed.
Remove items from the list using Power Automate Desktop
Here we will see how to remove a single item from a list using Power Automate Desktop.
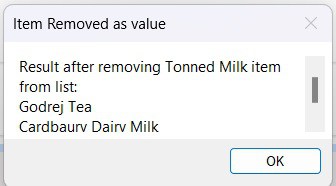
As product List contains the items i.e. Tonned Milk, Cadbury Dairy Milk, and Godrej Tea. After removing ‘Tonned Milk’, the items left on the list are Cadbury Dairy Milk and Godrej Tea.
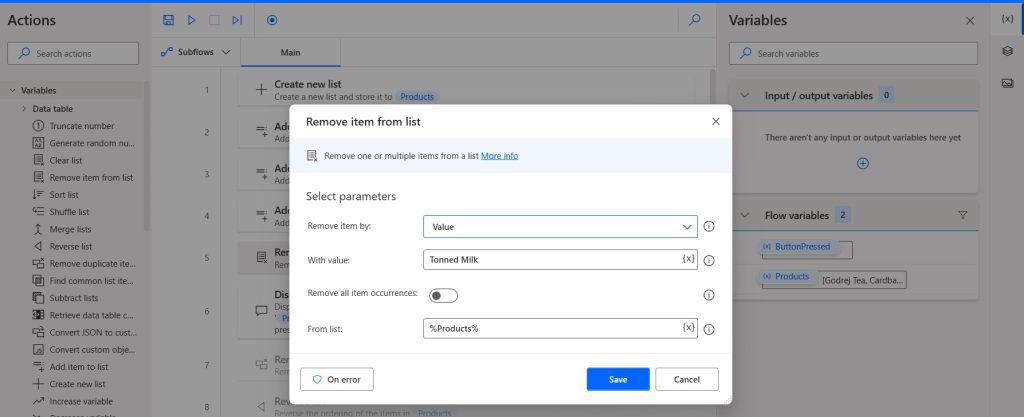
Expand the variable section, then drag and drop the Remove items from list action to canvas. Then provide the below information:
- Remove the item by: Selecting the value from the dropdown.
- With the value: Provide the value as Tonned Milk.
- Click on the variable icon {x} from the list, and select the Product variable. Then click on Save.
To display the result, we will add the display message action. So, expand the Message box section, and then drag and drop the Display Message action to the canvas. Then provide the below information
- Message box title: Provide the title like below.
- Message to display: Provide the message to display like below.
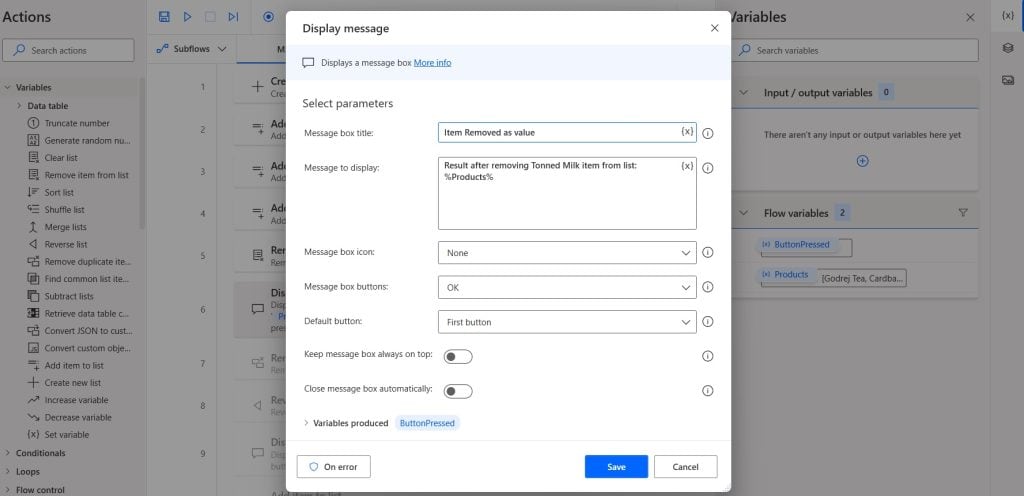
Now save the flow and run the flow, you can see the Message box popup displays the items by removing Tonned MIlk.
Sort items in the List using Power Automate Desktop
Here we will see how to sort items in the List using Power Automate Desktop.
Example 1: Sort items in the list
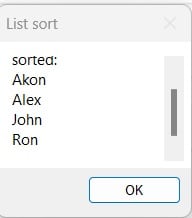
As, we have a list called Person which contains names i.e. Alex, Ron, John, and Akon. Then we will use the Sort list action to sort the items. After sorting the items the result will be Akon, Alex, John, and Ron.
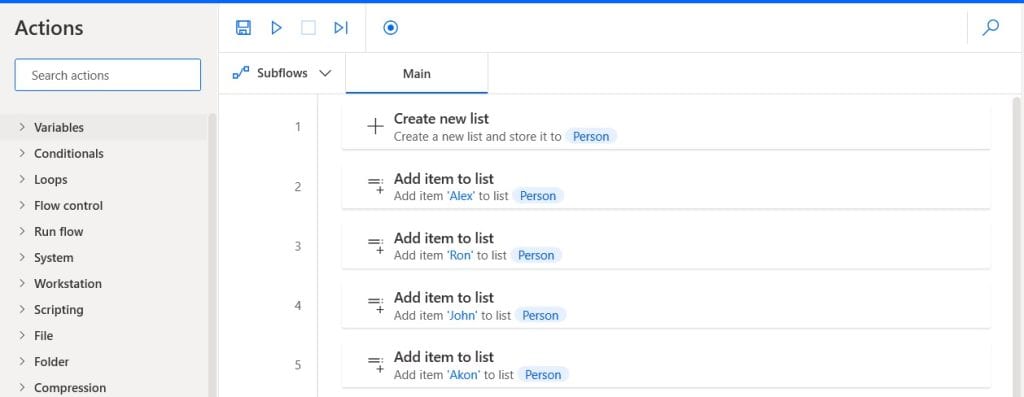
Like a Product list, you can create a Person list and add items to it in Power Automate Desktop as shown in the above screenshot.
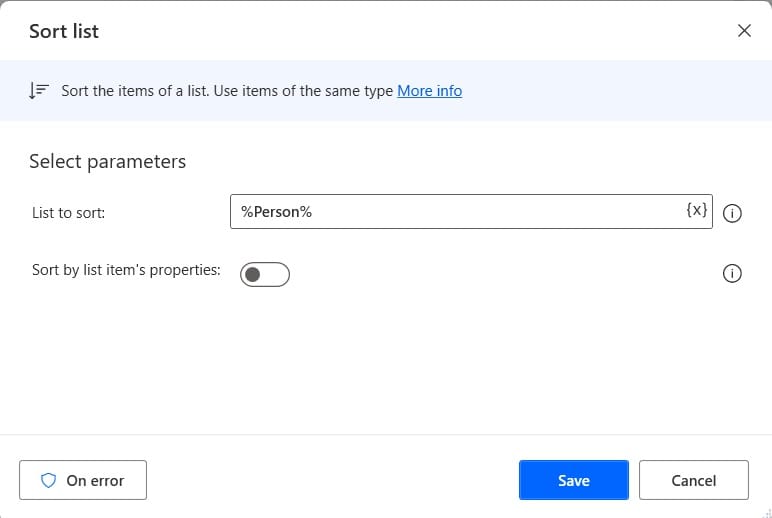
Then expand the variable section, and drag and drop the Sort list action to the canvas. Then Provide the below information:
- List to Sort: Click on the variable icon {x} -> select the Person and click on Save.
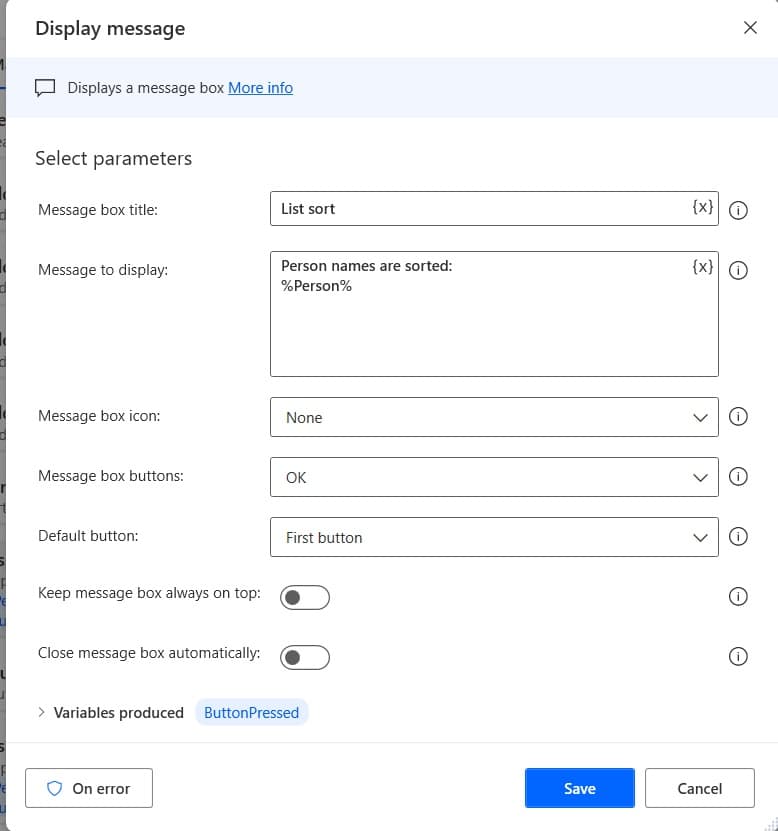
To display the result, we will add the display message action. So, expand the Message box section, and then drag and drop the Display Message action to the canvas. Then provide the below information
- Message box title: Provide the title like below.
- Message to display: Provide the message to display like below.
Now save the flow and run the flow, you can see the Message box popup displays the items that is sorted.
Example 2: Sort list items based on the Properties
For this, we will take a list of files in the folder, and then based on file name, we will sort the files.
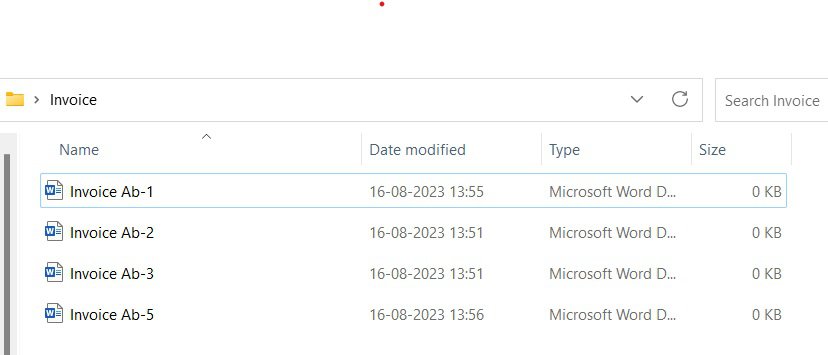
Now let’s create a flow in PAD, that will sort the file based on the name.
First, we will get all the files from the folder, so, create a new flow in PAD and then provide the flow name.
Then expand the Folder section under Action, and drag and drop the Get files in folder action to the canvas. Then provide the below information.
- Folder: Select the folder where files are available.
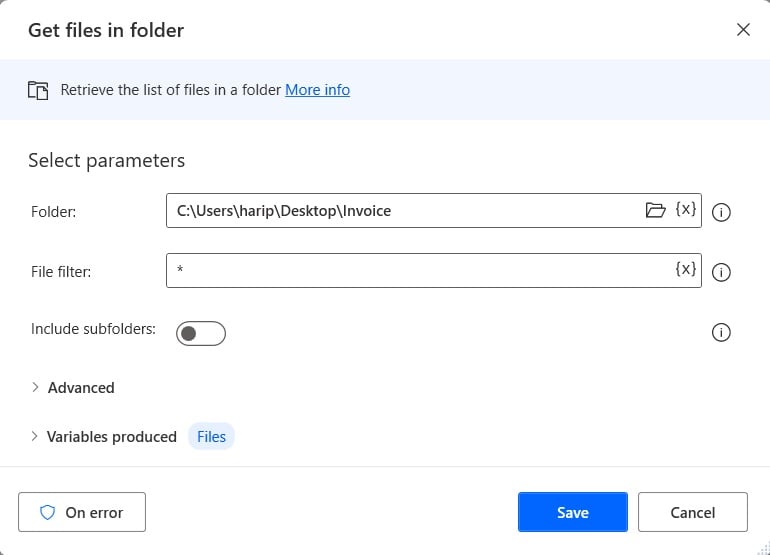
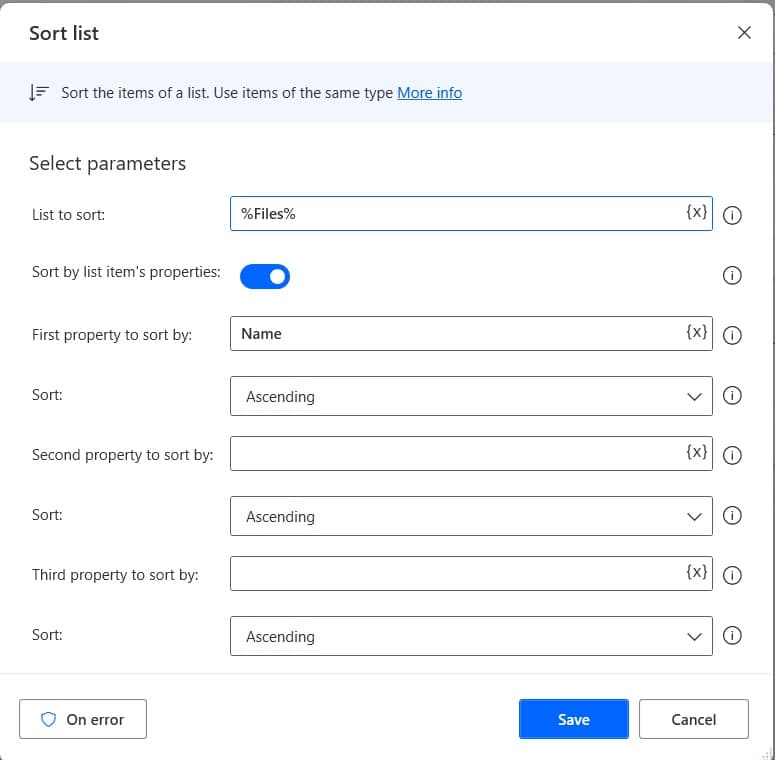
Let’s sort the files based on the names, for this, expand the variable section and then drag and drop the Sort list action to Canvas. Then provide the below information:
- List to sort: Click on variable icon {x}, select Files, and then click on Save.
- Enable the ‘Sort by list items properties’ options.
- The first property to sort by: Provide ‘Name’
- Sort: select Ascending
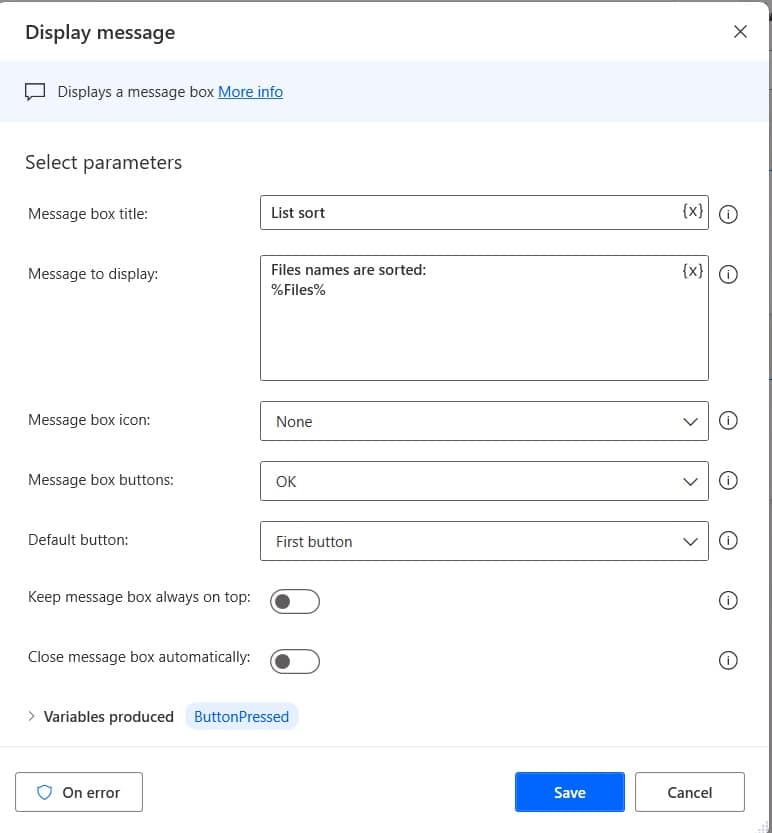
To display the result, we will add the display message action. So, expand the Message box section, then drag and drop the Display Message action to the canvas. Then provide the below information
- Message box title: Provide the title like below.
- Message to display: Provide the message to display like below.
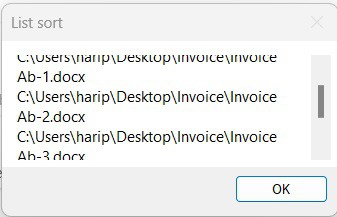
Now save the flow and run the flow, you can see the Message box popup displays the files that is sorted by the name.
Shuffle list items in Power Automate Desktop
Here we will see how to shuffle Person list items in Power Automate Desktop.
So, here we will take the above Person list, which contains names i.e. Alex, Ron, John, and Akon, and then shuffle the person names and display it. Every time we will shuffle the list, it will return a random permutation of the list.
For this, expand the variable section, and then drag and drop the Shuffle list action to Canvas. Then provide the below information:
- List to shuffle: Click on variable icon {x}, select Person, and then click on Save.
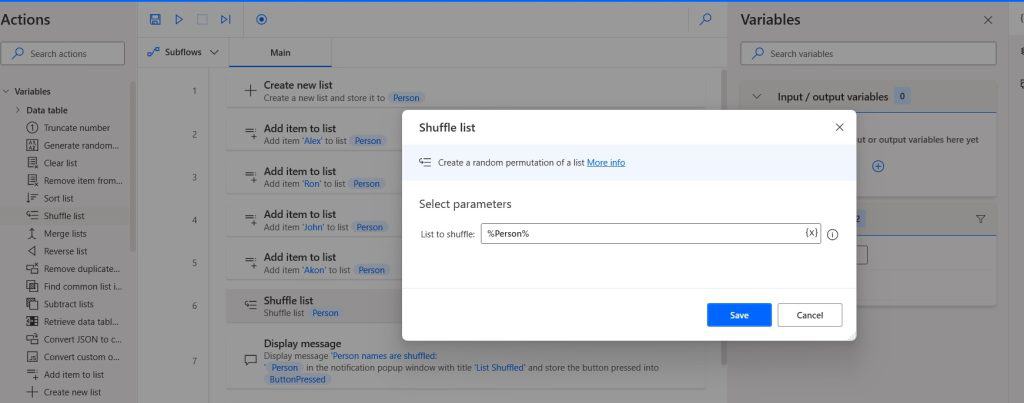
To display the result, we will add the display message action. So, expand the Message box section, and then drag and drop the Display Message action to the canvas. Then provide the below information
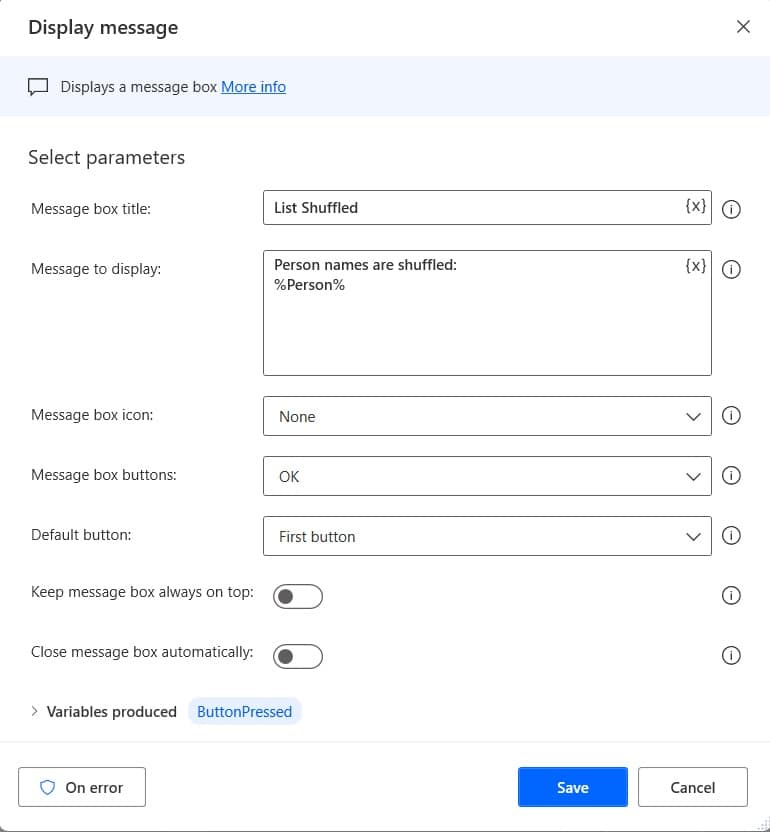
- Message box title: Provide the title like below.
- Message to display: Provide the message to display like below.
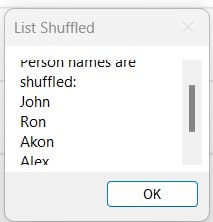
Now save the flow and run the flow, you can see the Message box popup displays the shuffled list items.
Clear the list in Power Automate Desktop
Here we will see how to clear items from the list in Power Automate Desktop.
Here, we will take the Person list, which contains names i.e. Alex, Ron, John, and Akon. Then we will use the Clear list actions to make the list empty.
For this, expand the variable section, drag and drop the Clear list action to canvas, Then provide the below information:
- List to clear: Click on variable icon {x} and select Person. Click on Save.
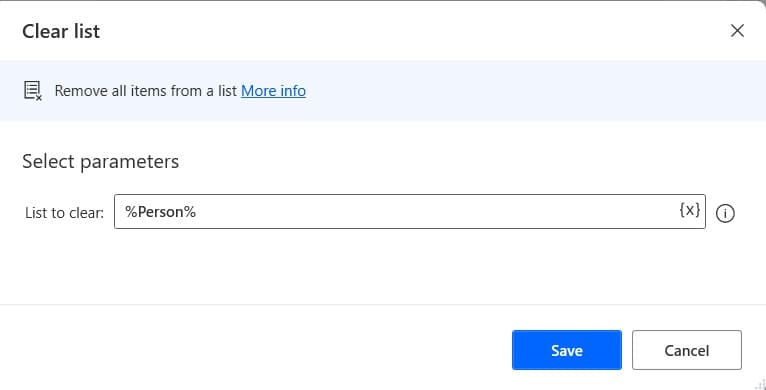
To display the result, we will add the display message action. So, expand the Message box section, and then drag and drop the Display Message action to the canvas. Then provide the below information
- Message box title: Provide the title like below.
- Message to display: Provide the message to display like below.
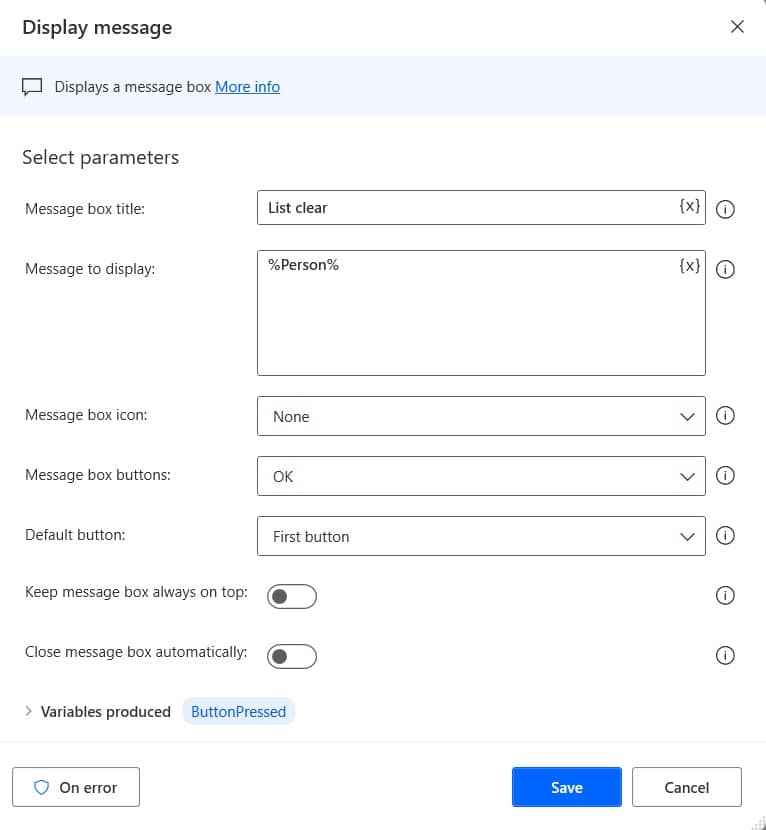
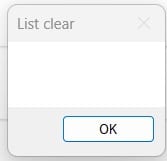
Now save the flow and run the flow, you can see the Message box popup displays the empty list.
Find common items in the list using Power Automate Desktop
Here we will see how to find common items in the list using Power Automate Desktop.
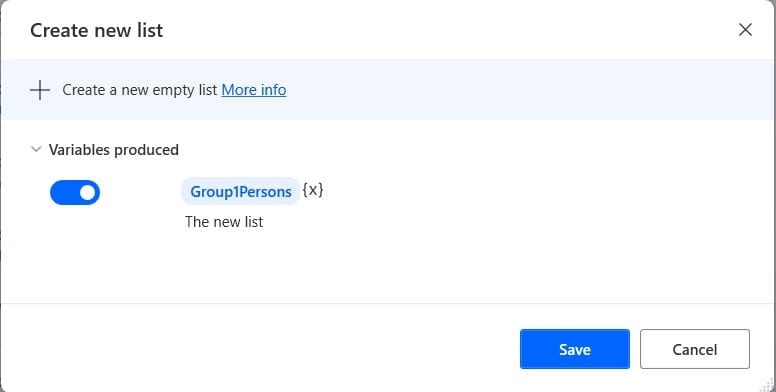
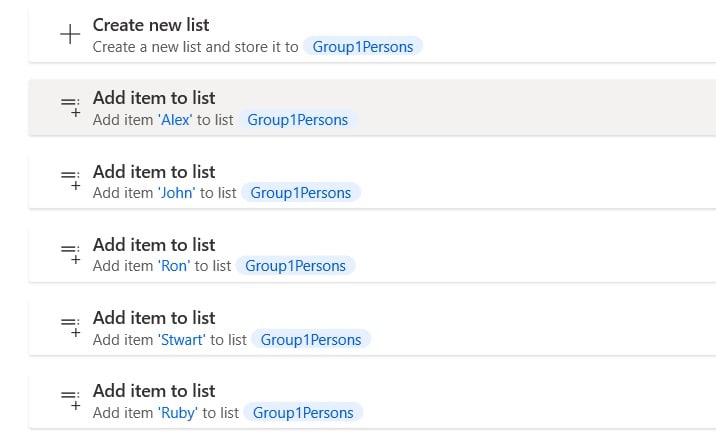
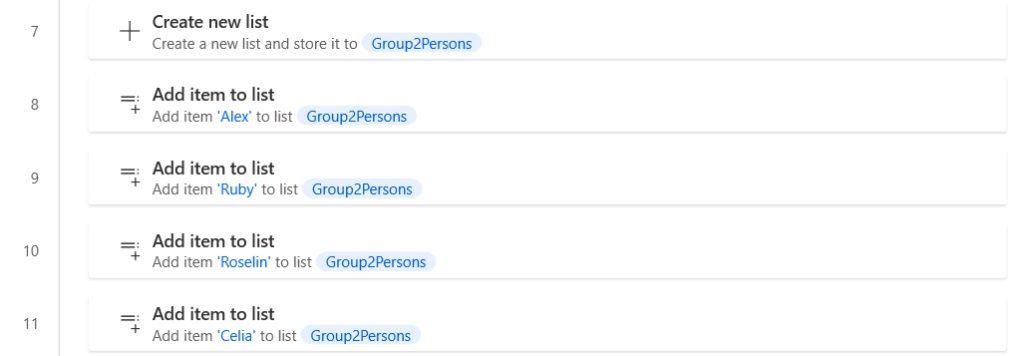
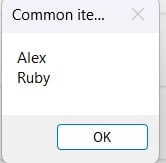
Here we will create two lists i.e. Group1Persons and Group2person. The Group1Person contains items such as Alex, Ron, John, Stwart, and Ruby, and Group2person contains items such as Alex, Ruby, Roselin, and Celia. Then we will find common items from the list by using the ‘Find common items in list’ action, it will return Alex, Ruby.
In Power Automate desktop, create a new flow, and provide the flow name. Click on Create.
Next, create a list, for this expand the Variable section, then drag and drop the Create a list to canvas. Then provide the below information
Now provide the new list name as Group1Person, then click on Save.
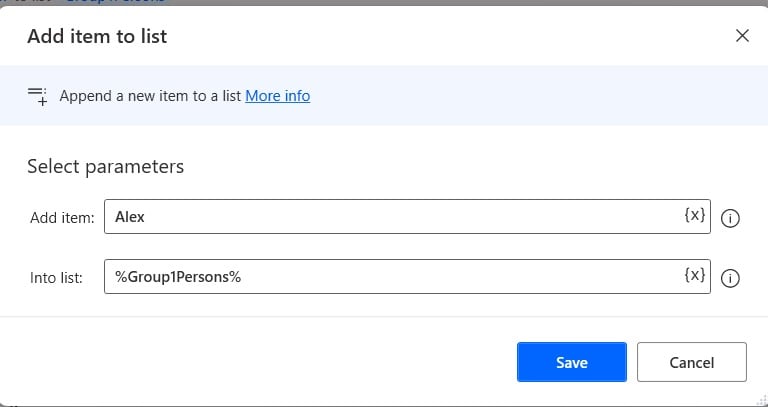
Expand the variable section, then drag and drop the ‘Add item to list ‘ action to canvas. Then provide the below information:
- Add item: Provide the item name ‘Alex’.
- Into List: Click on the variable icon {x} -> select Group1Person, then click Save.
Similarly, add other items to the list, then the flow will look like below.
After that, we will create another list Group2Persons. So similarly, create this list as we have created the above Group1Person list. Then add items to the Group2person list.
Now we have both the list, we can find the common items from both the lists. So, expand the variable section, then drag and drop the Find common list items action to canvas. Then provide the below information:
- First List: Click on variable icon {x}, select Group1Person, and click on save.
- Second List: Click on variable icon {x}, select Group2Person, click on save
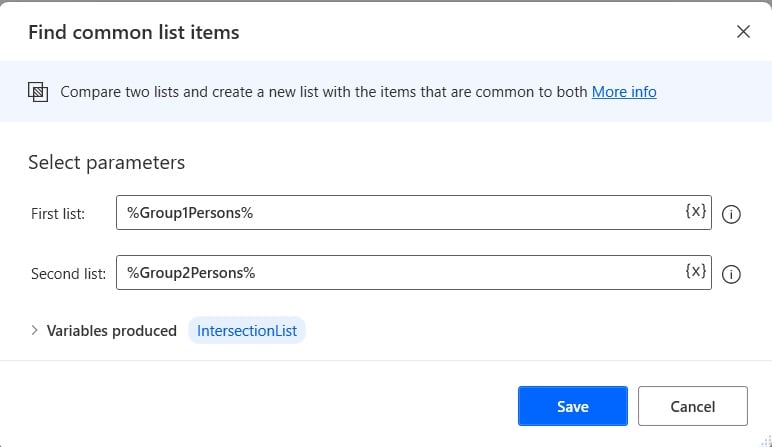
To display the result, we will add the display message action. So, expand the Message box section, and then drag and drop the Display Message action to the canvas. Then provide the below information
- Message box title: Provide the title like below.
- Message to display: Provide the message to display like below.
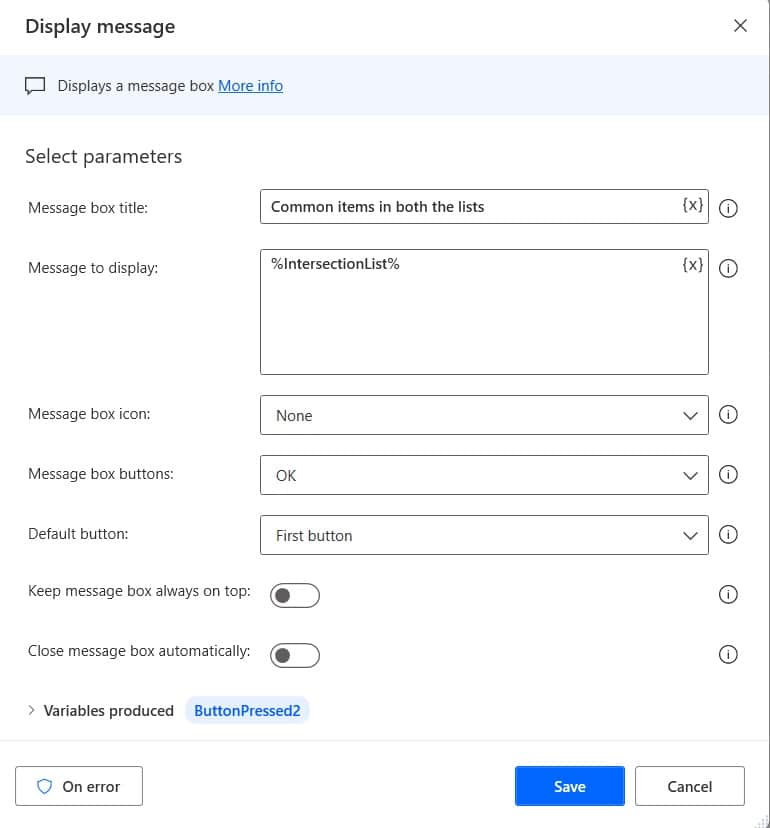
Now save the flow and run the flow, you can see the Message box popup displays the common items in the list.
Subtract items from the Lists
Here we will how to subtract items from the lists using Power Automate Desktop.
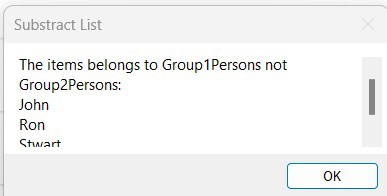
For this, we will take the above lists i.e. Group1Person and Group2person. Then we will subtract both the lists using Subtract list action and get the items from Group1Person, that are not in a Group2Person list.
So, expand the variable section and drag and drop the Subtract item action to the canvas. Then provide the below information:
- First List: Click on variable icon {x}, select Group1Person, and click on save.
- Second List: Click on variable icon {x}, select Group2Person, click on save
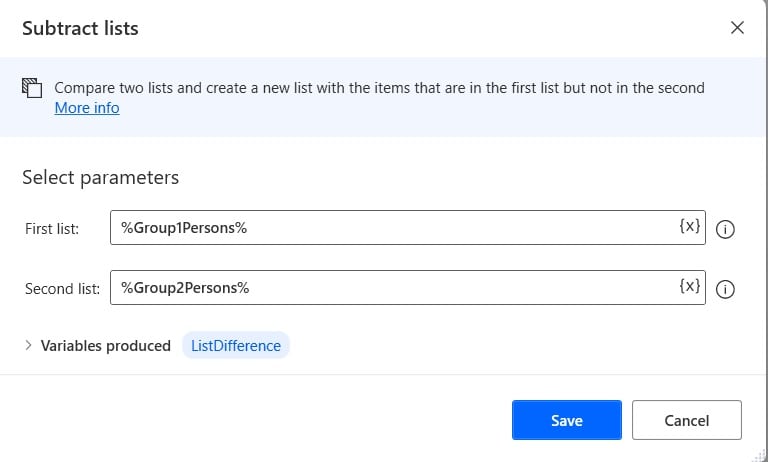
To display the result, we will add the display message action. So, expand the Message box section, and then drag and drop the Display Message action to the canvas.
Then provide the below information:
- Message box title: Provide the title like below.
- Message to display: Provide the message to display like below.
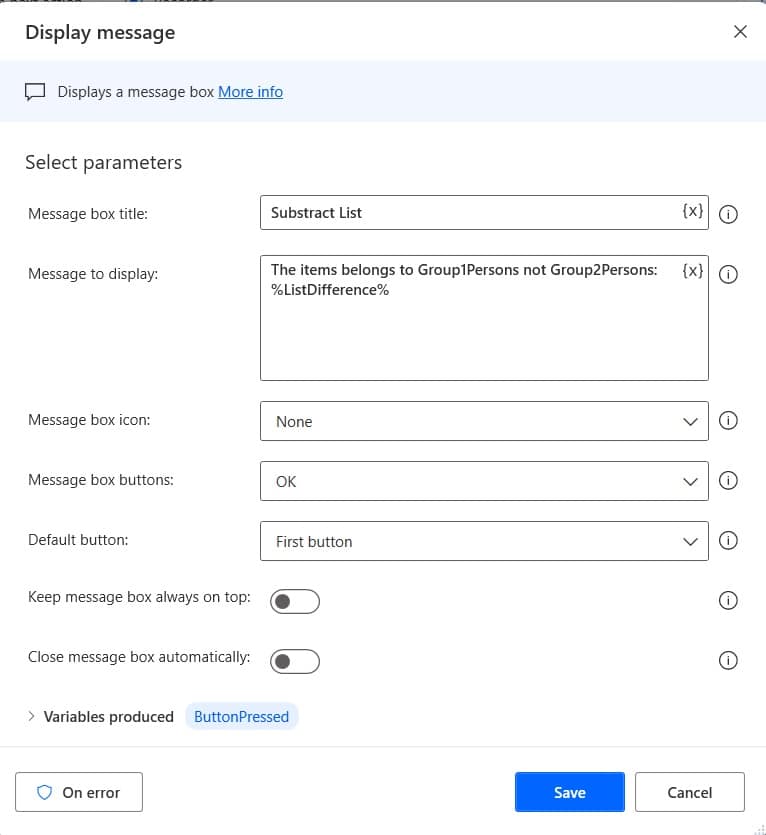
Now save the flow and run the flow, you can see the Message box popup displays the items available in the first list, not in the second list.
Merge list in Power Automate Desktop
Here we will see how to merge two lists in Power Automate Desktop.
For this, we will take the above lists i.e. Group1Person and Group2person. Then we will merge both the lists using Merge list action and get all the items from Group1Person and Group2Person lists.
Then expand the Variable section, and drag and drop the Merge list action to the canvas area. Then provide the below information:
- First List: Click on variable icon {x}, select Group1Person, and click on save.
- Second List: Click on variable icon {x}, select Group2Person, and click on save.
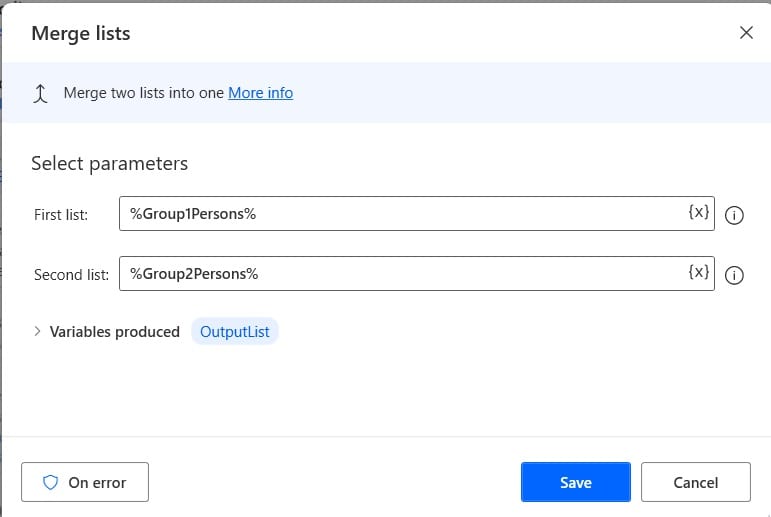
To display the result, we will add the display message action. So, expand the Message box section, and then drag and drop the Display Message action to the canvas. Then provide the below information
- Message box title: Provide the title like below.
- Message to display: Provide the message to display like below.
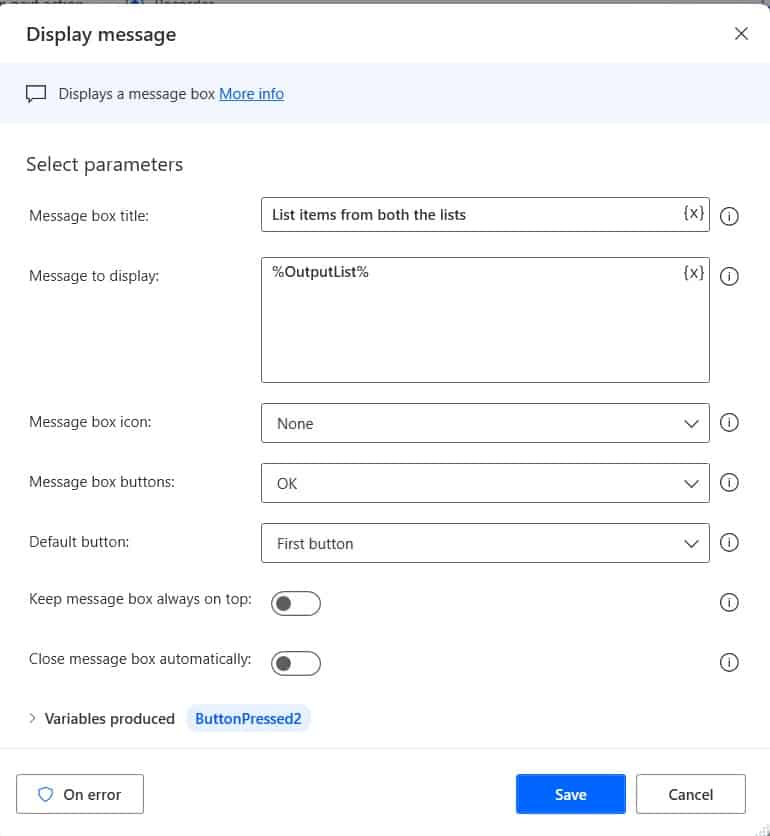
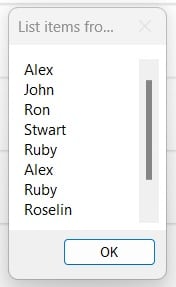
Now save the flow and run the flow, you can see the Message box popup displays the all items in both lists.
Conclusion
In this Power Automate Desktop tutorial, we saw all about list variables action in Power Automate Desktop.
You may also like:
- Extract Data from Word Documents to Excel using Power Automate Desktop
- Data table in Power Automate Desktop
- Power Automate Desktop format date
- How to Extract substring from text using Power Automate Desktop?
I am Bijay a Microsoft MVP (10 times – My MVP Profile) in SharePoint and have more than 17 years of expertise in SharePoint Online Office 365, SharePoint subscription edition, and SharePoint 2019/2016/2013. Currently working in my own venture TSInfo Technologies a SharePoint development, consulting, and training company. I also run the popular SharePoint website EnjoySharePoint.com