In this Power BI Tutorial, we will learn What is Power BI Object-Level security (OLS) and how to implement Object-level security in Power BI Desktop and also in Power BI Service. Moreover, we will also cover the below headings:
- Object-Level security in Power BI without a tabular editor
- Dynamic object level security in Power BI
What is Object-Level security in Power BI?
- Object Level Security (OLS) in Power BI is used to restrict user access to specified tables and columns.
- It is not possible for restricted users to view the tables and columns. For example, a column that includes important data like financial details can be restricted from certain users or viewers.
- In addition, we can also restrict the object’s names and the metadata which prevents users from accessing sensitive data such as employee, and financial records.
- All metadata in power bi reports that are opened in the power bi service includes Object-level security in a caching layer.
Also, check out, How to implement row level security (RLS) in Power BI
Object-Level security in Power BI Desktop
Let us see how we can implement the Object level of security in the Power Bi Desktop.
- Before entering into the steps, we have to know that we cannot directly enable the Object level security in Power Bi Desktop Like row-level security in Power Bi.
- Currently, for Object-level security we don’t need to create a filter in the power bi desktop, therefore we will use external tools i.e. Tabular Editor to modify the content inside the table.
Step:1
In this scenario, we will create a Power Bi report, and then we will define the object-level security for columns in Power BI Desktop. In this complete tutorial, we will use the financials excel sheet as source data.
- Log in to the Power Bi desktop and use the get data option to load data. To create Object Level Security, go to the Modeling tab and click Manage roles in the security section as below.

Step:2
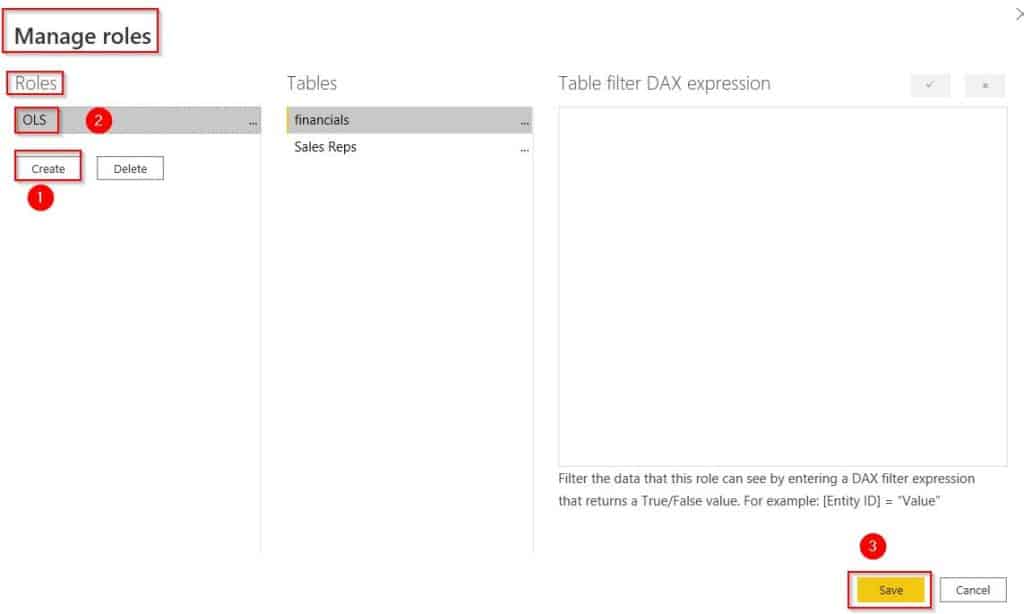
- In the Manage roles pop-up window, under the roles section, Click on the create option to Create a new role and name it. Here I have already created the role of OLS.
Step :3
- Click on External tools present in the ribbon of the Power Bi desktop to set the Object level security.
- You can only view the external tool tab, once you installed the tabular editor in your local system.
- Then click on the Tabular Editor, and it will automatically redirect to the Tabular editor in the local system.

Step:4
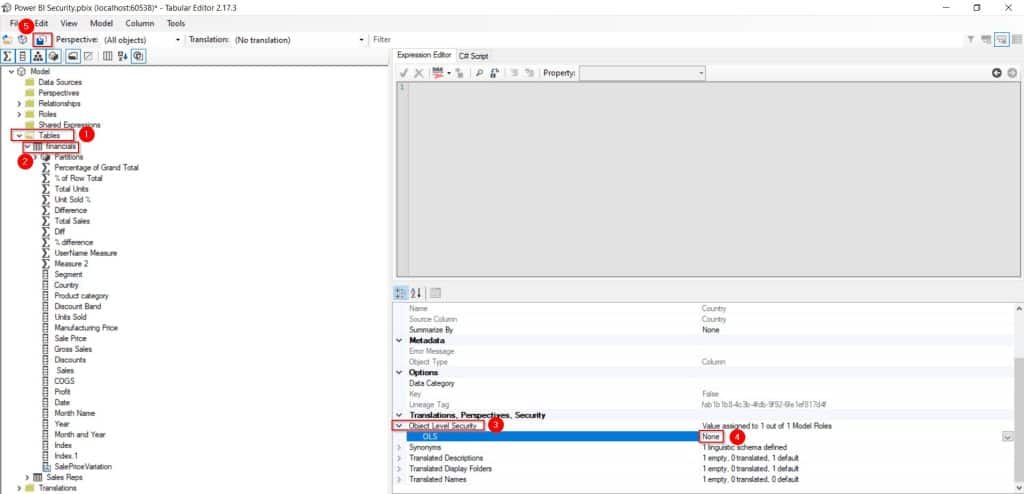
- In the tabular editor, expand tables, choose the table, and select the column, here I have selected the country column.
- Then expand Object Level security on the right-hand side, select the created OLS role, and change the settings from default to None as highlighted below:
- Select File -> Save or the Save icon to save the changes to the connected database as highlighted below:
Step:5
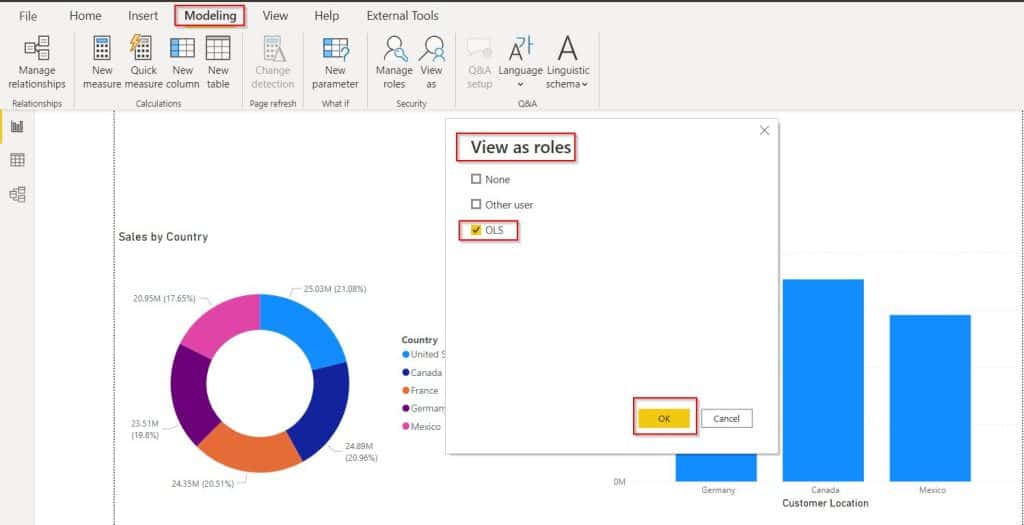
- Open the Power BI report on the Power BI Desktop, To check the created Object
- -level security role, select the Modeling tab and click View as an option.
- Select the created role name OLS, and click the ok button.
Step:6
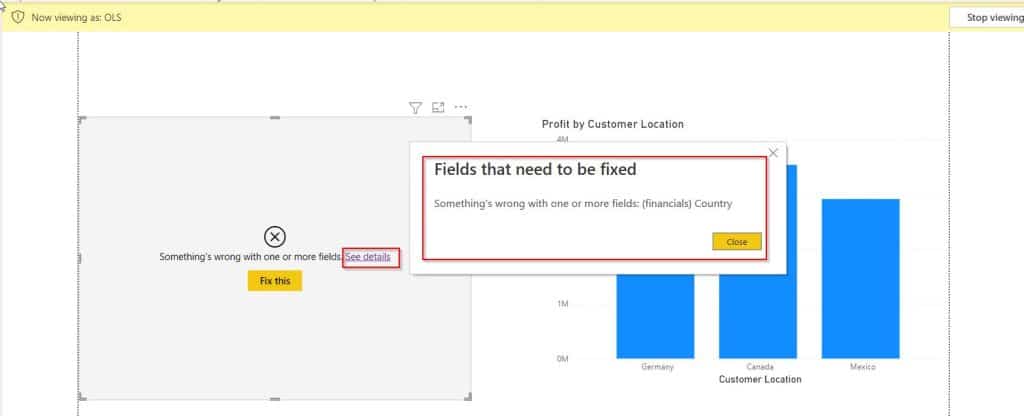
- Now in the below screenshot, you can see the Power BI report display the stacked column visual based on the selected role in the power bi desktop.
- In the same way, the donut chart visual doesn’t display the values because we have set the object level security for the financials country column has been, so based on the defined OLS role is restricted the country column in the Power BI Desktop.
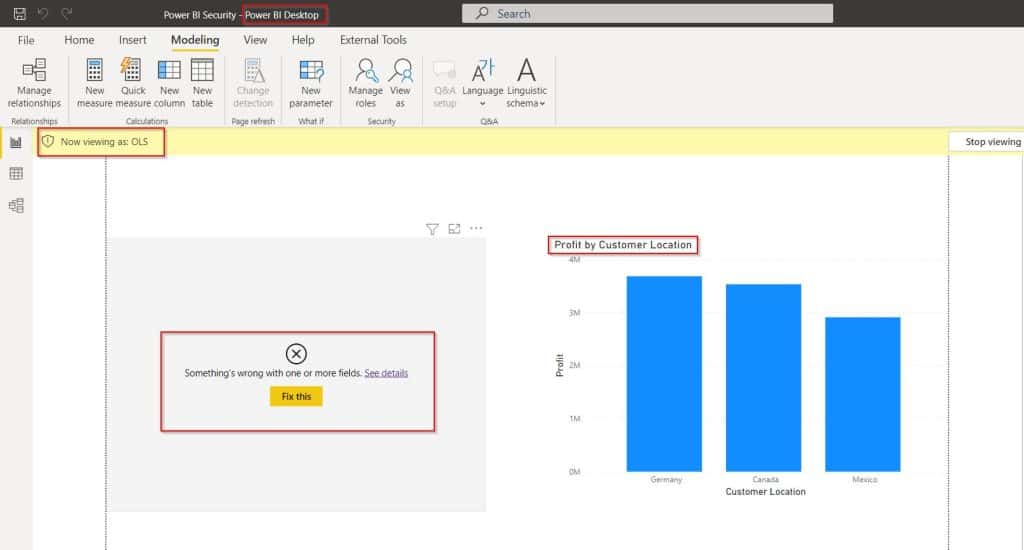
- When you click on the see details error, you can see that it displays something wrong with the fields and mentioned the restricted fields.
- In the Pop-up, you can see the financials(Country) that I have been restricted using the Object Level Security in Power Bi.
This is how to implement the Object level of security in the Power Bi Desktop.
Also, check out, Power BI Row level security vs Object level security
Object-Level security in Power BI Service
Let us see how we can create and implement the object level of security in the Power Bi Service
To achieve this, follow the below steps:
In this scenario, Initially, we will create a Power Bi report, and then we will define the object-level security for tables in Power BI Service.
Step 1:
- Log in to the Power Bi desktop and use the get data option to load data. To create Object Level Security, go to the Modeling tab and click Manage roles in the security section as below:

Step:2
- In the Manage roles pop-up window, under the roles section, Click on the create option to Create a new role and name it. Here I have named the role as OLS as highlighted below:

Step :3
- To Set the Object level security definition for the created role, Click on External tools present in the ribbon of the Power Bi desktop.
- You can only view the external tool tab, once you installed the tabular editor in your local system.
- Then click on the Tabular Editor, and it will automatically redirect to the Tabular editor in the local system.

Step:4
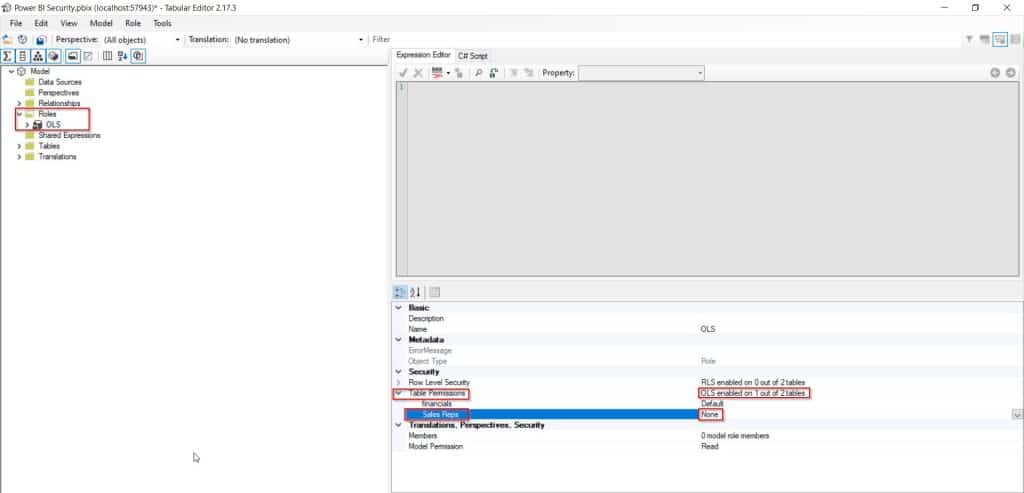
- In the tabular editor, Under the Roles folder, select the created role OLS. In the Table Permissions option, select and change the Sales Rep table from default to None.
- Once it changes, we can see that the created OLS role has been enabled. Here out of two tables, I have enabled the OLS for the Sales Reps table as highlighted below:
Step:5
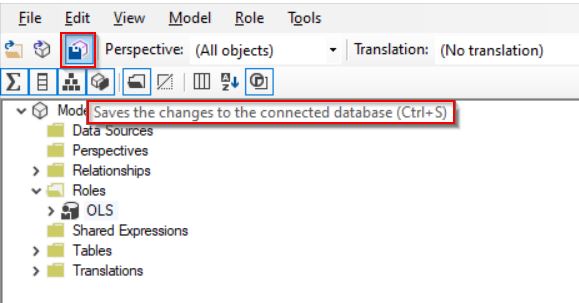
- Select File -> Save or the Save icon to save the changes to the connected database as highlighted below:
Step 6:
- Publish the Power BI report to the power bi service, by selecting the publish icon present in the home tab on the power bi desktop.

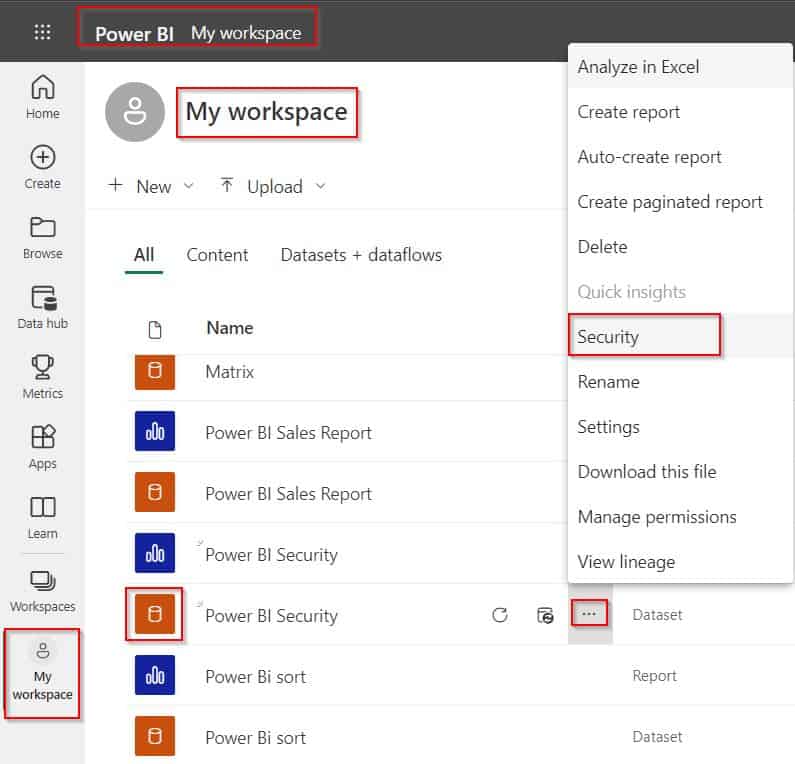
- After publishing the report, Login to the Power bi service. Then click on the My workspace and choose the published Power Bi report’s dataset.
- Click on the ellipsis icon for more options and Select the security option as highlighted below:
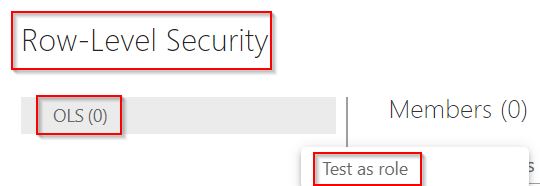
- Then Select the ellipsis icon for the created OLS role and click on the Test as a role.
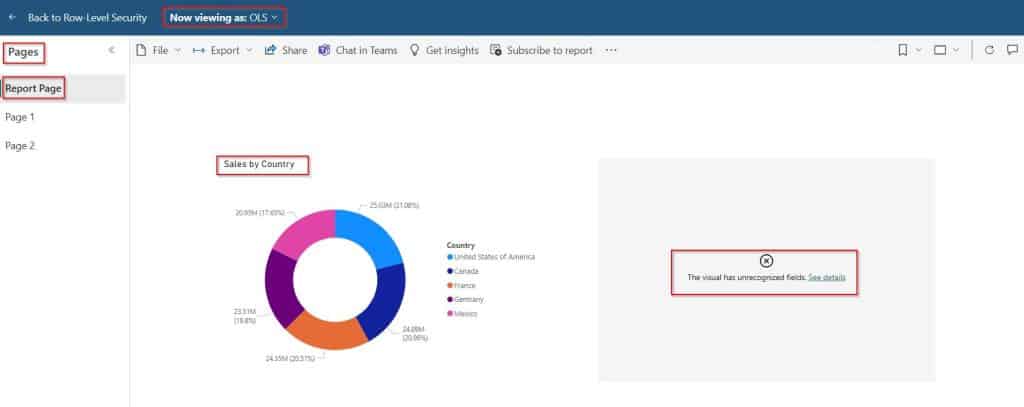
- Now in the below screenshot, you can see the Power BI report display the donut chart visual based on the selected role in the power bi service.
- In the same way, the stacked column chart visual doesn’t display the values because the Sales Reps table has been restricted by the defined OLS role in Power BI Service.
This is how to create and implement the object level of security in the Power Bi Service.
Object-Level security in Power BI without a tabular editor
- No, We can utilize Object Level Security by installing the Tabular Editor version 2 built within Power BI without Paying for a third-party tool. Tabular Editor version 2 is open source to utilize the functionality within Power BI.
- If we install Tabular Editor version 3, we have to get a license key for the Tabular Editor 3 paid version.
Dynamic Object level security in Power BI
- No, It is not possible to set dynamic object-level security in Power Bi. Because Power Bi doesn’t support Dynamic object-level Security.
- We cannot use the table filter DAX expressions like the username() and UserPrincipalName() in Object level security in Power BI.
- If the viewers don’t have to require permission, then the table or column simply does not exist in the Object Level security in Power BI.
In this Power BI Tutorial, we have learned What is Power BI Object-Level security (OLS) and how to implement Object-level security in Power BI Desktop and also in Power BI Service. Moreover, we also covered the below headings:
- Object-Level security in Power BI without a tabular editor
- Dynamic object level security in Power BI
You may also like:
- Calculate Percentage of Rows in Power BI
- Power BI Percentage of Total by Month
- How to Calculate Percentage of Two Columns in Power BI
I am Bijay a Microsoft MVP (10 times – My MVP Profile) in SharePoint and have more than 17 years of expertise in SharePoint Online Office 365, SharePoint subscription edition, and SharePoint 2019/2016/2013. Currently working in my own venture TSInfo Technologies a SharePoint development, consulting, and training company. I also run the popular SharePoint website EnjoySharePoint.com