In this Power Apps tutorial, I will show you how to export data from a Data table to Excel in Power Apps using two ways. Such as:
- Export Power Apps Data from the Data Table to Excel using SharePoint List
- Export Power Apps Data from the Data Table to Excel using Collection
Export Data from a Data Table to Excel in Power Apps
Recently, I got a requirement to work with exporting data from the data table to Excel in Power Apps using two simple examples.
Example-1: Export Power Apps Data from the Data Table to Excel using SharePoint List
Whenever you are trying to export the data from a data table control to an Excel file, I searched many sites and found no such direct way to achieve the need in PowerApps currently.
This is not possible because no such functionalities or functions can support PowerApps to export data from a Data Table control.
To achieve this requirement in PowerApps, we can try an alternative solution. What we can do is, instead of taking a Data table, insert a Gallery control that can work as a Data Table control. So follow the below instructions that you can work around with:
1. I have a SharePoint Online list named “Diseases List” and this list contains the below fields.
| Column Name | Data Type |
| Disease | It is a default single line of text |
| Doctor’s Name | A single line of text |
| Doctor’s Fees | Currency |
| Doctor’s Experience | Number |
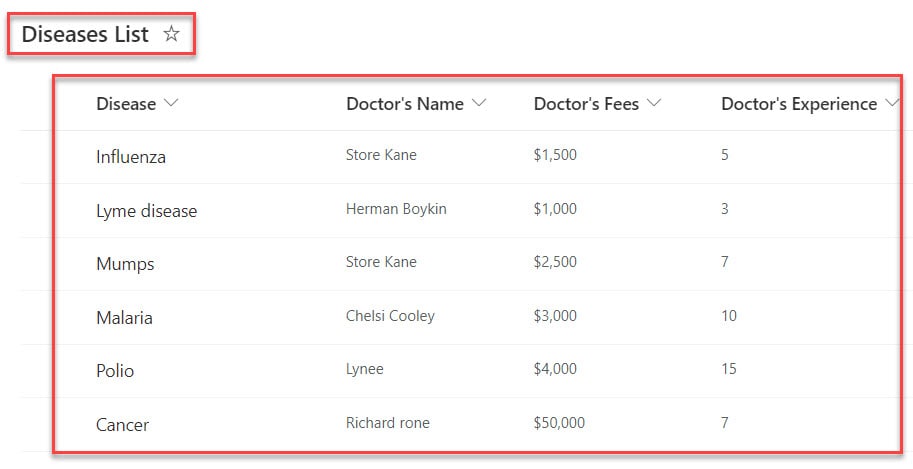
2. Now, I would like to export these SharePoint List records to the Excel File through the PowerApps Data Table control.
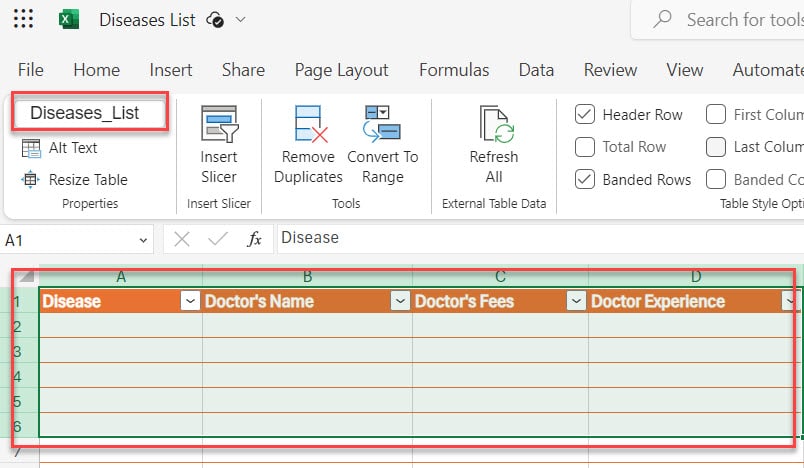
3. So next, we will create an Excel file and create these four columns (Disease, Doctor’s Name, Doctor’s Fees, and Doctor’s Experience) on it. Select the fields, format them as an Excel Table, and provide a name to the Excel table (Diseases_List).
Have a look at the below screenshot for the output:
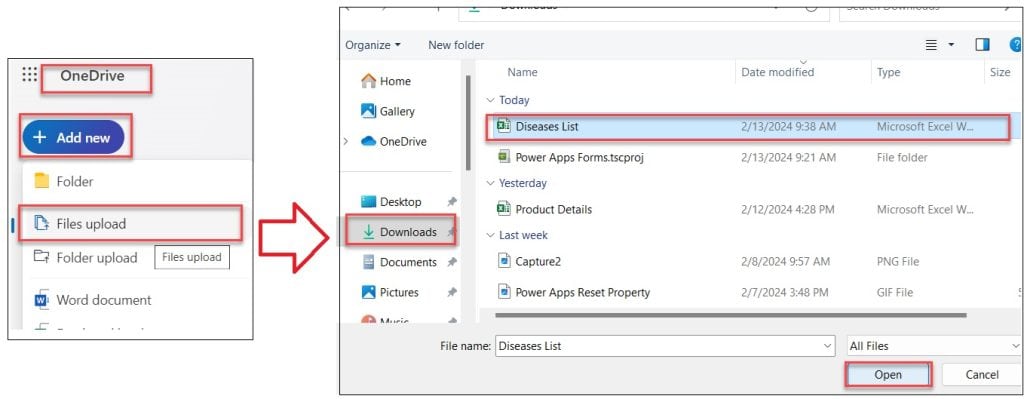
4. Once the Excel file is ready, you need to upload this file to your cloud service, e.g. OneDrive. Go to OneDrive -> + Add new -> Files upload -> Select the Excel file from your local system -> Open.
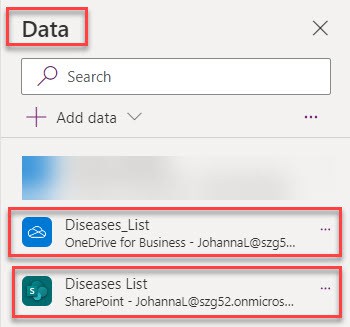
5. Now it’s time to configure your data in your Data table into a Gallery in PowerApps. For that, you should add a specific Excel file to the Power Apps Canvas app from your OneDrive for business. Also, you should add a specific SharePoint Online list [Diseases List] to the Power Apps.
6. Next, on the Power Apps Screen -> Insert a Blank Vertical Gallery control, add set its Items property to the code below.
Items = 'Diseases List'Where,
- ‘Diseases List’ = SharePoint Online List

7. Then, select the Edit gallery icon and add four label controls for getting SharePoint list records and those labels will give default text properties like below.
Text = ThisItem.Disease

Text = ThisItem.'Doctor''s Name'

Text = ThisItem.'Doctor''s Fees'

Text = ThisItem.'Doctor''s Experience'
Where,
- ThisItem.Disease, ThisItem.’Doctor”s Name’, etc… = SharePoint list fields

8. When you connect the SharePoint list to the gallery, you will see all the SharePoint field values or records in the gallery control as like below.
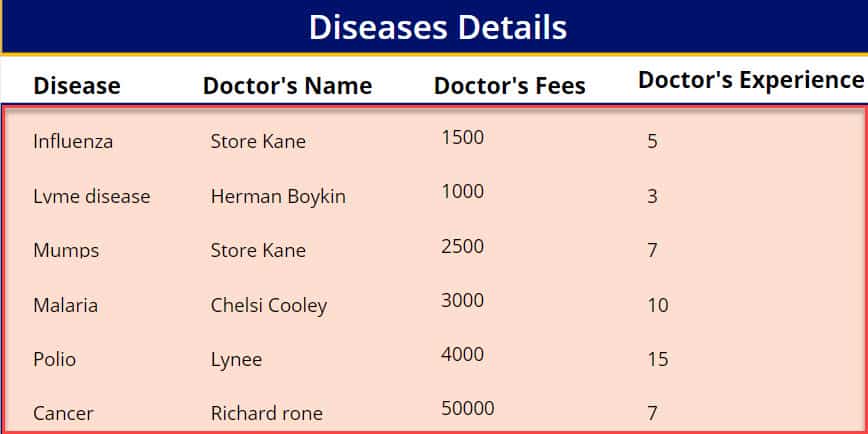
9. At last, to export the SharePoint Data to an Excel sheet, Insert a Power Apps Button control and rename it to Export to Excel. Select the button and apply the below formula on its OnSelect property:
OnSelect = ForAll(
    gal_Items.AllItems,
    Patch(
        Diseases_List,
        Defaults(Diseases_List),
        {
            Disease: ThisRecord.Disease,
            'Doctor''s Name': ThisRecord.'Doctor''s Name',
            'Doctor''s Fees': ThisRecord.'Doctor''s Fees',
            'Doctor Experience':ThisRecord.'Doctor''s Experience'
        }
    )
)
Where,
- ForAll = PowerApps ForAll() function helps to evaluate the formula and perform actions for all the records in a table
- gal_Items = Gallery control name
- Patch = This Patch Function is used to modify single or multiple records of a data source
- Diseases_List = Name of the Excel Table
- Disease, ‘Doctor”s Name’, etc… = These are the columns that are present in the Excel sheet
- ThisRecord.Disease, ThisRecord.’Doctor”s Name’, etc… = These are the controls that are present within the gallery
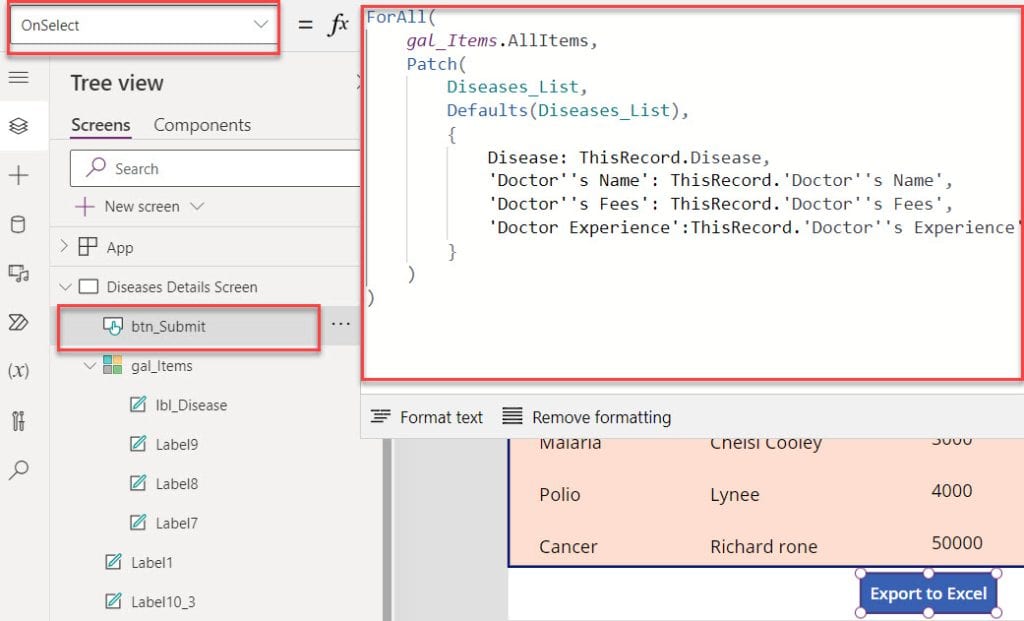
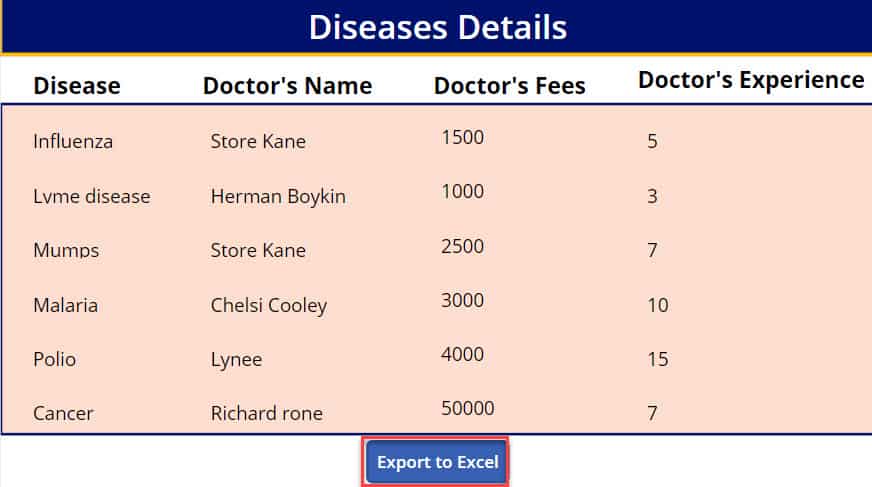
10. Once your app is ready, Save, publish, and Preview the app. Whenever the user clicks on the button control, it will start to export the data from the gallery to the Excel file.
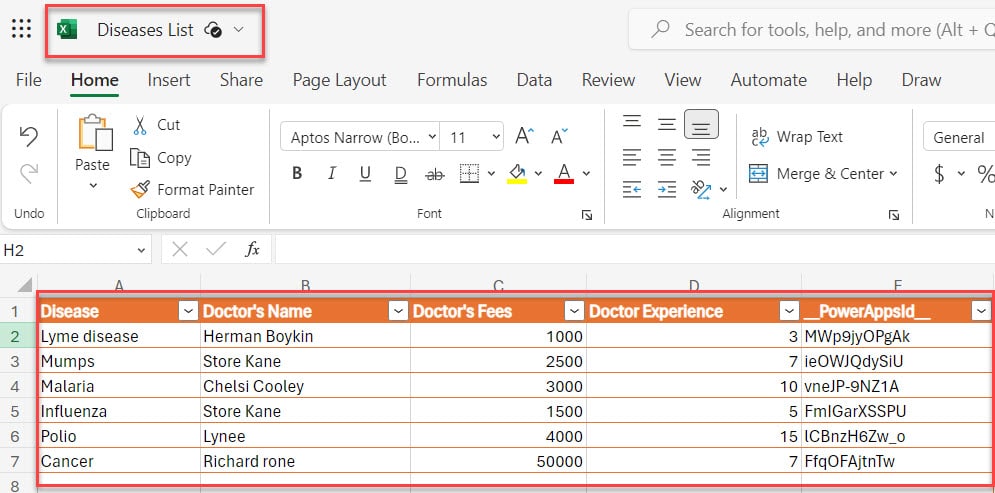
11. Now go to the OneDrive cloud storage where you uploaded the Excel file previously. Refresh the page and then open the specific Excel file. As soon as it is refreshed, you can view all the exported gallery records in the Excel sheet as it is. Only one extra column [PowerAppsId] has been added to the file.
This is the one way to export the Power Apps data from the Data table to the Excel file.
Example-2: Export Power Apps Data from the Data Table to Excel using Collection
Similarly, if you want to export the Power Apps data from a data to an Excel file using Collection, follow the simple example below.
1. I have a Power Apps collection, i.e., [colProducts], containing the fields below.
| Column Name | Data Type |
| Product Name | Text |
| Product Ordered Date | Date and time |
| Vendor | Text |
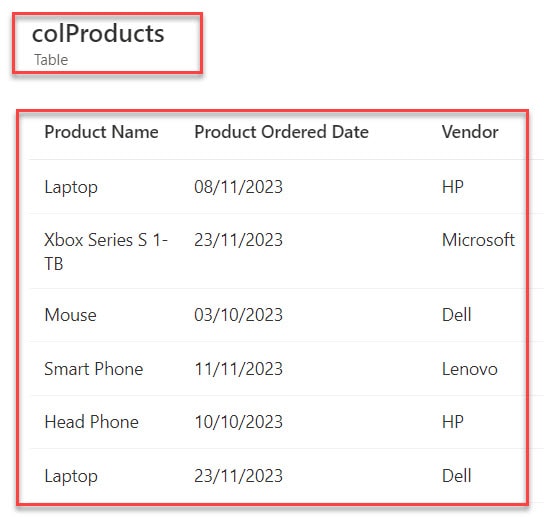
2. Now, I would like to export these Power Apps collection records to the Excel File through the PowerApps Data Table control.
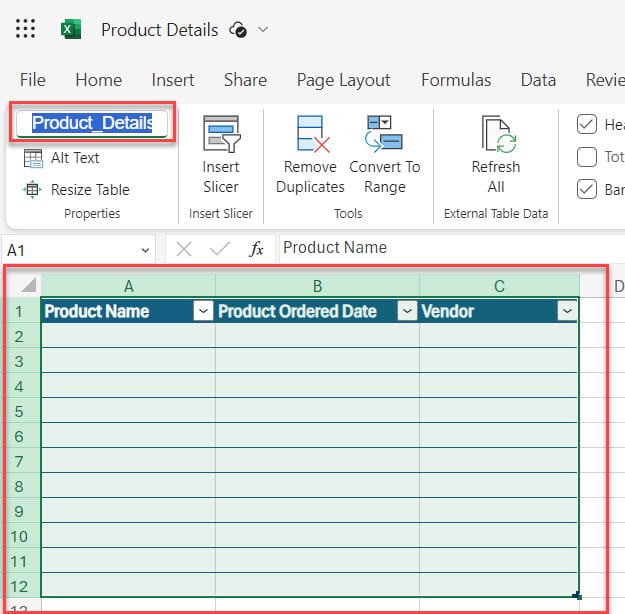
3. So next, we will create an Excel file and create these four columns (Product Name, Product Ordered Date, and Vendor) on it. Select the fields, format them as an Excel Table, and provide a name to the Excel table (Product_Details).
Have a look at the below screenshot for the output:
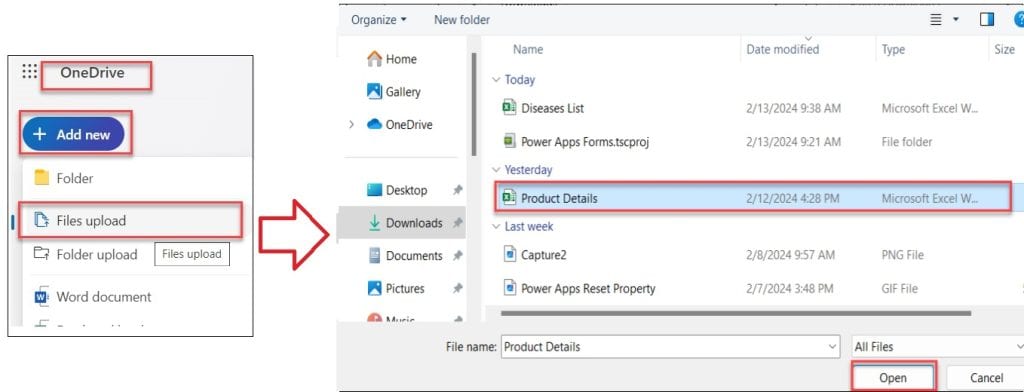
4. Once the Excel file is ready, you need to upload this file to your cloud service, e.g. OneDrive. Go to OneDrive -> + Add new -> Files upload -> Select the Excel file from your local system -> Open.
5. Now it’s time to configure your data in your Data table into a Gallery in PowerApps. For that, you should add a specific Excel file to the Power Apps Canvas app from your OneDrive for business. Also, you should add a specific Power Apps collection [colProducts] to the gallery control.
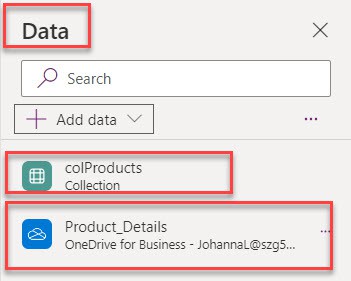
7. Next, on the Power Apps Screen -> Insert a Blank Vertical Gallery control and set its Items property as:
Items = colProductsWhere,
- colProducts = Power Apps collection

8. Then, select the Edit gallery icon and add three text label controls for collecting records; those labels will give default text properties like below.
Text = ThisItem.'Product Name'

Text = ThisItem.'Product Ordered Date'

Text = ThisItem.Vendor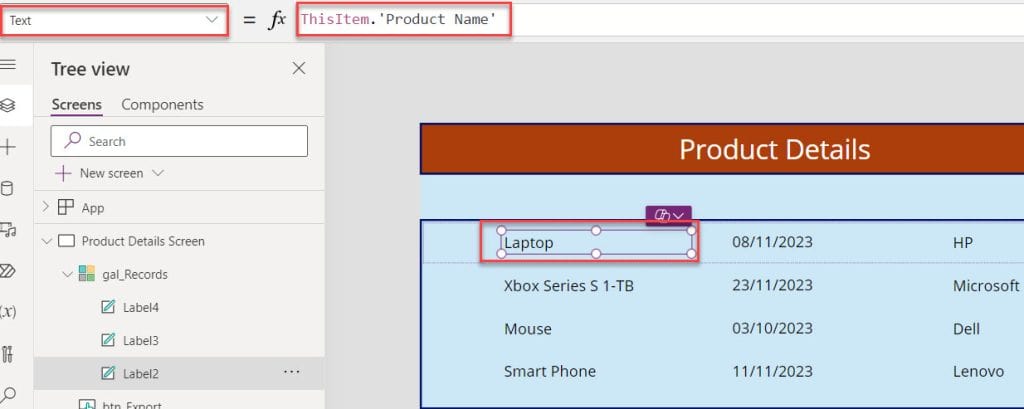
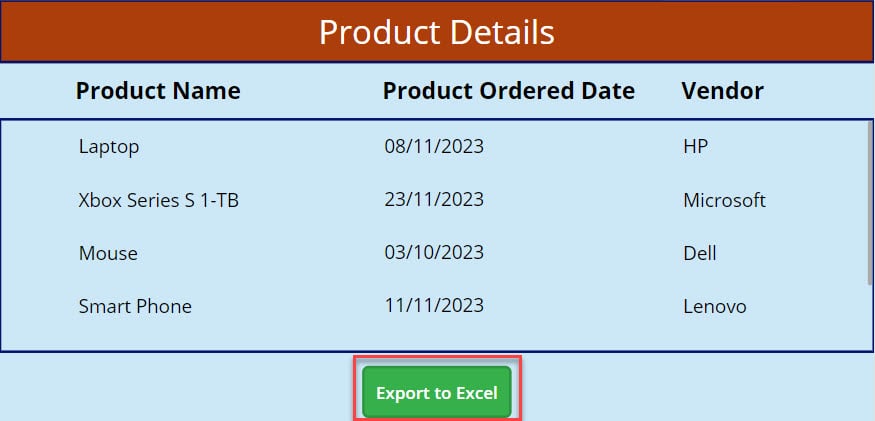
9. Look at the image below that the gallery control represents all the records from the Power Apps collection.

10. In the last, insert a Button control and set its OnSelect property to the code below.
OnSelect = ForAll(
    gal_Records.AllItems,
    Patch(
        Product_Details,
        Defaults(Product_Details),
        {
            'Product Name': ThisRecord.'Product Name',
            'Product Ordered Date': ThisRecord.'Product Ordered Date',
            Vendor: ThisRecord.Vendor
        }
    )
)
Where,
- gal_Records = Power Apps gallery name
- Product_Details = Excel sheet name
- ThisRecord.’Product Name’, ThisRecord.’Product Ordered Date’, and ThisRecord.Vendor = Collection records
Refer to the below screenshot:
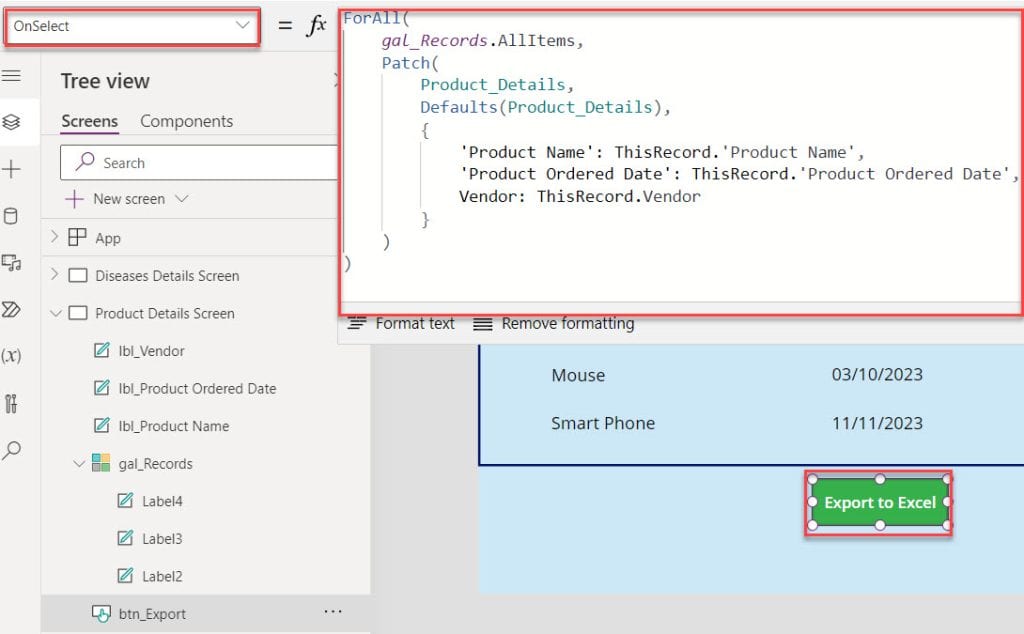
11. Save, Publish, and Preview the app. When a user clicks on the button control, it will export the collection records from the gallery to an Excel sheet.
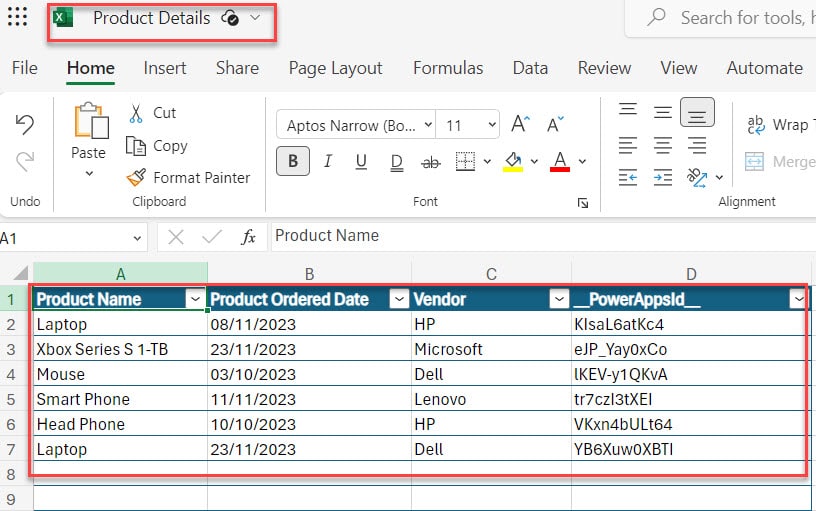
12. Now go to the OneDrive cloud storage where you uploaded the Excel file previously. Refresh the page and then open the specific Excel file to view all the exported gallery records in the Excel sheet, as it also includes one extra column [PowerAppsId].
Conclusion
I trust this Power Apps tutorial taught in detail information about how to export data from a data table to Excel in Power Apps, including:
- Export Power Apps Data from the Data Table to Excel using SharePoint List
- Export Power Apps Data from the Data Table to Excel using Collection
You may also like:
- Power Apps Data Table Conditional Formatting
- How to Filter Data table in Power Apps?
- Power Apps Data Table URL
- How to Delete Rows in Power Apps Data Table?
I am Bijay a Microsoft MVP (10 times – My MVP Profile) in SharePoint and have more than 17 years of expertise in SharePoint Online Office 365, SharePoint subscription edition, and SharePoint 2019/2016/2013. Currently working in my own venture TSInfo Technologies a SharePoint development, consulting, and training company. I also run the popular SharePoint website EnjoySharePoint.com