Recently, while working on the Power Apps Data table control, I got a requirement to delete rows from the data table control in Power Apps. Read this complete tutorial, where I have explained how to delete rows in Power Apps data table with different examples.
Delete Rows in Power Apps Data Table
While working with Power Apps data table control, sometimes we need to remove some unwanted records or rows, or else if there are any duplicate records in the data table, then you can easily remove or delete those records.
To work around these real-time scenarios, follow the below-mentioned steps.
Scenario-1: Delete Single Row From Data Table
Normally, in Power Apps, there is a Data table control where all the records are retrieved from different data sources, i.e., [SharePoint, Collection, Excel, etc…]. Here, I have taken my SharePoint Online list [Vacation Budget], which contains some records using different columns.
Input:
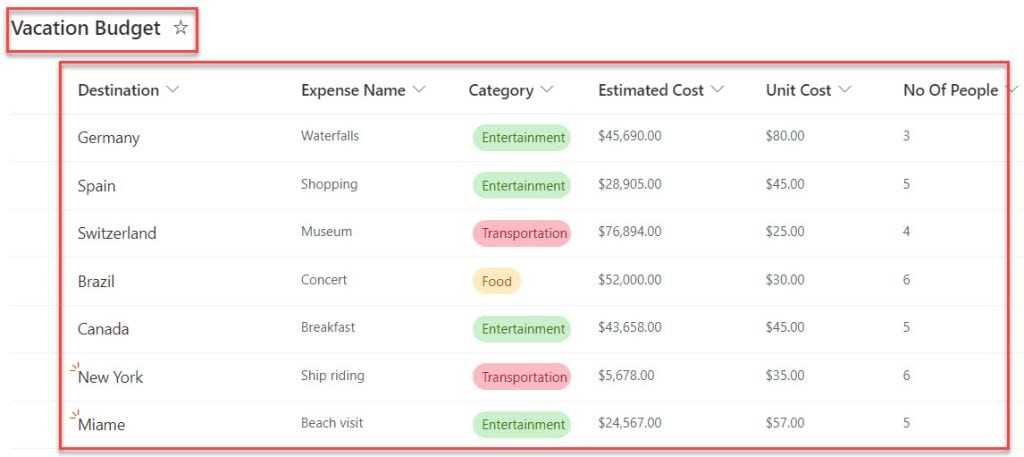
Now, I want to display these list records on the Power Apps Data table control and remove or delete the selected record. Refer to the screenshot below for the output.
Output:

To achieve it, follow the below steps.
1. Create a Blank Canvas app and connect it to the specific SharePoint Online list [Vacation Budget] like below.

2. Now, select the default screen -> Insert a Data table control and set its Items property as:
Items = 'Vacation Budget'Where,
- Vacation Budget = SharePoint Online List
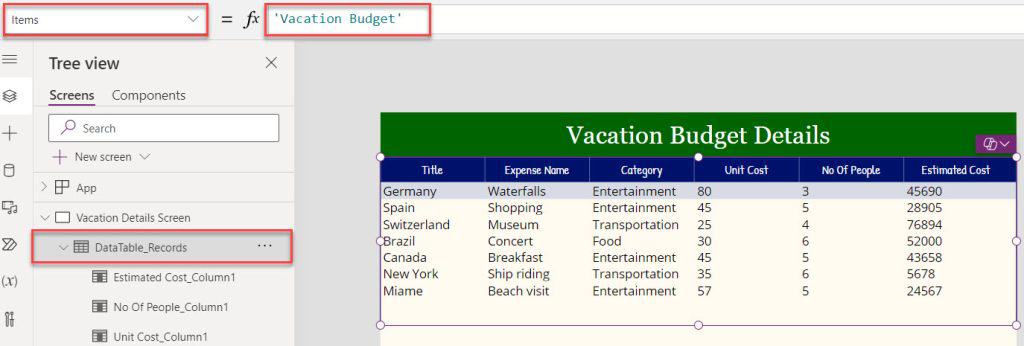
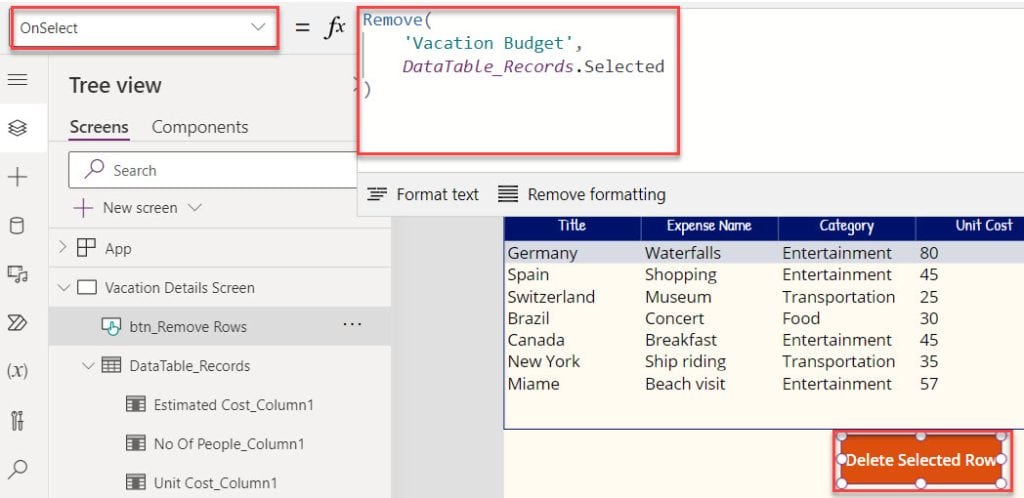
3. Next, insert a Button control [Delete Selected Row] and set its OnSelect property to the code below.
OnSelect = Remove(
    'Vacation Budget',
    DataTable_Records.Selected
)
Where,
- Remove() = This Power Apps Remove() function is used to remove a specific record or records from a data source
- Vacation Budget = SharePoint Online List
- DataTable_Records = Data table name
4. Once your app is ready, Save, Publish, and Preview the app. Whenever the selects any specific record from the data table and clicks on the button control, it will be deleted or removed from the data table as in the screenshot below.

5. Also, when the user clicks on the button control, it will remove the selected row in the SharePoint list. This lets you delete a row from the Power Apps data table control.
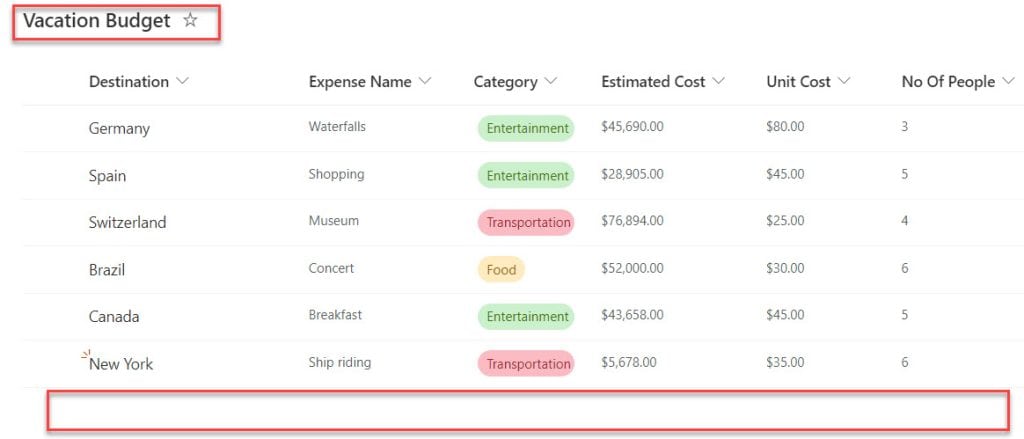
This is how to delete a row from a Power Apps data table.
Scenario-2: Delete Multiple Rows from Data Table
In this scenario, I want to delete multiple rows or records in the Power Apps data table using the Power Apps RemoveIf() function. I will also take the above Power Apps Data table [Vacation Budget Details] for this example.
Output:

To do so, follow the below steps.
1. On the Power Apps Screen -> Insert a Button control [Delete Multiple Rows] and set its OnSelect property to the code below.
Items = RemoveIf(
    'Vacation Budget',
    Category.Value = "Entertainment"
)
Where,
- RemoveIf() = We can use this function to remove a record or records based on a condition or a set of conditions
- Category = SharePoint list choice field
- “Entertainment” = SharePoint list choice field value
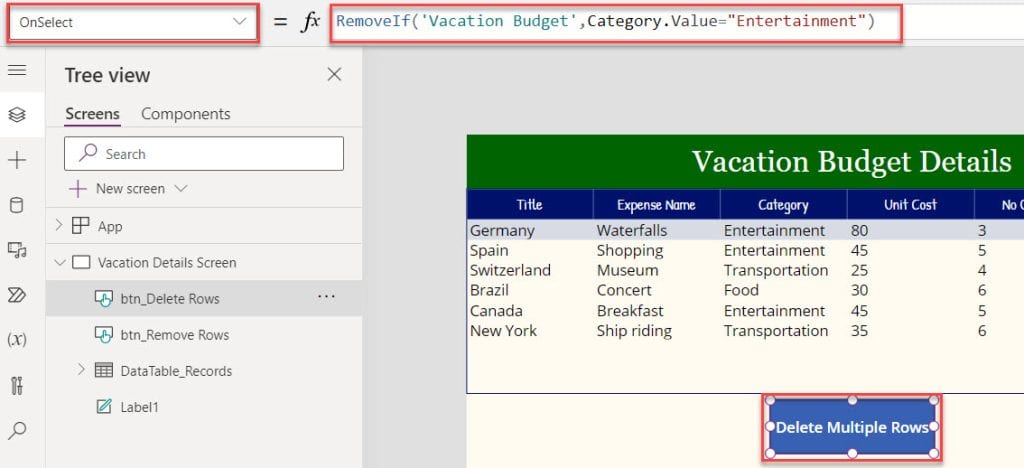
2. Save, Publish, and Preview the app. When the user clicks on the button control, the data table will remove all the records based on the SharePoint list choice field value [Entertainment] as shown below.

This is how to delete multiple records from a data table in Power Apps.
Scenario-3: Delete Set of Records from Power Apps Data Table
Now, I would like to display the first four records or rows and remove the last three rows in the Power Apps data table using the FirstN() function. Refer to the screenshot below for output.
Output:

To do so, follow the below steps.
1. On the Power Apps Screen -> Select the Data table and set its Items property to the code below.
Items = FirstN(
    'Vacation Budget',
    4                                                           //You can change the row count
)
Where,
- FirstN() = the Power Apps FirstN() function is used to return the first set of records of a table
- ‘Vacation Budget’ = SharePoint Online list
- 4 = Row count
Note: You can also use LastN() function to return the last set of records of a table
2. Now, you can preview the app, the data table will display only the first 4 rows/records and it will remove the remaining records like below.
This way, you can remove multiple rows in the Power Apps data table.
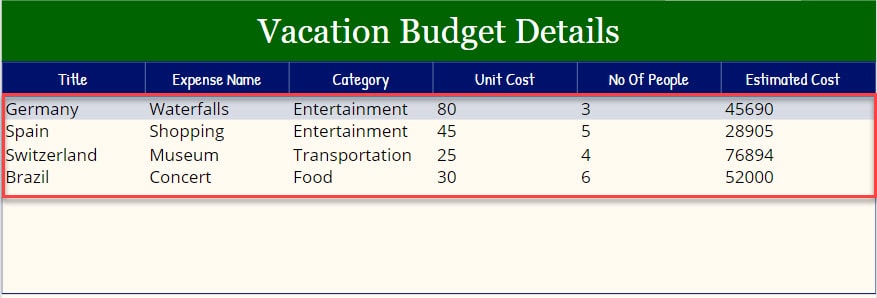
This way, you can delete bulk records in the Power Apps data table.
Conclusion
Now, I hope if you get any similar requirements to remove rows in the Power Apps data table, you can easily do it using the above different ways.
- Delete Single Row From Power Apps Data Table
- Delete Multiple Rows from Data Table in Power Apps
- Delete Set of Records from Power Apps Data Table
You may also like:
- How to Export Data from Data Table to Excel in Power Apps?
- Power Apps Data Table Conditional Formatting
- How to Filter Data table in Power Apps?
I am Bijay a Microsoft MVP (10 times – My MVP Profile) in SharePoint and have more than 17 years of expertise in SharePoint Online Office 365, SharePoint subscription edition, and SharePoint 2019/2016/2013. Currently working in my own venture TSInfo Technologies a SharePoint development, consulting, and training company. I also run the popular SharePoint website EnjoySharePoint.com