This Power Apps tutorial will explain all about the Power Apps Gallery Conditional Formatting with various examples.
- Power Apps Gallery Formatting Text Values
- Power Apps Gallery Formatting Single Text Value
- Power Apps Gallery Formatting Multiple Text Value
- Power Apps Gallery Formatting Number Values
- Power Apps Gallery Formatting With Person Column (Bold Font)
- Power Apps Gallery Formatting with Date
- Power Apps Gallery Selected item Color
- Power Apps Gallery Conditional Filtering With Row Colors
- Power Apps Gallery Formatting with Icons
- Power Apps Gallery Formatting with Emojis
- Power Apps Gallery Formatting with disabling Button
- Hover effect for Power Apps gallery items
- Power Apps Gallery Alternate Row Color
Check out: Power Apps Gallery Pagination
Power Apps Gallery Conditional Formatting
- Power Apps Gallery is a flexible and dynamic control in Microsoft Power Apps that allows you to present data in a scrollable, customizable format. It is widely used in Power Apps to display a list of items sourced from a wide array of data sources such as SharePoint, Excel, and various others.
- One powerful feature of Power Apps Gallery is its support for conditional formatting. This allows you to change the appearance of gallery items based on their properties or values.
- For example, you could change the background color of a gallery item if it meets a certain condition like a specific text value, a date range, a numerical threshold, or any logical condition that you can formulate.
The image below shows how a Power Apps gallery appears after using various condition formattings.
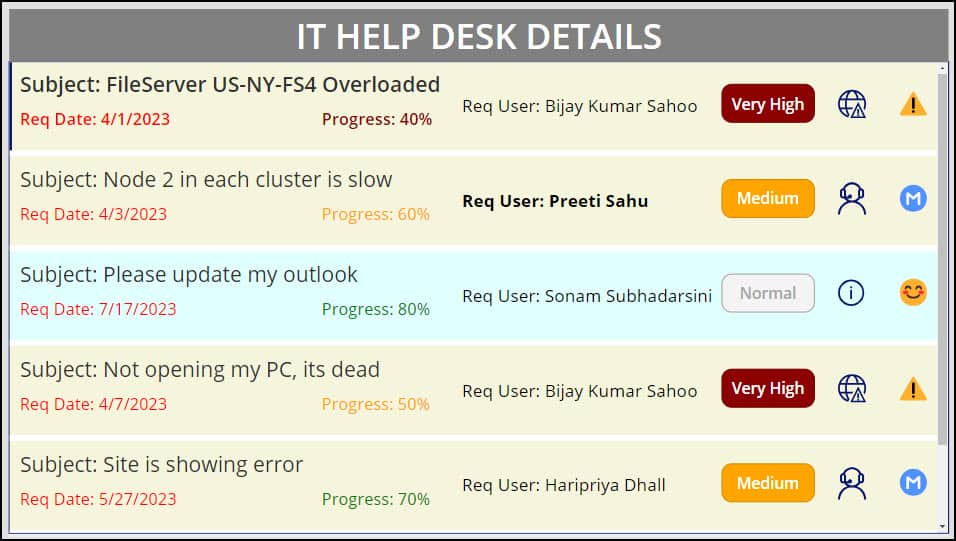
This is the overview of Power Apps Gallery Conditional Formatting.
Build a SharePoint Online List
First, we will create a SharePoint List named IT Help Desk with the various columns:
| Column | Data type |
|---|---|
| Request ID | Number |
| Subject | Title (Single line of text) |
| Request Date | Date and time |
| Category | Choice (Servers, User Workstation, Basic Software, Data Center) |
| Priority | Choice (Very High, Medium, Normal) |
| Progress | Number |
| Request User | Person |
Have a look at the below SharePoint Online list:
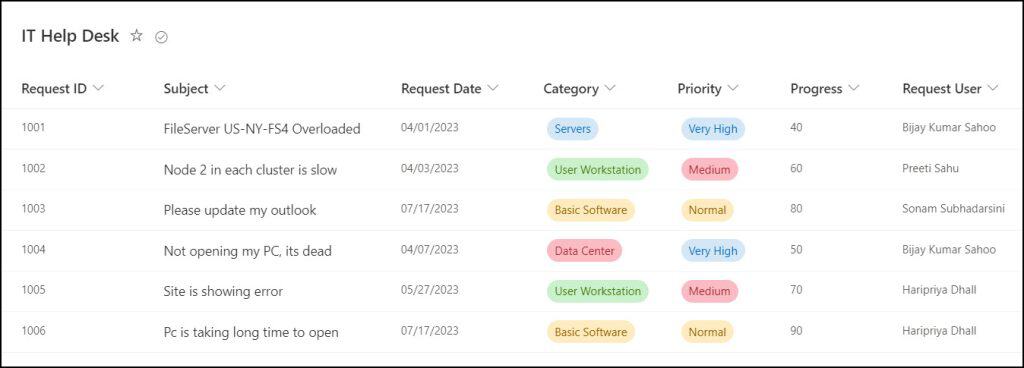
Create a Power Apps Blank Canvas app with Gallery Control
Next, we will create a new blank canvas app in Power Apps and add a gallery control to that. Follow the instruction below:
- Sign in to Power Apps with valid Microsoft credentials.
- Go to Apps -> Expand + New app -> Select Canvas.
- Provide the App name and choose the Table Format -> Click on Create.
- Connect the SharePoint List Datasource connector (IT Help Desk) to the app.
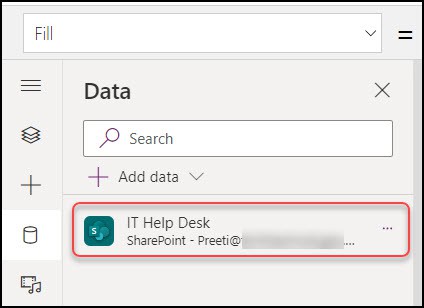
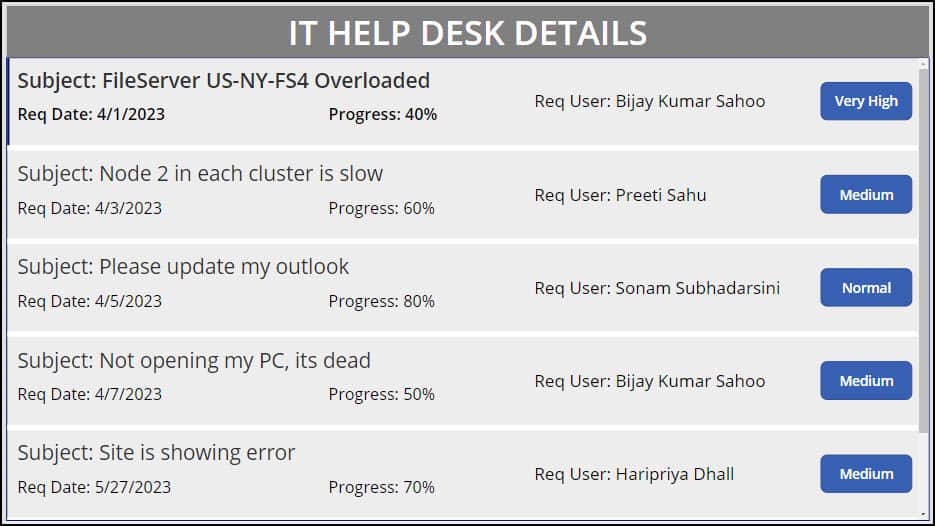
- Next, insert a Vertical Gallery control and set its Layout & Items property as:
Layout = Title, subtitle, and body
Items = 'IT Help Desk'     //[SharePoint List]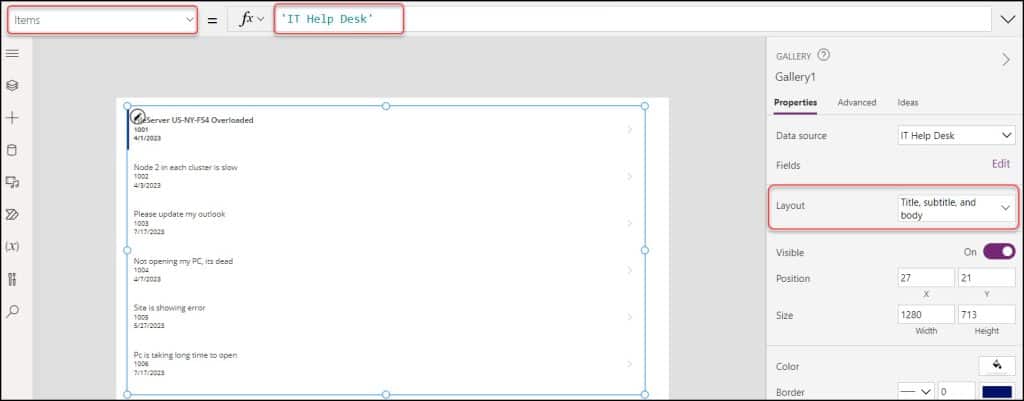
- Then, add one more label control (for Req User) and a Button control (for Priority) into the gallery. These are the below codes that I have used for all these label’s Text properties:
Title = "Subject: "&ThisItem.Title
Body = "Req Date: "& ThisItem.'Request Date'
Subtitle = "Progress: "& ThisItem.Progress & "%"
Label1 = "Req User: " & ThisItem.'Request User'.DisplayName     //For Request User
Button = ThisItem.Priority.Value
Refer to the image below.
Now we will apply different conditions one by one to the Power Apps Gallery Control.
Read: How to Add Gallery Data to a Collection in Power Apps
Power Apps Gallery Conditional Formatting Text Values
First, we will see the Power Apps Gallery Conditional Formatting with Text Values. There are two ways to use gallery formatting text values:
- Power Apps Gallery Conditional Formatting with Single Text Value
- Power Apps Gallery Conditional Formatting with Multiple Text Values
Power Apps Gallery Formatting Single Text Value
- In the below screenshot, you can see there are various buttons in the Power Apps Gallery control. All the button values (Very High, Medium, Normal) are retrieved from the SharePoint list.
- In the gallery control, I’d like to now highlight only one button (Very High) in red and the remaining buttons should appear in blue color as shown below.
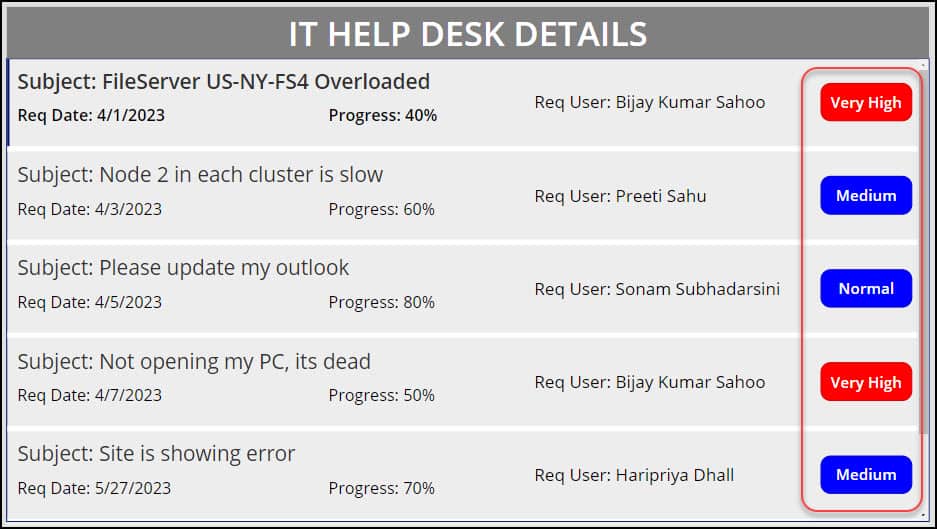
- To achieve this, select the Button control in the gallery and apply the code below on its Fill property as:
Fill = If(
    ThisItem.Priority.Value = "Very High",
    Color.Red,
    Color.Blue
)
Where,
- Priority = SharePoint Choice Column
- “Very High” = Specify the SharePoint Choice value that you want to make red color
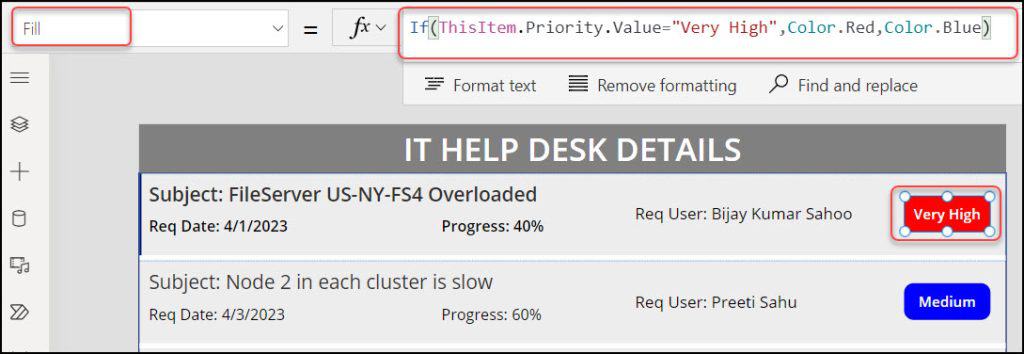
This is the Power Apps Gallery Formatting with Single Text Value.
Power Apps Gallery Formatting Multiple Text Values
Suppose in the Power Apps Gallery, you want to provide a specific color to a specific Power Apps button. For example,
| Button | Color |
|---|---|
| Very High | DarkRed |
| Medium | Orange |
| Normal | Green |
As shown in the image below:
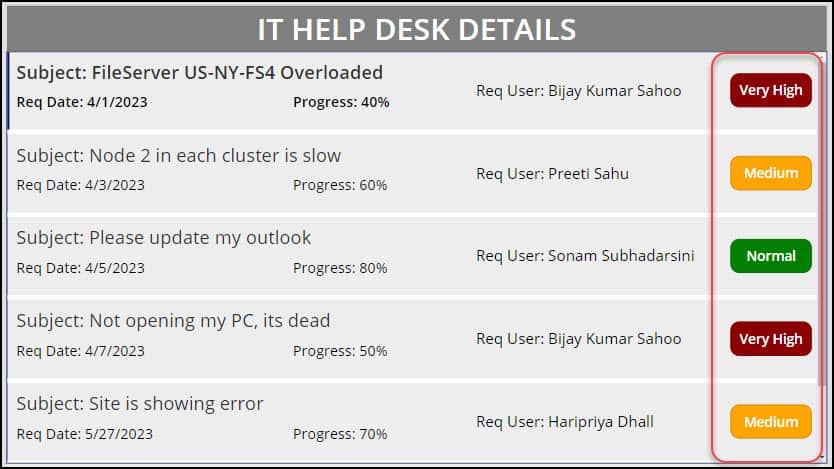
- To do so, select the Button in the Power Apps gallery and apply the formula below on its Fill property:
Fill = If(
    ThisItem.Priority.Value = "Very High",
    Color.DarkRed,
    ThisItem.Priority.Value = "Medium",
    Color.Orange,
    ThisItem.Priority.Value = "Normal",
    Color.Green
)
Refer to the image below.
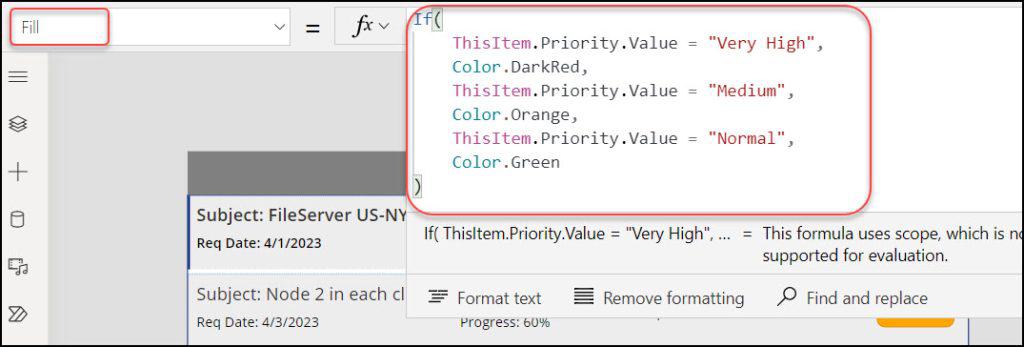
This is how to work with Power Apps Gallery Formatting Multiple Text Values.
Power Apps Gallery Conditional Formatting Number Values
Next, we will see how we can use Power Apps Gallery Conditional Formatting with Number Values. For example,
| Progress | Color |
|---|---|
| if(Progress>=70) | Green |
| if(Progress >= 50) | Orange |
| if(Progress<50) | DarkRed |
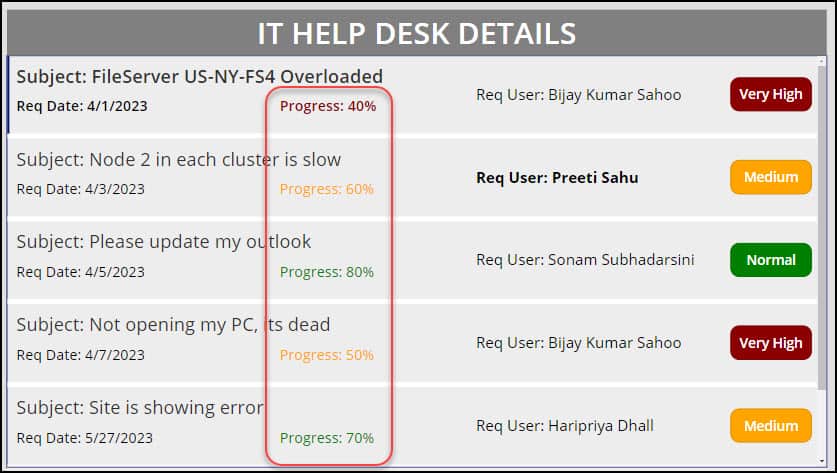
- Select the Progress Label in the gallery and set its Color property as:
Color = If(
    ThisItem.Progress >= 70,
    Color.Green,
    ThisItem.Progress >= 50,
    Color.Orange,
    Color.DarkRed
)
Where,
Progress = SharePoint Number Column

This is how to work with Power Apps Gallery Conditional Formatting Number Values.
Check: How to Filter Gallery by Current User in Power Apps
Power Apps Gallery Conditional Formatting With Person Column (Bold Font)
Here, we will see how to work with Power Apps Gallery Conditional Formatting With Person Column (Bold Font).
- As you can see, there are some Request users (SharePoint Person Column) in the Power Apps gallery below. The user who is presently logged in in the Power Apps gallery control will now be bold.
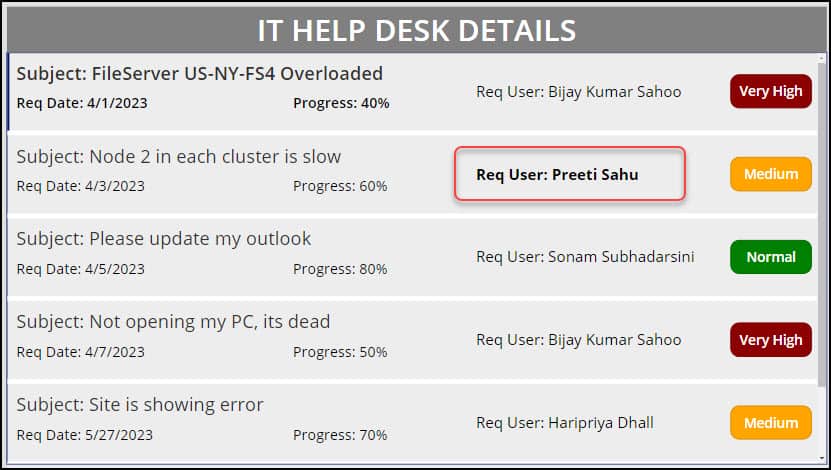
- For this, select the Request User Label control from the gallery and apply the below code on its FontWeight property as:
FontWeight = If(
    ThisItem.'Request User'.Email = User().Email,
    FontWeight.Bold,
    FontWeight.Normal
)
Where,
‘Request User‘ = SharePoint Person Column

This is how to work with Power Apps Gallery Conditional Formatting With Person Column.
Power Apps Gallery Conditional Formatting With Date
In this section, we will see how to use Power Apps Gallery Conditional Formatting With Date values.
- If the Request Date is Today and the Priority value is Normal, the Request Date will appear in Green in the Power Apps Gallery control; otherwise, it will appear in Red.
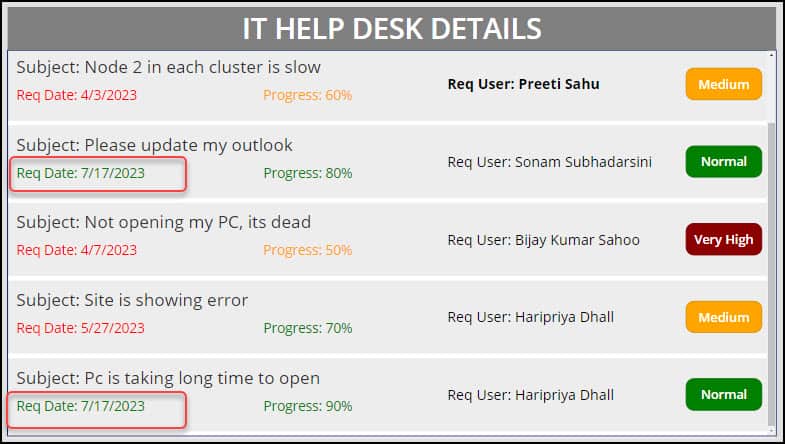
- To work around this, select the Request Date from the gallery control and set its Color property as:
Color = If(
    ThisItem.'Request Date' = Today() && ThisItem.Priority.Value = "Normal",
    Color.Green,
    Color.Red
)
Where,
- ‘Request Date‘ = SharePoint Date Column
- Priority = SharePoint Choice Column
- “Normal” = SharePoint Choice value

This is how to use Power Apps Gallery Conditional Formatting With Date values.
Power Apps Gallery Selected Item Color
Here we will see how to work with Power Apps Gallery Selected Item Color.
- When a user selects an item from the Power Apps gallery, that item’s row color changes to AliceBlue, while the rest of the gallery’s rows stay BlanchedAlmond.
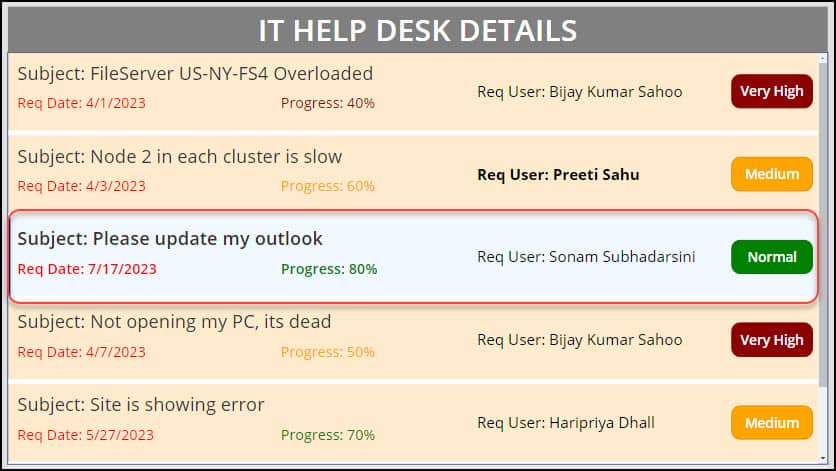
- There are two different codes that you can use on the Gallery’s TemplateFill property. Such as:
TemplateFill = If(
    ThisItem.IsSelected,
    Color.AliceBlue,
    Color.BlanchedAlmond
)

OR

TemplateFill = If(
    ThisItem.Title = galITHelpDesk.Selected.Title,
    Color.AliceBlue,
    Color.BlanchedAlmond
)
Where,
- Title = SharePoint Title field name
- galITHelpDesk = Gallery Control name

This is how to work with Power Apps Gallery Selected Item Color.
Power Apps Gallery Conditional Filtering With Row Colors
- In the below Power Apps gallery control, if the Priority value is Normal, then the specific row colors will be LightCyan color and the remaining gallery row colors will be Beige color.
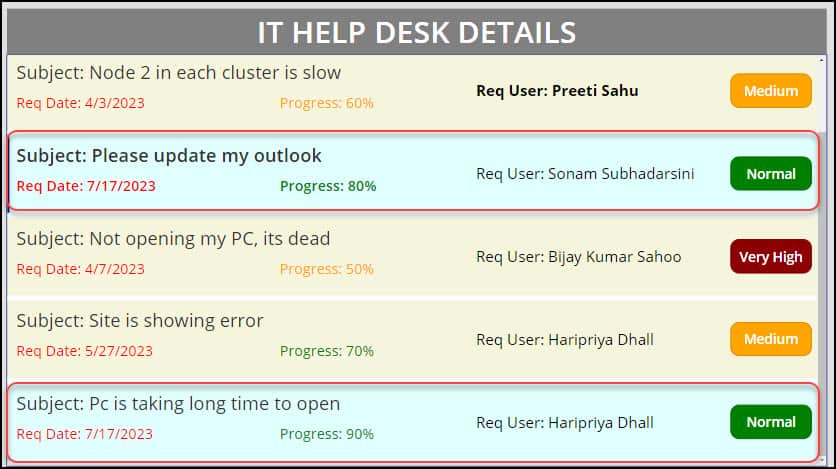
- To do so, select the first section of the gallery and set its TemplateFill property to the below formula:
TemplateFill = If(
    ThisItem.Priority.Value = "Normal",
    Color.LightCyan,
    Color.Beige
)
Where,
- Priority = SharePoint Choice Column
- “Normal” = Specify the choice value that the gallery row you want to make with different color

This is all about Power Apps Gallery Conditional Filtering With Row Colors.
Read: How to Set Gallery First Item in Power Apps Display Form
Power Apps Gallery Conditional Formatting With Icons
- Consider the scenario where you want to place some eye-catching Power Apps icons based on the Priority values of the gallery control.
For example,
| Priority | Icons |
|---|---|
| Very High | GlobeWarning |
| Medium | Support |
| Normal | Information |
Refer to the image below.
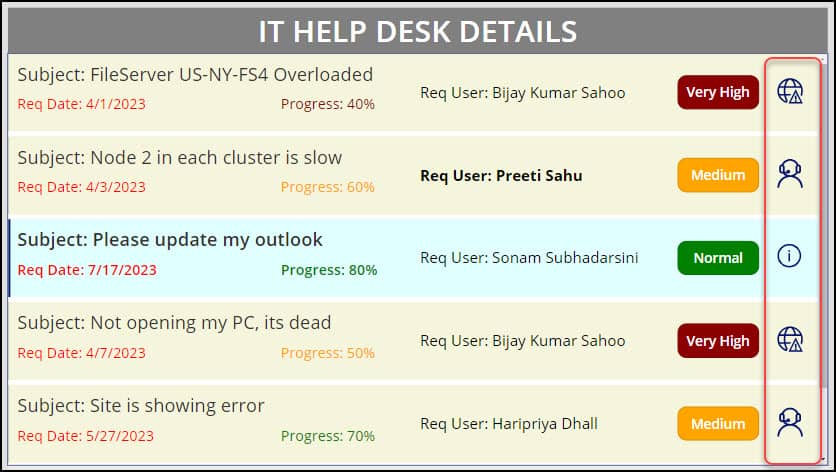
- To achieve this, we will use the Power Apps Switch function. Insert any Power Apps icon to the gallery control and set its Icon property as:
Icon = Switch(
    ThisItem.Priority.Value,
    "Very High",
    Icon.GlobeWarning,
    "Medium",
    Icon.Support,
    "Normal",
    Icon.Information
)
Where,
- Priority = SharePoint Choice Column
- “Very High”, “Medium”, and “Normal” = SharePoint Choice Values
- Icon.GlobeWarning, Icon.Support, Icon.Information = Power Apps icons

This is how to work with Power Apps Gallery Conditional Formatting With Icons.
Power Apps Gallery Conditional Formatting With Emojis
Now we will see how to work with Power Apps Gallery Conditional Formatting With Emojis.
- In the Power Apps Gallery Control, we will display the below emojis based on the Priority values i.e.
| Priority | Emoji |
|---|---|
| Very High | ⚠️ |
| Medium | Ⓜ️ |
| Normal | 😊 |
NOTE:
You can get different types of emojis by using Windows + Dot (.) key from your keyboard. Open a Notepad and then click on Windows + Dot (.) key -> Select the emoji that you want to put in the Power Apps gallery control. Copy the specific emoji from the notepad and then use it in the Power Apps formula bar.
Refer to the screenshot below:
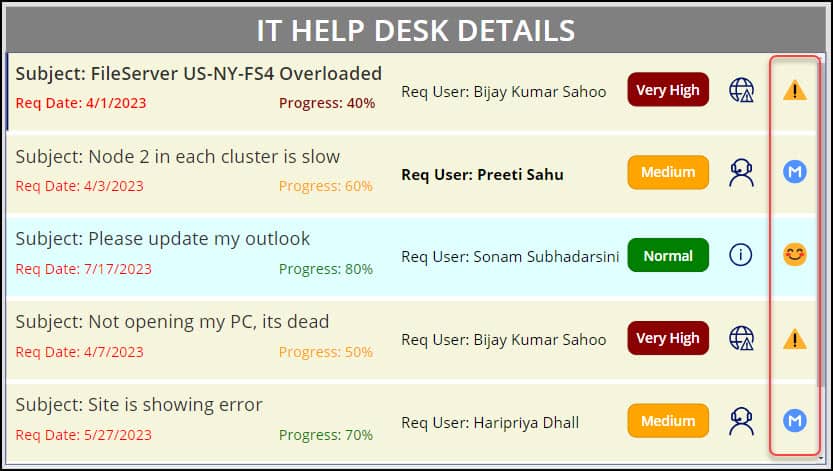
- To work around this, insert a Text label control to the gallery and set its Text property to the code below:
Text = If(
    ThisItem.Priority.Value = "Very High",
    "⚠️",
    ThisItem.Priority.Value = "Medium",
    "Ⓜ️️",
    ThisItem.Priority.Value = "Normal",
    "😊"
)
Where,
- Priority = SharePoint Choice Column
- Very High, Medium, Normal = Specify the choice values

This is how to work with Power Apps Gallery Conditional Formatting With Emojis.
Power Apps Gallery Conditional Formatting With Disabling Button
- Let’s say that when the priority value changes to Normal, you want to disable the Power Apps Gallery Button. In this case, we may disable the button by using the Power Apps Gallery control’s DisplayMode property.
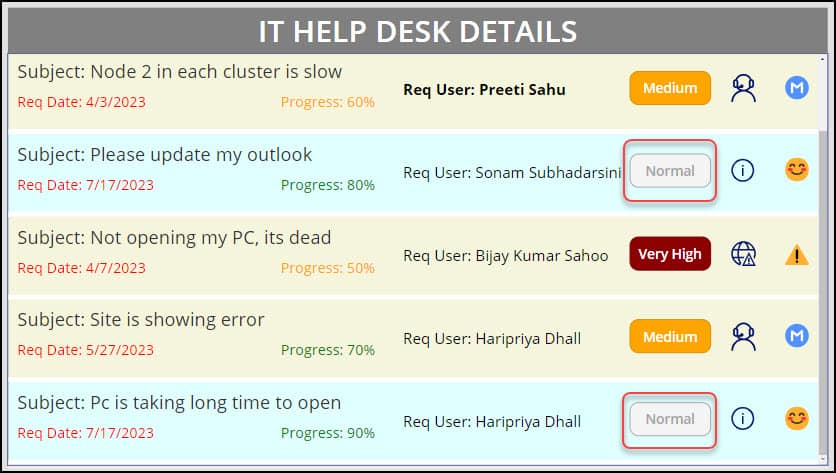
- Select the Button from the gallery and apply the code below on its DisplayMode property as:
DisplayMode = If(
    ThisItem.Priority.Value = "Normal",
    DisplayMode.Disabled,
    DisplayMode.Edit
)
Where,
Priority = SharePoint Choice column

This is all about Power Apps Gallery Conditional Formatting With Disabling Button.
Hover Effect for Power Apps Gallery Items
- A user will see transition effects like push and pop whenever they hover over any item in the Power Apps gallery. Refer to the gif below:
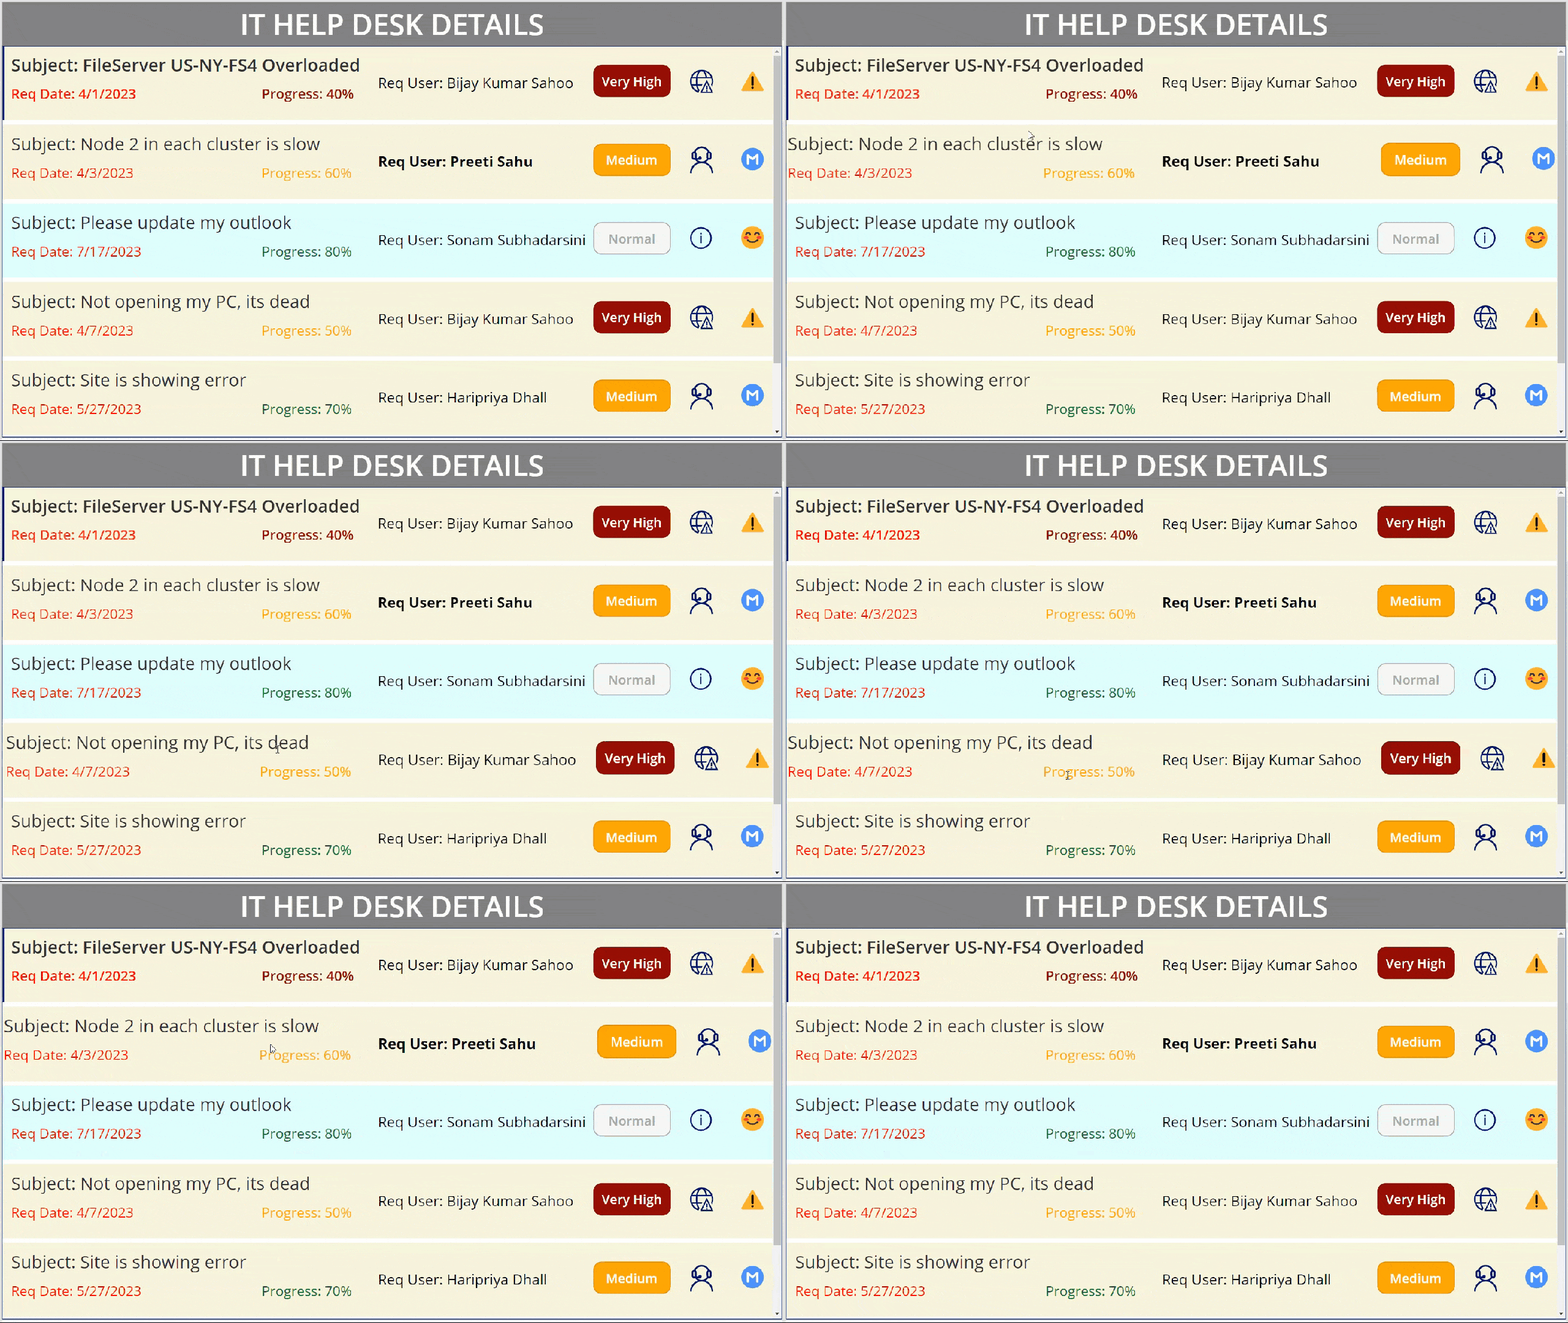
- To do so, we can use Gallery’s Transition property:
Transition = Transition.PopWe can either apply Pop or Push transition based on our needs.

This is about Hover Effect for Power Apps Gallery Items.
Power Apps Gallery Alternate Row Color
If you want to make alternate row color in Power Apps Gallery, then check out this complete tutorial to know more details: Alternate Row Color in Power Apps Gallery
Additionally, you may like some more Power Apps tutorials:
- Power Apps Gallery Control Examples Download [20 Various Real Scenarios]
- Power Apps Select All Checkbox in Gallery
- Power Apps Sort Gallery [With 15 Useful Examples]
- PowerApps Gallery Control Filter Example
This Power Apps tutorial explained all about the Power Apps Gallery Conditional Formatting with various examples like:
- Power Apps Gallery Formatting Text Values
- Power Apps Gallery Formatting Single Text Value
- Power Apps Gallery Formatting Multiple Text Value
- Power Apps Gallery Formatting Number Values
- Power Apps Gallery Formatting With Person Column (Bold Font)
- Power Apps Gallery Formatting with Date
- Power Apps Gallery Selected item Color
- Power Apps Gallery Conditional Filtering With Row Colors
- Power Apps Gallery Formatting with Icons
- Power Apps Gallery Formatting with Emojis
- Power Apps Gallery Formatting with disabling Button
- Hover effect for Power Apps gallery items
- Power Apps Gallery Alternate Row Color
I am Bijay a Microsoft MVP (10 times – My MVP Profile) in SharePoint and have more than 17 years of expertise in SharePoint Online Office 365, SharePoint subscription edition, and SharePoint 2019/2016/2013. Currently working in my own venture TSInfo Technologies a SharePoint development, consulting, and training company. I also run the popular SharePoint website EnjoySharePoint.com