Do you want to know how to patch the Power Apps collection? In this Power Apps tutorial, I will explain how to patch Power Apps collection to SharePoint list? Also, I will show you how to patch items to the Power Apps collection dynamically.
How to Patch Power Apps Collection
Here, we will discuss how to patch the Power Apps collection with a simple example:
Example:
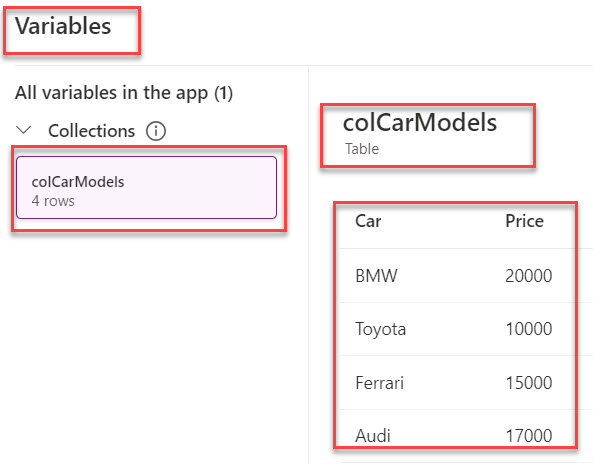
I have a manual Power Apps collection named “colCarModels” and this collection contains the below items with respective headers/columns.
| Column Name | Data Type |
| Car | Text |
| Price | Number |
Refer to the below screenshot:
I would like to add a record or item to the Power Apps collection using a Patch() function, as shown below.
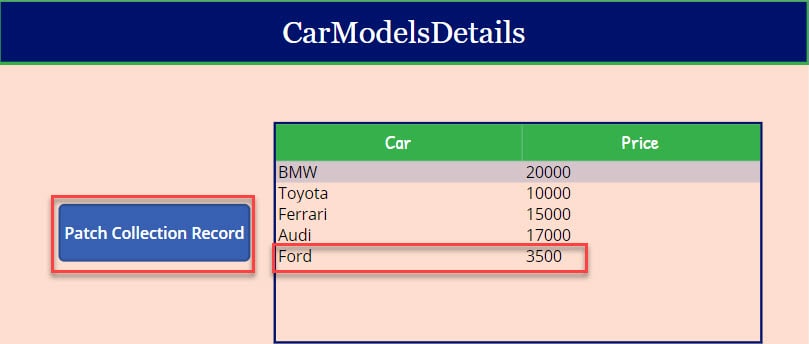
To achieve it, follow the below-mentioned steps. Such as:
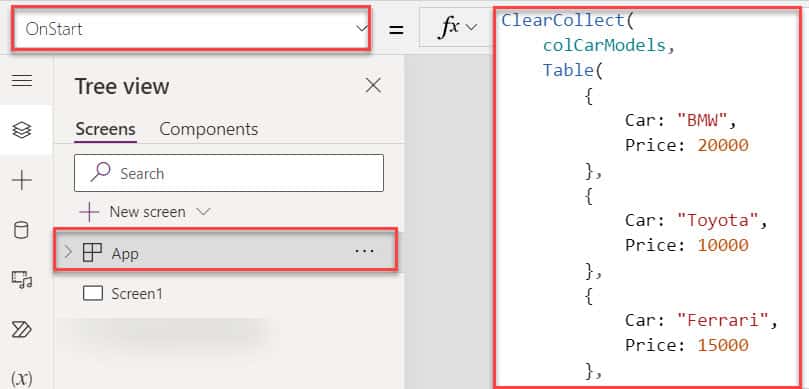
1. To create a Power Apps collection -> Select the App object [From the left navigation] and set its OnStart property to the code below.
OnStart = ClearCollect(
    colCarModels,
    Table(
        {
            Car: "BMW",
            Price: 20000
        },
        {
            Car: "Toyota",
            Price: 10000
        },
        {
            Car: "Ferrari",
            Price: 15000
        },
        {
            Car: "Audi",
            Price: 17000
        }
    )
)
Where,
- colCarModels = Collection name
- Car, Price = Collection Headers/Columns
- “BMW”, 2000 = Collection Values/Items
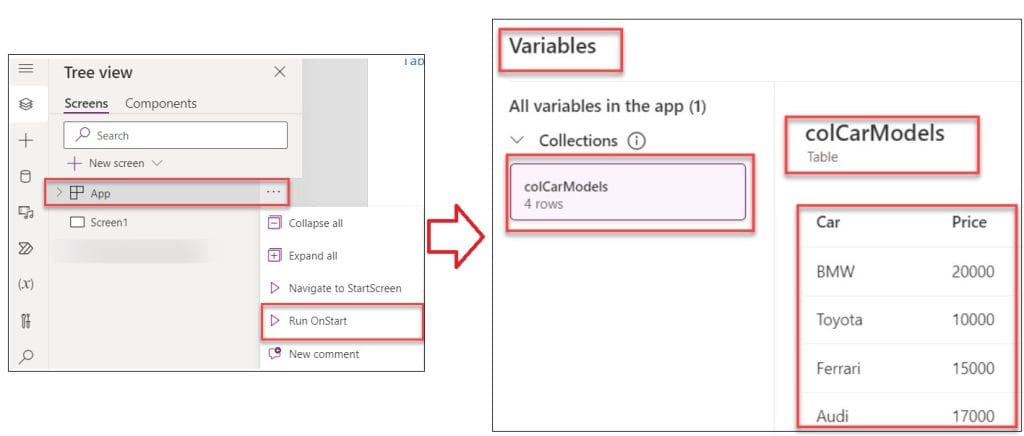
2. Click on the App’s Run OnStart property to get the created collection. Then, go to the Variables section and select your respective collection, as shown below.
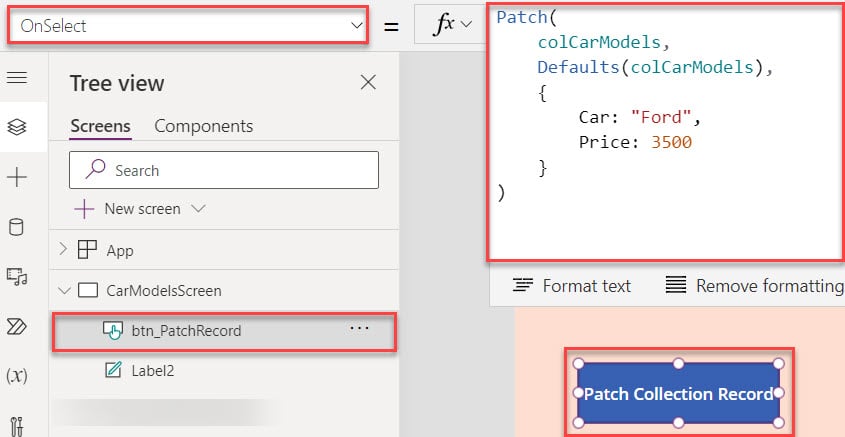
3. Next, select the Power Apps default screen [CarModelsScreen] -> Insert a Button control and set its OnSelect property to the code below.
OnSelect = Patch(
    colCarModels,
    Defaults(colCarModels),
    {
        Car: "Ford",
        Price: 3500
    }
)
Where,
- Patch() = This function allows us to create and modify records in a data source
- colCarModels = Power Apps Collection Name
- Defaults() = Defaults function to pre-populate a data entry form, making it easier to fill.
- Car: “Ford”, Price: 3500 = New Collection Record
4. Then, insert a Data table control and set Its Items property as:
Items = colCarModels5. To display the Power Apps collection records, click on the Edit fields option under the Properties pane and choose the respective fields as per needs, as shown below.

6. Once the app is ready, Save, Publish, and Preview the app. When the user clicks on the button control, the data table control displays collection records, including the new record, as in the screenshot below.

This is all about how to patch an item to the Power Apps collection.
Patch Items to Power Apps Collection Dynamically
Next, we will see how to patch items to the Power Apps collection dynamically with a simple example.
Example:
I will also take the above Power Apps collection [colCarModels] for this example. Now, I want to patch the new items or an item to the Power Apps collection dynamically.
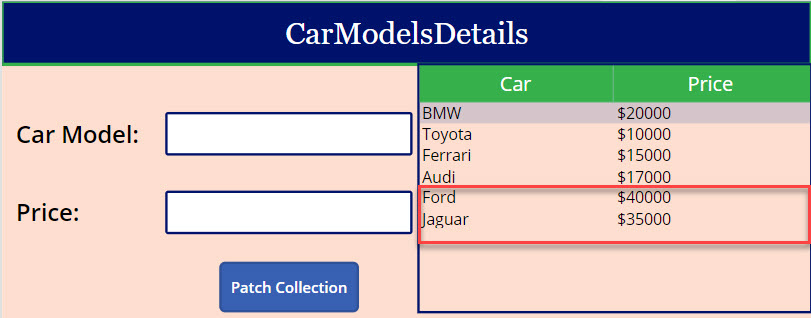
In Power Apps, there are two Text input controls, a Button control, and a data table control; whenever the user adds a new record using text inputs and clicks on the button control, the new record will be patched on the collection.
Also, the collection will be displayed on the data table control, as in the screenshot below.
To work around this example, follow the below steps:
1. On the Power Apps Screen -> Insert two Text input controls, i.e., [txt_CarModel and txt_Price] -> Insert a Button control and set its OnSelect property to the code below.
OnSelect = Patch(
    colCarModels,
    Defaults(colCarModels),
    {
        Car: txt_CarModel.Text,
        Price: txt_Price.Text
    }
);
Reset(txt_CarModel);
Reset(txt_Price)
Where,
- colCarModels = Power Apps Collection Name
- txt_CarModel.Text, txt_Price.Text = Power Apps Text input Controls
- Reset() = The Reset function resets a control to its Default property value
Refer to the below screenshot:

2. Then, insert a Data table control and set Its Items property to the code below.
Items = colCarModels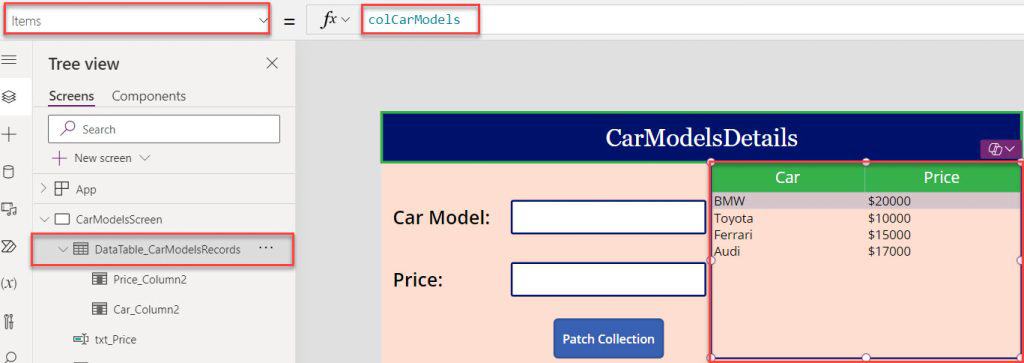
3. Save, Publish, and Preview the app. When the user adds a new record or records using text inputs and clicks on the button control, the data table will display new collection records as shown below.

This is how to patch items to the Power Apps collection dynamically.
Patch Power Apps Collection into SharePoint List
In the last, I will show you how to patch the Power Apps collection into a SharePoint list with a simple scenario:
Scenario:
I have created a SharePoint Online list, i.e., [Orders List]. This list contains the below fields.
| Column Name | Data Type |
| ProductName | It is a default single line of text column |
| OrderDate | Date and time |
| Price | Currency |

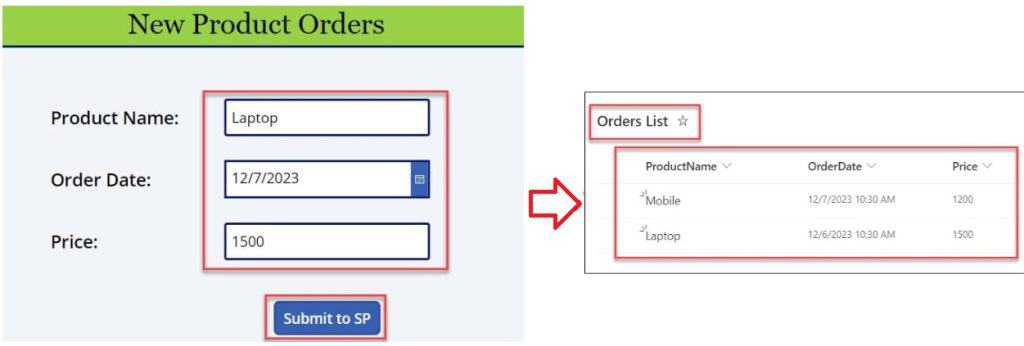
Now, I want to patch the Power Apps collection into a SharePoint list. When a user clicks the button control after providing the Product’s information, it will be stored in the Power Apps collection, as in the screenshot below.
To do so, follow the below steps.
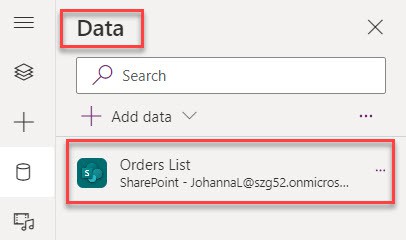
1. Create a Power Apps Canvas app and connect it to the respective SharePoint list [Orders List], as shown below.
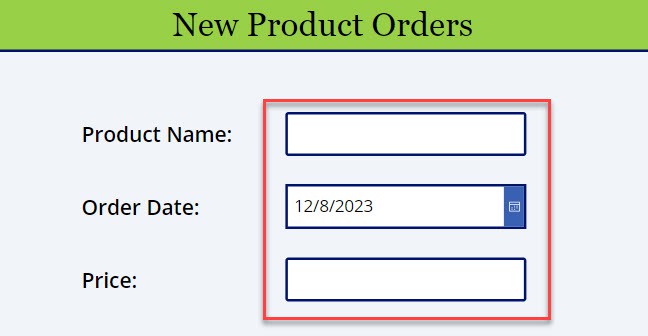
2. On the Power Apps Screen -> Insert two Text inputs, i.e., [TextInput_ProductName and TextInput_Price] and a DatePicker control [DatePicker_OrderDate] as shown below.
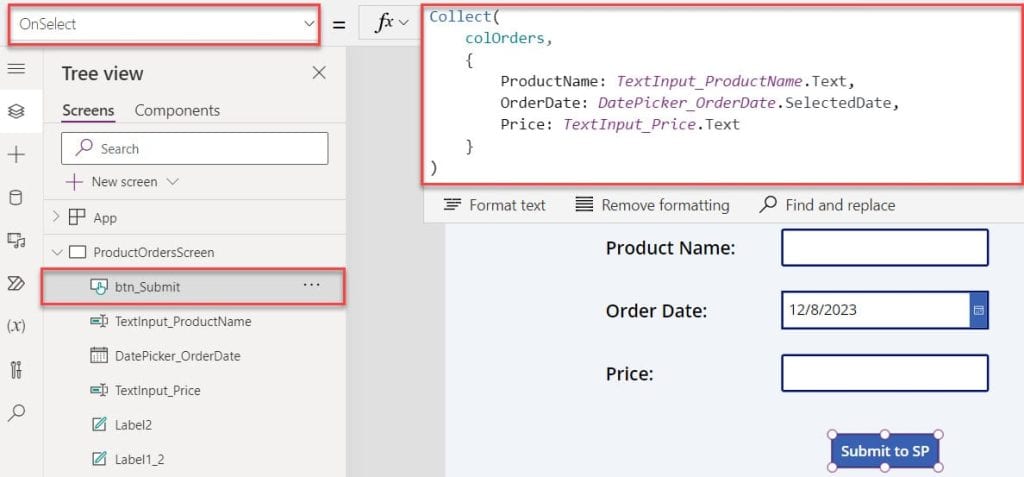
3. Then, insert a Button control [btn_Submit] and set its OnSelect property to the code below.
OnSelect = Collect(
    colOrders,
    {
        ProductName: TextInput_ProductName.Text,
        OrderDate: DatePicker_OrderDate.SelectedDate,
        Price: TextInput_Price.Text
    }
);
Where,
- Collect() = This function is used to add records to a data source or table
- colOrders = Power Apps collection name
- ProductName, OrderDate, Price = Collection headers/columns
- TextInput_ProductName, TextInput_Price = Power Apps text input controls
- DatePicker_OrderDate = Date picker name
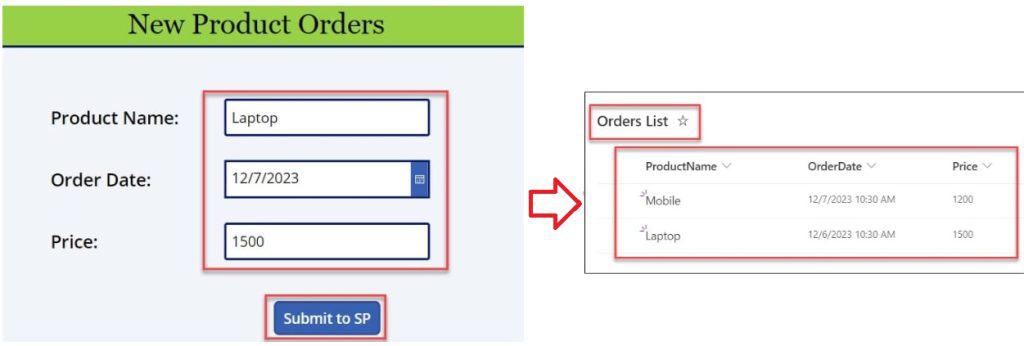
4. Save, Publish, and Preview the app. When a user clicks the button control after providing the Product’s information, it will be stored in the Power Apps collection, as in the screenshot below.
5. Now, I want to submit data from the Power Apps collection into the SharePoint list. To do so, select the button control and set its OnSelect property to the code below.
OnSelect = Collect(
    colOrders,
    {
        ProductName: TextInput_ProductName.Text,
        OrderDate: DatePicker_OrderDate.SelectedDate,
        Price: TextInput_Price.Text
    }
);
Patch(
    'Orders List',
    Defaults('Orders List'),
    {
        Title: First(
            LastN(
                colOrders,
                1
            )
        ).ProductName,
        OrderDate: First(
            LastN(
                colOrders,
                1
            )
        ).OrderDate,
        Price: First(
            LastN(
                colOrders,
                1
            )
        ).Price
    }
);
Reset(TextInput_ProductName);
Reset(DatePicker_OrderDate);
Reset(TextInput_Price)
Where,
- ‘Orders List’ = SharePoint Online List
- Defaults() = This function returns a record that contains the default values for the data source
- Title, OrderDate, Price = SharePoint list fields
- First() = This function returns the first record of a table
- LastN() = This function returns the last record of a table
- colOrders = Power Apps Collection
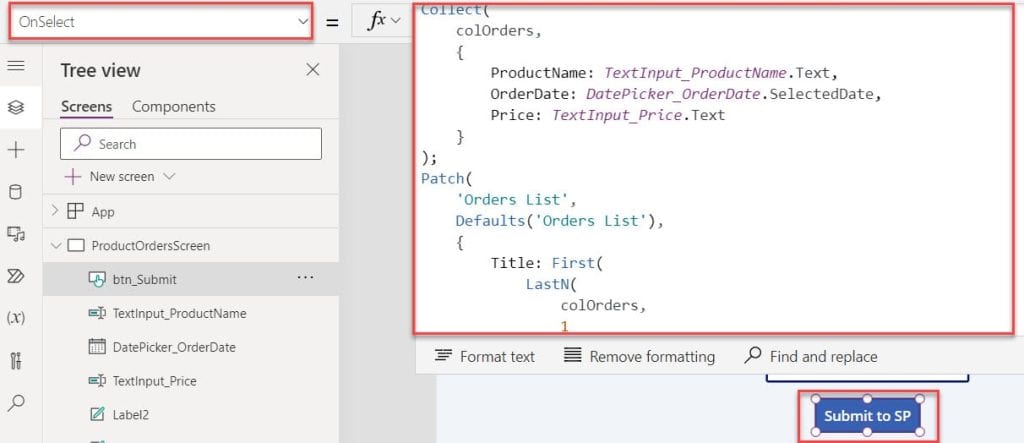
Once your app is ready, Save, Publish, and Preview the app. Whenever the user patches the Power Apps collection data by clicking the button control, it will be saved in the SharePoint Online list.
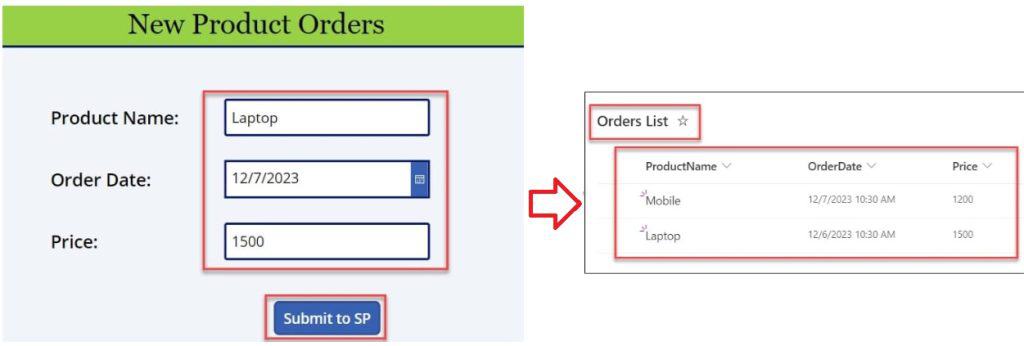
This is how to patch the Power Apps collection into a SharePoint list.
Conclusion
I trust this Power Apps tutorial taught in detail information about how to patch the Power Apps collection, including:
- How to Patch Item to Power Apps Collection
- Patch Items to Power Apps Collection Dynamically
- How to Patch Power Apps Collection into SharePoint List
You may like the following tutorials:
- How to Add Column in Power Apps Collection?
- Remove Duplicate Rows From a Power Apps Collection
- Power Apps Save Collection to SharePoint List
- Remove Items From Power Apps Collection
- Count Rows in Power Apps Collection
I am Bijay a Microsoft MVP (10 times – My MVP Profile) in SharePoint and have more than 17 years of expertise in SharePoint Online Office 365, SharePoint subscription edition, and SharePoint 2019/2016/2013. Currently working in my own venture TSInfo Technologies a SharePoint development, consulting, and training company. I also run the popular SharePoint website EnjoySharePoint.com