Here we will see how to add Site columns to SharePoint content type using Power Automate.
So, here we will create an Instant cloud flow, which will trigger and perform the below tasks:
- It will create a Site content type in SharePoint. We will fetch the Site content type Id once it gets created.
- Next, we will get all the Site columns from the SharePoint site. Then we will filter the list of Site columns, to get the site column you want and then fetch the site column id.
- Then we will fetch the SharePoint site id. After that by using these three id: Content type id, site column id, and SharePoint site id, we will add a site column to the SharePoint content type using graph Api in Power Automate.
This is how the Flow will look like:
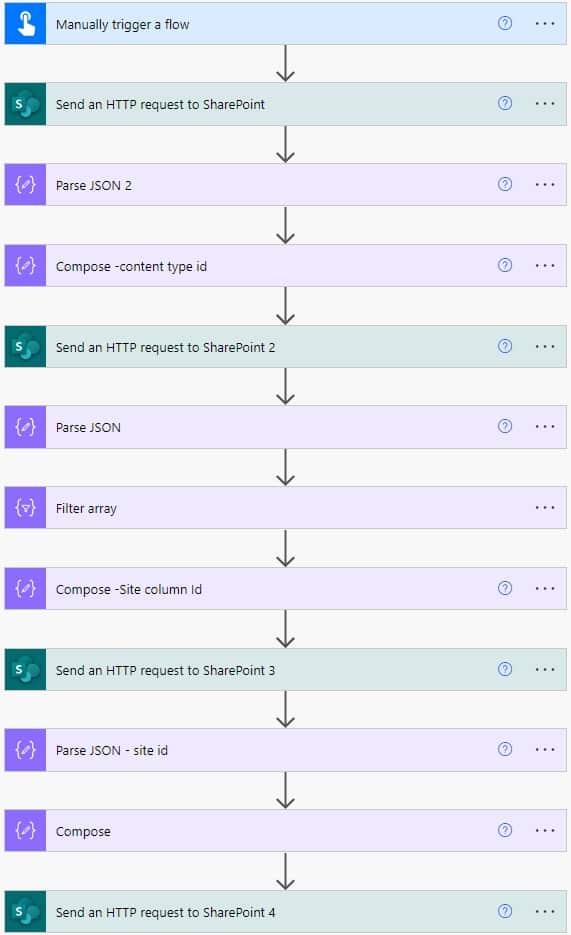
Now let’s see how we can build that will automatically add site columns to the SharePoint site using Power Automate.
How to add Site columns to SharePoint content type using Power Automate
Here we will see how we can add site columns to SharePoint content type using Power Automate.
So we will use the below Employee Department site column, which is coming under Employee Column. We will create a Content type named Employee Information and we will add the Site column.

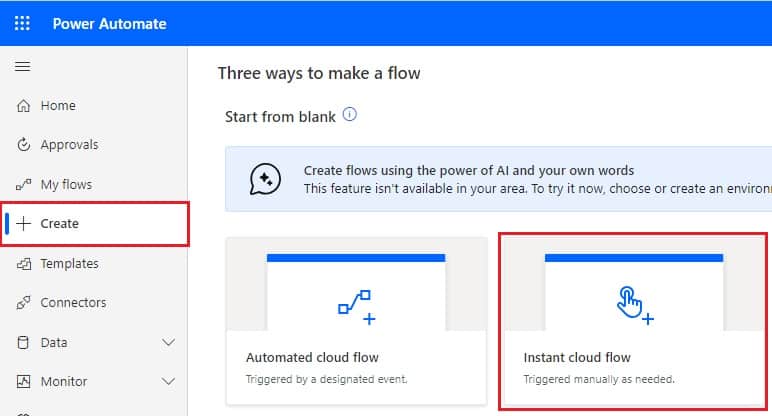
Step 1: Log in to Power Automate, then click on the +Create icon on the Navigation bar. Select Instant Cloud Flow.
Then provide the flow name, and select Manually trigger a flow. Click on Create.
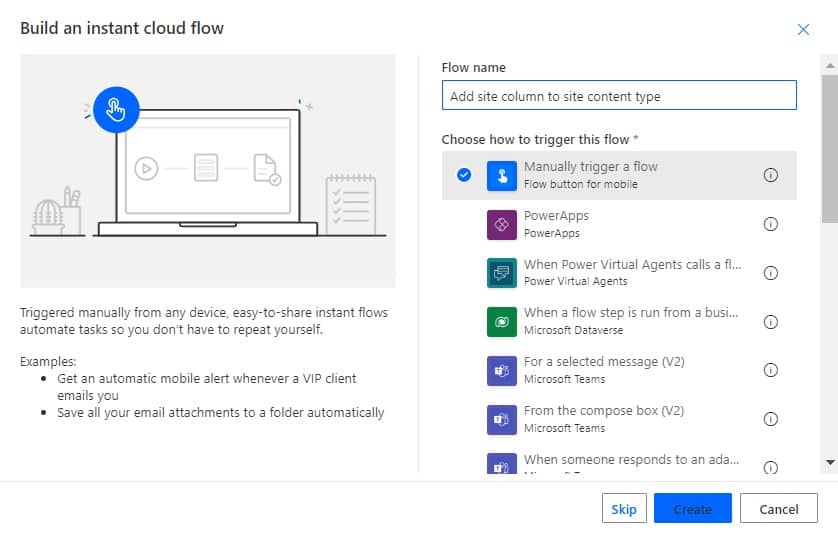
Now you can see the Manually trigger flow is added to the flow in Power Automate.

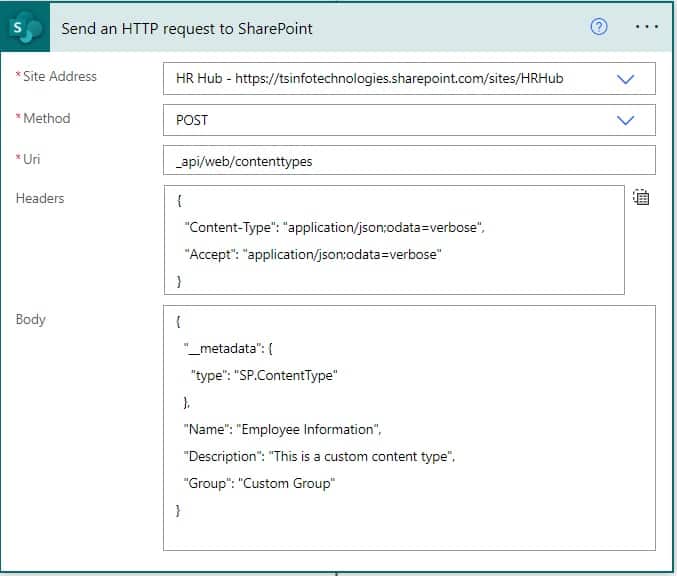
Step 2: Now we will create content type using Power Automate, so click on the +New step -> select ‘Send an HTTP request to SharePoint‘ action. Then provide the below information:
- Site address: Provide or Select the site address
- Method: Select the POST method
- Uri: Provide the Uri as below, we are creating site content type
_api/web/contenttypes- Header: Provide the header as below required to do rest API call
{
  "Content-Type": "application/json;odata=verbose",
  "Accept": "application/json;odata=verbose"
}- Body: Provide the body as below, which contains information related to site content type.
{
  "__metadata": {
    "type": "SP.ContentType"
  },
  "Name": "Employee Information",
  "Description": "This is a custom content type",
  "Group": "Custom Group"
}
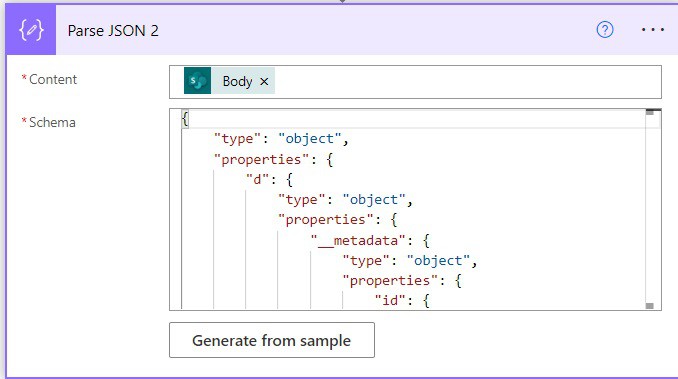
Step 3: Next click on the +New step -> select Parse json action, then provide the below information:
- Content: Select the Body of the previous step from the dynamic content
- Schema: To get the schema, click on Generate from the sample and provide the above step output.
Step 4: Next click on the +New step -> select Compose action, then provide the below information:
- Inputs: Select the StringId from the dynamic content.

Step 5: Here we will get the site columns available in the SharePoint site, so click on the +New step and select the ‘Send an HTTP request to SharePoint‘ action. Then provide the below information:
- Site address: Provide or Select the site address.
- Method: Select the GET method as we are fetching all the site columns from SharePoint.
- Uri: Provide the Uri as below, to get site columns.
_api/web/fields?$select=Id,Title,InternalName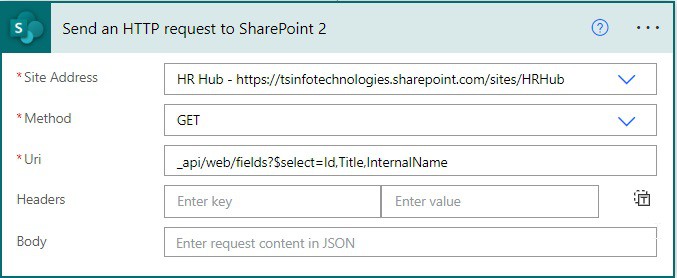
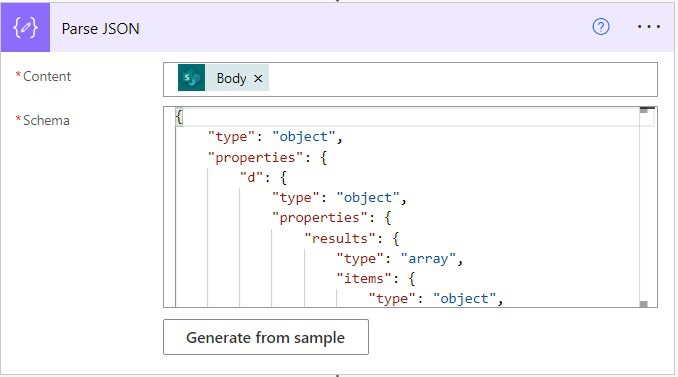
Step 6: Next click on the +New step -> select Parse json action, then provide the below information:
- Content: Select the Body of the previous step from the dynamic content
- Schema: To get the schema, click on Generate from the sample and provide the above step output.
Step 7: Next, click on the +New step -> select Filter array action, to get the particular site column. Then provide the below information:
- From: Select results from the dynamic content
- Choose a value: Select or provide the title from the dynamic content.
- Operator: Select the operator as equal to
- Choose value: Write the value as ‘Employee Department’

Step 8: Next click on the +New step -> select Compose action, then provide the below information:
- Inputs: Provide the below expression:
first(body('Filter_array'))['Id']
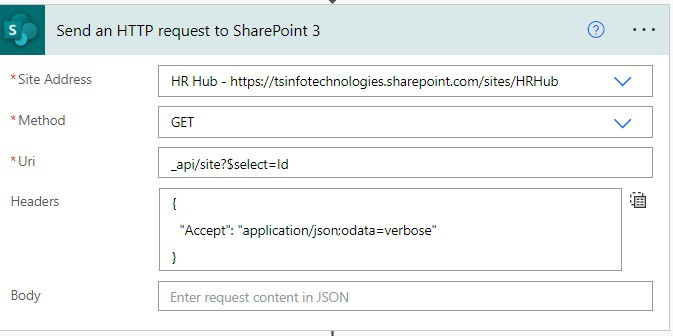
Step 9: Here we will get the site columns available in the SharePoint site, so click on the +New step and select ‘Send an HTTP request to SharePoint‘ action. Then provide the below information:
- Site address: Provide or Select the site address.
- Method: Select the GET method to get the site id
- Uri: Provide the Uri as below, we are getting site id.
_api/site?$select=Id- Headers: Provide the headers required to do the rest API calls.
{
  "Accept": "application/json;odata=verbose"
}
Step 10: Next click on the +New step -> select Parse json action, then provide the below information:
- Content: Select the Body of the previous step from the dynamic content
- Schema: To get the schema, click on Generate from the sample and provide the above step output.
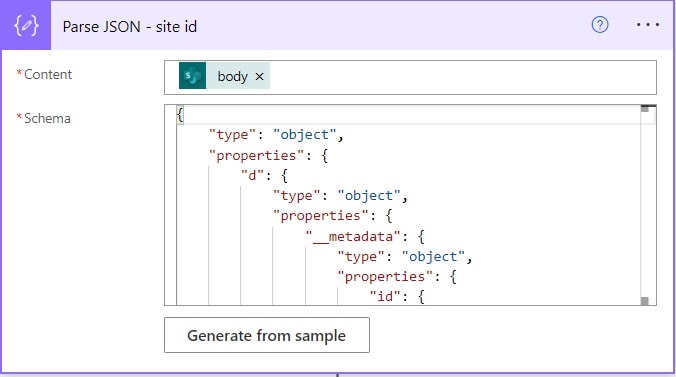
Step 11: Next click on the +New step -> select Compose action, then provide the below information:
- Inputs: Select the Id-parse json from the dynamic content

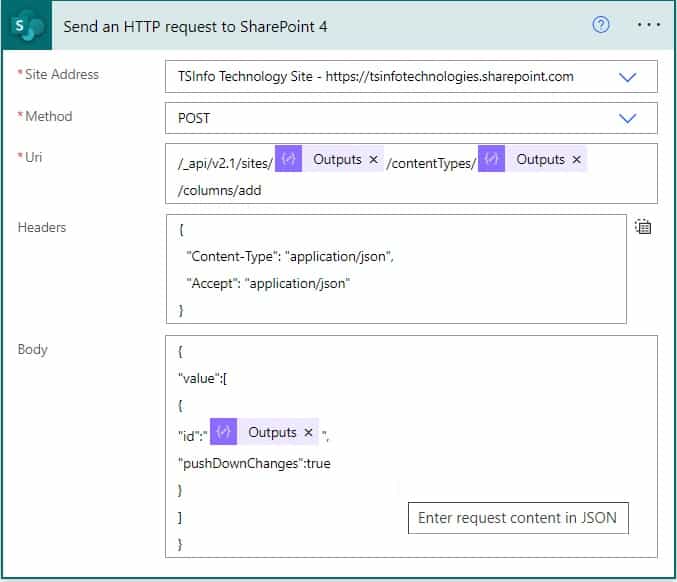
Step 12: Here we will add the site columns to the site content type, so click on the +New step and select ‘Send an HTTP request to SharePoint‘ action. Then provide the below information:
- Site address: Provide or Select the site address.
- Method: Select the POST method as we are adding a site column to the site content type in SharePoint
- Uri: Provide the Uri as below, to add the site columns to the content type.
/_api/v2.1/sites/@{outputs('Compose')}/contentTypes/@{outputs('Compose_-content_type_id')}/columns/add- Headers: Provide the headers like below, as it is required for the rest API calls:
{
  "Content-Type": "application/json",
  "Accept": "application/json"
}- Body: Provide the body like below, to add the site columns:
{
"value":[
{
"id":"@{outputs('Compose_-Site_column_Id')}",
"pushDownChanges":true
}
]
}
Step 12: To run the flow, click on Save -> click on the Test icon -> select Manually -> select the Test button. Then enter the search text in the form field. Here I am searching the text ‘js’. Then click on Run Flow -> click on Done.
You can see your flow ran successfully, and then go to your SharePoint site settings – select Web Designer galleries-> go to Site content type – you can see the Employee Information content type. Once you expand it, you can see the Site column.
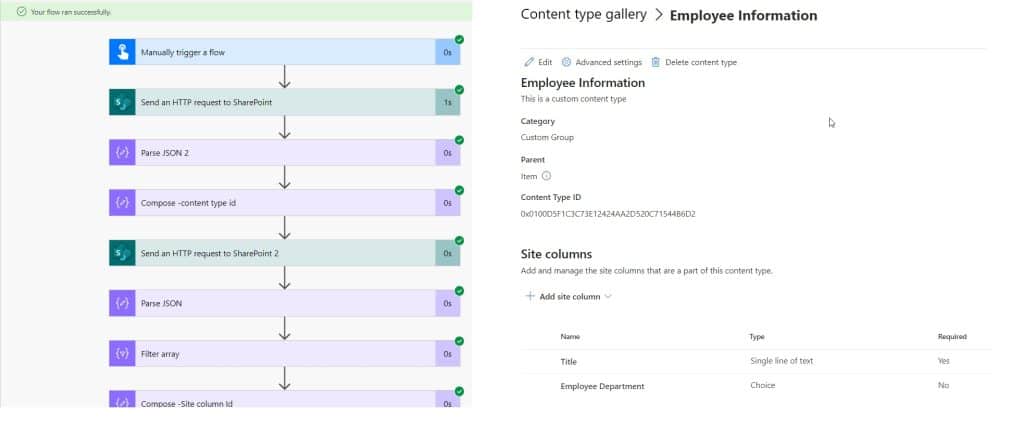
This is how to add a site column to the site content type in SharePoint using Power Automate.
Conclusion
In this Power Automate tutorial, we saw how to create site content types in SharePoint. Also, we saw how we can add a site column to the site content type using Power automate
You may also like:
- Expense Reimbursement and Approval using Power Automate [SharePoint List, Microsoft Forms, Planner]
- Create Calendar Events from a SharePoint list using Power Automate
- Create SharePoint Group using Power Automate
I am Bijay a Microsoft MVP (10 times – My MVP Profile) in SharePoint and have more than 17 years of expertise in SharePoint Online Office 365, SharePoint subscription edition, and SharePoint 2019/2016/2013. Currently working in my own venture TSInfo Technologies a SharePoint development, consulting, and training company. I also run the popular SharePoint website EnjoySharePoint.com