In this Dataverse tutorial, We will discuss Power Automate Dataverse Add New Row. That means, how we can add a new row in Dataverse using Power Automate.
Also, we’ll explore how to use Power Automate to send a user a successful message after the row has been added to the Dataverse table.
Recently, I had a task where I needed to use Power Automate to automatically add a new row to a Dataverse table.
Also, Read: How to Update a Row in Dataverse Using Power Automate
Power Automate Dataverse Add New Row
Consider the scenario where you want to add a new record to a Dataverse Table without doing it manually one by one. In that case, Power Automate can be used to help you add a new row to the Dataverse table whenever an action takes place. Let’s follow the example below to know more details.
Scenario:
Below represents a Dataverse table named IT Issue Resolutions. This custom table has the below fields with various data types. Such as:
- Sender = This is the Dataverse Primary Column name with the Text data type
- Issues = Single line of text data type
- Report Date = Date Data type
- Status = Choice Column having some choices like Approved, Rejected, Pending, etc.

Now I want to build a flow where, when a user reports an issue via email, all the issue information is automatically stored in a specific Dataverse table (IT Problem Resolutions). And at the same time, the specific sender will get a success notification once the particular record has been added to the Dataverse Table. To do so, follow the instructions below.
Step – 1: [Create a new Automated cloud flow]
- Open Power Automate and Sign in with your valid Microsoft credentials.
- Go to + Create (from the left navigation) -> Select Automated cloud flow under the Start from blank section.

Step – 2: [Provide Flow name and Choose the trigger]
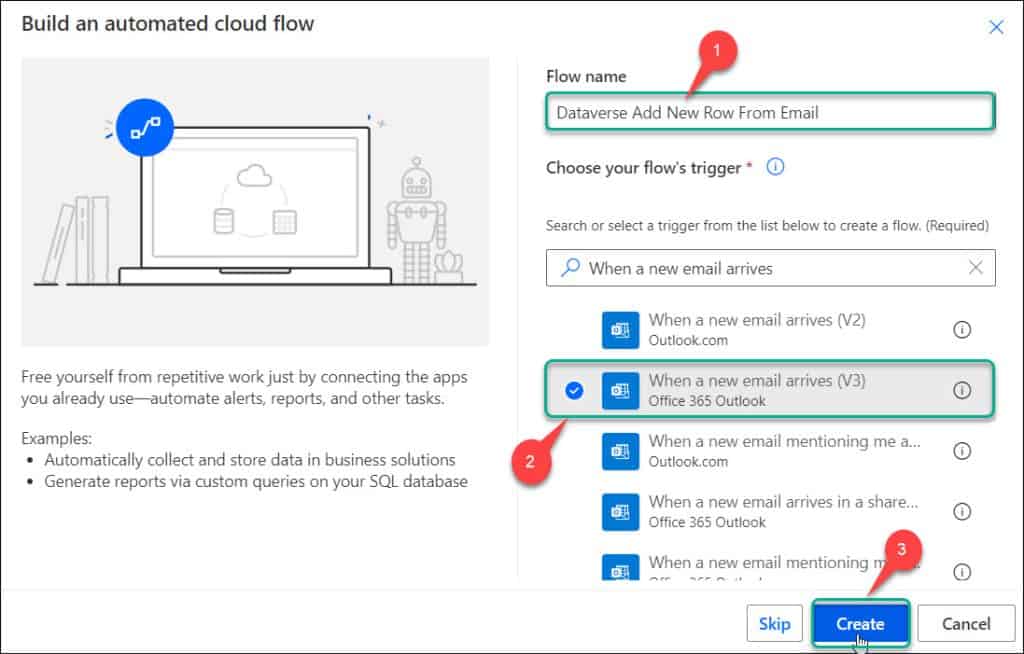
- Then the below window will appear where you need to provide the flow name and choose the flow trigger.
- Flow name = I have given the flow name as Dataverse Add New Row From Email.
- Choose your flow’s trigger = Search or select the trigger from the list below to create a flow. In my case, it’s When a new email arrives (V3).
- Click on Create.
- Once the flow has been created, the trigger will appear as shown in the screenshot below. You can just rename it to “When a new issue arrives“.

Step – 3: [Insert Dataverse Add a new row action]
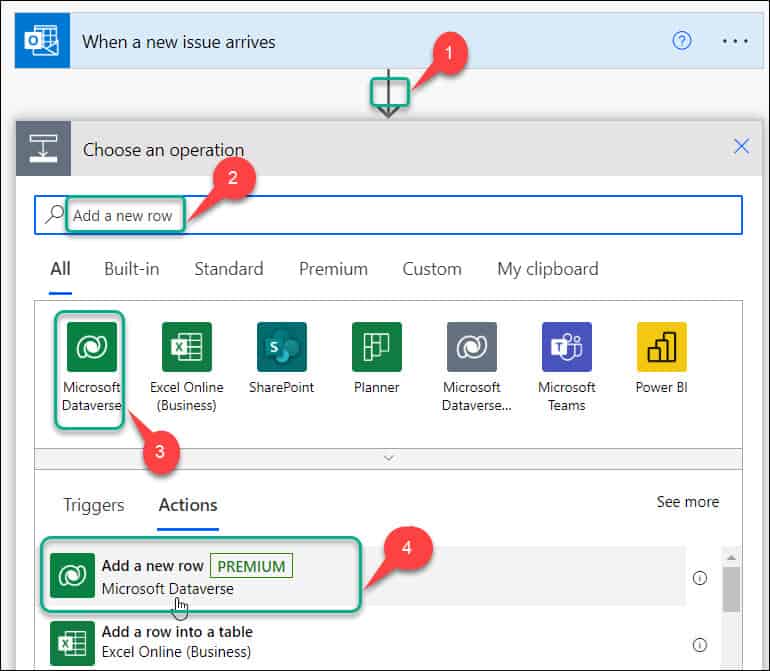
- Next, click on the + icon to insert a new step below the trigger (When a new issue arrives).
- Search Add a new row in the search bar -> Select Microsoft Dataverse -> Click on Add a new row (PREMIUM) under the Actions tab.
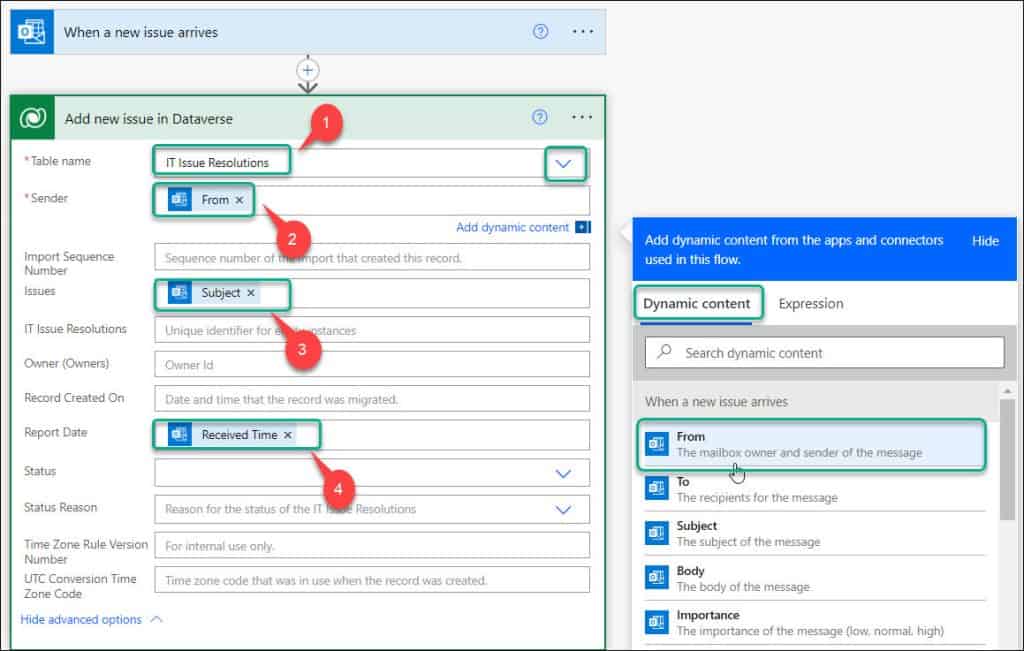
- Just rename the action Add a new row to Add new issue in Dataverse. Also, enter the details below:
- Table name = Select the IT Issue Resolutions table using the dropdown menu.
- Sender = Select the field -> Go to Dynamic content -> Click From under When a new issue arrives.
- Issues = Select the field -> Go to Dynamic content -> Click Subject under When a new issue arrives.
- Report Date = Select the field -> Go to Dynamic content -> Click Received Time under When a new issue arrives.
Step – 4: [Add Send an Email action]
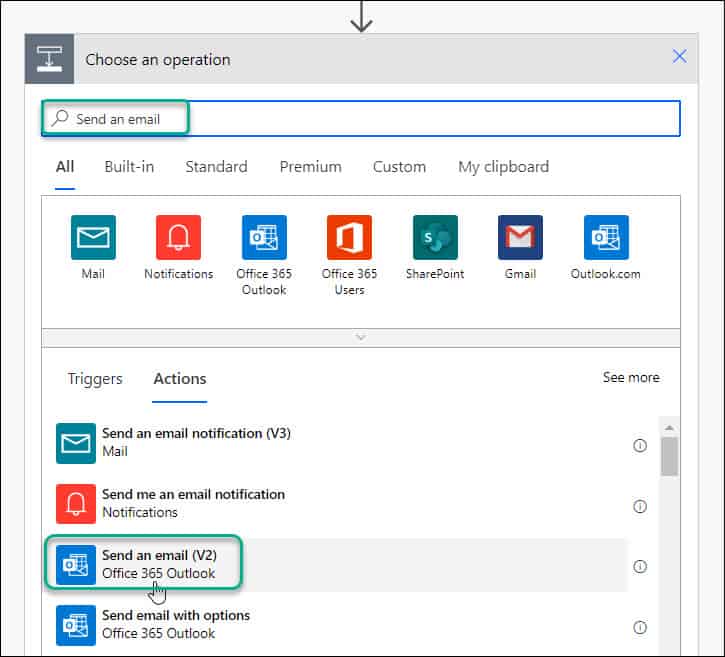
- Then, click on the + icon to insert a new step below the Dataverse add a new row action.
- Search Send an email in the search bar and add Send an email (V2) under the Actions tab.
- Expand the action and apply the below field values:
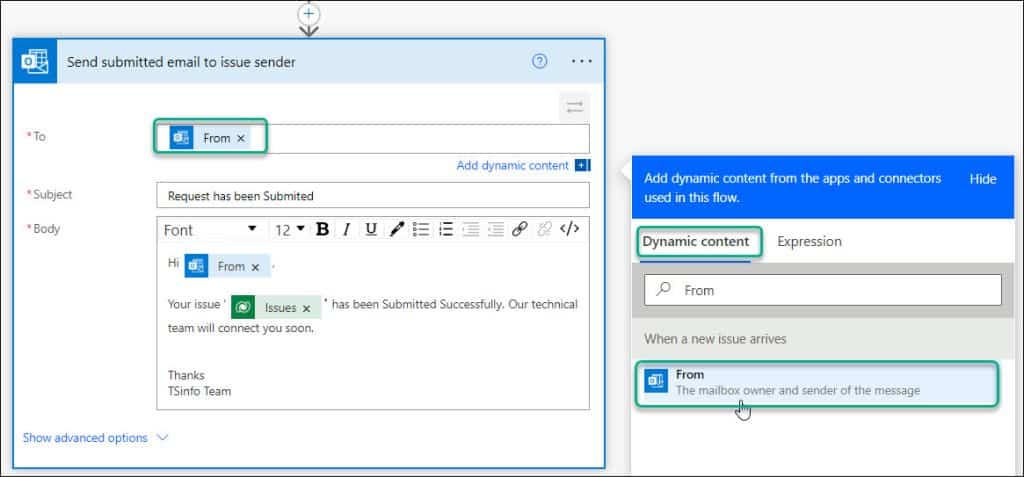
- To = Select the field -> Go to Dynamic content -> Select From under the When a new issue arrives.
- Subject = Provide any subject line that you want to mention in the mail.
- Body = You can describe your body details like the respective issue has been submitted Successfully.
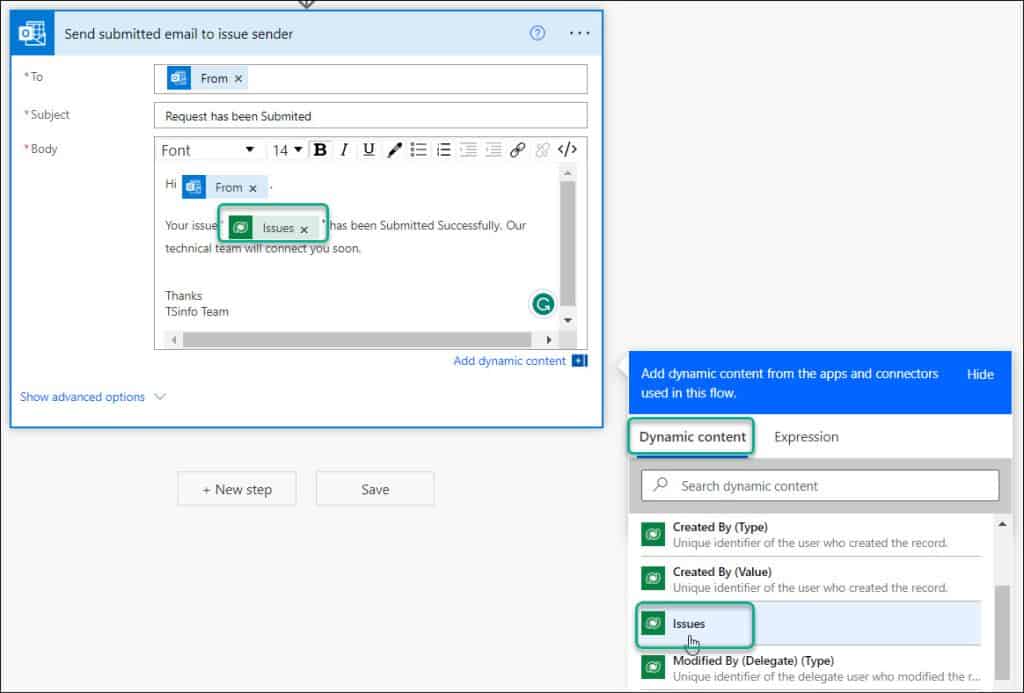
- You can take the Issues field from the Dynamic content -> Add new issue in Dataverse action.
Step – 5: [Save and Test the flow]
- Finally, save the flow. Also, click the Flow checker and check if any issues are there.
- If yes, then fix it, and If not, then proceed to Test the flow. Click on Test.

- In the Test Flow pane, select Manually and click on Test as shown below. To see whether the flow works or not, you need to send a new email to your inbox.
- For this purpose, I have used another user (Sonam) and sent a mail to my inbox.

- After a while, the flow will run successfully and a notification will appear at the top of the flow like “Your flow ran successfully“.

Step – 6: [Refresh Dataverse Table]
- Now come back to the relevant Dataverse table (IT Issue Resolutions) and refresh it once. You can view the new item that has been added to the Dataverse table in the below image.

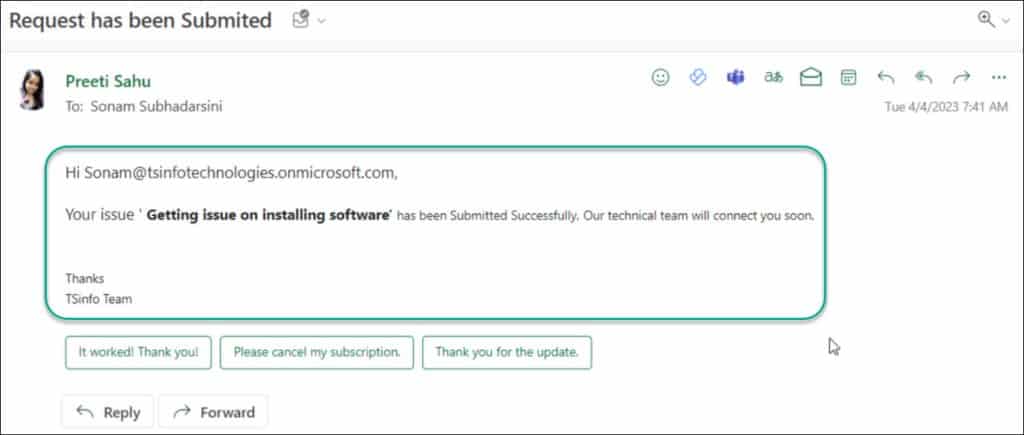
- Also, at the same time, the sender will get a submitted notification that “Request has been Submitted” as shown in the screenshot below.
This is how we can work with Power Automate Dataverse Add New Row.
Furthermore, you may like some more below Dataverse tutorials:
- How to Patch Dataverse Number Field in Power Apps
- How to Get Dataverse Created by in Power Automate
- Power Apps Select All Checkbox in Gallery
- Power Automate Get Display Name From Email
- How to Detect Text in Dataverse Using AI Builder
- How To Get Row by ID From Dataverse Table
- How To Get Dataverse List Rows Count Using Power Automate
- How to Upload images to Dataverse from Power Apps
In this Dataverse tutorial, We discussed Power Automate Dataverse Add New Row. That means, how we can add a new row in Dataverse using Power Automate.
Also, we saw how to use Power Automate to send a user a successful message after the row has been added to the Dataverse table.
I am Bijay a Microsoft MVP (10 times – My MVP Profile) in SharePoint and have more than 17 years of expertise in SharePoint Online Office 365, SharePoint subscription edition, and SharePoint 2019/2016/2013. Currently working in my own venture TSInfo Technologies a SharePoint development, consulting, and training company. I also run the popular SharePoint website EnjoySharePoint.com