In Power Apps, you can customize the data table by hiding specific columns. This feature allows you to focus on essential information or hide sensitive data from view. Follow this tutorial to learn how to hide a column in the Power Apps data table with different use cases.
Hide a Column in Power Apps Data Table
While working with the Power Apps data table, sometimes we need to hide specific columns or a column as per our requirements. Now, I will show you how to hide a column in the Power Apps data table using different examples. Such as:
- How to Hide Power Apps Data Table Column using Button Control
- How to Hide Power Apps Data Table Column using Dropdown
- Power Apps Hide Data Table Column Based on Text Input
- Working with Power Apps Hide Data Table Column based on Current User
Hide Power Apps Data Table Column using Button Control
Let’s take a simple scenario: I have created a Power Apps data table using my SharePoint Online list [Travel Requests] and this list contains the below fields.
| Column Name | Data Type |
| Trip Title | It is a Default single line of text |
| Destination | Location |
| Travel Start Date | Date and time |
| Travel End Date | Date and time |
| Requested By | Person or Group |
| Number of Days | Number |
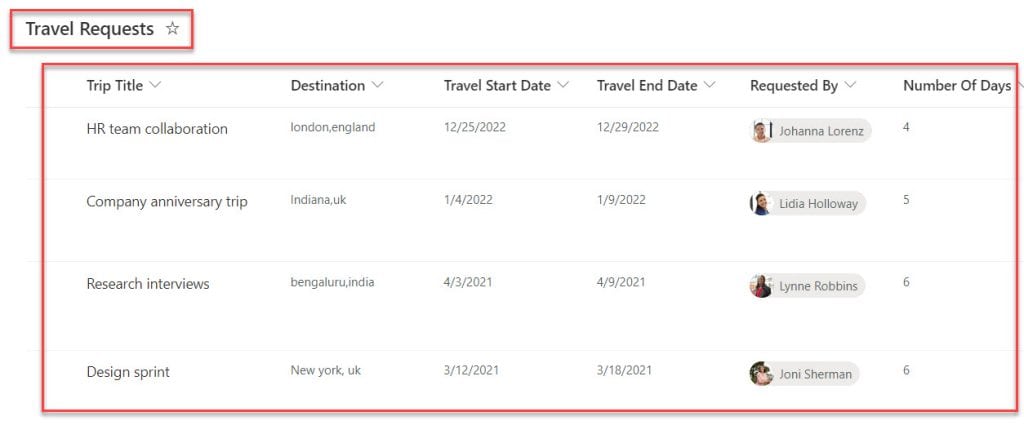
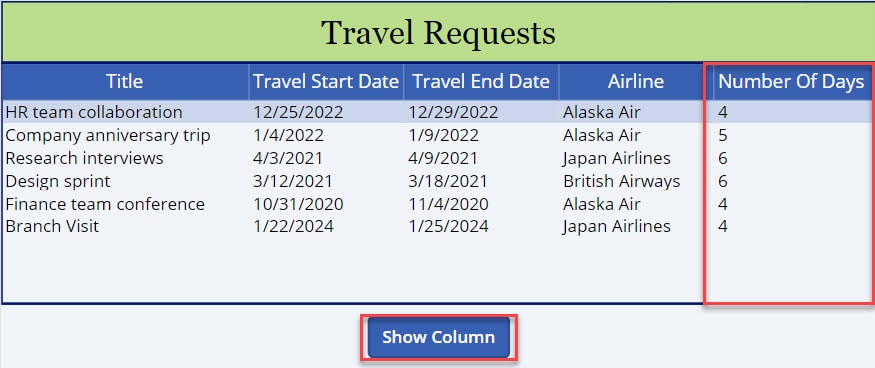
The Power Apps data table displays six columns, as I mentioned above, and Now, I would like to hide the “Number Of Days” column when the Power Apps screen is loaded, and the column should be only visible when a user clicks or taps the button control.
Refer to the below Screenshot:

To achieve it, follow the below-mentioned steps. Such as:
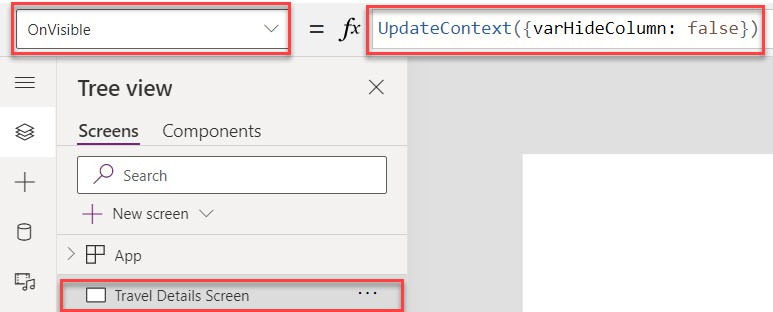
1. Create a Blank Canvas app and connect it to the specific SharePoint list [Travel Requests] -> Select the Power Apps Screen and set its OnVisible property to the code below.
OnVisible = UpdateContext({varHideColumn: false})Where,
- UpdateContext() = This Power Apps function helps to create a context variable
- varHideColumn = Context variable name
2. On the Power Apps Screen -> Insert a Data table and set its Items property as:
Items = 'Travel Requests'Where,
- Travel Requests = SharePoint Online List

3. Now select the specific column [Number Of Days] that you want to hide in the data table and set its Visible property to the below code:
Visible = varHideColumn
4. Then, insert a Button control and set its OnSelect property as:
OnSelect = UpdateContext({varDispColumn: true})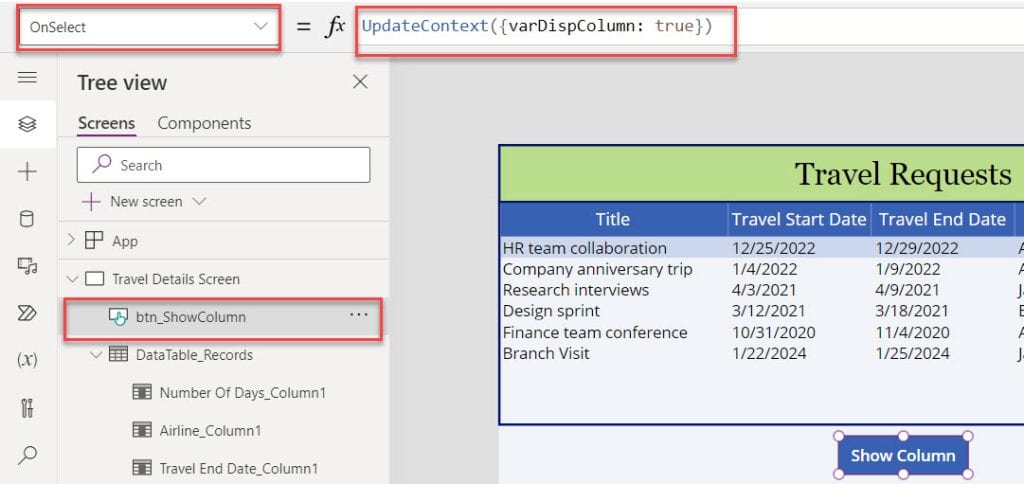
5. Once your app is ready, Save, Publish, Reload, and Preview the app. You can see the specific column has been hidden in the data table control.
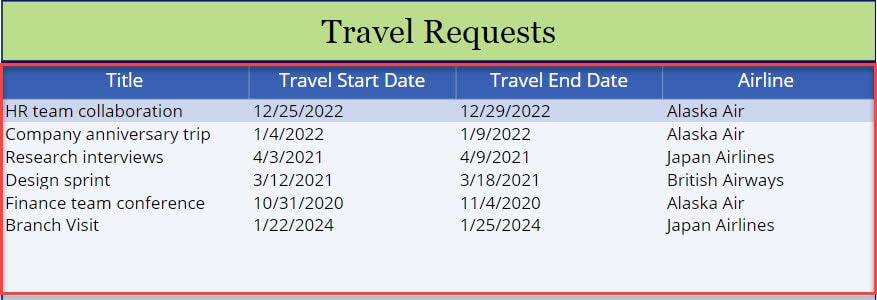
6. Also, if you want to display a specific column then click on the button control like below.
Hide Power Apps Data Table Column using Dropdown
Here. I will show you how to hide or disable the Power Apps data table column using a dropdown control with a simple example.
Example:
I will also take the above SharePoint Online list [Travel Requests] for this example. In Power Apps, there is a Dropdown control and a data table control. The dropdown control displays SharePoint list column names, and the data table displays all SharePoint list records.
Input:
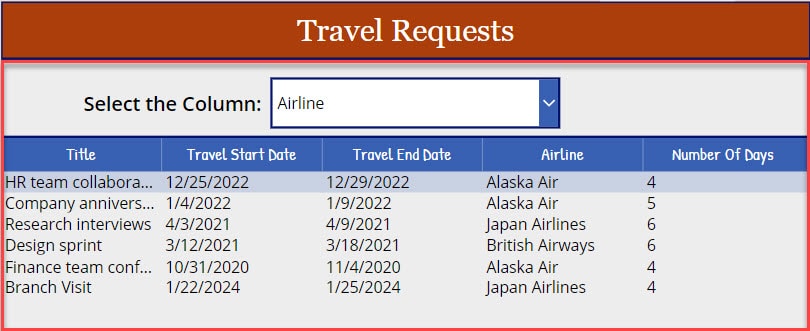
Now, I would like to hide the column in the Power Apps data table based on the dropdown selected column, as in the screenshot below.
Output:
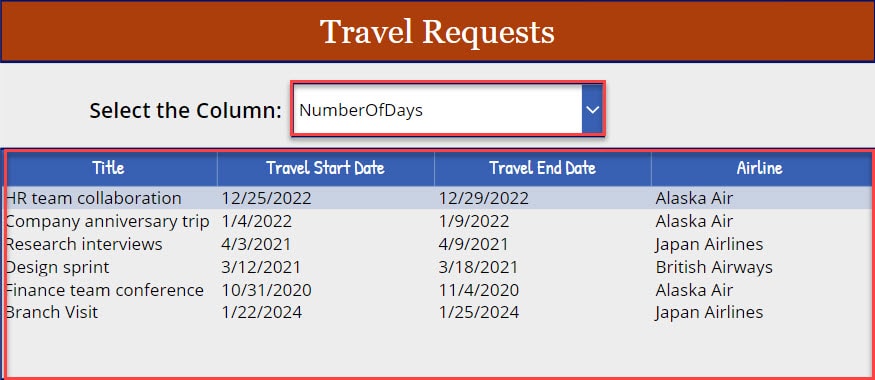
To do so, follow the below steps. Such as:
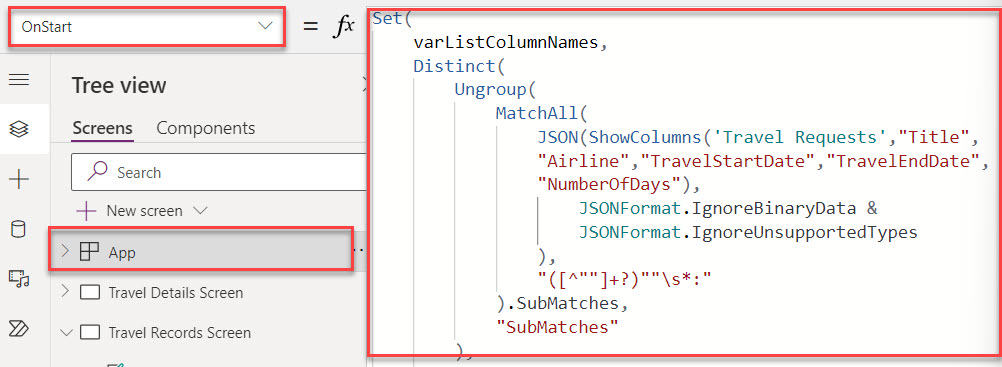
1. On the Power Apps app -> Select the App object [From the left navigation] and set its OnStart property to the code below.
OnStart = Set(
    varListColumnNames,
    Distinct(
        Ungroup(
            MatchAll(
                JSON(ShowColumns('Travel Requests',"Title","Airline","TravelStartDate","TravelEndDate","NumberOfDays"),
                    JSONFormat.IgnoreBinaryData & JSONFormat.IgnoreUnsupportedTypes
                ),
                "([^""]+?)""\s*:"
            ).SubMatches,
            "SubMatches"
        ),
        Value
    )
)
Where,
- Set() = This Power Apps Set() function can help us to set a global variable to the entire app
- varListColumnNames = Global Variable Name
- Distinct() = This function used to remove the duplicates in the table
- Ungroup() = This function returns a formula for breaking separate records
- MatchAll() = We can use this function to extract all text strings that match
- JSON() = This function helps us to represent a data structure as a text so that it is suitable for sorting or transmitting across a network
- ShowColumns() = The ShowColumns() function includes columns of a table and drops all other columns
- ‘Travel Requests’ = SharePoint Online List
- “Title”,”Airline”,”TravelStartDate”,”TravelEndDate”,”NumberOfDays” = SharePoint List Columns
- “([^””]+?)””\s*:” = Regular expressions to check the text again
- “SubMatches” = Group Name
2. Next, select the Power Apps screen -> Insert a Dropdown control and set its Items property:
Items = varListColumnNames
3. Then, insert a Data table control and set its Items property like below.
Items = 'Travel Requests'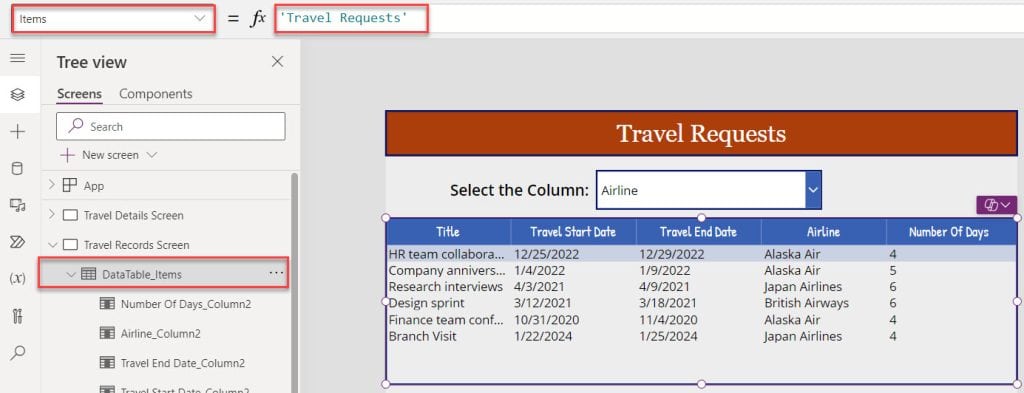
4. Now, select the specific column [Number Of Days] that you need to hide in the data table and set its Visible property as:
Visible = If(
    "NumberOfDays" in drp_ColumnNames.Selected.Value,
    false,
    true
)
Where,
- If() = This function helps us to evaluate unrelated conditions
- “NumberOfDays” = SharePoint list column which we want to hide in the data table
- drp_ColumnNames = Power Apps dropdown name
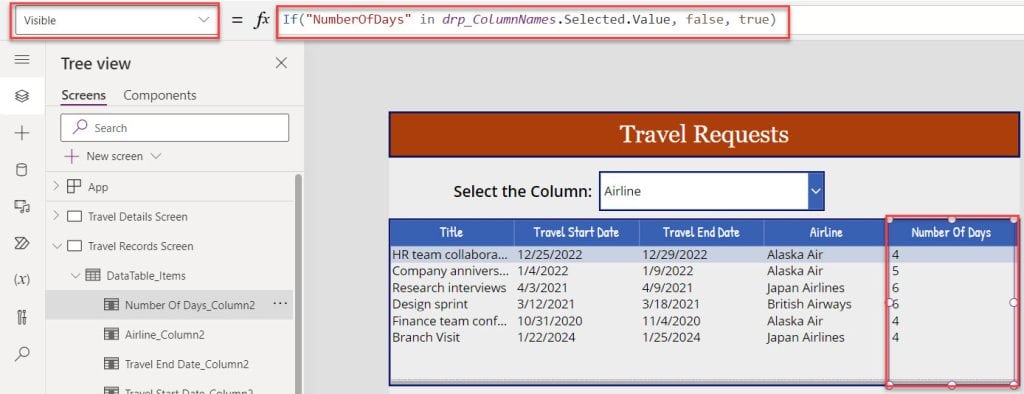
Note: If you want to remove any other column in data table then you can select the specific column and set its visible property as I mentioned above.
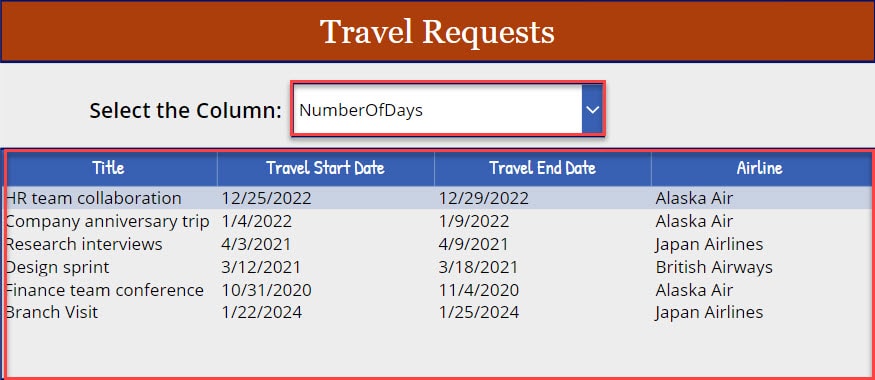
5. Save, Publish, and Preview the app. Whenever the user selects a specific column from the dropdown, the data table will hide that column like below.
Power Apps Hide Data Table Column Based on Text Input
Let’s see how to hide a Power Apps data table column based on the text input search results with a simple scenario:
Scenario:
I have a Power Apps collection [colBlogDetails] and this collection contains the below fields.
Input:
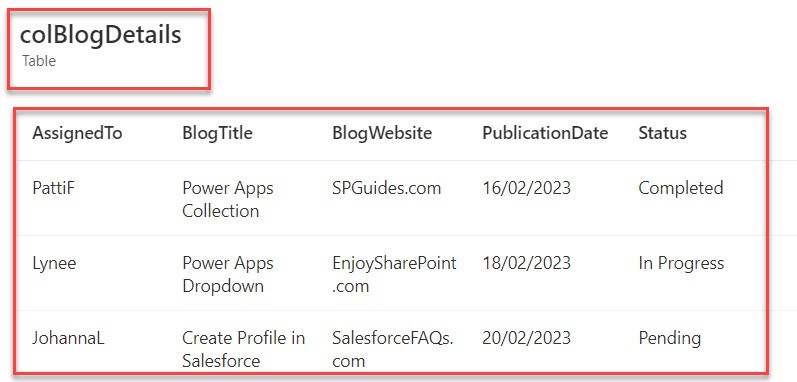
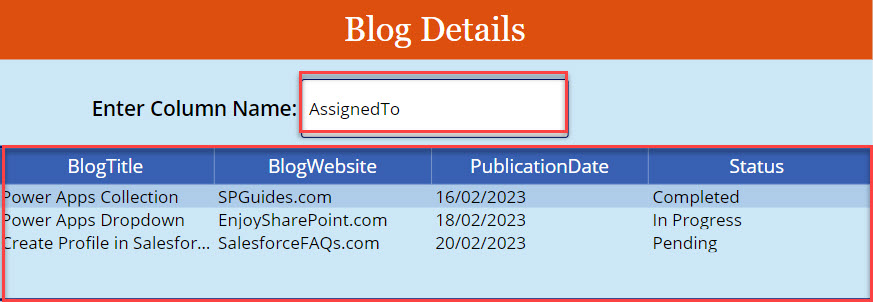
Now, I would like to display these collection records on the data table and Whenever the user enters a specific column name in the text input control, the data table will hide that specific column like below.
Output:

To achieve it, follow the below steps.
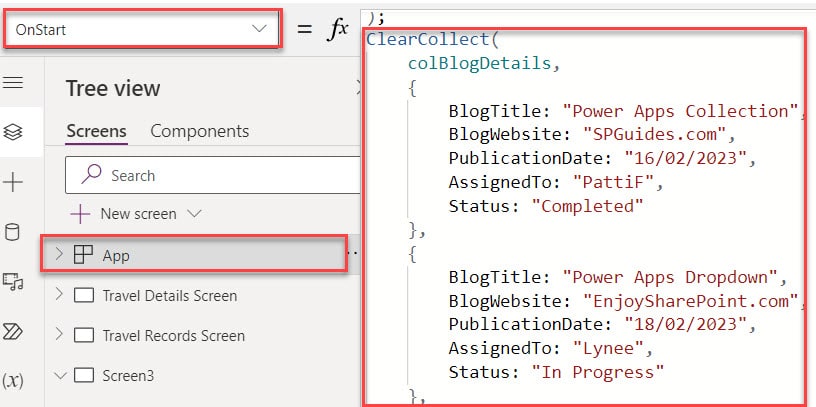
1. To create a Power Apps collection, select the App object and set its OnStart property like below.
OnStart = ClearCollect(
    colBlogDetails,
    {
        BlogTitle: "Power Apps Collection",
        BlogWebsite: "SPGuides.com",
        PublicationDate: "16/02/2023",
        AssignedTo: "PattiF",
        Status: "Completed"
    },
    {
        BlogTitle: "Power Apps Dropdown",
        BlogWebsite: "EnjoySharePoint.com",
        PublicationDate: "18/02/2023",
        AssignedTo: "Lynee",
        Status: "In Progress"
    },
    {
        BlogTitle: "Create Profile in Salesforce",
        BlogWebsite: "SalesforceFAQs.com",
        PublicationDate: "20/02/2023",
        AssignedTo: "JohannaL",
        Status: "Pending"
    }
)
Where,
- colBlogDetails = Power Apps collection name
- BlogTitle, BlogWebsite, PublicationDate, etc… = Collection headers/columns
- “Power Apps Collection”, “SPGuides.com”, etc… = Collection records/rows
2. Then, on the Power Apps Screen -> Insert a Text input control and set the Default property as blank.

3. Next, insert a Data table control and set its Items property as:
Items = colBlogDetails
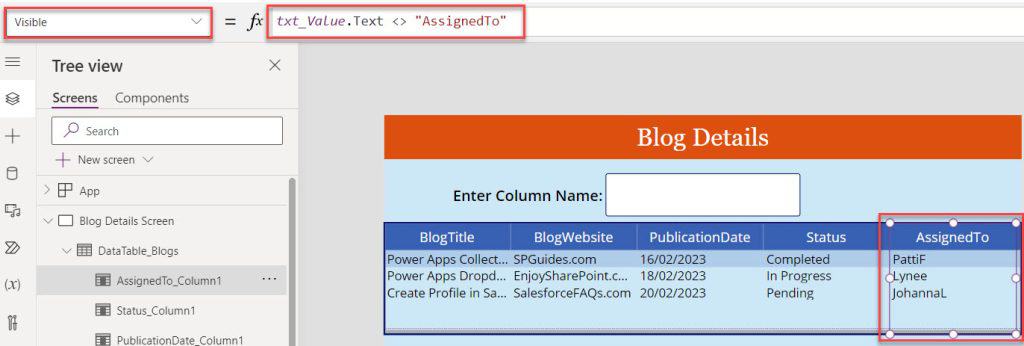
4. Now, select the specific column [AssignedTo] and set its Visible property to the code below.
Visible = txt_Value.Text <> "AssignedTo"Where,
- txt_Value = Power Apps text input name
- “AssignedTo” = This is the column we need to hide in the data table
5. Whenever the user enters the specific column that he/she wants to hide in the data table, the data table will hide that column, as shown below.
Power Apps Hide Data Table Column based on Current User
In the last, I will show you how to hide the data table column based on the current user. I will also take the above Power Apps collection for this.
Now, I want to disable the specific column [AssinedTo] on the data table based on the current user [If the user email is not equal to the current logged-in user email, then the specific column will be hidden]
Have a look at the output:

To work around this, follow the below steps.
1. On the Power Apps Screen -> Select the Data table control and set the Visible property of the specific column [AssignedTo] like below.
If(
    User().Email = "Lynee@szg52.onmicrosoft.com",
    true,
    false
)
Where,
- User().Email = We can use the User(). Email function to get the current user email address
- “Lynee@szg52.onmicrosoft.com” = Another user email address

2. Once your app is ready, Save, Publish, and Preview the app. The data table will hide the specific column, as in the screenshot below.
This way, we can hide the Power Apps data table column.

Conclusion
I hope you get to know now how to hide a column in Power Apps data table with various examples.
- Hide Power Apps Data Table Column using Button Control
- Hide Power Apps Data Table Column using Dropdown
- Power Apps Hide Data Table Column Based on Text Input
- Power Apps Hide Data Table Column based on Current User
You may also like:
- How to Make Power Apps Data Table Empty?
- How to Delete Rows in Power Apps Data Table?
- Export Data from Data Table to Excel in Power Apps
- Power Apps Data Table Conditional Formatting
- How to Filter Data table in Power Apps?
I am Bijay a Microsoft MVP (10 times – My MVP Profile) in SharePoint and have more than 17 years of expertise in SharePoint Online Office 365, SharePoint subscription edition, and SharePoint 2019/2016/2013. Currently working in my own venture TSInfo Technologies a SharePoint development, consulting, and training company. I also run the popular SharePoint website EnjoySharePoint.com