This Power Apps tutorial will assist you with what is Validation in Power Apps, and what are the purposes of Power Apps validation.
Also, we will learn how to do email validation in Power Apps; Power Apps required field validation with various scenarios.
Validation in Power Apps
Validation in Power Apps is an essential tool that guarantees data entered into an app is accurate, consistent, and complete before processing or saving.
In Power Apps, validation defines the criteria or requirements that data must meet to be considered accurate or valid. This is especially relevant in business applications where data integrity is critical.
Purpose of Power Apps Validation
| Purpose | Explanation |
|---|---|
| Data Integrity | It ensures the accuracy and consistency of the data entered into the app. This is crucial for maintaining high-quality data standards. |
| Error Prevention | It helps prevent errors by ensuring that the data entered meets specific criteria before it’s processed or stored, reducing the risk of issues arising from insufficient data. |
| User Guidance | It provides users with immediate feedback on their data entry, guiding them to input data correctly and efficiently. |
| Business Rule Enforcement | Enforces specific business rules and standards within the app. For example, validating that a date field contains a future date or a numeric field contains only numbers. |
| Improved User Experience | Validation contributes to a smoother, more user-friendly experience by preventing invalid data entry, reducing frustration and the need for corrections. |
| Data Format Consistency | It ensures that data is entered consistently, which is essential for data processing, reporting, and integration with other systems. |
These are the Power Apps validation purposes.
Email Validation in Power Apps
We frequently need to verify the email address in Power Apps; let’s see these different scenarios to achieve this.
Example – 1:
1. There is a Power Apps Text input control. When a user doesn’t enter the correct email, the text box fill will be maroon. If the user enters a correct email, the text box fill will appear green.

2. To achieve this, select the text input control and set its Fill property to the code below:
Fill = If(
    IsMatch(
        txtEmail.Text,
        Match.Email
    ),
    Color.DarkGreen,
    Color.Maroon
)
Where,
txtEmail = Text input control name

3. Save, publish, and preview the app. Enter the proper email address into the text box, and then the box will display the green color in maroon color.
Example – 2:
1. The screenshot below represents an Email Address field [retrieved from SharePoint list]. When the user enters a proper email, the check icon will appear.
The warning icon will appear if the user does not enter a proper email address. Let’s do this.

2. Please select the Email Address field Data Card and Unlock it [Using Power Apps Edit form].
3. Add a Warning or Lock icon (Insert -> Icons -> Warning/Lock) at the right side of the Email Text input control.
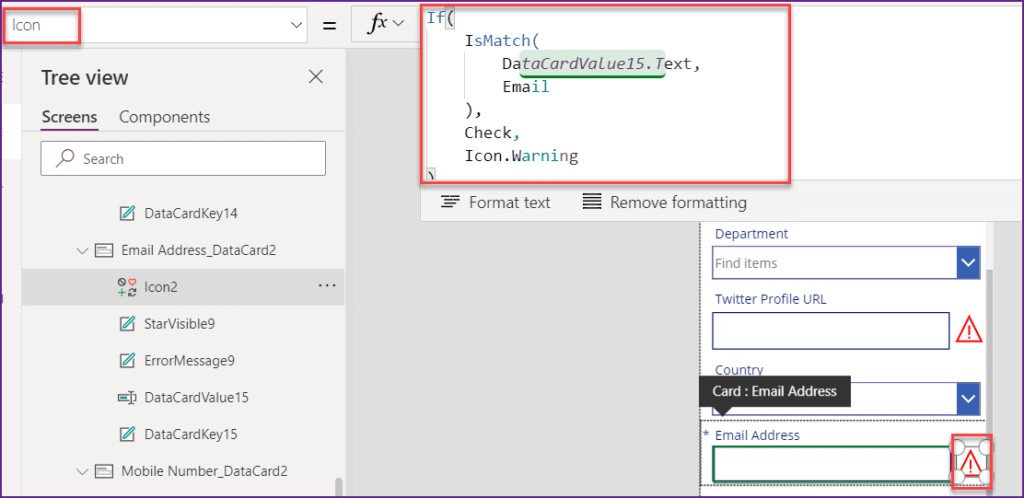
4. Select the Warning icon and apply the below code on its Icon property as:
Icon = If(
    IsMatch(
        DataCardValue15.Text,
        Email
    ),
    Check,
    Icon.Warning
)
Where,
- DataCardValue15 = Email Address text field name (As a Data card, the name is DataCardValue. If you are using any Power Apps Text input control, it should be “YourTextBoxName.Text“.
- Email = The name “Email” contains the format of an email address, such as xyz@gmail.com. If entered incorrectly, the email field will not accept the email address.
- Check = A checkmark icon will be displayed instead of a warning icon if the formula condition is true.
- Icon.Warning = A similar Warning sign will appear if the formula condition is false.
5. Change the Color of the Email field Validation Icon
Use the following formula on the icon’s Color Property to alter the Email validation icon’s color:
Color = If(
    IsMatch(
        DataCardValue15.Text,
        Email
    ),
    Green,
    Red
)
Where,
- Green = The icon will change to a checkmark icon with green if the condition is met.
- Red = The icon will continue to be a red Warning icon if the above scenario is not true.
6. When you preview the Edit screen (by pressing the F5 or Run icon) and type the email address (Preeti@gmail.com) correctly in the field, the warning icon will automatically change to a checkmark icon (green in color), as seen below.

This is how to work with Power Apps email validation.
Power Apps Required Field Validation
Now, we will see how to implement Power Apps Required Field Validation. Follow the examples below:
Example – 1:
We will create a Power Apps from a SharePoint Online list and then implement the validation.
1. Create a SharePoint List as Event Registration Details. This SharePoint list has some columns like:
| Column | Data type |
|---|---|
| First Name | Title with a Single line of text. I just renamed it to First Name. |
| Last Name | Single line of text |
| Employee ID | Single line of text |
| Organization | Single line of text |
| Twitter Profile URL | Hyperlink |
| Department | Choice |
| Country | Choice |
| ZipCode | Single line of text |
| Email Address | Single line of text |
| Mobile Number | Number |
Refer to the image below:

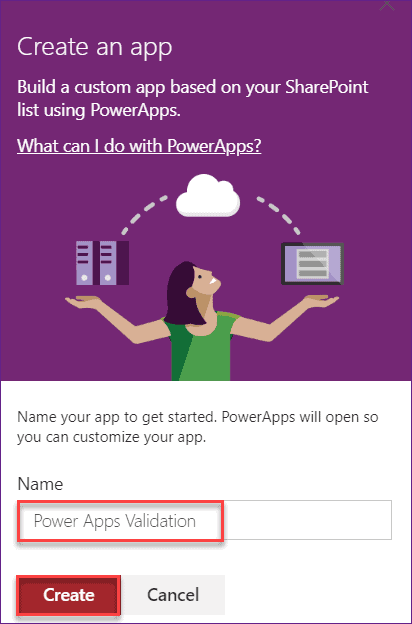
2. Next, create an app for this SharePoint List. Expand Integrate -> PowerApps -> Create an app, as shown below.

3. Provide a Name for the new app to start and click the Create button.
4. This Apps contains the below three screens:
- Browse Screen: This screen will help you browse one or more items displayed to the user. Also, it will help you to Refresh, Sort, and Add a new item to the screen.
- Detail Screen: This screen will help you display the details or information of a specific item.
- Edit Screen: This screen will help you edit or modify a specific item and save that change.

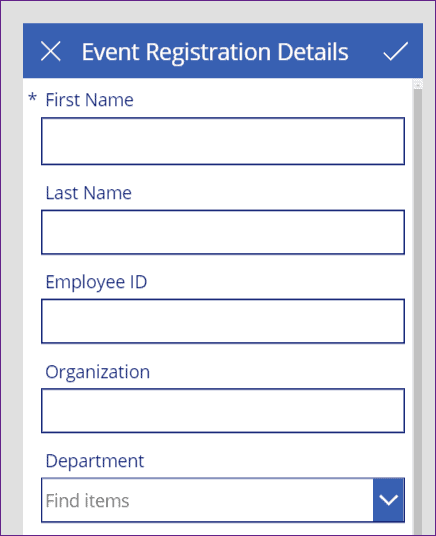
5. We will include the validation in this app’s Edit Screen. The Edit screen, which will contain every field, looks like this below.
6. Unlock all the Data Card values and rename your desired fields. To unlock the Data Card, Select one data card -> go to the Advanced tab, -> Click on the Lock icon as shown below. [It will unlock the data card]

7. You may see an asterisk (*) in the First Name area in the screenshot below. This indicates that the user must fill out a particular field.
To do so, Select that specific Data card and set its Required property as:
Required = trueYou can do this with other fields you want to display as mandatory.

8. The First Name field will be mandatory for the user now. If the user doesn’t provide anything to the text box, an error will appear at the top of the page.
Example – 2:
1. The screenshot below represents a Text input and Label control. When the user does not enter any contact number, the validation error will display like “Required. Please enter contact number.“
The validation error will be dismissed if the user provides the contact number to the text box.

2. To work around this, insert a Text label control and set its Text property as:
Text = "Required. Please enter contact number."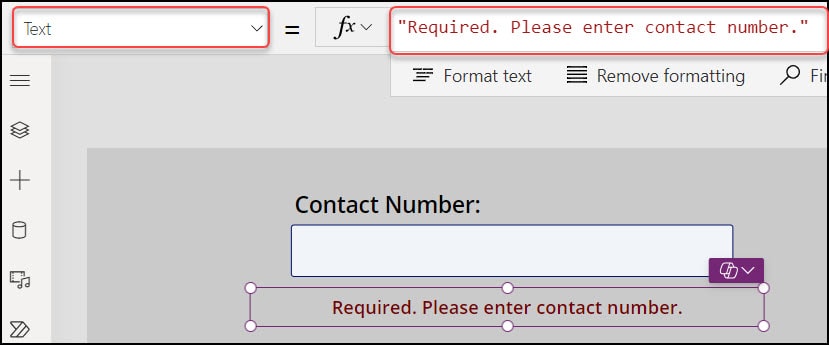
3. Again select the label and apply the code below on its Visible property as:
Visible = IsBlank(txtContact.Text)Where,
txtContact = Contact Number Text input control name
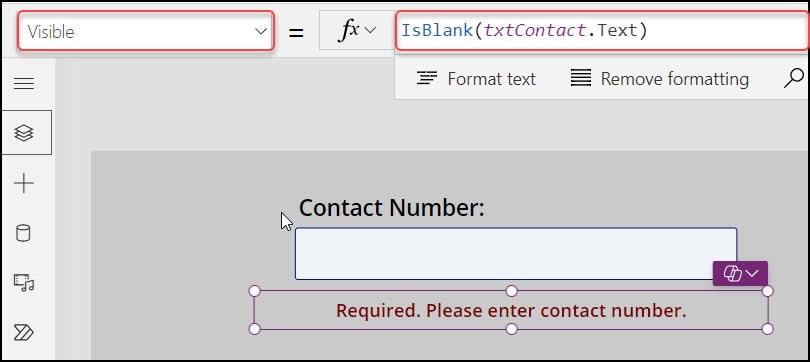
4. Finally, save, publish, and preview the app. The validation error won’t appear if the user enters any contact number; otherwise, it will.
Example – 3:
1. This scenario has a Power Apps Text input and a Button control. The button will be in disabled mode if the text box is empty. The button will be in edit mode if the user enters any phone number and clicks the text field, as shown below.

2. To achieve this, select the text input control and set its OnChange property as:
OnChange = UpdateContext({txtvalid: Not(IsBlank(txtContNumber.Text))})Where,
- txtvalid = Context variable name
- txtContNumber = Text input control name

3. Select the SAVE button and apply the code below on its DisplayMode property as:
DisplayMode = If(
    txtvalid,
    DisplayMode.Edit,
    DisplayMode.Disabled
)
Refer to the image below.

4. Save, publish, and preview the app. Enter the user’s contact number and then click on the text box. You can see the button will be visible in edit mode it will be in disabled mode.
This is all about required field validation in Power Apps.
Conclusion
This Power Apps tutorial taught us about Power Apps Validation and Power Apps validation purposes.
Also, we discussed how to do email validation in Power Apps, and Power Apps mandatory field validation with different examples.
Additionally, you may like some more Power Apps tutorials:
- Power Apps Currency Format
- Power Apps Gallery Conditional Formatting
- How to Submit Form to SharePoint List in Power Apps
- Customize SharePoint List Forms with Power Apps
I am Bijay a Microsoft MVP (10 times – My MVP Profile) in SharePoint and have more than 17 years of expertise in SharePoint Online Office 365, SharePoint subscription edition, and SharePoint 2019/2016/2013. Currently working in my own venture TSInfo Technologies a SharePoint development, consulting, and training company. I also run the popular SharePoint website EnjoySharePoint.com
Hi , How can I check through validation that any url entered should be acceptable?
Hello, is there anyway you know to validate based on a prefix within the entry (aka input must start with 1Q), but the number of digits or letters after the prefix can vary so they can’t be hard coded?
Is it possible that after applying all your steps to validate individual fields using icons , we can have a final check at the submission of the record ? If there are still any red icon left during submission , we show an error message at the top of the page , else we allow the record to be submitted. This way we will be able more accurate data.
This is awesome!
Thank you Bijay, these articles are perfect and saves me a lot of time in testing solutions. Thank you for all of your efforts, they are greatly appreciated!