If you want to become a SharePoint developer, especially working in the SharePoint on-premises versions like SharePoint Server 2019, then read this complete tutorial on the SharePoint server object model or SSOM in SharePoint.
In this tutorial, I will explain how to work with SharePoint SSOM, the various classes to use, and a few server-side object model examples.
SharePoint Server Side Object Model
As the name suggests, the code runs on the SharePoint server, which is why Microsoft does not allow server-side object model code in SharePoint Online.
You can only use these codes in on-premises versions of SharePoint, like SharePoint server 2019/2016 or SharePoint subscription editions where you have installed SharePoint and are using it.
To work with the SharePoint server object model, we need to refer to the Microsoft.SharePoint.dll that is presented in the C:\Program Files\Common Files\microsoft shared\Web Server Extensions\19\ISAPI directory. The path will vary depending on which version of SharePoint you are using.
Using SSOM code, you can develop custom solutions and visual web parts, which can then be deployed using PowerShell commands.
To work with SharePoint Online, Microsoft provides a lot of client object model code like SharePoint Rest API, JSOM, and CSOM.
Various SSOM Classes
Microsoft provides a lot of namespaces and classes to work with SharePoint objects using server object model code.
Here are two diagrams to understand the object model hierarchy of these classes.
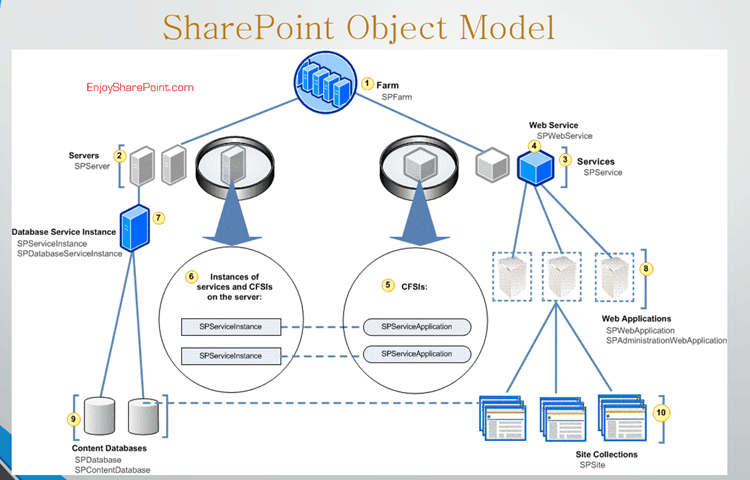
There are various classes that we can use.
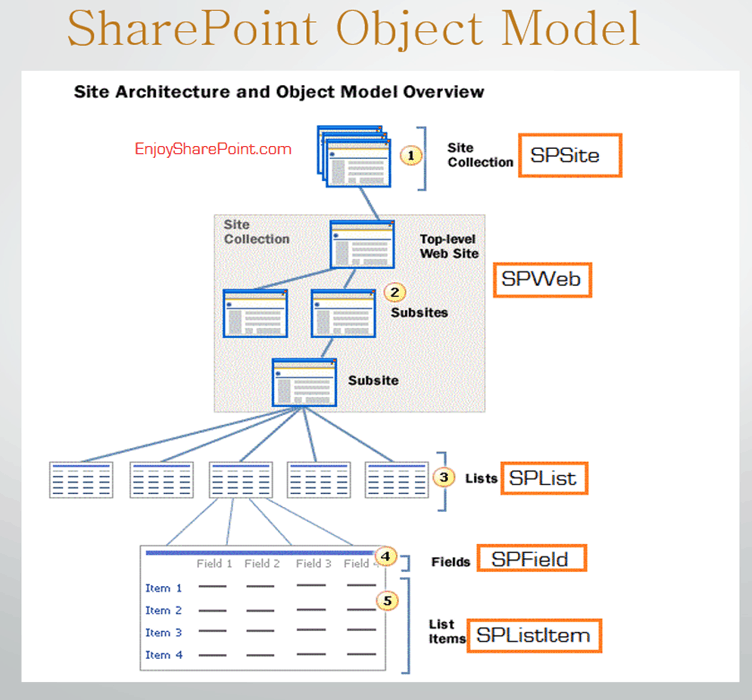
Today, to use any class, you need first to import the DLL and the namespaces. To make it simple and easy to understand, I have made a table. Follow this:
| SharePoint Components | Server Object Model Class | Namespace |
| Farm | SPFarm | Microsoft.SharePoint.Administration |
| Server | SPServer | Microsoft.SharePoint.Administration |
| Web Application | SPWebApplication | Microsoft.SharePoint.Administration |
| Content Database | SPContentDatabase | Microsoft.SharePoint.Administration |
| Site Collection | SPSite | Microsoft.SharePoint |
| Site | SPWeb | Microsoft.SharePoint |
| List/Library | SPList | Microsoft.SharePoint |
| Item | SPItem | Microsoft.SharePoint |
Create a Windows Or Console application
To use the classes or methods, let us create a Windows or Console application using Visual Studio. You can use the latest version of Visual Studio.
But make sure to create this on the SharePoint server where you have installed SharePoint, or else it will not work. You cannot run the code from a client machine.
Here, I have created a Windows application.
- Open Visual Studio and then click on File -> New -> Project. Then, from the templates, choose Windows and then choose Windows Forms Application.
- Next, we need to add a reference to the Microsoft.SharePoint.dll. So that we can use the classes or methods. For this, right-click on the References and then click on Add Reference… like below:
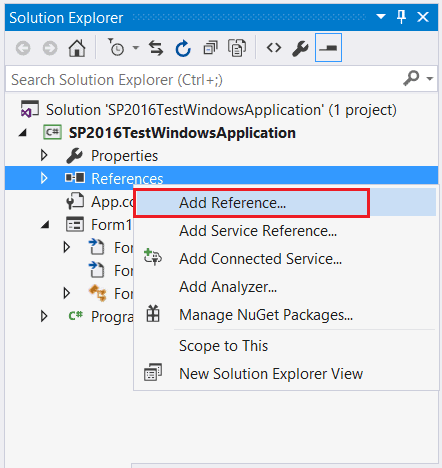
- Then go to the below path: C:\Program Files\Common Files\microsoft shared\Web Server Extensions\16\ISAPI. Then, add Microsoft.SharePoint.dll from the folder.
Now, you can write the code. For this case, I just wrote a sample code to get all the SharePoint site collections presented under a web application in SharePoint.
string s = string.Empty;
            SPWebApplication web = SPWebApplication.Lookup(new Uri("http://mypc:4120"));
            foreach (SPSite site in web.Sites)
            {
                s += "Site URL: " + site.Url + " Site RootWeb Title " + site.RootWeb.Title + " Rootweb URL " + site.RootWeb.Url + "\n";

            }
            label2.Text = s;
Once you execute the code, it will display all the site collection URLs, Titles, and Root Web URLs.
Now, let us check a few examples of server-side object model in SharePoint.
Another popular use of object model code is inside SharePoint visual web parts. Later in this tutorial, I will show an example of how to create a visual web part in SharePoint.
SharePoint Object Model Examples
Now, let’s examine a few examples of how the SSOM code can be used in SharePoint on-premises versions.
1. Create a SharePoint document library
I will explain here how to create a SharePoint document library by using server object model code.
Let us see how to programmatically create a Document Library in SharePoint using the SharePoint server object model. For this example, I have created a visual web part.
In the visual web part, I have created a form for users to enter library details like name, description, etc.
Below are the controls we will use to develop the form.
- TextBox: I have taken two textboxes one for the document library name and another for library description.
- Button: Add the Create button.
- Label: If an error occurs after deploying the code, this control helps display the error message.
<table>
    <tr>
        <td>Document Library Name:</td>
        <td><asp:TextBox ID="txtDocumentLibraryName" runat="server"></asp:TextBox></td>
    </tr>
    <tr>
        <td>Description:</td>
        <td><asp:TextBox ID="txtDescription" runat="server" TextMode="MultiLine"></asp:TextBox></td>
    </tr>
    <tr>
        <td></td>
        <td><asp:Button ID="btnCreateDocumentLibrary" runat="server" Text="Create" Width="90px" OnClick="BtnCreateDocumentLibrary_Click" /></td>
    </tr>
    <tr>
        <td><asp:Label ID="lblMessage" runat="server" Text=""></asp:Label></td>
    </tr>
</table>
The input design form looks like below:
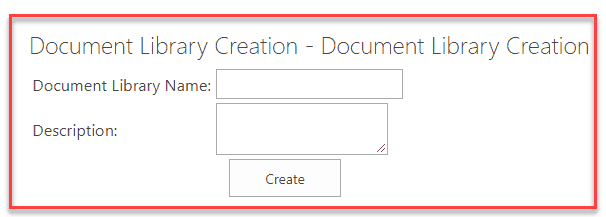
Below is the SharePoint server object model code to create the SharePoint document library programmatically, that you can write on the button click event.
using Microsoft.SharePoint;
using System;
using System.Web.UI;
using System.Web.UI.WebControls;
using System.Web.UI.WebControls.WebParts;

namespace Document_Library_Creation.Document_Library_Creation
{
    public partial class Document_Library_CreationUserControl : UserControl
    {
        protected void Page_Load(object sender, EventArgs e)
        {
            if (!IsPostBack)
                {
            }
        }

        protected void BtnCreateDocumentLibrary_Click(object sender, EventArgs e)
        {
            CreateDocumentLibrary();
        }
        public void CreateDocumentLibrary()
        {
            try
            {
                SPSite siteCollection = SPContext.Current.Site;
                SPWeb web = SPContext.Current.Web;
                web.AllowUnsafeUpdates = true;
                SPList spList = web.Lists.TryGetList(txtDocumentLibraryName.Text.Trim());
                if (spList == null)
                {
                    web.Lists.Add(txtDocumentLibraryName.Text.Trim(), txtDescription.Text.Trim(), SPListTemplateType.DocumentLibrary);
                    //SPList newList = web.Lists["TestList"];
                    web.AllowUnsafeUpdates = false;
                    CreateColumn(web);
                    lblMessage.Text = "Your document library created successfully";
                }
                else
                {
                    lblMessage.Text = "This document library already exists";
                }

            }
            catch (Exception ex)
            {
                lblMessage.Text = ex.Message;
            }
        }
    }
}
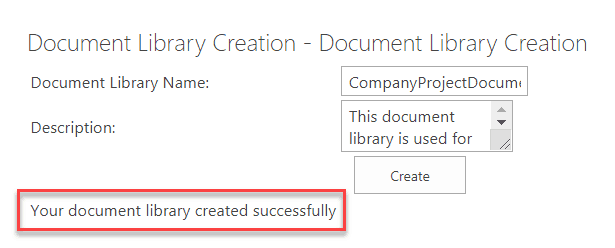
Once you fill in all the field values and click the “Create” button, the document library will be created on the SharePoint site. It will display a successful message like the one below:
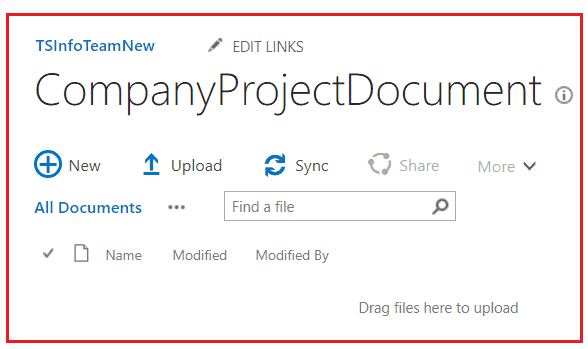
You can also verify the document library in the SharePoint site contents page.
This is how to create a document library programmatically c#.net using SharePoint server object model code.
2. Add columns to the SharePoint document library
In the below example, we will see how we can add columns (Choice columns and Single line of text column) to the SharePoint document library. We are adding the below 3 columns programmatically to the SharePoint document library.
- DocumentLocation (Single line of text): This column is a Single line of text.
- DocumentLanguage (Choice column): This column is a Choice field. This language field column has some choice values:
- DocumentDepartment (Choice Column): This column is also a Choice field. This department field column has some choice values as:
- IT
- HR
- Finance
Below is the SharePoint server object model Code you can use for creating (Single line of text and Choice column) in SharePoint Document Library programmatically.
string libraryDocumentLocationColumnName = "DocumentLocation";
        string libraryLanguageColumnName = "DocumentLanguage";
        string languageChoiceColumn1 = "USA English";
        string languageChoiceColumn2 = "UK English";
        string libraryDepartmentColumnName = "DocumentDepartment";
        string departmentChoiceColumn1 = "IT";
        string departmentChoiceColumn2 = "HR";
        string departmentChoiceColumn3 = "Finance";

public void CreateColumn(SPWeb web)
        {
            try
            {
                web.AllowUnsafeUpdates = true;
                SPList spList = web.Lists.TryGetList

(txtDocumentLibraryName.Text.Trim());
                spList.Fields.Add

(libraryDocumentLocationColumnName, SPFieldType.Text, false);
                spList.Fields.Add(libraryLanguageColumnName,

SPFieldType.Choice, false);
                spList.Fields.Add(libraryDepartmentColumnName, SPFieldType.Choice, false);

                /* get the newly added choice field instance */
                SPFieldChoice chFldDocLanguage =

(SPFieldChoice)spList.Fields[libraryLanguageColumnName];

                /* set field format type i.e. radio / dropdown */
                chFldDocLanguage.EditFormat =

SPChoiceFormatType.Dropdown;

                /* set the choice strings and update the field */
                chFldDocLanguage.Choices.Add

(languageChoiceColumn1);
                chFldDocLanguage.Choices.Add

(languageChoiceColumn2);
                chFldDocLanguage.Choices.Add

(languageChoiceColumn3);
                chFldDocLanguage.Update();

                /* get the newly added choice field instance */
                SPFieldChoice chFldDocDepartment =

(SPFieldChoice)spList.Fields[libraryDepartmentColumnName];

                /* set field format type i.e. radio / dropdown */
                chFldDocDepartment.EditFormat =

SPChoiceFormatType.Dropdown;

                /* set the choice strings and update the field */
                chFldDocDepartment.Choices.Add

(departmentChoiceColumn1);
                chFldDocDepartment.Choices.Add

(departmentChoiceColumn2);
                chFldDocDepartment.Choices.Add

(departmentChoiceColumn3);
                chFldDocDepartment.Update();
                spList.Update();
                web.AllowUnsafeUpdates = false;
            }
            catch (Exception exc)
            {
                lblMessage.Text = exc.Message;
            }
        }
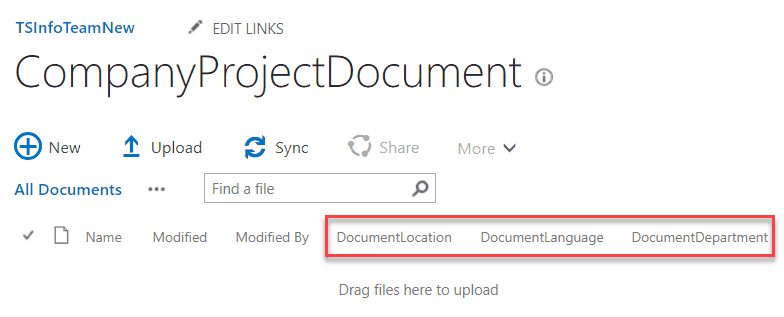
Now deploy the code and go to the existing SharePoint document library; you will see that one single line of the text column and other choice columns will be available, as shown below.
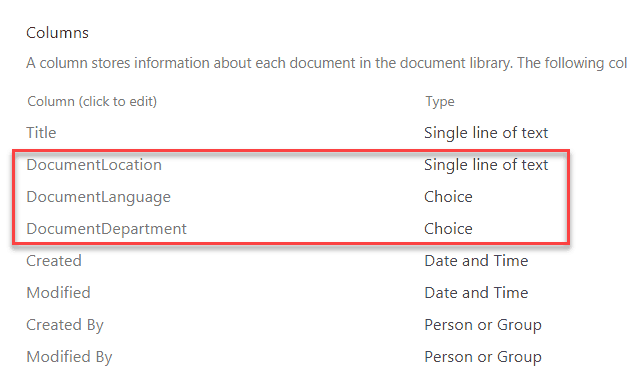
Once you go to the “Columns” section of “Library Settings” of that SharePoint Document Library, then you can see all the Column name with their “Type“.
While you click on the Choice Column name, you can see all the choice field values in the “Type each choice on a separate line” option, as in the screenshot below.
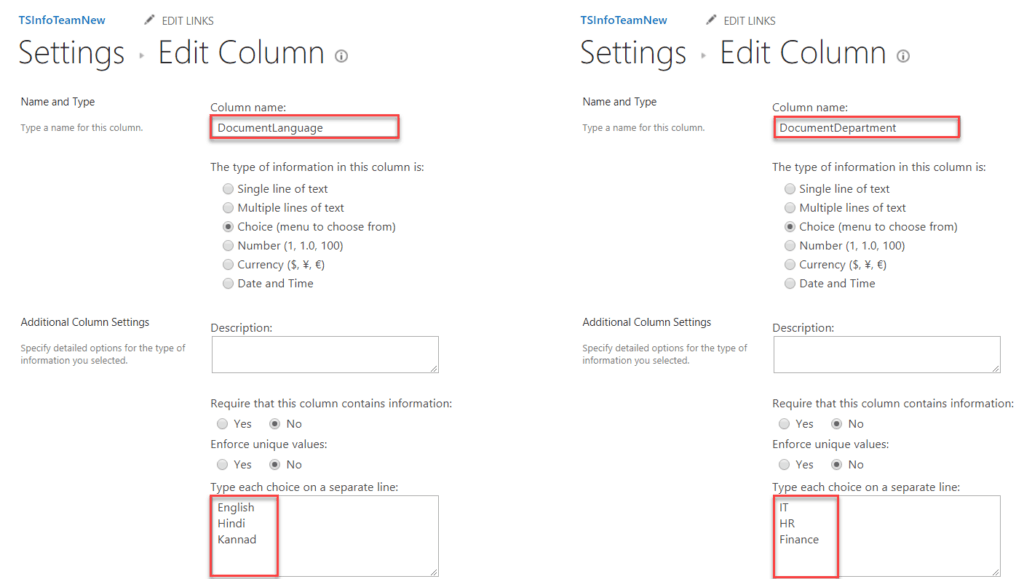
This is how to add columns to a SharePoint document library using SSOM.
3. Upload documents to SharePoint document library programmatically with metadata
Now, I will show you how to upload documents to a document library using SSOM code in a visual web part.
In this case, I will show you how to set up metadata while uploading the document, which means we can also set up some values for a few choice columns (Language and Department).
In the visual web part, we can design the form in the .ascx file. Here, we will add the controls below.
- fileUpload: This control is used for uploading a file.
- Button: This control helps to create a button. So that when a user uploads a file and then after clicking on the button, the file will save in the particular document library.
- Label: If some error occurs after deploying the code, then this control helps to show the error message.
<table>
    <tr>
        <td>Select File:</td>
        <td><asp:FileUpload ID="fuUploadFile" runat="server" </td>
    </tr>
    <tr>
        <td></td>
        <td><asp:Button ID="btnSave" runat="server" Text="Save" Width="105px" OnClick="BtnSave_Click1" /></td>
    </tr>
    <tr>
        <td><asp:Label ID="lblMessage" runat="server" Text=""></asp:Label></td>
    </tr>
    <tr>
        <td><asp:Label ID="lblCheckMesaage" runat="server" Text=""></asp:Label></td>
    </tr>
</table>
Below is the complete code you can write on the button click.
using Microsoft.SharePoint;
using System;
using System.IO;
using System.Text;
using System.Web.UI;
using System.Web.UI.WebControls;
using System.Web.UI.WebControls.WebParts;

namespace TSInfo_Intranet.File_Upload
{
    public partial class File_UploadUserControl : UserControl
    {
        string siteURL = "";
        string listTitle = "Company Document";

        protected void Page_Load(object sender, EventArgs e)
        {

if (!IsPostBack)
            {
}
        }

        protected void BtnSave_Click1(object sender, EventArgs e)
        {
            uploadDocument();

        }

        public void uploadDocument()
        {
            if (fuUploadFile.PostedFile != null &&

fuUploadFile.HasFile)
            {
                try
                {
                    SPSite siteCollection = SPContext.Current.Site;
                    SPWeb web = SPContext.Current.Web;
                    SPList spList = web.Lists.TryGetList(listTitle);
                    {
                        {
                            byte[] contents;
                            using (Stream filestream =

fuUploadFile.PostedFile.InputStream)
                            {
                                contents = new byte[filestream.Length];
                                filestream.Read(contents, 0,

(int)filestream.Length);
                                filestream.Close();

                                string fileName = Path.GetFileName

(fuUploadFile.PostedFile.FileName);
                                string fileNameWithoutExtension =

Path.GetFileNameWithoutExtension

(fuUploadFile.PostedFile.FileName);
                                spList.RootFolder.Files.Add

(spList.RootFolder.Url + "/" + fileName, contents, true);
                                spList.Update();
                            }
                        }
                    }
                }

                catch (Exception ex)
                {

                    lblMessage.Text = ex.StackTrace;
                    lblCheckMesaage.Text = ex.Message;
                }
            }
            else
            {
                lblMessage.Text = "Select a File";
            }
        }
    }
}
Here, we have added two dropdown lists to the visual web part for setting up metadata programmatically.
<table>
<tr>
    <td>Language:</td>
    <td><asp:DropDownList ID="ddllang" runat="server">
        <asp:ListItem>Select Language</asp:ListItem>
        <asp:ListItem>USA/English</asp:ListItem>
        <asp:ListItem>UK/English</asp:ListItem>
        </asp:DropDownList></td>
</tr>
    <tr>
        <td>Document Type:</td>
        <td><asp:DropDownList ID="ddldoctype" runat="server">
            <asp:ListItem>Select Document Type</asp:ListItem>
            <asp:ListItem>IT</asp:ListItem>
            <asp:ListItem>HR</asp:ListItem>
            <asp:ListItem>FINANCE</asp:ListItem>
            </asp:DropDownList></td>
    </tr>
</table>
Below is the SharePoint server object model Code that you can use to set the metadata to the choice field programmatically.
public void SetupMetadata(SPWeb spWeb, SPList spList, string title, string fileNameWithoutExtension)
        {
            try
            {
                string fullFilePath = siteURL + spList.RootFolder.Url + "/" + title;
                SPFile newFile = spWeb.GetFile(fullFilePath);
                SPListItem item = spList.Items[newFile.UniqueId];
                item["Title"] = fileNameWithoutExtension;
                item["Language"] = spList.Fields
["Language"].GetFieldValue(ddlLanguage.SelectedValue);
                item["Department"] = spList.Fields
["Department"].GetFieldValue(ddlDepartment.SelectedValue);
                item.Update();
                spWeb.Update();
              }
            catch (Exception )
            {
                lblMessage.Text = "Error ocuured";
            }
        }
Conclusion
I hope now you have some idea of how to work with the SharePoint server-side object model, and I am sure all the examples will help you.
You may also like:
- Patch Function in Power Apps
- Power Apps If Statement Examples
- SharePoint Page Viewer Web Part
- How to Create Date Hierarchy in Power BI?
I am Bijay a Microsoft MVP (10 times – My MVP Profile) in SharePoint and have more than 17 years of expertise in SharePoint Online Office 365, SharePoint subscription edition, and SharePoint 2019/2016/2013. Currently working in my own venture TSInfo Technologies a SharePoint development, consulting, and training company. I also run the popular SharePoint website EnjoySharePoint.com
Thank you, Kumar for your great help.