This SharePoint Online tutorial explains everything about SharePoint List View, like what is a view in SharePoint Online List and how to select a different view in SharePoint Online.
Also, we will see how to create a list view in SharePoint Online, Different ways to create a SharePoint List view, and many more like:
- Create a new view based on the current one
- How to Change a View in SharePoint List
- Change the default view in SharePoint list
- How to delete a SharePoint List View
- Create or edit a gallery view in SharePoint List
What is SharePoint List View?
- SharePoint list views let you focus on the parts of a list or document library that matter most to you or meet your needs. You can create views like, for example, the most recent files created, lists of items related to a certain department, or the files created by a particular user.
- You can organize and display the most relevant items (such as specific columns), add filtering or sorting, or create custom views of libraries and lists for a more beautiful layout.
- If you have the necessary permissions, you can build a personal view (that only you can see) or a public view (that anybody using the list can see).
- At least one view is automatically created whenever a SharePoint Online list or library is created. The default view for a SharePoint list is All Items, and the default view for a SharePoint document library is All Documents.
- This will be the same for the SharePoint list and the document library.
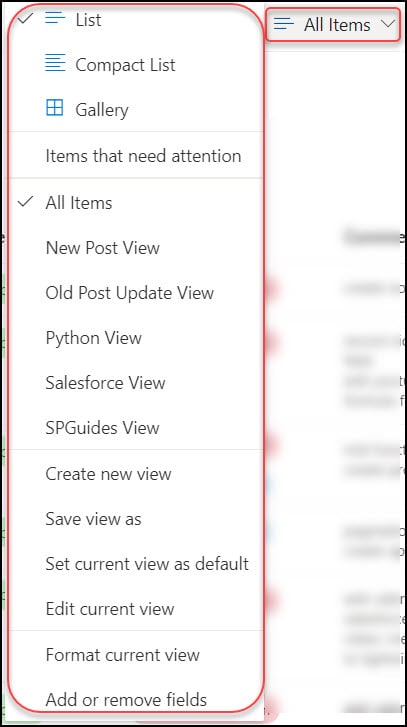
The above image represents what a SharePoint list view looks like.
Select a Different View in SharePoint Online
- There are three views in the SharePoint Online list. Such as:
- List
- Compact
- Gallery
- The default view of the SharePoint list is List. Also, we can switch a list view to other layout options like Compact or Gallery.
- The screenshot [1st image] below represents the view as a List view. When I selected a different view as Gallery, the SharePoint list layouts converted to gallery layout.

- To select a different view in the SharePoint list, expand the View options -> Choose the name of the view you want to use -> Select Gallery layout.
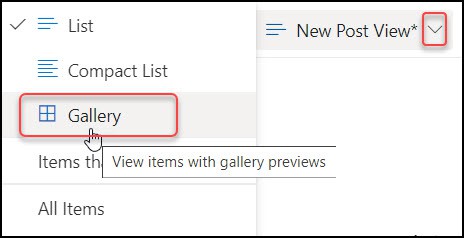
This is how to select a different view in SharePoint Online.
Create a List View in SharePoint Online
Next, we will see how to create a list view in SharePoint Online.
There are two different ways to create a view in the SharePoint Online list, i.e.
- Create a new SharePoint list view from All Items
- Create a new view from the SharePoint Filters option
Let’s see one by one.
Create a new SharePoint list view from All Items
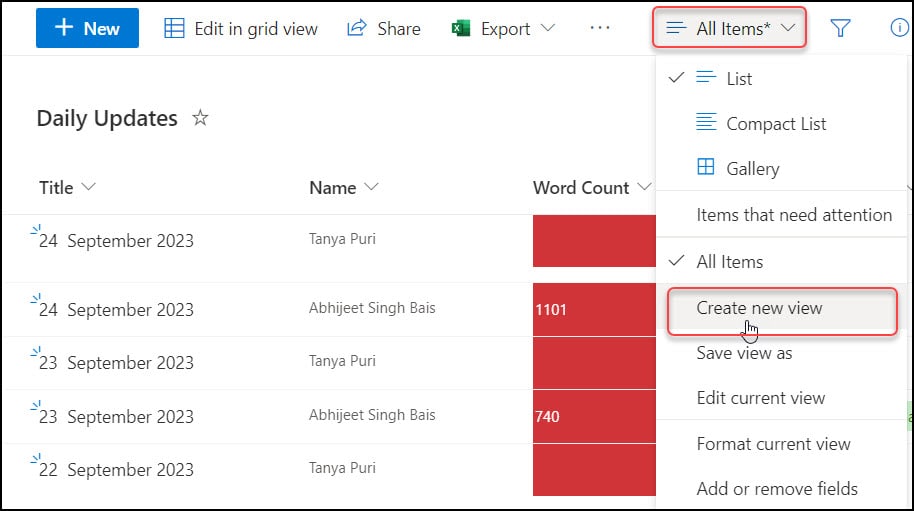
- To create a view in the SharePoint list, click on the View option [All Items] -> Create new view.
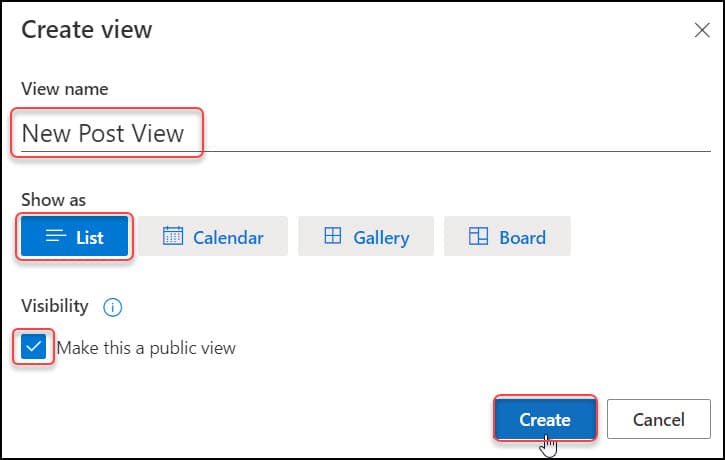
- In the Create view window, provide the below details:
- View name: Provide a name for the new view.
- Show as: Choose the kind of view you want to create.
- Visibility: If you want to make the view public, then check on it.
- Click on Create.
- Then, the new view will be created without any conditions or filters shown below.
This is the one way to create a list view in SharePoint Online.
Create a new view from the SharePoint Filters option
Next, we will see the other way to create a new view in SharePoint List.
- In the SharePoint list, open the filters pane [from top right] -> Choose any value that you want to filter [SPGuides.com].
- Then, the SharePoint list will be filtered and displayed with all the filtered records.

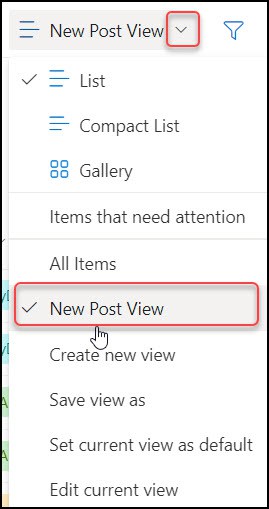
- Now, expand the Views option -> Click on Save view as.
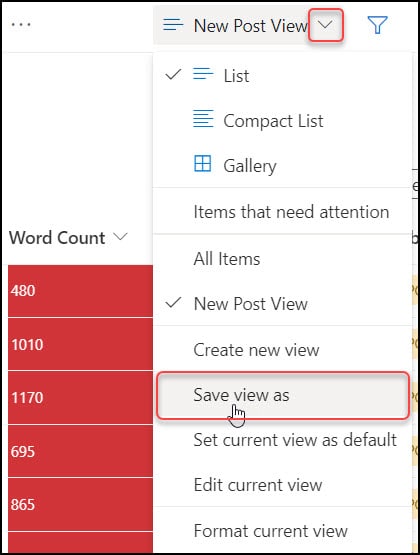
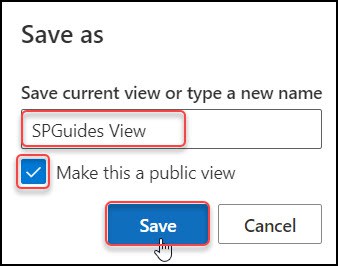
- Provide the new name to the view -> Check if you want to make it public -> Click on Save as shown below.
- Now, the new view has been saved in the SharePoint View option. If you want to use this view, click on it, and the result will appear in the SharePoint list.
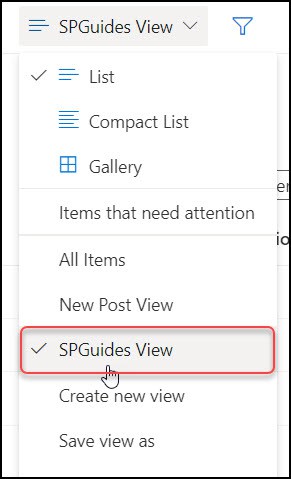
This is the other way to create a view in the SharePoint Online list.
Edit Current View in SharePoint Online
After creating a new view in the SharePoint Online list, we need to edit it. Then, the view will filter and show the result.
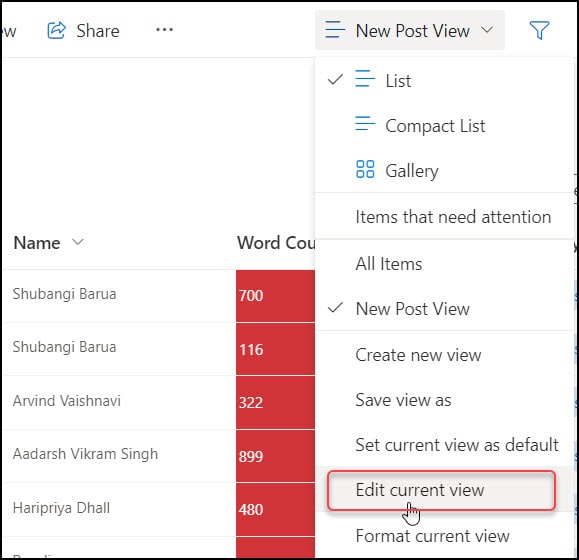
- To do so, select the new view from the View option -> Click on Edit current view.
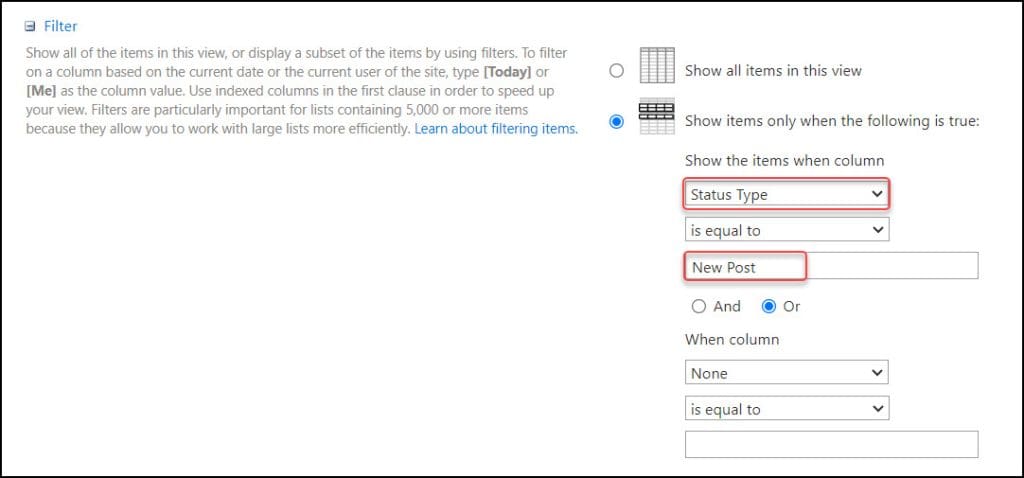
- In the Edit view window, go to the Filter section -> Provide a condition like Status Type equals New Post.
- Click on OK.
- The SharePoint list has been filtered with the current view, like below.
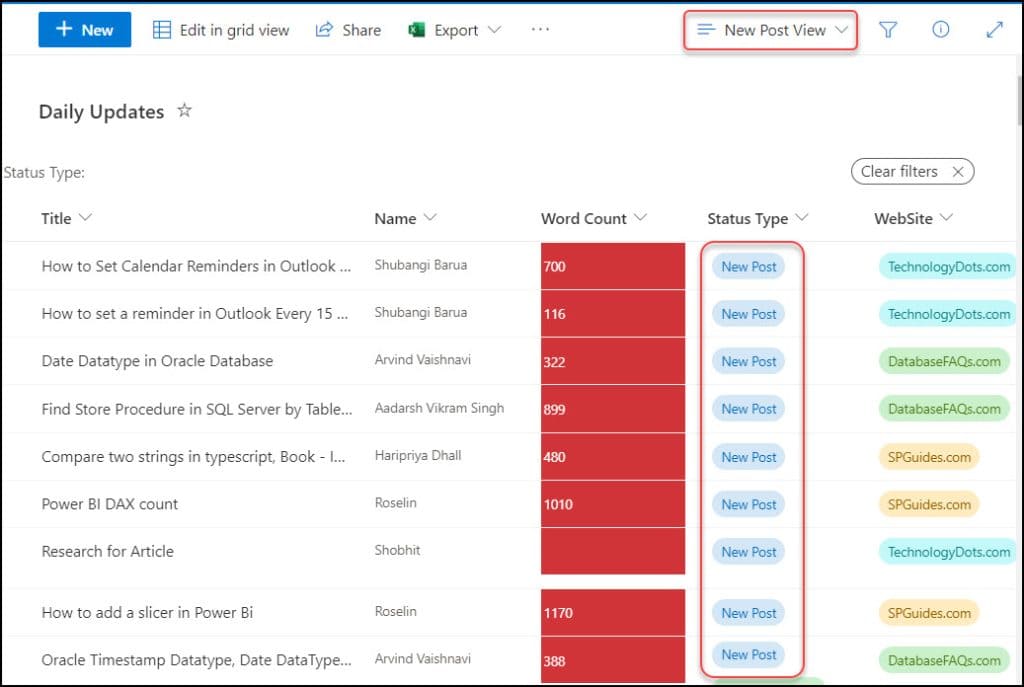
This is how to edit the current view in the SharePoint Online list.
Different View Types in SharePoint List
- You can see a Show as an option while creating a new view in the SharePoint list. That implies that the user must choose a specific choice, such as the view type.
- This contains a total four number of different view options:
- List
- Calendar
- Gallery
- Board
Let’s explore one by one.
- List:
When creating the new list view, we have covered this option in the previous example [Create a List View in SharePoint Online].
2. Calendar:
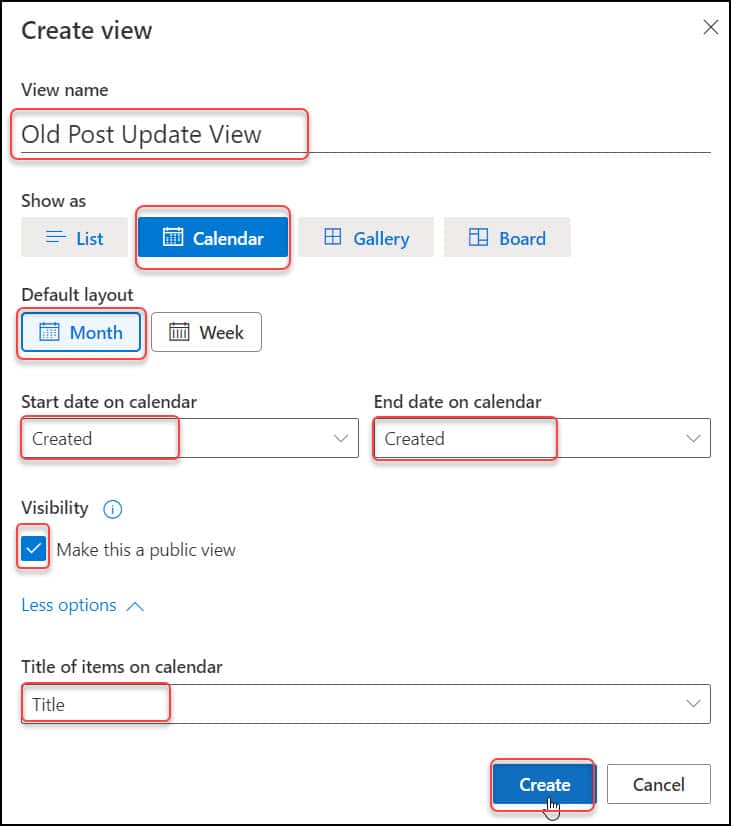
While we will choose the Show as option as Calendar, then it will appear like the image below:
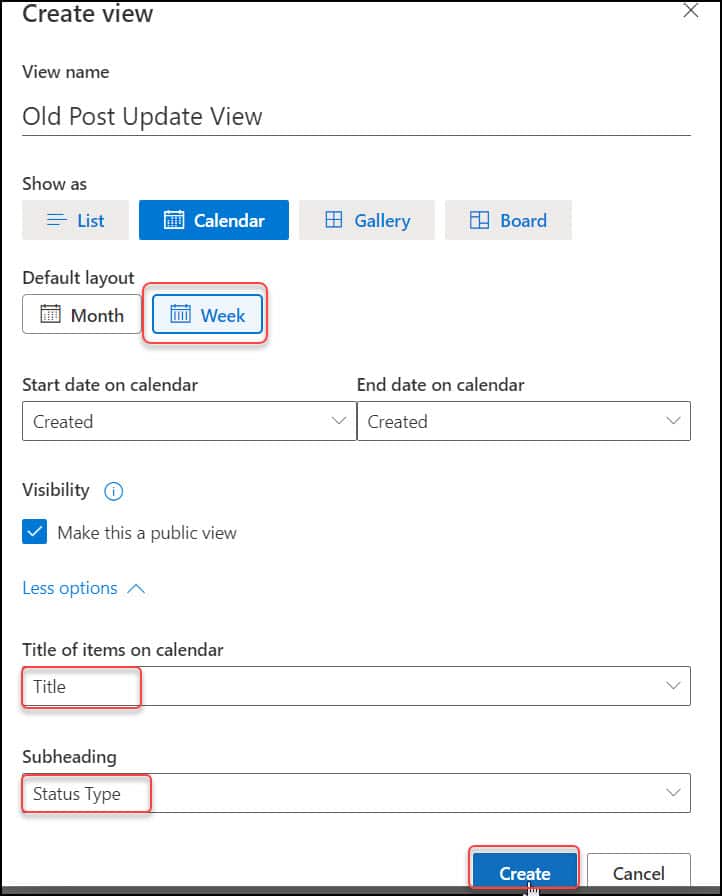
- View name: Provide a name to the view
- Show as: Select Calendar
- Default layout: Select Month or Week
- Start date on calendar: Select either Created or Modified
- End date on calendar: Select either Created or Modified
- Visibility: If you want to make the view public, then check on it
- Title of items on calendar: Select any column
Click on Create.
- Once the new view has been created in the SharePoint list, it will look like the image below.
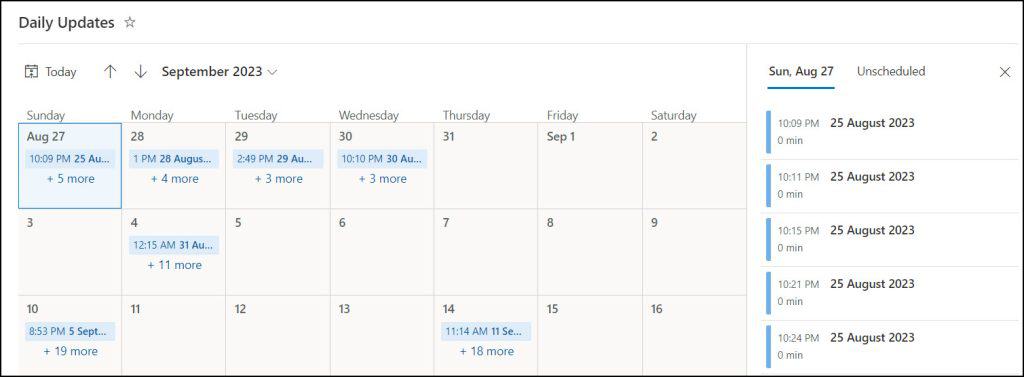
- If we choose the created calendar view as Week, the SharePoint list will appear as shown in the figure.

- Similarly, if you click on the Default layout as Week, it will ask you the Title of items and the Subheading.
3. Gallery:
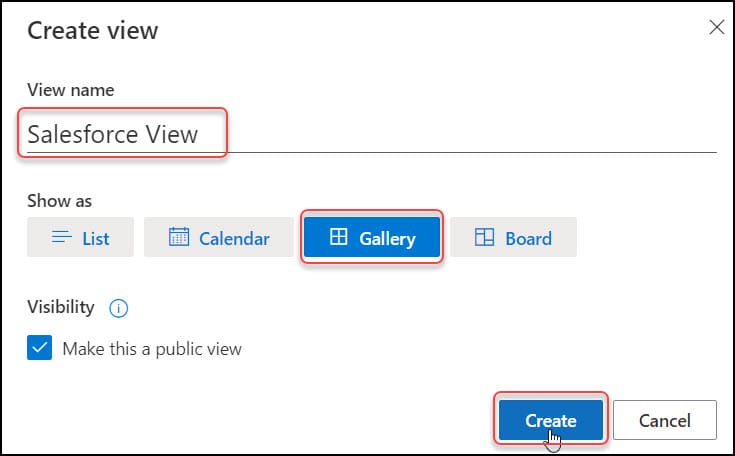
- While creating the SharePoint list view, Provide a View name and select the Show as Gallery. Click on Create.
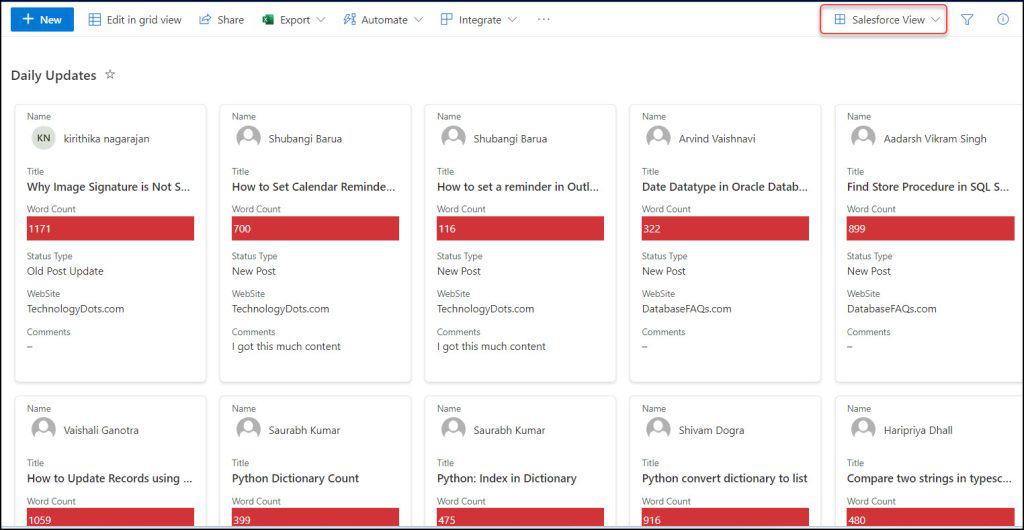
- Then, the SharePoint list will appear with the created gallery view, as shown below.
4. Board:
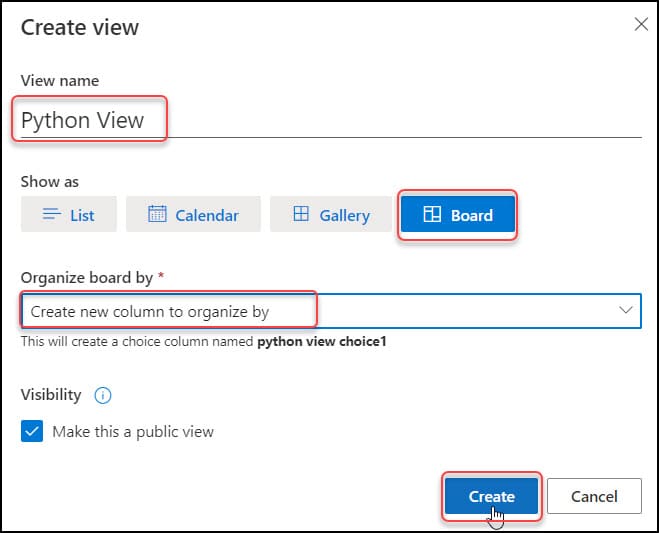
- While creating the SharePoint list view, Provide a View name and select the Show as Board.
- Select the Create new column to organize by from the dropdown menu.
- Click on Create.
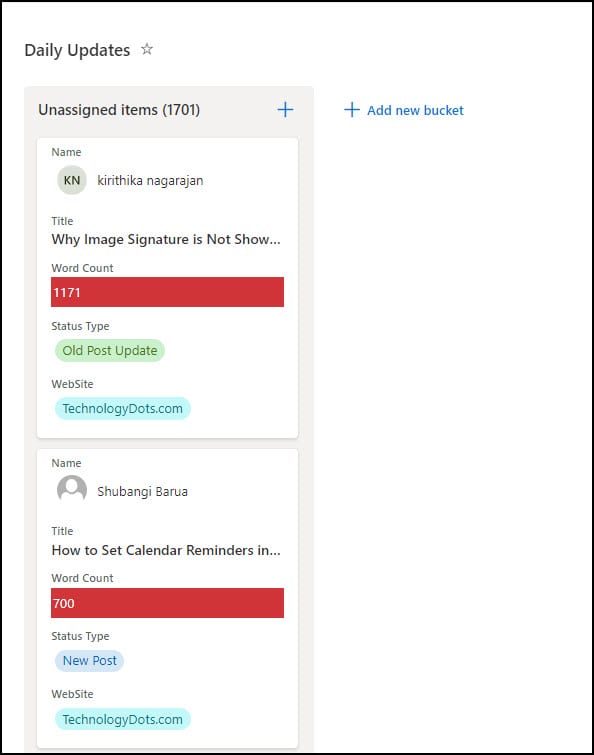
- Once the SharePoint list Board view has been created, the SharePoint list records will appear with the board layout as shown in the image below.
These are the different view types in the SharePoint List.
Create a new view based on the current one in SharePoint List
Next, we will see how to create a new view based on the current one in SharePoint List.
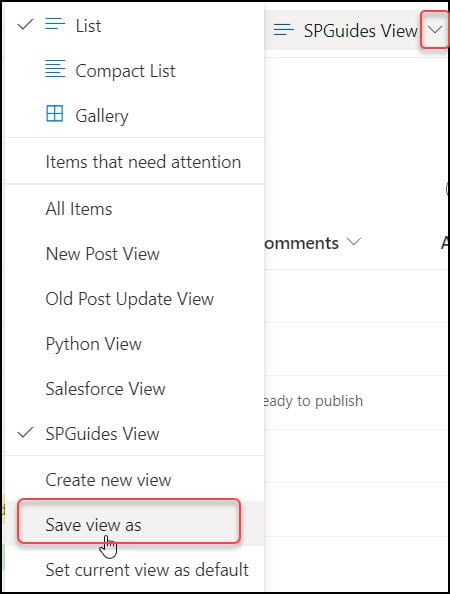
- Go to the View option -> Click on Save view as.
- Provide a new name to the view and click Save.
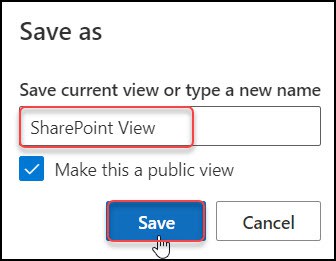
The new view will be created based on the current one in the SharePoint List.
Change a SharePoint List view
We can change the SharePoint list view regarding columns, sorts, or filters.
- Let’s say I want to display only certain important columns in the list view while hiding some specific unnecessary columns. Therefore, those fields will appear anytime a user opens this list view.
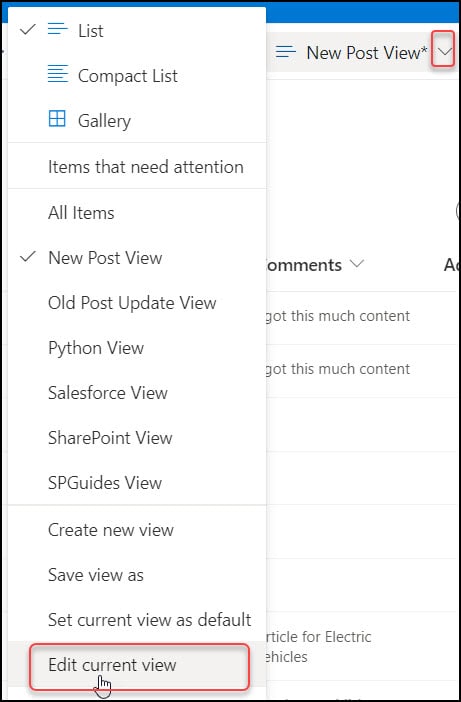
- To do so, Select the View option. Choose the name of the required view from the list.
- Again, select the Edit current view.
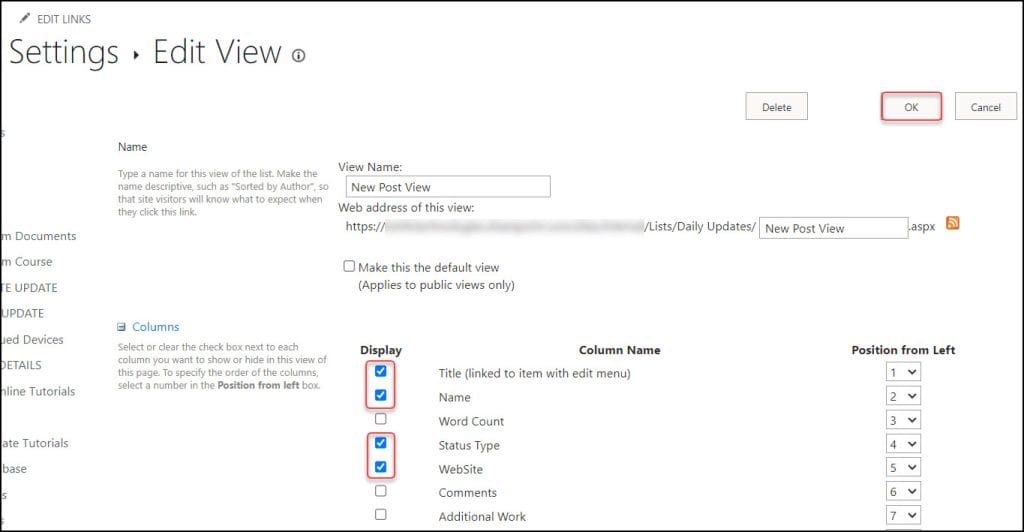
- Under the Columns section, check the columns you want to display in the view and click OK.
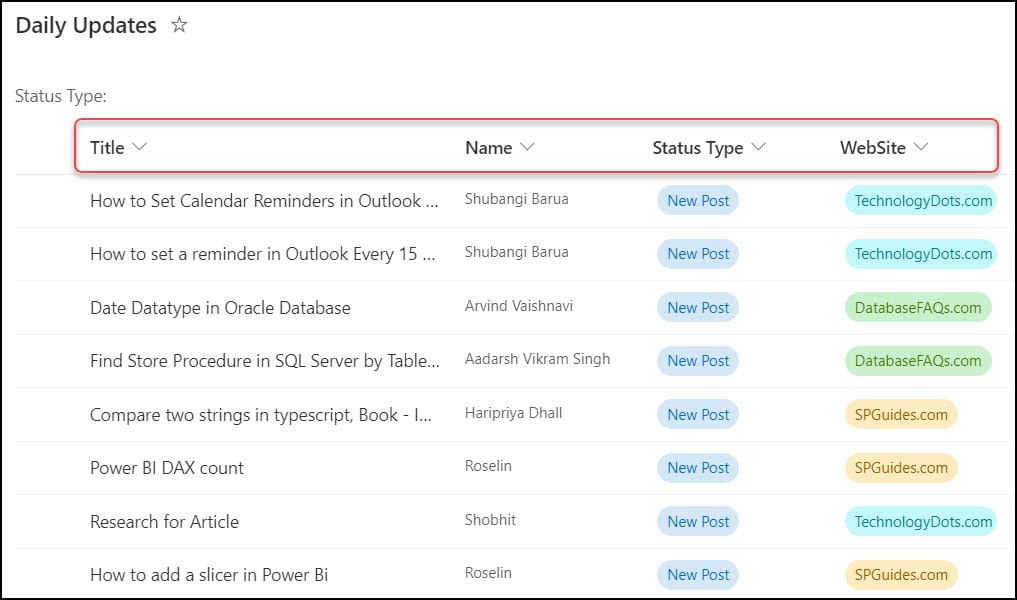
- The changes have been reflected in the SharePoint list view with the selected columns below.
This is how to change a view in the SharePoint List.
Change the default view in SharePoint List
In the SharePoint list, we can change the default view. Therefore, that particular default view will be used anytime a user opens the list.
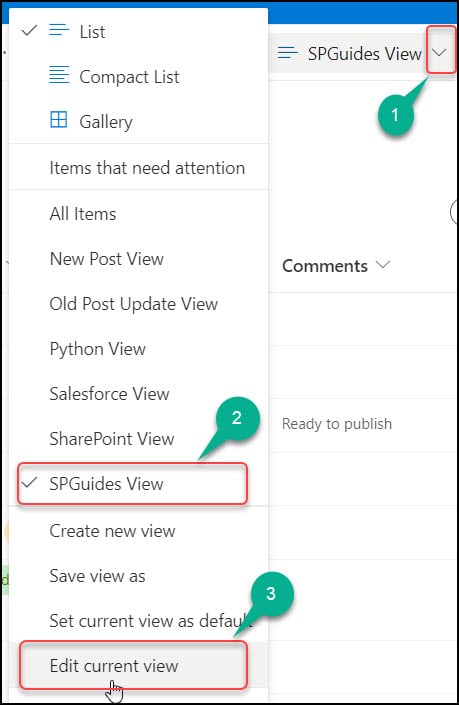
- Select the View option from the command bar -> Choose the view you want to make it default.
- Again, select the View option -> Click on Edit current view.
- Check on Make this the default view on the Edit View page and click OK.
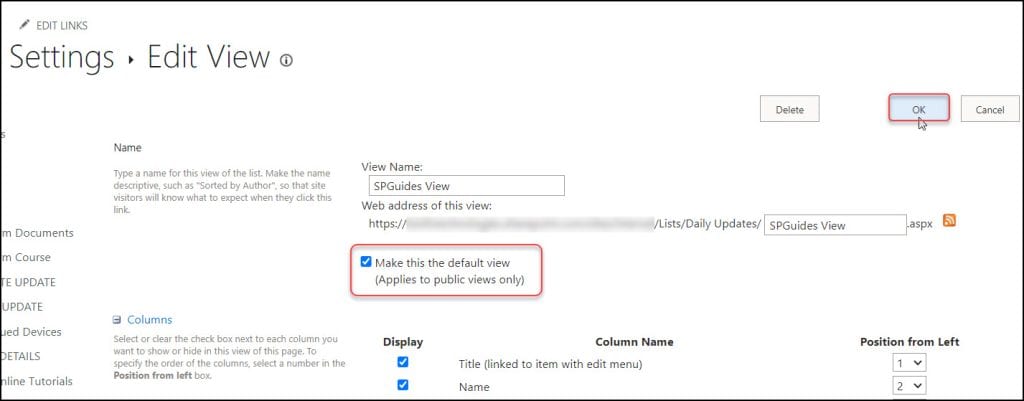
This way, we can change the default view in the SharePoint List.
Delete a view in SharePoint Online
To delete a specific view from the SharePoint list, follow the things below:
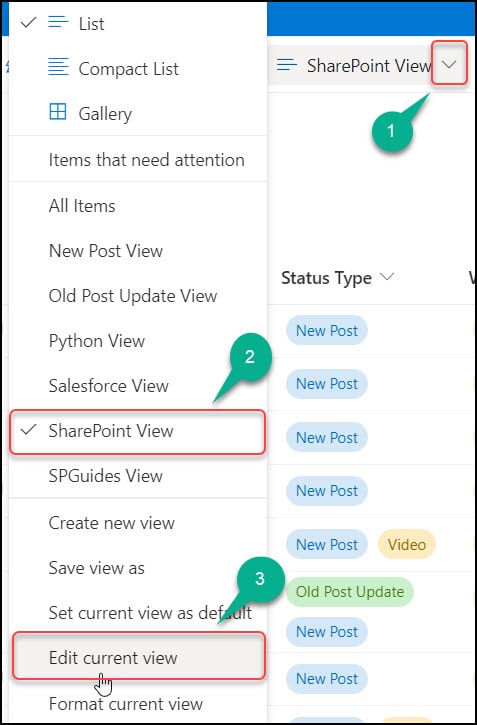
- Select the View option from the command bar -> Choose the view you want to delete.
- Again, select the View option -> Click on Edit current view.
- In the Edit View page, click on Delete.
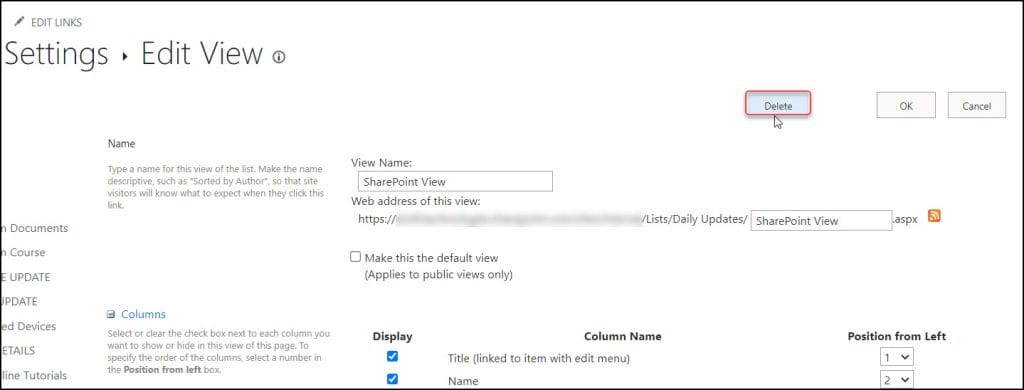
- Click on OK. And then, the specific list view will be deleted from the SharePoint list.

This is how to delete a view in the SharePoint Online list.
Create or edit a gallery view in SharePoint
Here we will see how to create or edit a gallery view in the SharePoint list.
- Select the View option from the command bar and choose the view that you want to format.
- Select Gallery.
- Click on Format current view.
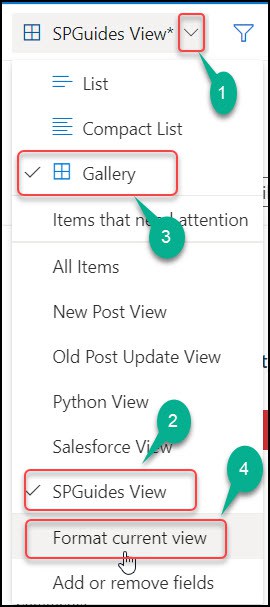
- Select Format view and select the Card Designer.
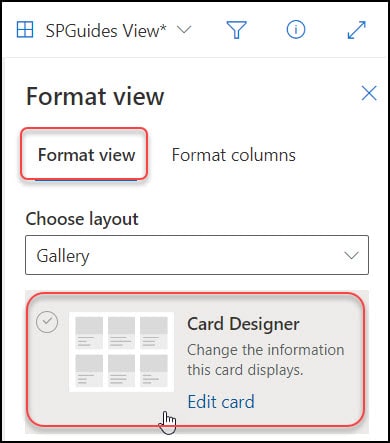
- The Card Designer allows us to reorder columns, show or hide previews, and show or hide columns. Click on Save.
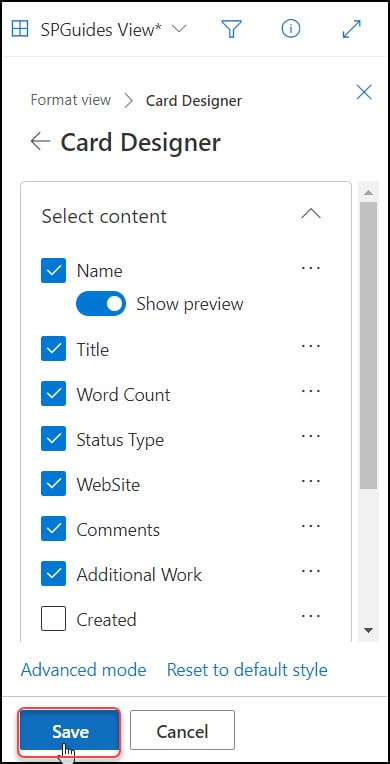
This is how to create or edit a gallery view in the SharePoint list.
Conclusion
This SharePoint Online tutorial discusses every aspect of the SharePoint List View, including what a view in a SharePoint Online list is and how to select a different view in SharePoint Online.
Additionally, we learned how to create a list view in SharePoint Online, as well as several methods for doing so, including:
- How to create a new view based on the current one
- Change a View in SharePoint List
- How to change the default view in SharePoint List
- Delete a SharePoint List View
- Create or edit a gallery view in SharePoint List
You may also like:
- Create Indexed Column in SharePoint List
- SharePoint Online List Forms JSON Formatting
- Customize SharePoint List Forms with PowerApps
- SharePoint list view threshold
- SharePoint List View Filter By Current User Email
I am Bijay a Microsoft MVP (10 times – My MVP Profile) in SharePoint and have more than 17 years of expertise in SharePoint Online Office 365, SharePoint subscription edition, and SharePoint 2019/2016/2013. Currently working in my own venture TSInfo Technologies a SharePoint development, consulting, and training company. I also run the popular SharePoint website EnjoySharePoint.com