In this Power BI tutorial, I have explained how to use the Power BI DAX calendar function and also, and we will see how to create calendar table using DAX. I will also show you various examples of calendar function in Power BI.
I recently worked on a Power Bi report, where I got a requirement to use the calendar function and filter the table data values based on the need. To achieve it, I have used the Power BI Dax Calendar function.
- What is the Power BI DAX calendar function?
- How to display calendar Table using Power BI DAX
- How to use the date function in Power BI DAX
- How can we check the time function in Power BI DAX?
- Power BI DAX calendar month
- Power BI DAX formula for the month name
- How to calculate the last calendar month using Power BI DAX
- How to use the Power BI DAX Weekday function
- Calculate the day of the year using Power Bi Dax
- Power bi Dax days in the month
- How to check Power bi Dax last day of the month
- How to find the calendar week number using Power BI DAX
- How to calculate last calendar week’s data using Power BI DAX
- Power bi Dax dates in the period
- How to use the Calendar Auto function in Power BI
Power BI DAX calendar function
Now, let us first understand what is the calendar function in Power BI.
The Power Bi calendar function returns a table with a single column added named Date that contains a contiguous set of dates. We can also set the range of dates from the specified start date to the specified end date.
Let us see how to use the Power bi Dax calendar function in Power bi. We will see an example that will return dates specified in the calendar function.
Power Bi Syntax for Calendar function:
CALENDAR(<start_date>, <end_date>)- Open the Power Bi desktop, and load the data into the desktop. Once the data has been loaded select the New Table option under the Home tab from the ribbon.
- In the New table formula section, enters the below formula and select the check icon.
Calendar Table = CALENDAR(DATE(2022, 1, 1),DATE(2022, 1, 5))Where,
- Calendar Table = New Table name
- Date = Function name
- The screenshot below shows that the new table has been added with a single column called date and displays the set of date ranges passed in the formula.

This is how to use the Power bi Dax calendar function in Power bi.
Read Power BI Report Export to PDF
Power BI DAX calendar Table
Here we will create a calendar table in Power BI using DAX.
In this example, we will display the calendar table starting from today’s date till the end date as per the requirement.
- Open the Power Bi desktop, and load the data into the desktop. Once the data has been loaded select the New Table option under the Home tab from the ribbon.
- In the New table formula section, enters the below formula and select the check icon., Where the Startdate argument is passed as today function so that it will calculate the calendar table accordingly.
Calendar Table = CALENDAR(TODAY(),DATE(2023, 5, 31))Where,
- Calendar Table = New Table name
- Today & Date = Function name
- In the below screenshot, you can see that the new table has been added with a single column called date and displays the date value from today ( ie, Today’s date is 23/11/2022) till the date ranges passed in the formula.
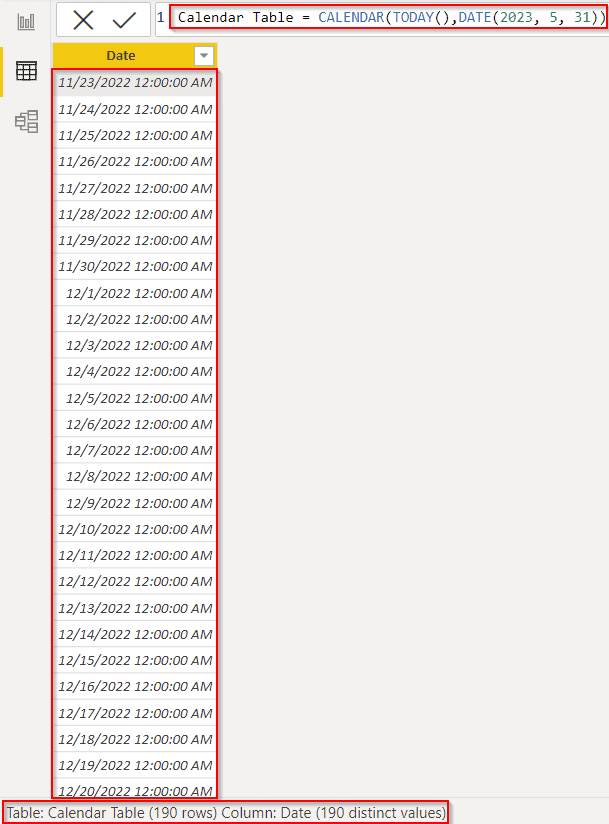
This is how to generate a calendar table using power bi Dax.
Check out, Power BI DAX Count
Power BI DAX date function
Let us see how we can use the Power bi Dax Date function with an example in Power bi.
The date function returns the table-specified date in DateTime format.
Power Bi Syntax for Date function:
DATE(<year>, <month>, <day>)- Open the Power Bi desktop, and load the data into the desktop. Once the data has been loaded, select the new measure option from the ribbon under the Home tab and apply the below-mentioned formula.
Fixed Date = DATE(2022,11,5)Where Fixed Date = New Measure name
- Now in the report section, select the Table visual from the visualization and then drag and drop the column fields and the created Date measure value in it.
- By default, it will display the date in the date-time format.
- We can also change the date time format to only the date format from the ribbon.
- The screenshot below represents the fixed date value in the table visual as excepted.
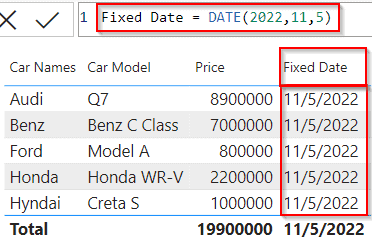
This is how we can use the Power bi Dax Date function in Power bi.
Read Embed Power BI report in SharePoint Online
Power BI DAX time function
Let us see how we can use the Power BI Dax time function in Power Bi with an example.
The time function converts hours, minutes, and seconds passed as numbers to time in DateTime format.
Power Bi Syntax for Time Function:
TIME(hour, minute, second)- Hour – Hour represents a number from 0 to 23.
- Minute- Hour represents a number from 0 to 59.
- Second- Hour represents a number from 0 to 59.
- Open the Power Bi desktop, and load the data into the desktop. Once the data has been loaded, select the new measure option from the ribbon under the Home tab and apply the below mentioned formula.
Time function = TIME(3,0,0)Where,
- Time function = New Measure name
- Now from the visualization, select the Table visual and drag and drop car names, car models, and price field values and the created Time function measure value.
- The screenshot below represents the time value in the DateTime Format as expected.
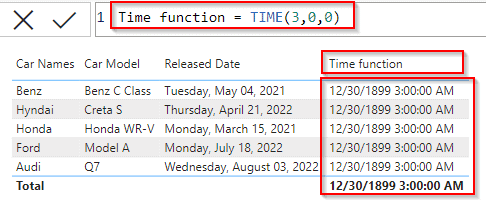
This is how to use the Power BI Dax time function in Power Bi.
Power BI DAX calendar month
Here we will see how to display the month number using the Power Bi Dax Calendar Month function in Power BI,
The Month function returns a number from 1 to 12 from 1 (January) to 12 (December).
Power Bi Syntax for Month Function:
MONTH(<datetime>)- Load the data into the Power Bi desktop, and select the New column option under the Home tab from the ribbon.
- Apply the below-mentioned formula in the column section formula bar.
Month Value = MONTH('Calendar Table'[Date])Where,
- Month Value = New Column name
- Calendar Table = Table Name
- Date = Existing column name
- In the below screenshot, you can see that the new column displays the Month value based on the date column presented in the Power bi Calendar table.
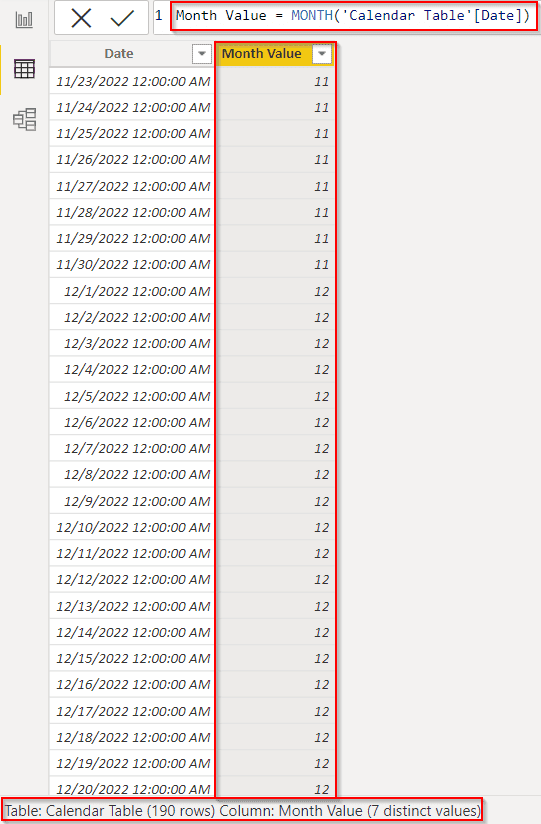
This is how to display the month number using the Power Bi Dax Calendar Month function in Power BI.
Read Power BI report using People Picker Field
Power BI DAX formula for the month name
Let us see how we can extract the month name using the Dax formula in Power BI.
We use the Power BI Dax Format function to extract the month name from the table. In this example, I’ll extract the month name for the released date column presented in the vehicles table data.
- Load the data into the Power Bi desktop, and select the New column option under the Home tab from the ribbon.
- Apply the below-mentioned formula in the column section formula bar.
Month Name = FORMAT(Cars[Released Date],"MMMM")Where,
- Month Name = New Column name
- Cars = Table Name
- Released Date = Existing column name
In the below screenshot, you can see that the new column extracts only the month name from the released date column.

This is the Formula to extract the month name using the Power Bi Dax in Power BI.
Power BI DAX last calendar month
Let us see how to calculate the last calendar month’s data using the Dax function in Power BI,
In this example, Initially, we will find the current month’s number and then we will calculate the last month’s data for the car price value.
- Open the Power Bi desktop, and load the data into the desktop. Once the data has been loaded select the New Column option under the Home tab from the ribbon.
- In the New column formula section, enter the below formula to find the current month value. (Ie. November (month number will be 11 )).
thismonth = MONTH(today())Where,
- this month= New Column name
In the same way, calculate the previous month’s value based on the date column presented in the table, for that select the New Column option and apply the below formula:
Previous Month = if (Cars[Released Date].[MonthNo]= Cars[thismonth]-1,Cars[thismonth]-1,Cars[Released Date].[MonthNo])Where,
- Previous Month = New column name
- Cars = Table Name
- Released Date = existing column name

- Where Current month is (November) so from the released date there is three car’s fall on the last calendar month.
- So now we will calculate the car price value for the last month, for that apply the below-mentioned formula:
last month data = var amount =CALCULATE(SUM(Cars[Price]),Cars[Previous Month]=Cars[thismonth]-1) return amountWhere,
- Last month’s data = New Column name
- amount = Variable name
- Cars = Table Name
- Price, Calendar Week, and this week = Existing column names
- In the below screenshot, you can see that the new column has been added and displayed the car price values only for the last calendar month.

This is how to calculate the last calendar month’s data using the Dax function in Power BI.
Read Export Power BI reports to PDF
Power BI DAX Weekday function
Let us see how to use the Power BI Dax Weekday function in Power Bi with an example.
The Weekday function returns a number from 1 to 7 specifying the day of the week of a date. By default, the day ranges from starts from 1 (Sunday) to 7 (Saturday).
Power Bi Syntax for Weekday Function:
WEEKDAY(<date>, <return_type>)- If we select the return type as 1 then the week begins on Sunday (1) and ends on Saturday (7).
- If we select the return type as 2, then the week begins on Monday (1) and ends on Sunday (7).
- If we select the return type as 3, the week begins on Monday (0) and ends on Sunday (6).
- Load the data into the Power Bi desktop, and select the New column option under the Home tab from the ribbon.
- Apply the below-mentioned formula in the column section formula bar.
Weekday Column = WEEKDAY(Cars[Released Date],1)Where,
- Weekday Column = New Column name
- Cars = Table Name
- Released Date = Existing column name
- In the below screenshot, you can see that the new column displays the weekday value based on the released date column.

This is how to use the Power BI Dax Weekday function in Power Bi.
Power Bi Dax day of the year
Let us see how we can calculate the day of the year using the Power Bi Dax function in Power Bi.
Using the Power BI Dax DateDiff function we will calculate the day of the year which returns the number between the two dates.
- Load the data into the Power Bi desktop, and select the New column option under the Home tab from the ribbon.
- Apply the below-mentioned formula in the column section formula bar.
Day Of Year = DATEDIFF(STARTOFYEAR(Cars[Released Date]),Cars[Released Date],DAY)+1Where,
- Day Of Year = New Column name
- Cars = Table Name
- Released Date = Existing column name
- In the below screenshot, you can see that the new column displays the day-of-year number value based on the released date column.

This is how to calculate the day of the year using the Power Bi Dax function in Power Bi.
Read Export Power BI Reports to Excel
Power bi Dax days in month
Here we will see how to calculate the days that are presented in the month in Power BI,
This example will calculate and show how many days are presented in a month. In this example, we will calculate and show you the count of days for the current month using the Today function,
- Load the data into the Power Bi desktop, and select the New column option under the Home tab from the ribbon.
- Apply the below-mentioned formula in the column section formula bar.
DaysinMonth = DAY(
    IF(
        MONTH(TODAY()) = 12,
        DATE(YEAR(TODAY()) + 1,1,1),
        DATE(YEAR(TODAY()),  MONTH(TODAY()) + 1, 1)
    ) - 1
)
Where,
- Day in Month = New Column name
- Today = Function name
In the below screenshot, you can see that the new column displays the count of days in a month.
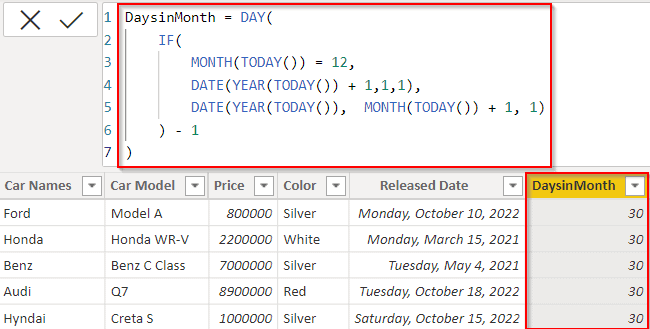
This is how to calculate the days that are presented in the month in Power BI.
Power bi Dax last day of the month
Here we will see how we can calculate the last day of the month using Power BI Dax in Power BI
Power BI EOMonth returns the last day of the month as the date in the date time format.
Power Bi Syntax for EOMonth Function:
EOMONTH(<start_date>, <months>)In this example, we will use the End of the month function to calculate the last day of the month in Power BI,
- Load the data into the Power Bi desktop, and select the New column option under the Home tab from the ribbon.
- Apply the below-mentioned formula in the column section formula bar, From today’s date (28/11/2022) it will calculate the integer as a month.
LastdayofMonth = EOMONTH(TODAY(),1)Where,
- LastdayofMonth = New Column name
- Today = Function name
- In the below screenshot, you can see that the new column displays the last day of the month passed as the month parameter in the EOMonth function in Power BI.

This is how to calculate the last day of the month using Power BI Dax in Power BI.
Read Get Current Month Sales Report using Power BI Measure
Power BI DAX calendar week number
Let us see how we can use the Power BI Dax WeekNum function in Power Bi.
- The WeekNum function returns the week number for the given date according to the return_type value.
- The week number will be displayed based on the year, where January 1 is the first week of the year and is numbered week 1.
Power Bi Syntax for WeekNum Function:
WEEKNUM(<date>[, <return_type>])- Load the data into the Power Bi desktop, and select the New column option under the Home tab from the ribbon.
- Apply the below-mentioned formula in the column section formula bar.
WeekNumber = WEEKNUM(Cars[Released Date])Where,
- WeekNumber = New Column name
- Cars = Table Name
- Released Date = Existing column name
In the below screenshot, you can see that the new column displays the week num value based on the released date column.
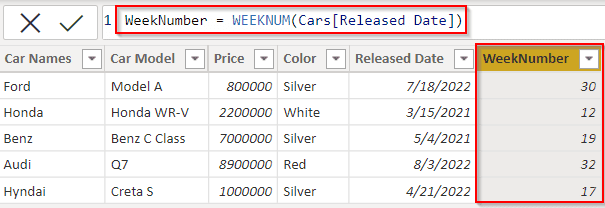
This is how to use the Power BI Dax WeekNum function in Power Bi.
Power BI DAX last calendar week
Let us see how we can calculate the last calendar week using the Dax function in Power BI,
In this example, Initially, we will find the current week’s number and then we will calculate the last week’s car price value.
- Open the Power Bi desktop, and load the data into the desktop. Once the data has been loaded select the New Column option under the Home tab from the ribbon.
- In the New column formula section, enter the below formula to find the calendar week number for the Released date column presented in the data table.
Calendar Week = WEEKNUM ( Cars[Released Date] , 1)Where,
- Calendar Week = New Column name
- Cars = Table Name
- Released Date = Existing Column name

- Now select the New Column option and apply the below formula to find the current week number,
thisweek = WEEKNUM(today())Where,
- this Week = New Column name

- Where Today’s date is ( 24/11/2022), so from the released date there are two car’s falls on the last calendar week.
- So now we will calculate the car price value for the last week, for that apply the below-mentioned formula:
Last Week data = var amount =CALCULATE(SUM(Cars[Price]),Cars[Calendar Week]=Cars[thisweek]-1) return amountWhere,
- Last Week’s data = New Column name
- Cars = Table Name
- Price, Calendar Week, and this week = Existing column names
- In the below screenshot, you can see that the new column has been added and displayed the car price values only for the last calendar week.

This is how to calculate the last calendar week using the Dax function in Power Bi.
Read Power BI DAX Filter Table
Power bi Dax dates in the period
Let us see how we can use the Date in Period function in Power Bi Dax in Power BI.
Power Bi DatesInPeriod function Returns a table that contains a column of dates based on the intervals,
Power Bi Syntax for DATESINPERIOD Function:
DATESINPERIOD (<dates>, <start_date>, <number_of_intervals>, <interval>) - Load the data into the Power Bi desktop, and select the New column option under the Home tab from the ribbon.
- Apply the below-mentioned formula in the column section formula bar.
DatesInPeriod = DATESINPERIOD('Date'[Date],DATE(2022,11,28),1,DAY)Where,
- DatesInPeriod = New Column name
- In the below screenshot, you can see that the new column displays the return of the one-day date value as expected.

This is how to use the Date in Period function in Power Bi to calculate the date values.
Power BI DAX Calendar Auto
Here we will calculate and display the calendar table using the Calendar Auto function in Power BI,
In this example, we will display the calendar auto table. The Calendar auto function automatically scans the loaded data into the Power Bi desktop and finds the Date column and chooses the minimum and maximum date value and generates the Calendar table.
In this example, you can see below that the Minimum year from the Released date column is 2021, so it generates the calendar table from the year 2021.
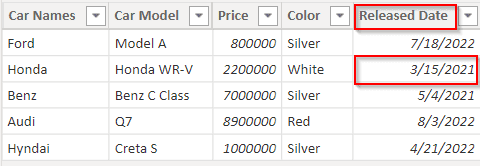
Power Bi Syntax for Calendar Auto Function:
CALENDARAUTO([fiscal_year_end_month])- Open the Power Bi desktop, and load the data into the desktop. Once the data has been loaded select the New Table option under the Home tab from the ribbon.
- In the New table formula section, enters the below formula and select the check icon.
CalendarAuto Table = CALENDARAUTO()Where,
- Calendar Auto Table = New Table name
- CALENDARAUTO() = Function name
- In the below screenshot, you can see that the new table has been added with a single column called date and displays the date value from the minimum year 2021 automatically.
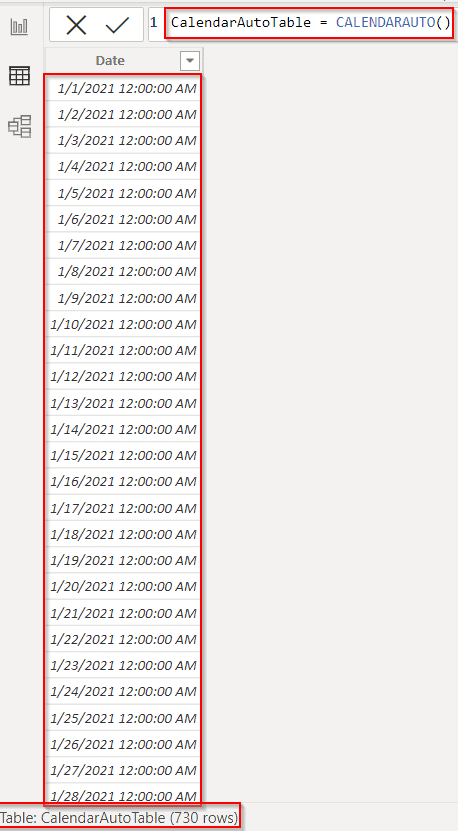
This is how to calculate and display the calendar table using the Calendar Auto function in Power BI.
This is how to create or generate a calendar using the Power BI DAX in Power BI, Also examined the below-mentioned topics in this Power Bi tutorial.
- Power BI DAX calendar function
- Power BI DAX calendar Table
- Power BI DAX calendar month
- Power BI DAX Weekday function
- Power BI DAX calendar week number
- Power Bi Dax day of the year
- Power BI DAX calendar Auto
- Power BI DAX formula for the month name
- Power BI DAX time function
- Power BI DAX now function
- Power BI DAX last calendar week
- Power BI DAX last calendar month
- Power bi Dax days in the month
- Power bi Dax dates in the period
You may like the following Power BI tutorials:
- How To Remove Filter From Power BI DAX
- Power BI DAX Max Date [With 15+ Real Examples]
- How to Filter Blank Value in Power BI
- Power BI DAX Filter If
- How to add an empty column in Power BI
- Power BI Dax Filter
I am Bijay a Microsoft MVP (10 times – My MVP Profile) in SharePoint and have more than 17 years of expertise in SharePoint Online Office 365, SharePoint subscription edition, and SharePoint 2019/2016/2013. Currently working in my own venture TSInfo Technologies a SharePoint development, consulting, and training company. I also run the popular SharePoint website EnjoySharePoint.com