The form control in Power Apps displays, edits, and submits data to data sources. Modern form control enables users to build professional-looking forms with flexible design options.
In this article, I will explain the following topics:
- How to use Power Apps modern form control
- Power Apps submit modern form data to the SharePoint list
How to Use Power Apps Modern Form Control
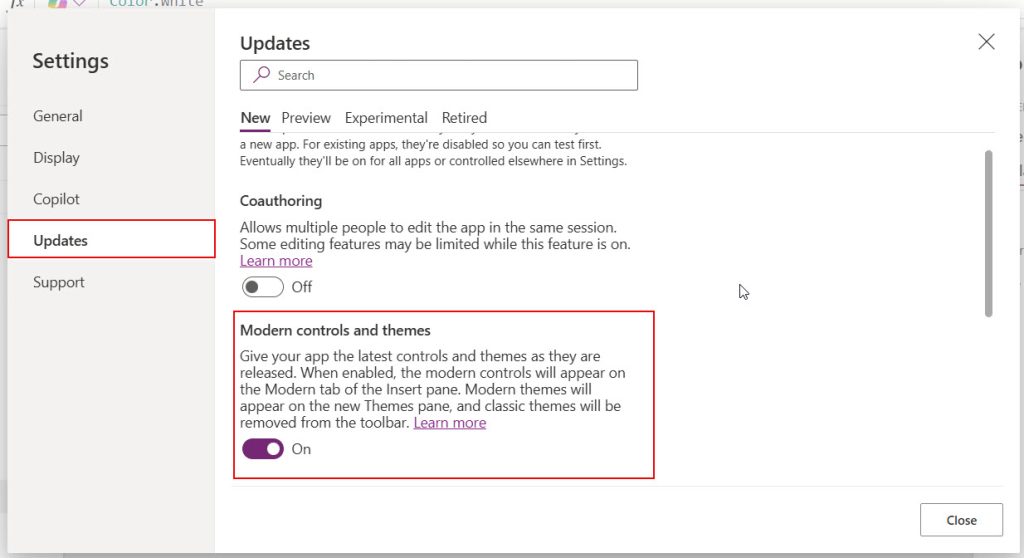
In Power Apps, to get the modern form control, we first need to enable the modern controls in Settings. Follow the steps below to do this!
1. In the Power Apps application, click on ellipses (…) on the top navigation -> Click on Settings.

2. From Updates -> Under New -> Enable Modern controls and themes.
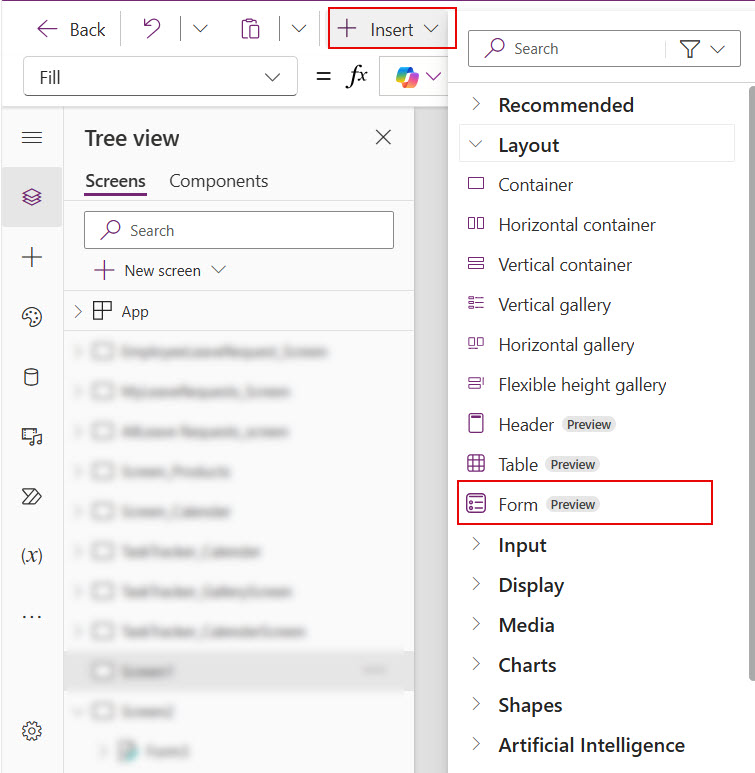
3. Click on +Insert tab in top navigation ->Under Layout -> Select Form (preview).
I have a SharePoint list named “Employee Leave Requests.”

| Column Name | Data Type |
|---|---|
| Leave Title | Single line of text |
| Employee Name | Person |
| Submitted Date | Date&Time |
| Start Date | Date&Time |
| End Date | Date&Time |
| Team Lead | Person |
| Leave Type | Choice |
| Department | Choice |
| Leave Days | Number |
| Reason For Leave | Multiline text |
4. Connect the Power Apps modern form control with the data source. Here, I connected with the SharePoint list.
DataSource = 'Employee Leave Requests'
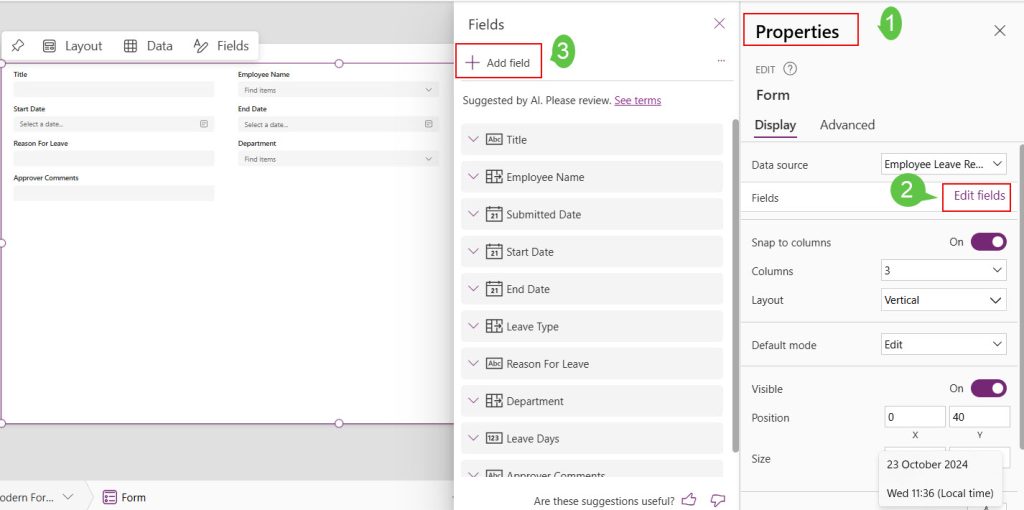
5. To add the fields into the Form control-> Go to the Properties -> Click on Edit fields -> Click on +Add field. ->Select the fields and click on Add.
By default, it adds only a few fields.
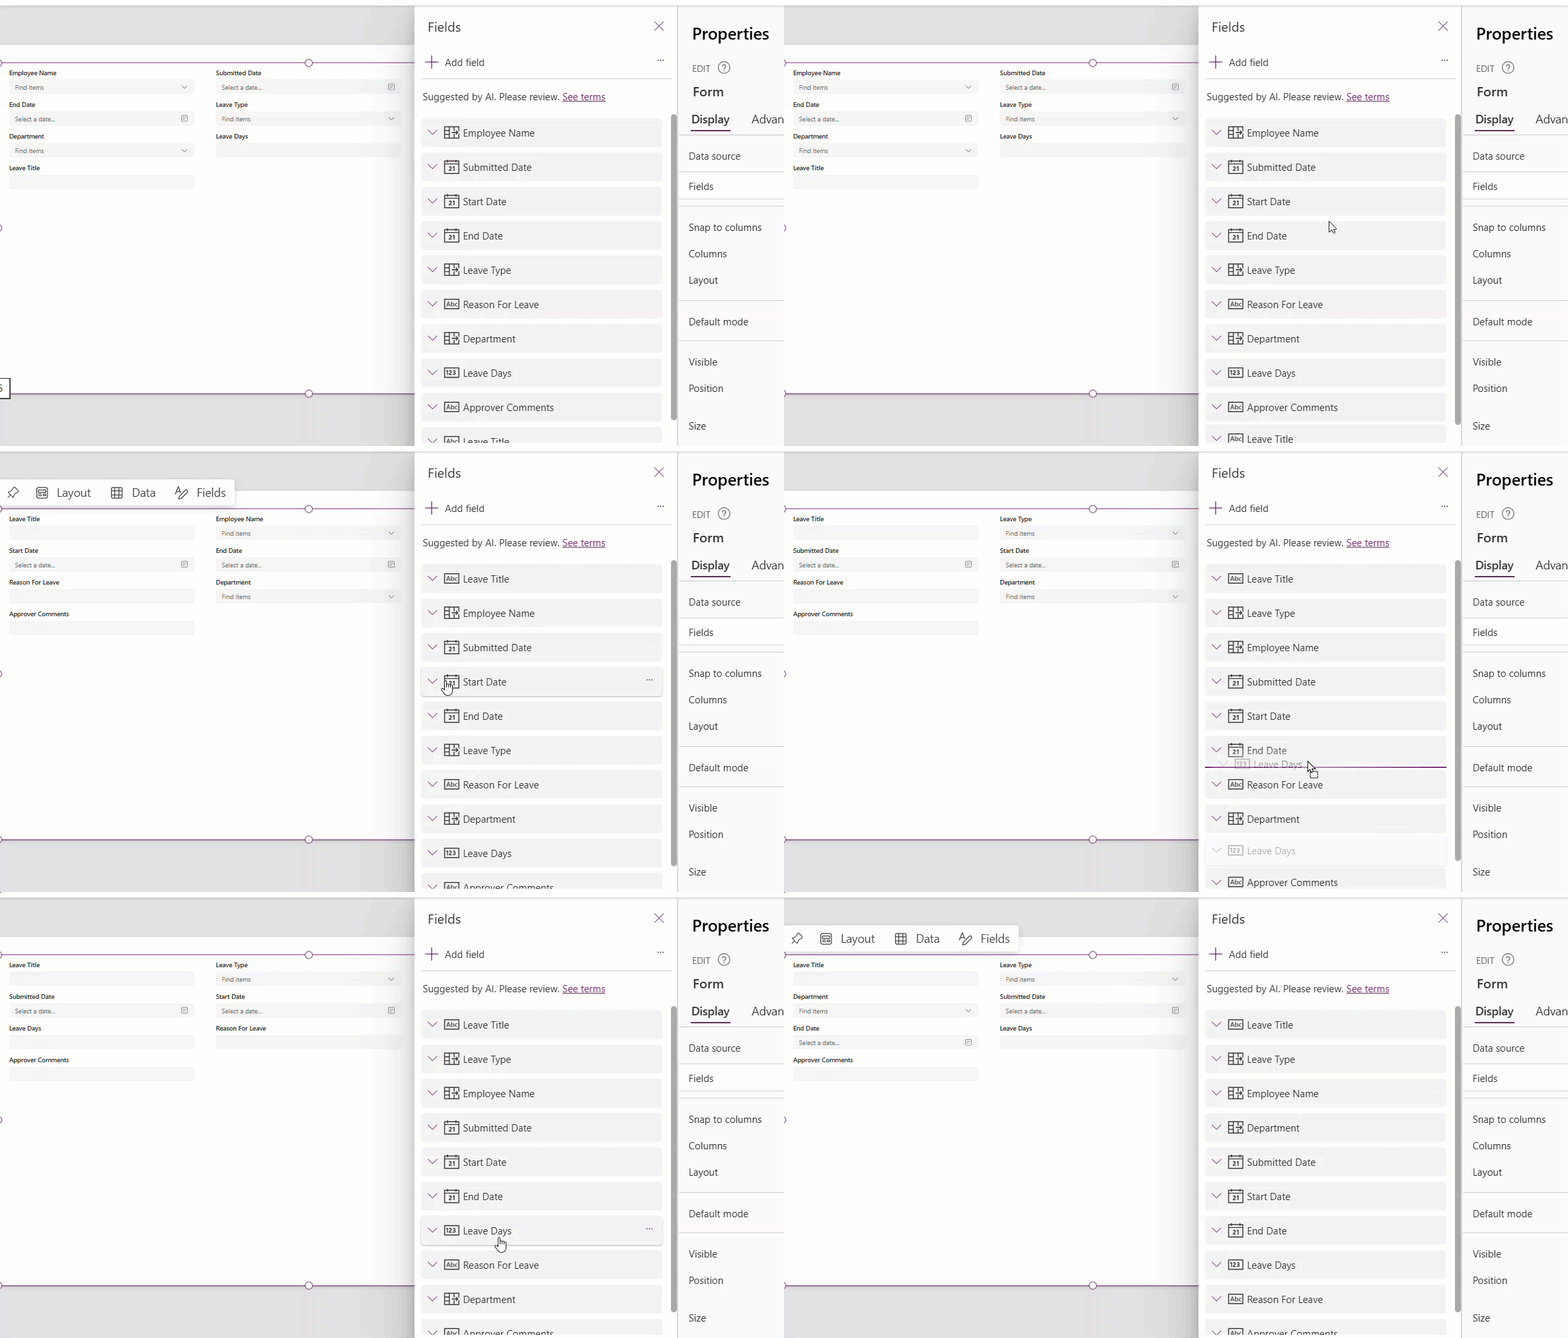
6. As in the example below, You can also drag and drop the fields in the Power Apps modern form control.
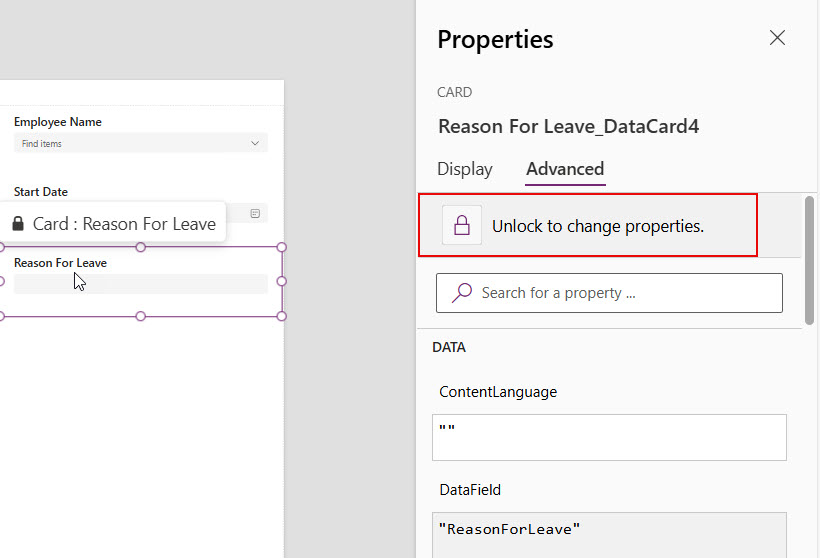
7. To change the properties of the fields in modern form control, click on the field, go to the Advanced section, and click on Unlock to change properties.
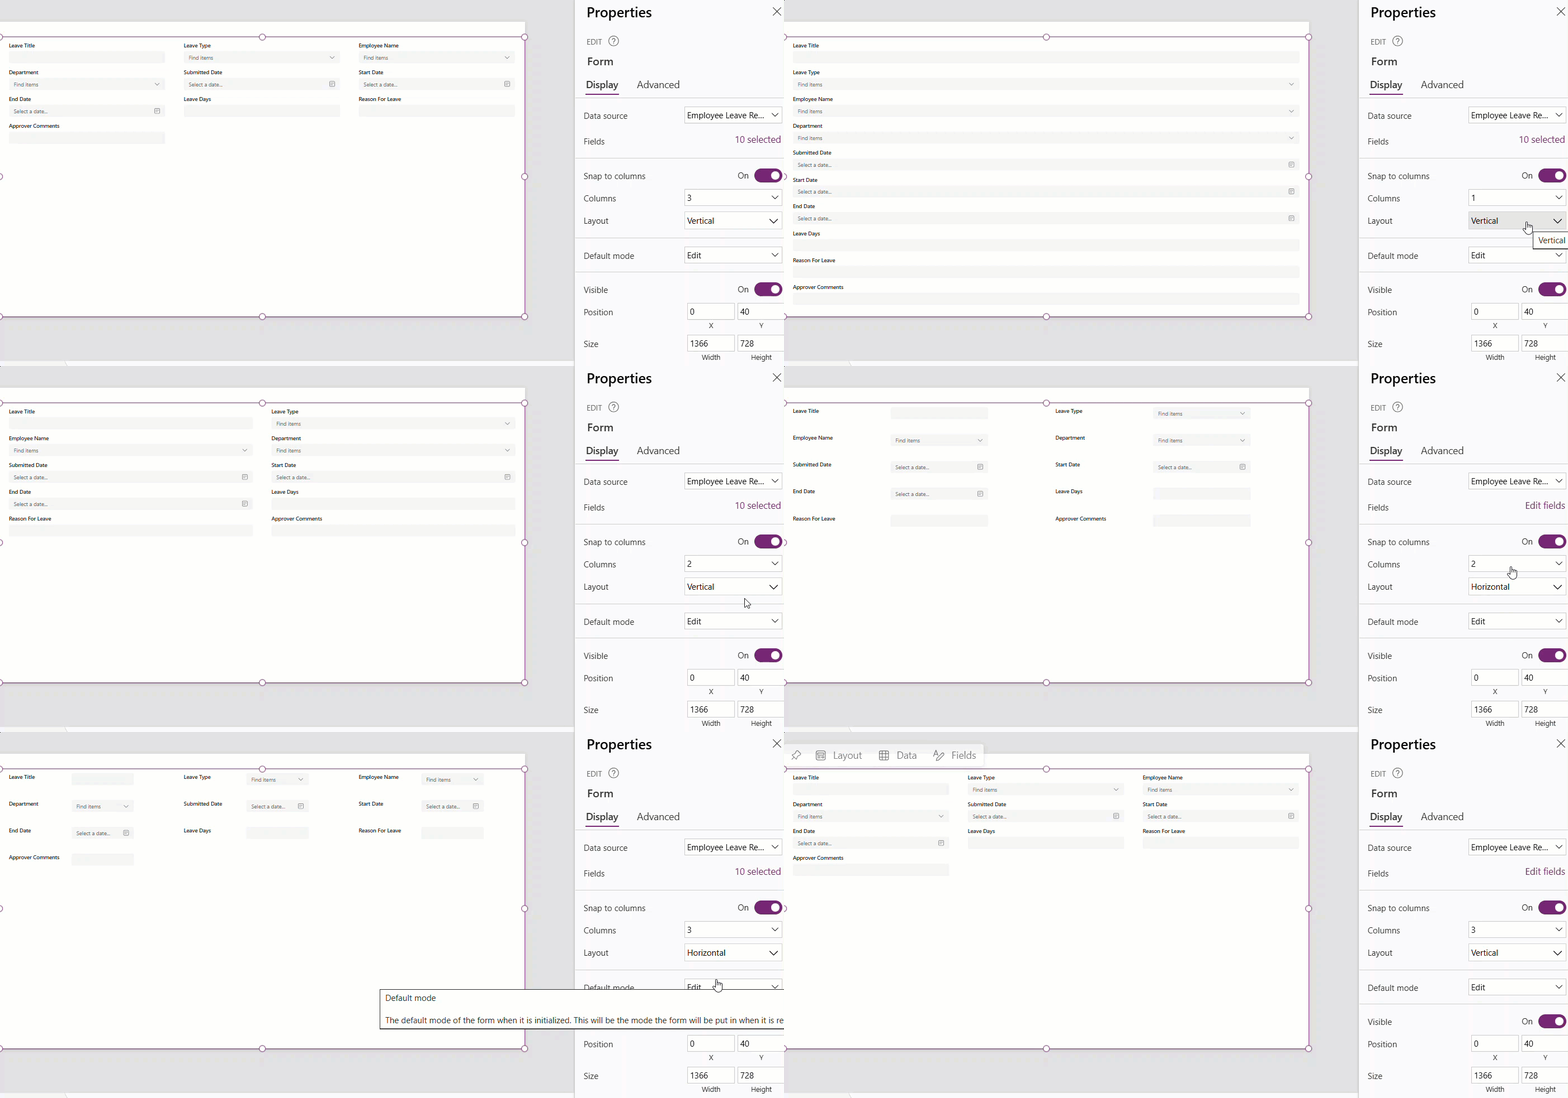
8. Power App’s modern form control has a Layout property to change the layout, like
- Horizontal
- Vertical
Also, the Column property enables us to provide the number of columns present in the form control. To use the above two properties, look at the example below.
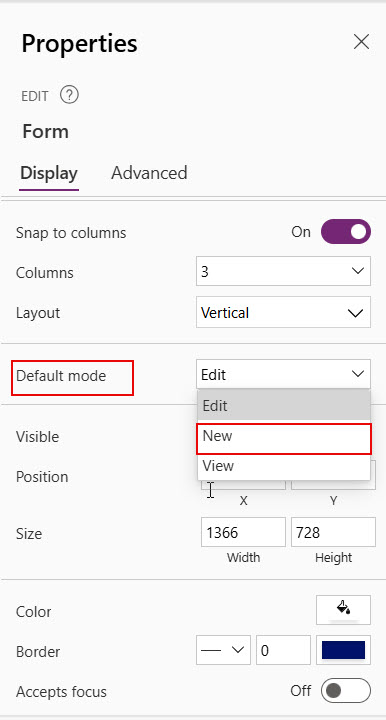
9. Choose New for the Default mode property. We must make the form control new to submit data to the data source.
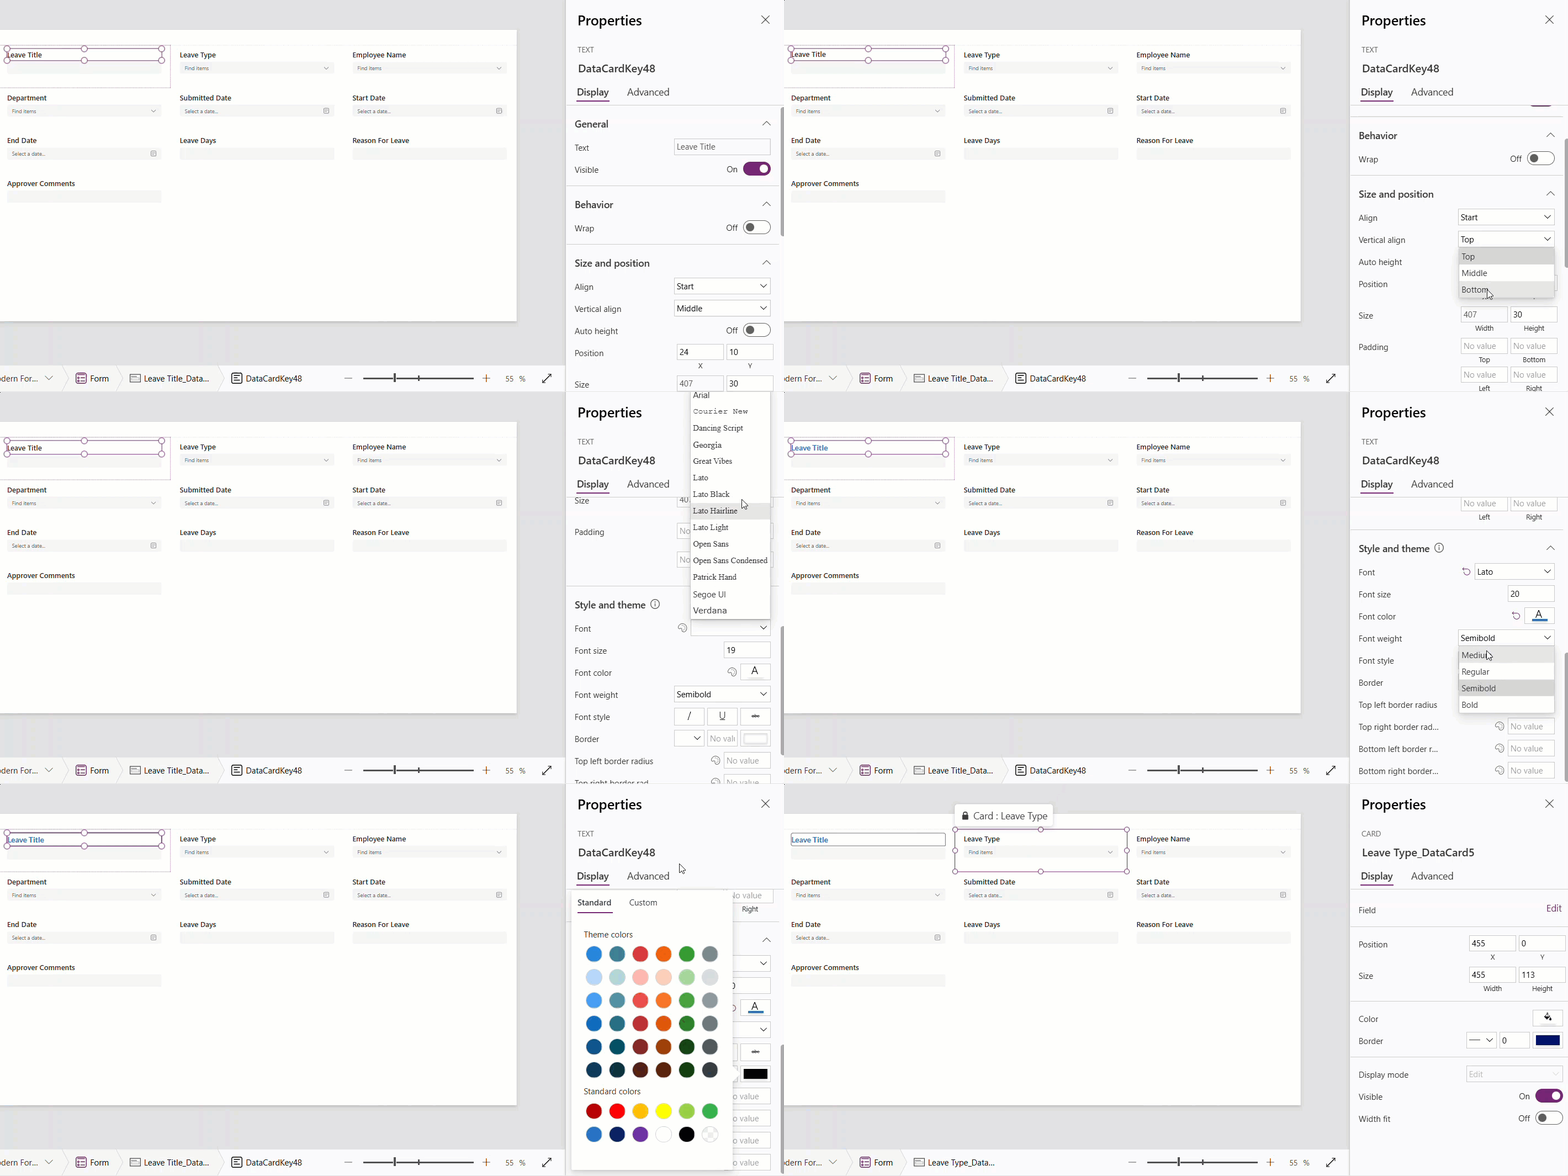
10. Look at some of the new properties for designing the field title(DataCardKey) present within the data card of the field.
| Property | Description |
|---|---|
| Align | It has the values Start, End, Center, and Justify, which apply horizontally. |
| Vertical align | Top, Middle, Bottom. |
| Positions[X, Y] | X – Distance between the control’s left side and the screen’s left edge. Y – Distance between the top of the control and the top edge of the screen. |
| Font | Choose the font from the dropdown. |
| Font size | Provide the number for font size. |
| Font color | Choose the color for the font. |
| Font weight | Bold, Semibold, Regular, Medium. |
| Font style | Choose from Italic, Underline, or Strike. |
| Border | Provide Border style, Border thickness, and Border color. |
| Top left, right, & Bottom left, right radius | Provide the border radius. |
11. Look at the properties for DataCardValue in each field datacard in the Power Apps modern form control.
| Property | Description |
|---|---|
| Placeholder text | Enter some text to understand the field’s purpose. |
| Mode | Choose from Single line, Multiline |
| Type | Choose the type of text from Text, Password, Search. |
| Displaymode | By default, Parent.DisplayMode will be present. But this property has the following values: Disabled, Edit, View. |
| Trigger output | This property enables when the formula provided in the OnChange property needs to trigger: Delayed: Triggers OnChange after a half-second delay. Useful for delaying expensive operations until the user completes inputting text. Keypress: Triggers OnChange immediately as the user types. FocusOut: Triggers OnChange only when the text input control loses focus. |
| Align | Start, End, Center, Justify. This align applied horizontally. |
| Positions[X, Y] | X – Distance between the control’s left side and the screen’s left edge. Y – Distance between the top of the control and the top edge of the screen. |
| Size (Width, Height) | Provide the width and height for the data card value. |
| Padding [Top, Bottom, Left, Right] | Space between the text and border of the data card value. |
| Appearance | Appearance of the control’s border and fill. It has values: Filled Darker, Filled Lighter, Outline. |
| Color palette | Provide a color theme for data card value. |
| Font | Choose the font from the dropdown. |
| Font size | Provide the number for font size. |
| Font color | Choose the color for the font. |
| Font weight | Bold, Semibold, Regular, Medium |
| Font style | Choose from Italic, Underline, or Strike. |
| Border | Provide Border style, Border thickness, and Border color. |
| Border radius | Provide the number of the border-radius. |
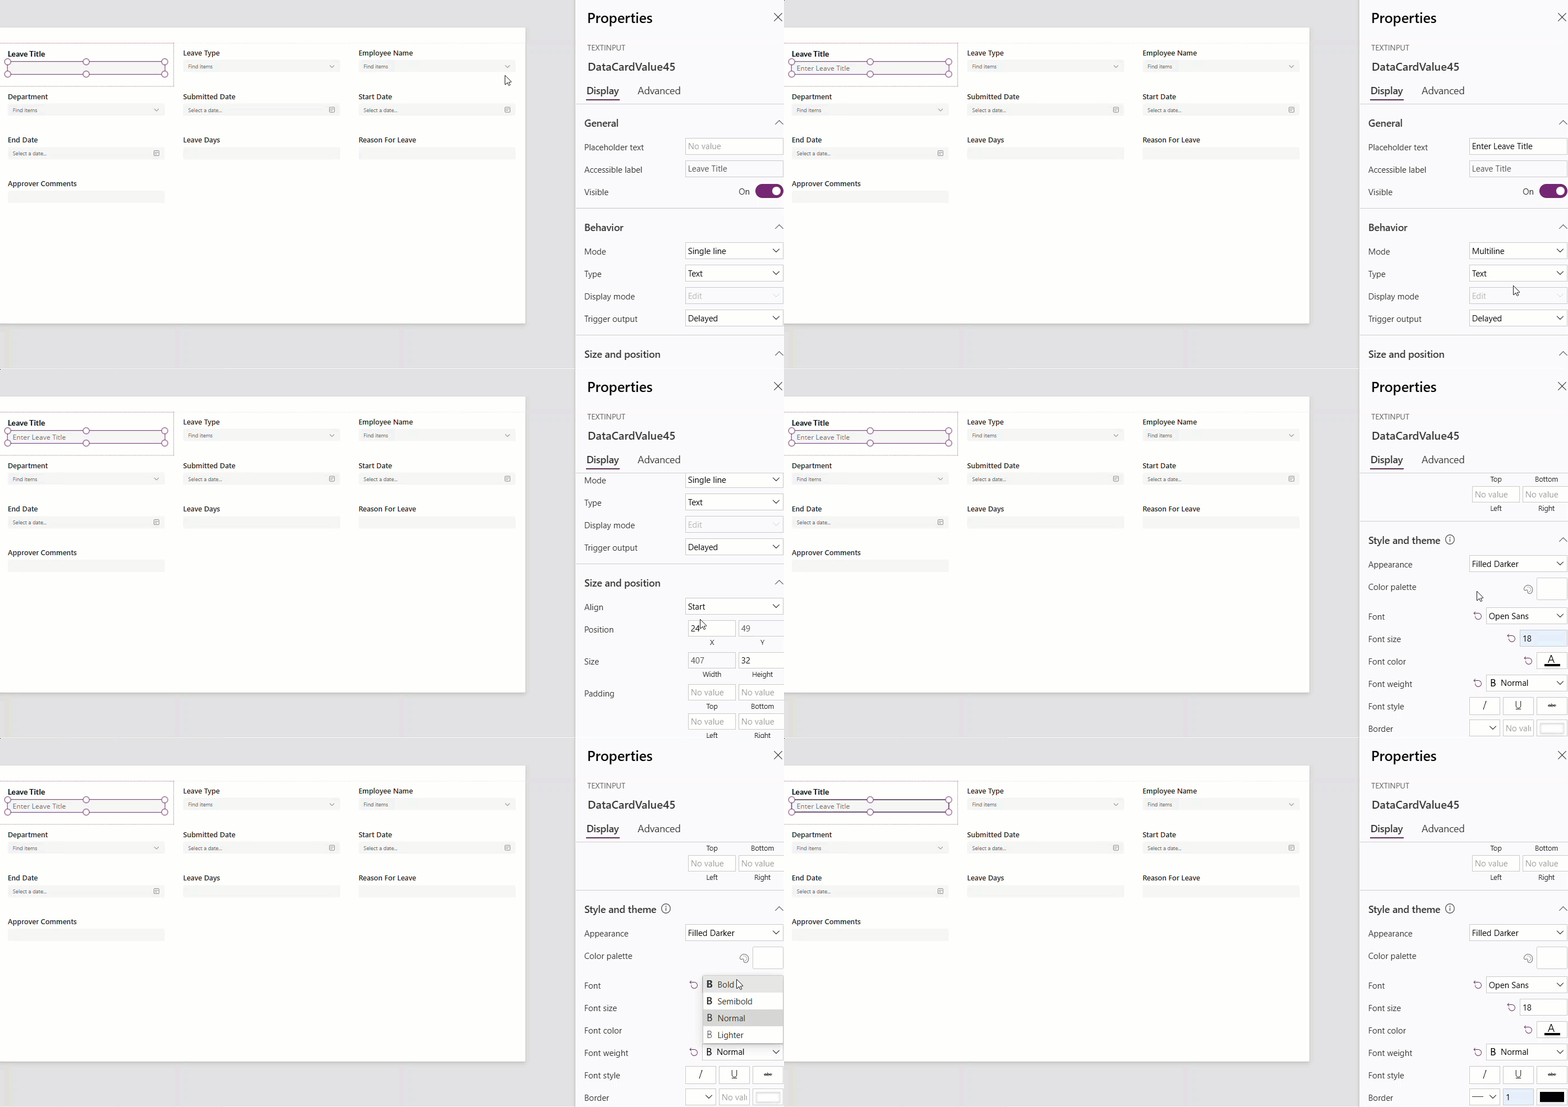
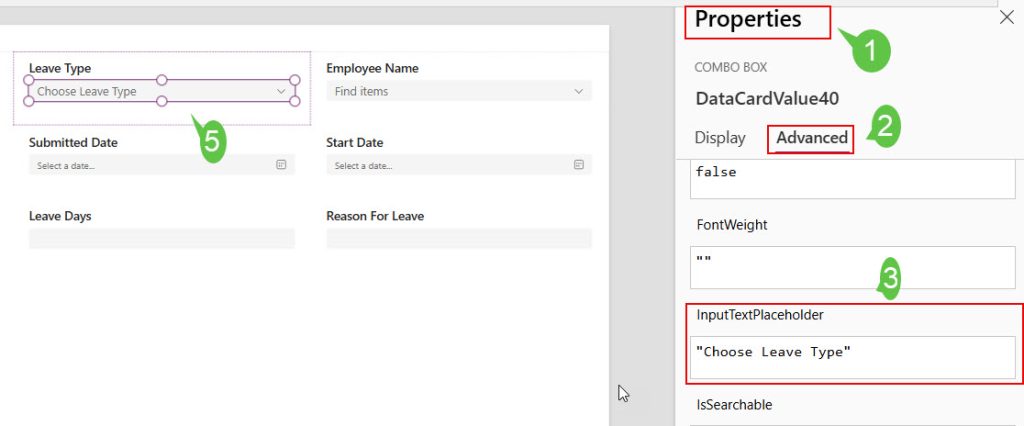
12. To change the default text for the choice field in the Power Apps form control. Click on the data card value -> Open Properties -> Advanced -> InputTextPlaceholder -> Provide the custom text within quotes.
13. A modern combo box control won’t display all the people’s names if the form control has a person field. Many people face the same issue.

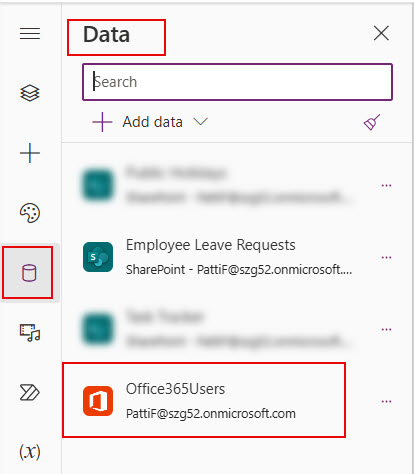
Here, I will explain an alternative solution to this problem. Connect the Power Apps application with Office365Users.
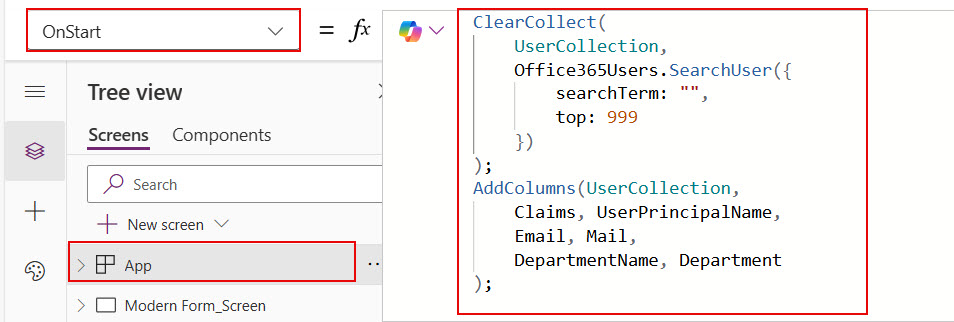
14. Then, add the code below to the OnStart property of the App object.
ClearCollect(
    UserCollection,
    Office365Users.SearchUser({
        searchTerm: "",
        top: 999
    })
);
AddColumns(UserCollection,
    Claims, UserPrincipalName,
    Email, Mail,
    DepartmentName, Department
);
I created a collection named UserCollection, containing all Microsoft 365 users. I took the top 999; you can take the number according to your wants.
Also, UserCollection contains columns like Claims, Email, and DepartmentName.
15. Provide the below collection name in the items property of the Employee Name data card value. Also, provide the same collection name for the Team Lead data card Value.
Note: In case, you’re using different example then in place of person fields’ data card values’ items property provide this collection name.
UserCollection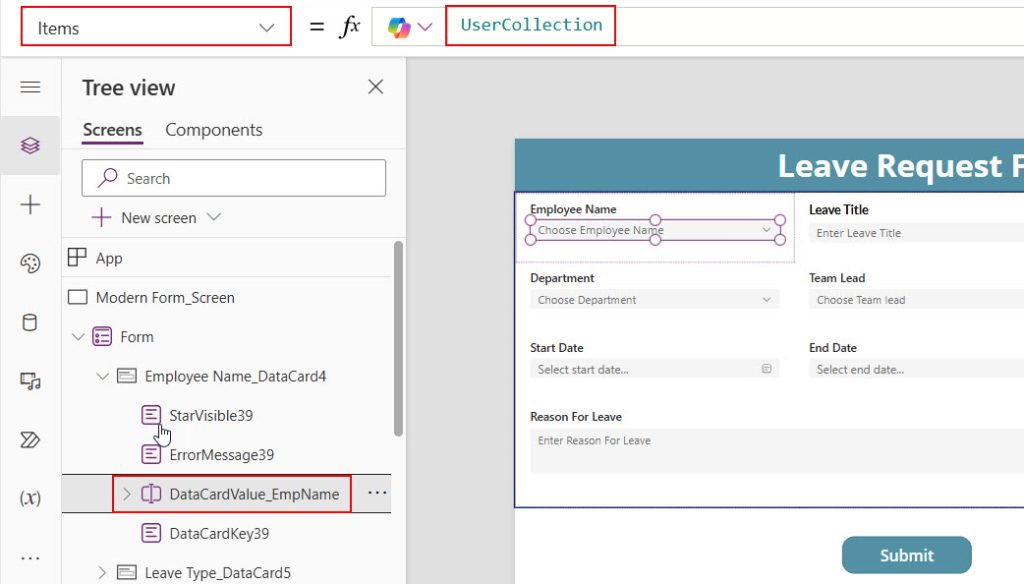
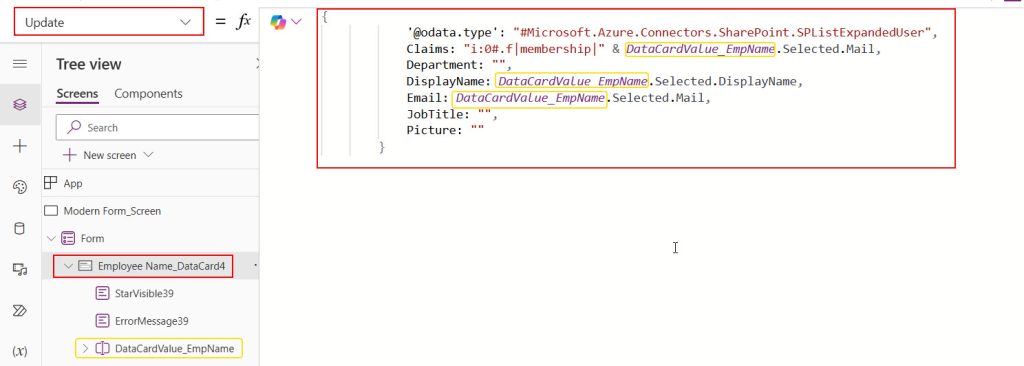
16. Add the below code in the Update property of the Employee Name DataCard.
{
    '@odata.type': "#Microsoft.Azure.Connectors.SharePoint.SPListExpandedUser",
    Claims: "i:0#.f|membership|" & DataCardValue_EmpName.Selected.Mail,
    Department: "",
    DisplayName: DataCardValue_EmpName.Selected.DisplayName,
    Email: DataCardValue_EmpName.Selected.Mail,
    JobTitle: "",
    Picture: ""
}
Here, DataCardValue_EmpName is the employee name’s data card value name.
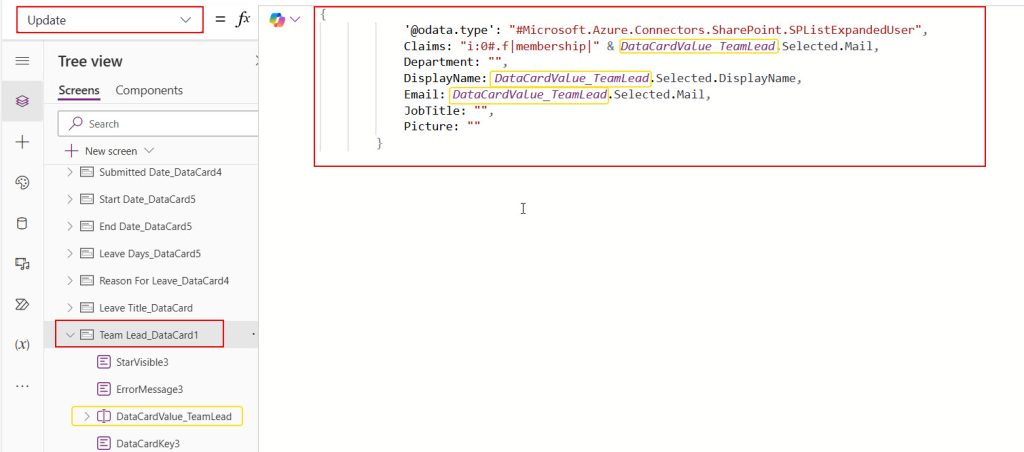
17. Add the below formula in the Update property of the Team Lead Data Card.
{
    '@odata.type': "#Microsoft.Azure.Connectors.SharePoint.SPListExpandedUser",
    Claims: "i:0#.f|membership|" & DataCardValue_TeamLead.Selected.Mail,
    Department: "",
    DisplayName: DataCardValue_TeamLead.Selected.DisplayName,
    Email: DataCardValue_TeamLead.Selected.Mail,
    JobTitle: "",
    Picture: ""
}
DataCardValue_TeamLead is the team lead data card value name.
Now, save all the changes, and to submit the form details, follow the below section.
Submit Power Apps Modern Form Data to SharePoint List
In Power Apps, we must use the SubmitForm() function to submit the form data to the SharePoint list.
Syntax:
SubmitForm( FormName )FormName is a required parameter. Provide the name of the form within the above function.
Add a button control to save the form data to the data source. Provide the code below for its OnSelect property.
SubmitForm(Form)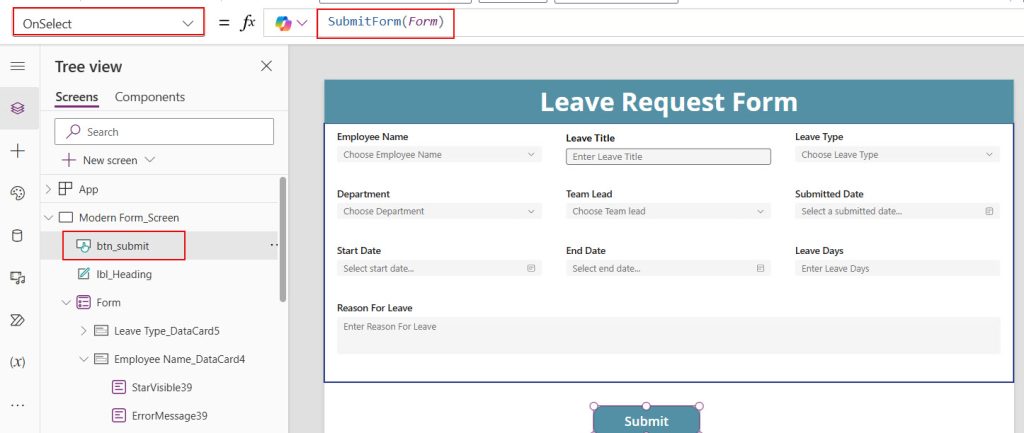
Save changes and Preview app: after filling in the leave request details in the form control, click the save button control.
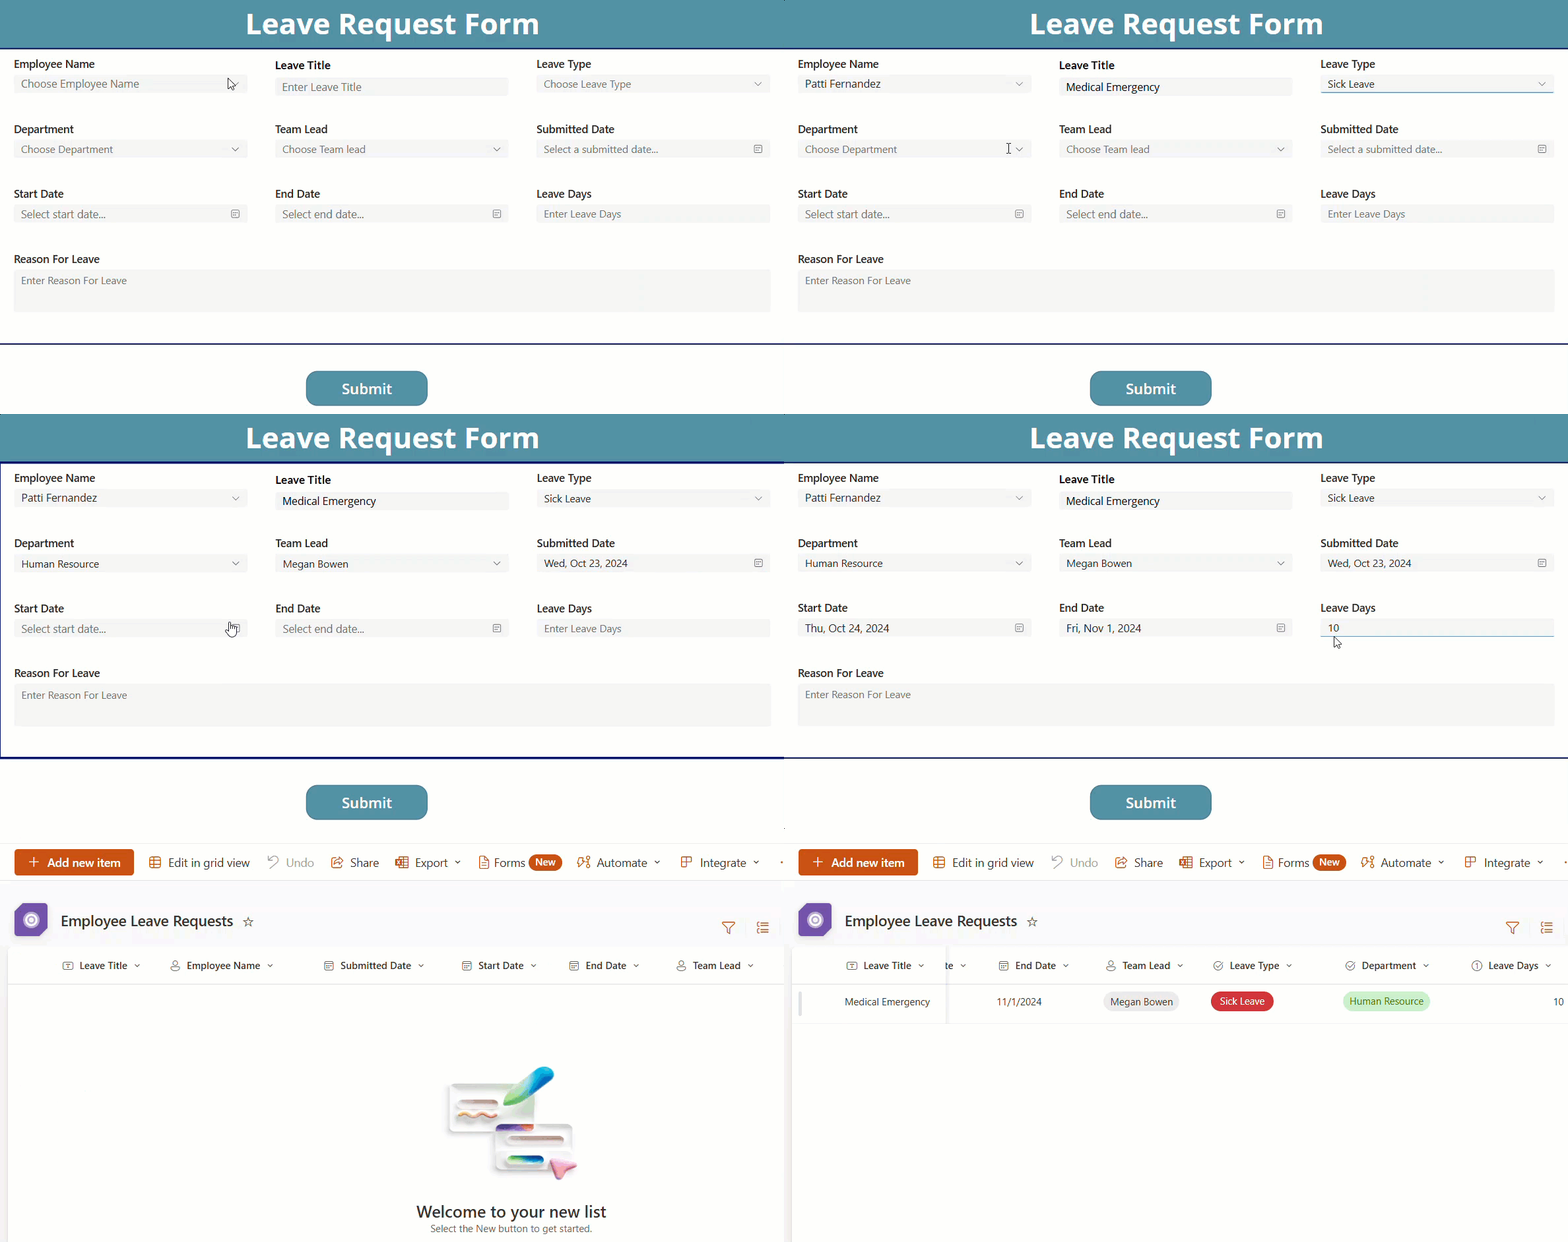
I hope you understand how to use Power App’s modern form control and the properties of data card keys and values. I also explained how to get Microsoft 365 users into the person field in the form control and save those fields’ data to the SharePoint list.
The Power Apps modern form control can be used as an alternative to the classic form; it provides various properties and designs that look like professional forms.
Also, you may like:
- Power Apps modern combo box control
- Power Apps modern slider control
- Power Apps modern toggle control
- Power Apps modern radio group control
- Power Apps modern check box control
- Power Apps Calendar Function With Examples
I am Bijay a Microsoft MVP (10 times – My MVP Profile) in SharePoint and have more than 17 years of expertise in SharePoint Online Office 365, SharePoint subscription edition, and SharePoint 2019/2016/2013. Currently working in my own venture TSInfo Technologies a SharePoint development, consulting, and training company. I also run the popular SharePoint website EnjoySharePoint.com