In Power Apps, the Calender() function gets the Dates, Weeks, and Months. We can use those calendar function formulas in the items property of the single-column table or a dropdown and list box controls for display purposes.
I developed a calendar view project task tracker in the Power Apps application using those calendar functions a few days before. In this article, I will explain the Power Apps calendar function and display Power Apps gallery items in the calendar view.
Power Apps Calendar Function
The table below shows the Power Apps Calendar function formulas for getting Months’ and Weeks’ names in both long and short form.
| Function | Example |
|---|---|
| Calendar.MonthsLong() | 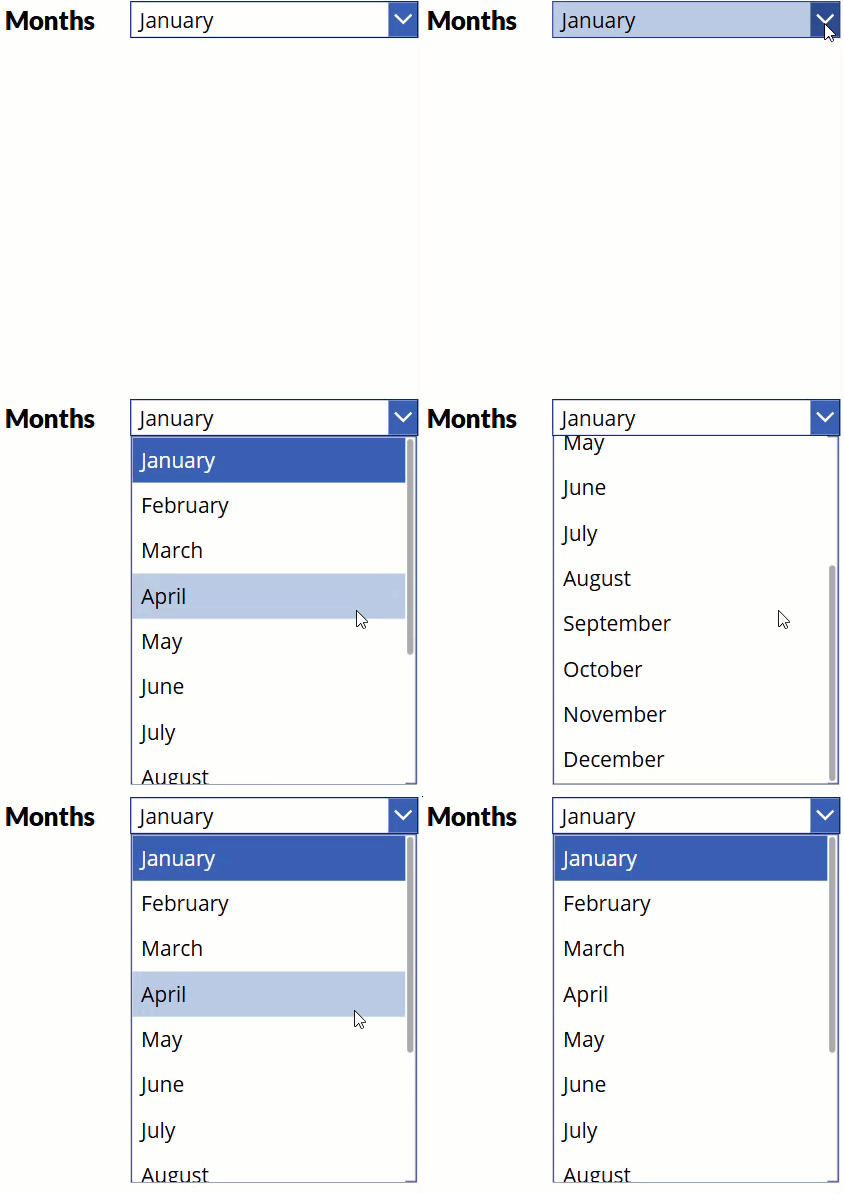 |
| Calendar.MonthsShort() | 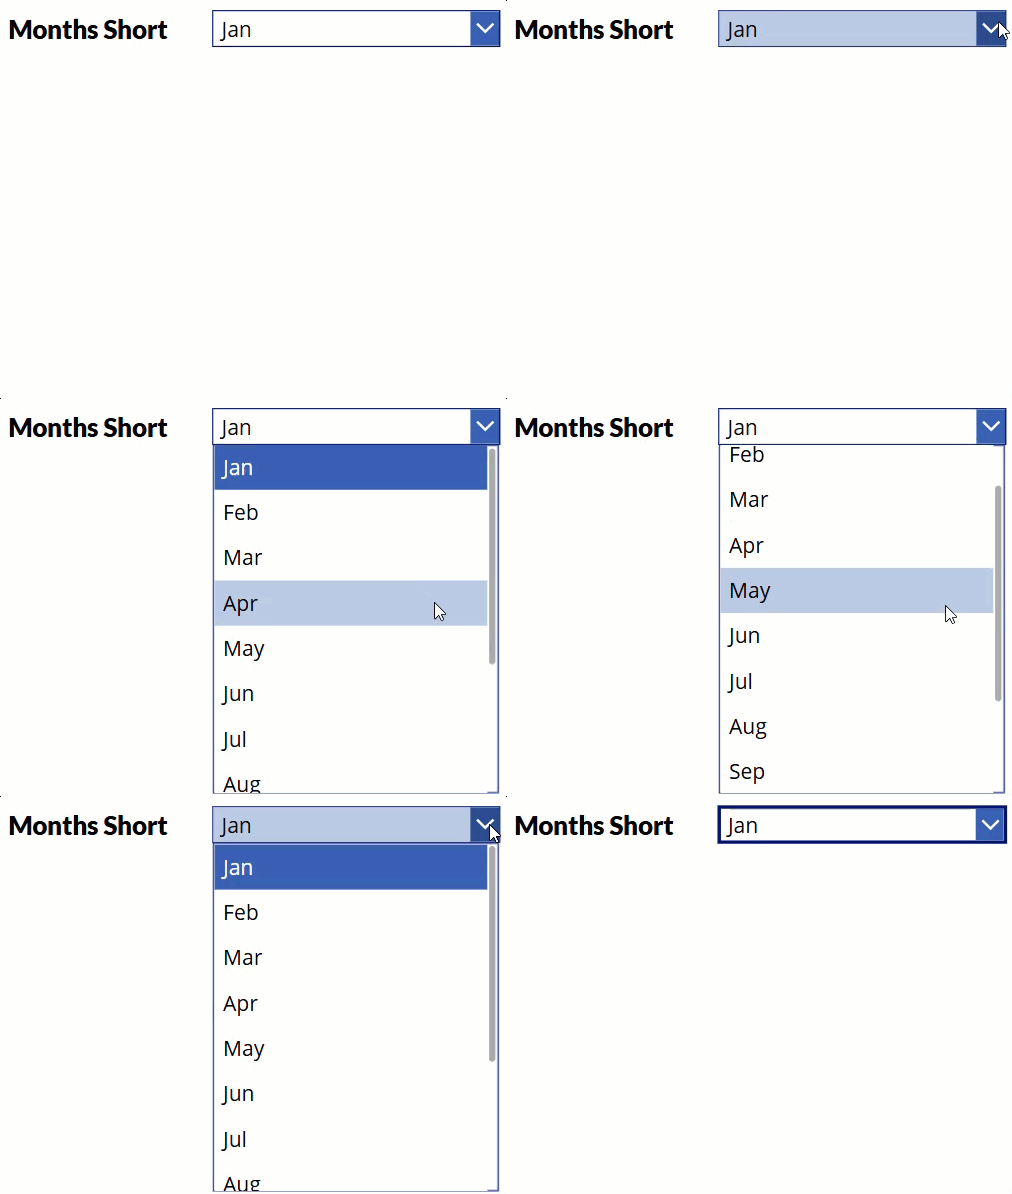 |
| Calendar.WeekdaysLong() | 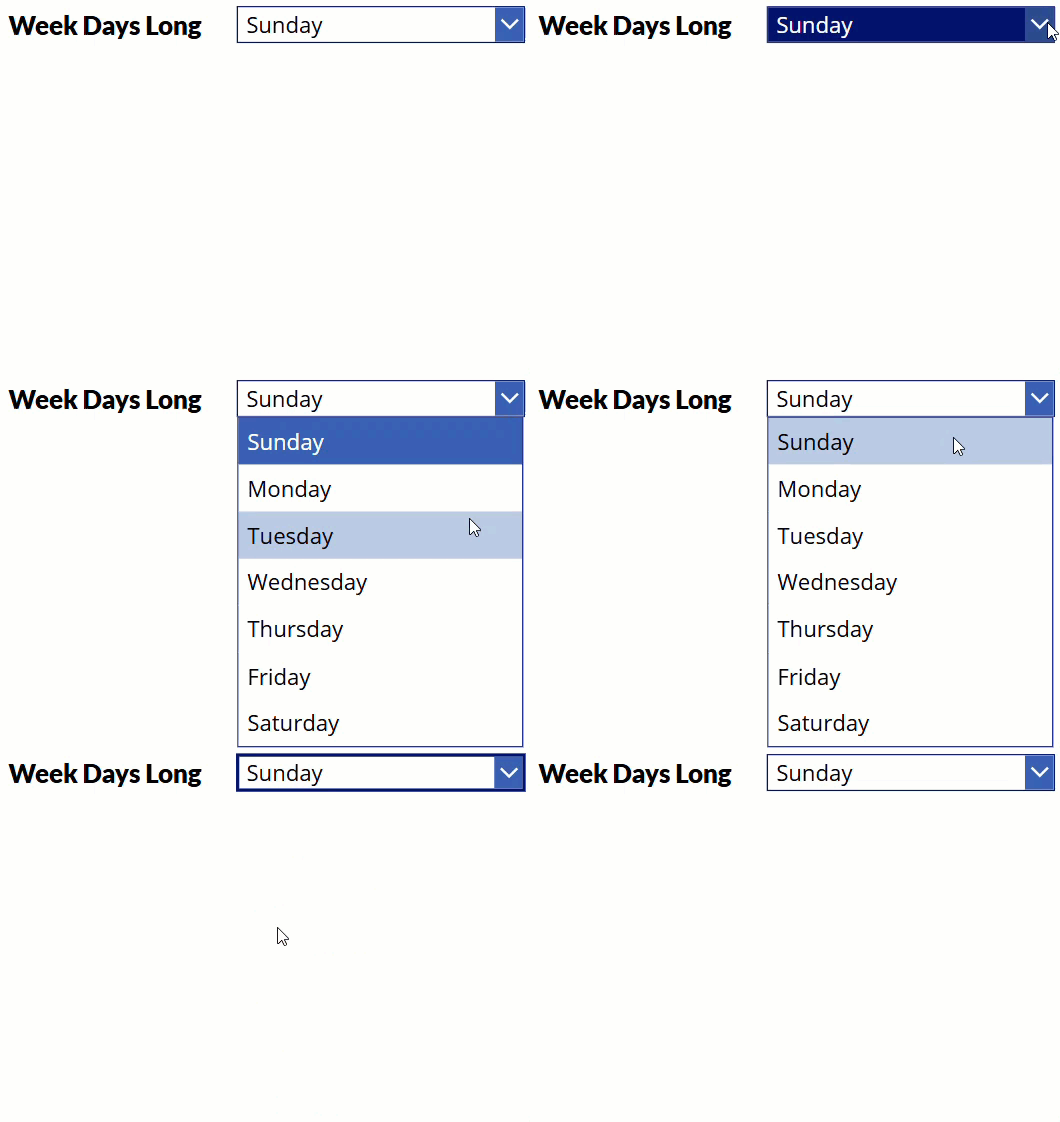 |
| Calendar.WeekdaysShort() | 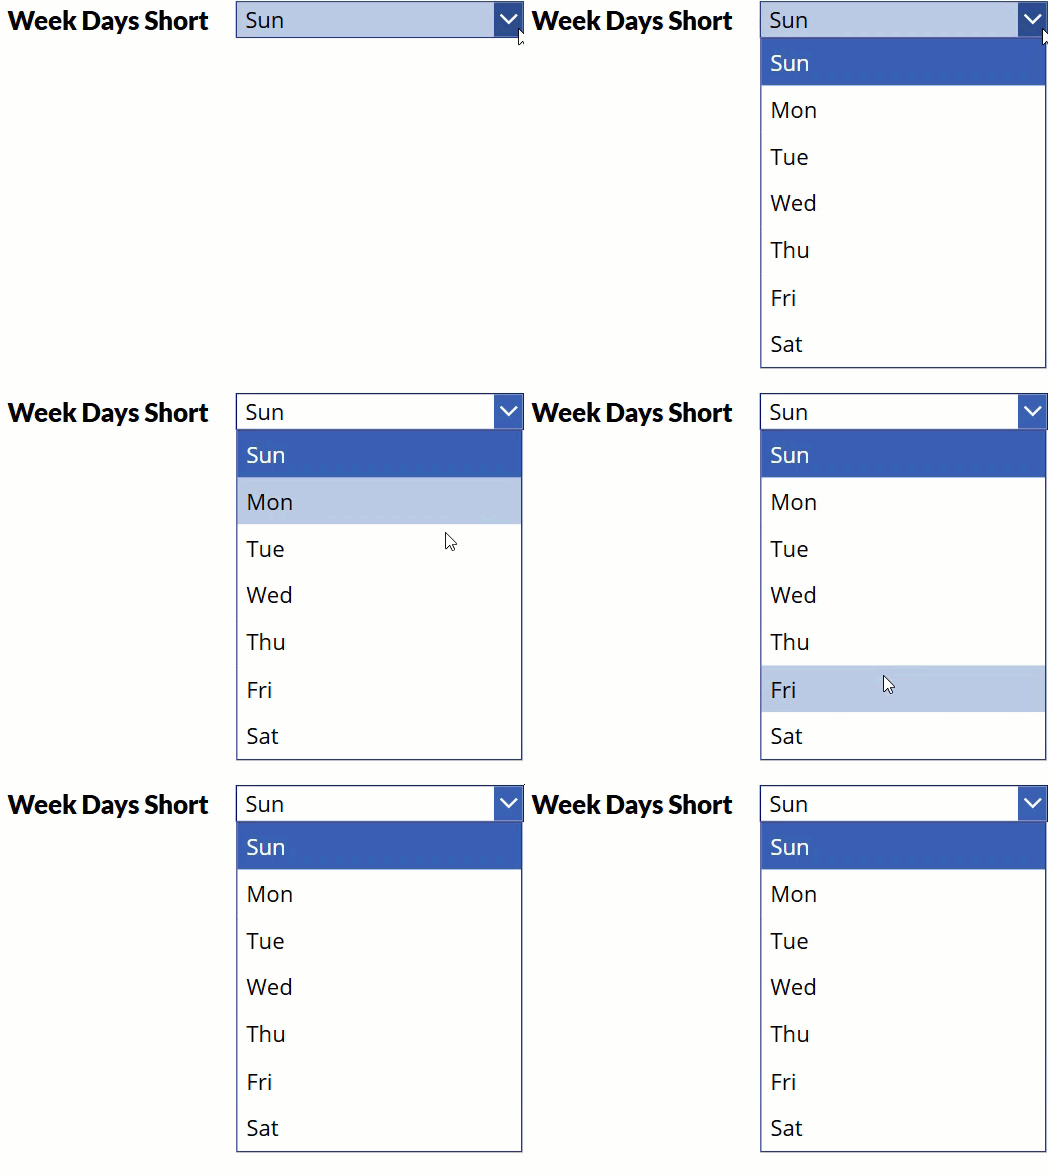 |
Power Apps Convert Gallery View to Calendar View
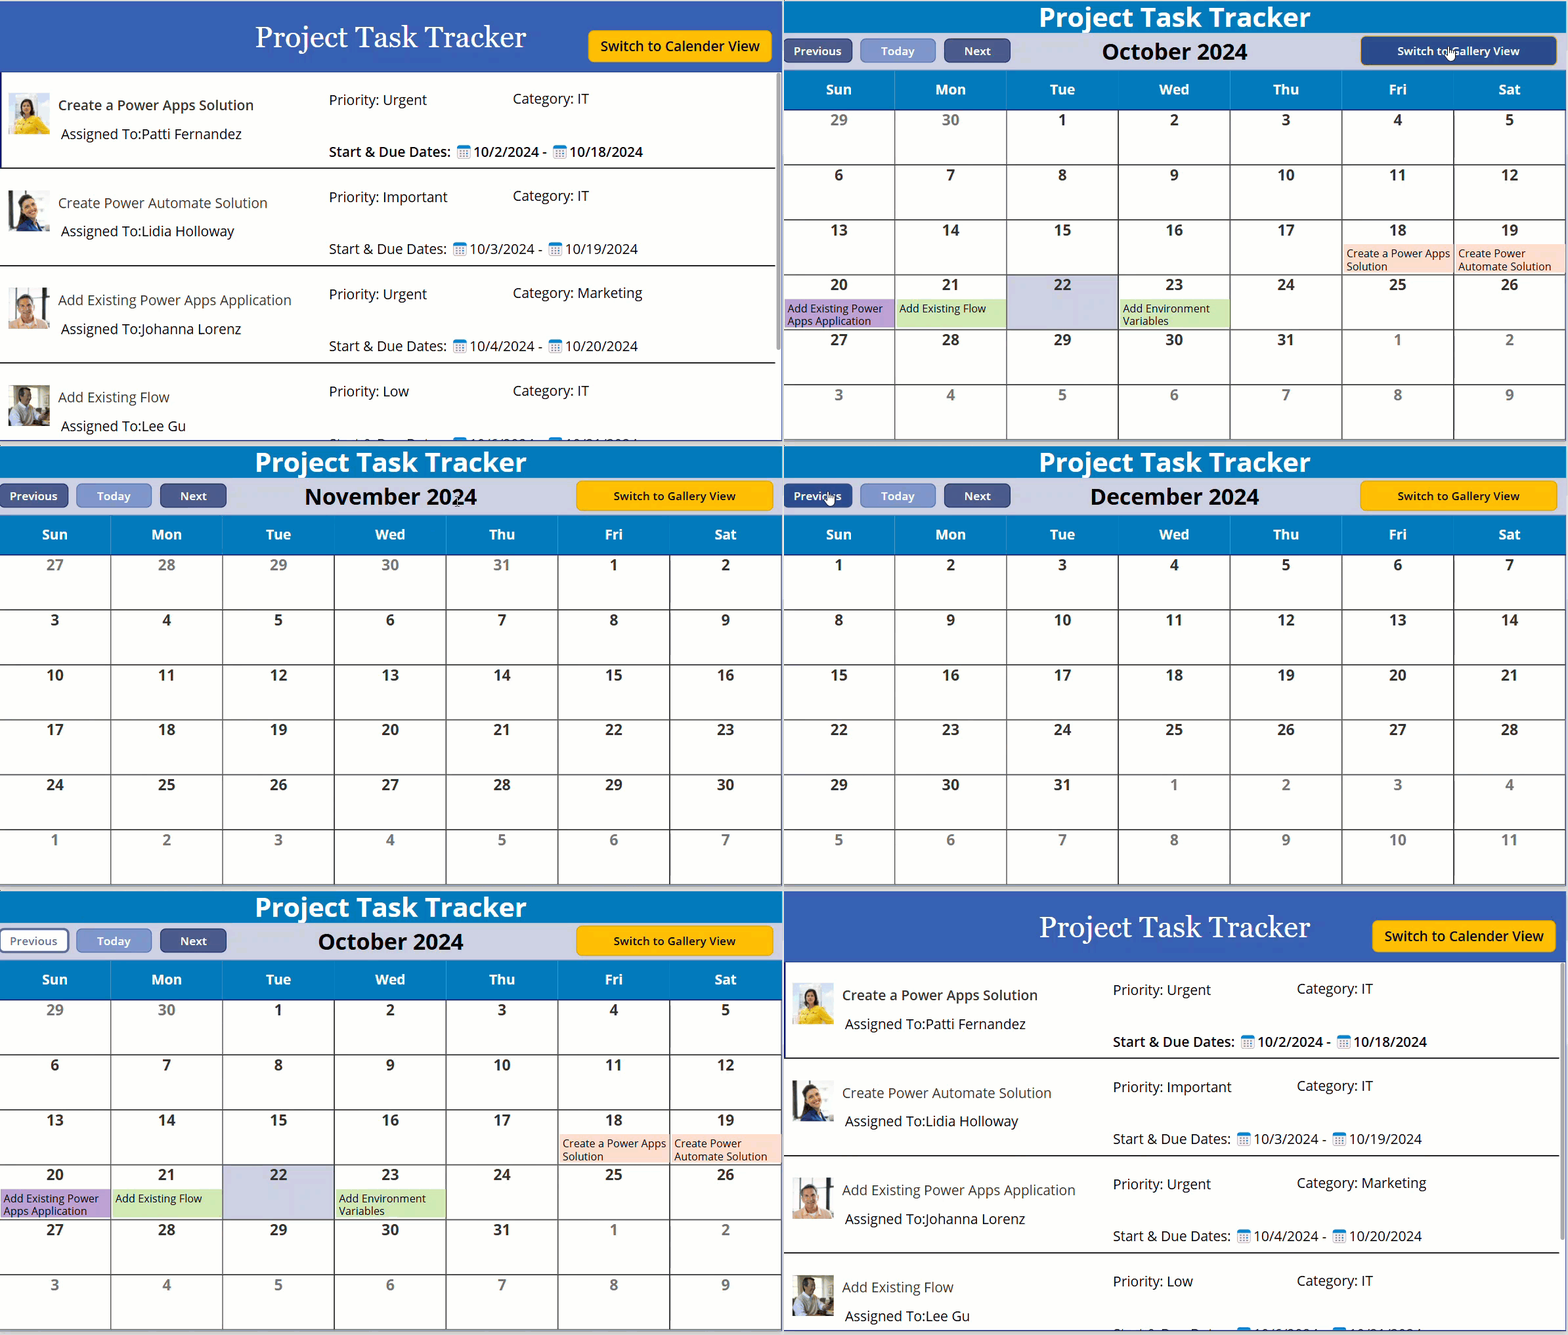
The example below shows that the Power Apps gallery control contains project task tracker details; after clicking the switch to calendar view button control, it navigates to calendar view screen; there, you can see,
- The task’s names are on the respective due dates within the calendar.
- To differentiate the tasks based on status, we’ve used the below colors,
- Red = Not Started
- Blue = In Progress
- Green = Completed
- We can see the dates for the next and previous months and the tasks presented on their respective due dates.
- Again, we can switch back to the gallery view.
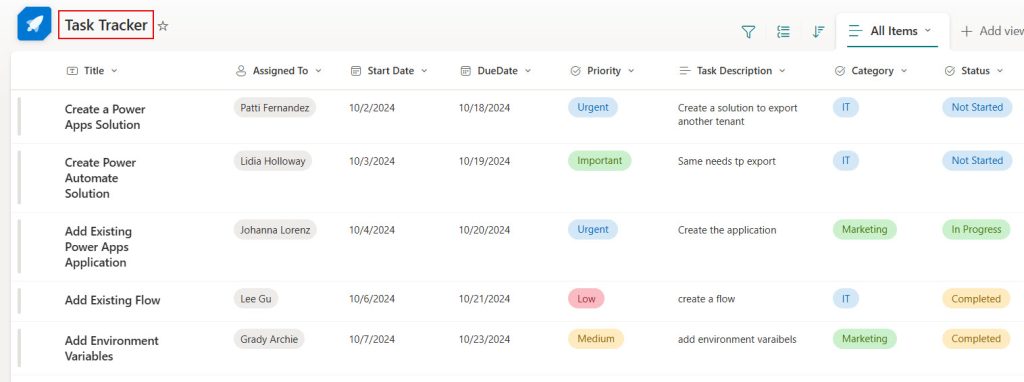
Here is the SharePoint list named Task Tracker, which contains the task details.
Follow the steps below to achieve this!
1. In Power Apps, add a Gallery control and connect it with the SharePoint list by providing its name in the gallery’s items property.
'Task Tracker'
2. Provide the formula below for the OnStart property of the App object.
Set(varCurrentDate,Date(Year(Today()),Month(Today()),1))This formula is fetching the first day of the current month. Here,
- varCurrentDate = Global variable contains the current month’s first date.
- Today() = Retrieves current date.
- Year(Today()) = Extracting the current year from the current date.
- Month(Today()) = Extracting the current month from the current date.
- Date(Year(Today()),Month(Today(),1) = Date function creates the dates present in the current year and current month. 1 represents the first date from all the dates.

3. Add a new screen within that, add a blank vertical gallery, and provide the formula below in its OnSelect property.
- Also, give the Wrap count property value as 7.
- Template Size = Parent.Height/8.
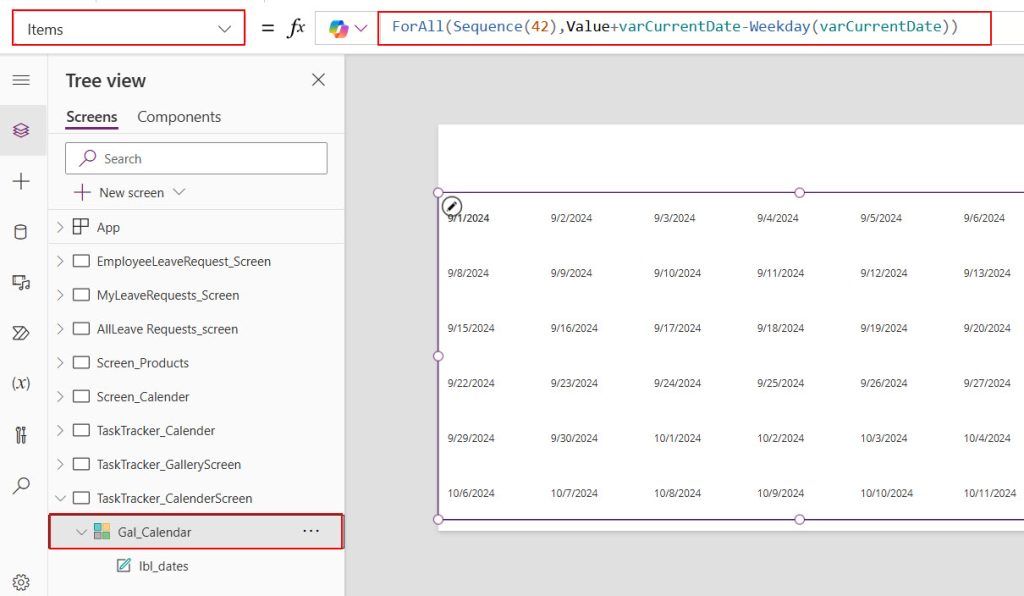
ForAll(Sequence(42),Value+varCurrentDate-Weekday(varCurrentDate))Here, the
- Sequence(42) = This function creates a series of numbers from 1 to 42. The reason for taking 42 is that in a calendar for each month, there are a fixed 6 rows and 7 columns. So, we required 6* 7=42 cells to represent the dates in a calendar.
- The ForAll function iterates and performs calculations over each value the sequence function generates.
- varCurrentDate is the global variable we created in the onstart property of the app object, which contains the first date of the current month.
- Weekday() = Gives the weekday number of provided date. The weekday numbers are (1 for Sunday,2 for Monday, 3 for Tuesday, etc, up to 7).
- Let’s look at the example below to understand Value +varCurrentDate-Weekday (varCurrentDate).
Note: varCurrentDate = 1st October 2024. So, Weekday = 3 (Tuesday ). Value = 1 to 42.| Value | Formula | Result Date |
| 1 | 1 + 1st Oct 2024 –3 = (1-3= -2) | 29th Sept 2024 [2 days before 1st Oct]. |
| 2 | 2 + 1st Oct 2024 –3 =(2-3= -1) | 30th Sep 2024 [1 day before 1st Oct]. |
| 3 | 3 + 1st Oct 2024 –3 = (3-3= 0) | 1st Oct |
| 4 | 4 + 1st Oct 2024 –3 = (4-3= 1) | 2nd Oct [1 day after 1st Oct]. |
| 5 | 5 + 1st Oct 2024 -3 = (5 -3 = 2) | 3rd Oct [2 days after 1st Oct]. |
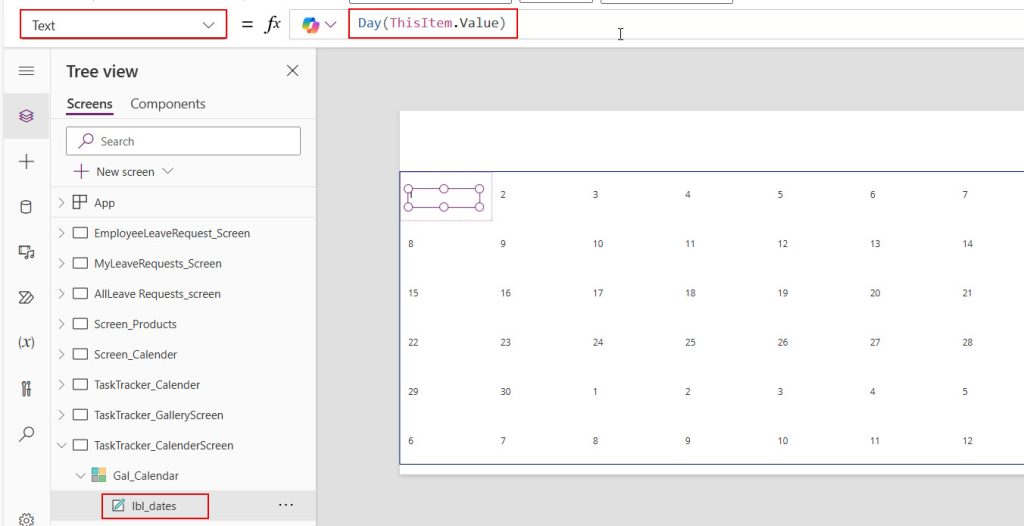
4. Add the formula below to the Text property of the label present in the gallery control.
Day(ThisItem.Value)The Day function gets the day from the date.
Also, fill in the below values for the given properties.
Height = Parent.TemplateHeight
Width = Parent.TemplateWidth
Align = Align.Center
VerticalAlign = VerticalAlign.Middle
Border = 1
Color = If(Month(ThisItem.Value) <> Month(varCurrentDate),RGBA(116, 116, 116, 1), RGBA(50,49,48,1))
Fill = If(ThisItem.Value=Today(),RGBA(204, 208, 225, 1),Color.White)
The formula in the Color property indicates that if the day were not in the current month, it would be a different color from the day in the current month.
Fill property indicates the provided RGBA color will be applied for the current day.
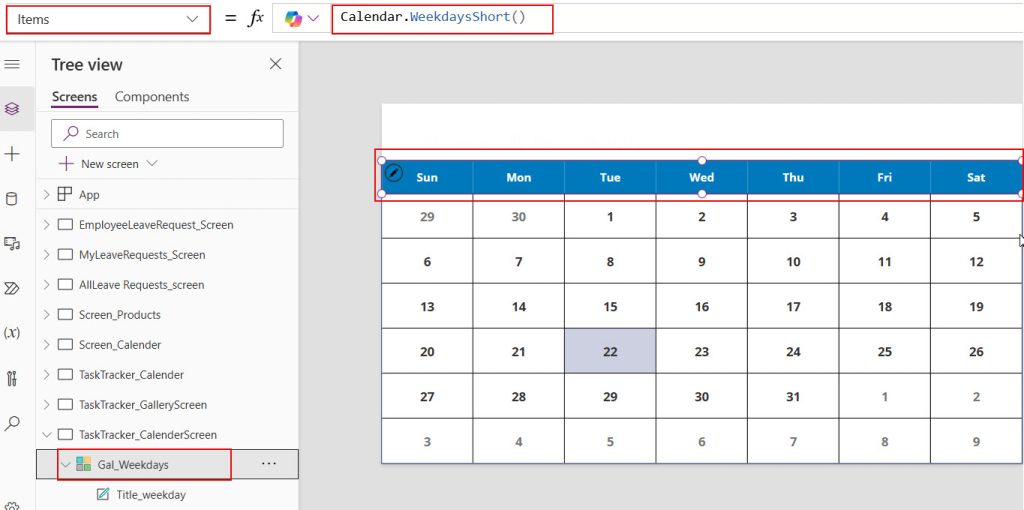
5. Add another gallery control on the same screen and provide the formula below in its items property.
Calendar.WeekdaysShort()Also, set its Wrap count to 7 and provide the formula below to the Text property of the label in the gallery.
ThisItem.ValueIt displays all the week’s names in short form within the gallery.
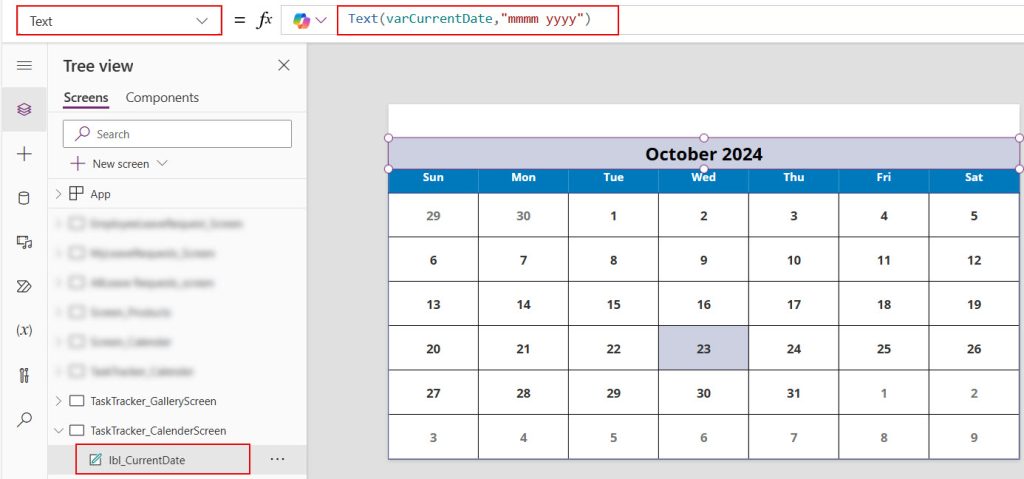
6. Now, to display the month name dynamically as a heading. Add a text label and provide the below formula in its Text property.
Text(varCurrentDate,"mmmm yyyy")It displays the date present in the varCurrentDate variable in the format of “mmmm yyyy”
7. To get the previous months’ and next month’s dates, add three button controls and provide the below code in each OnSelect property.
Previous button's OnSelect property : Set(varCurrentDate,Date(Year(varCurrentDate),Month(varCurrentDate)-1,1))

Today button's OnSelect property :
Set(varCurrentDate,Date(Year(Today()),Month(Today()),1))

Next buttons's OnSelect property:
Set(varCurrentDate,Date(Year(varCurrentDate),Month(varCurrentDate)+1,1))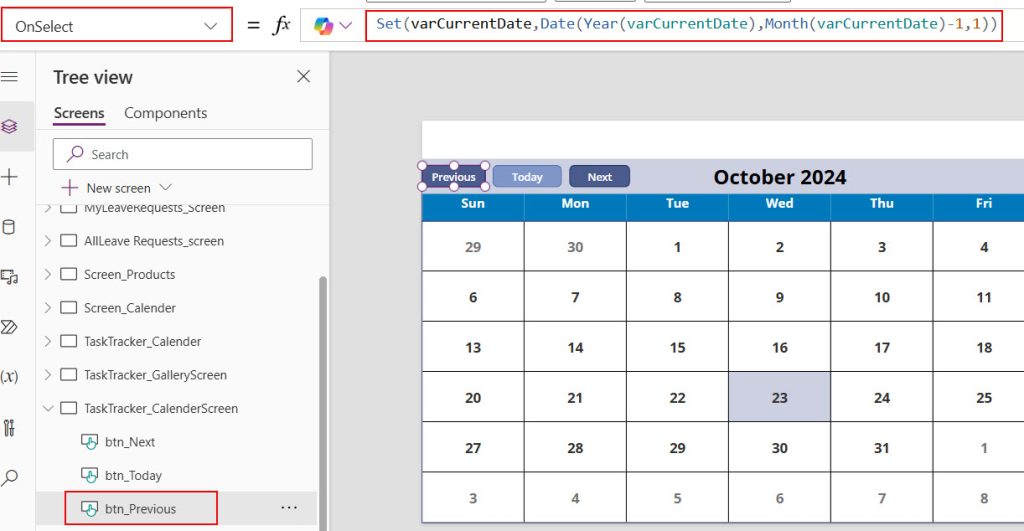
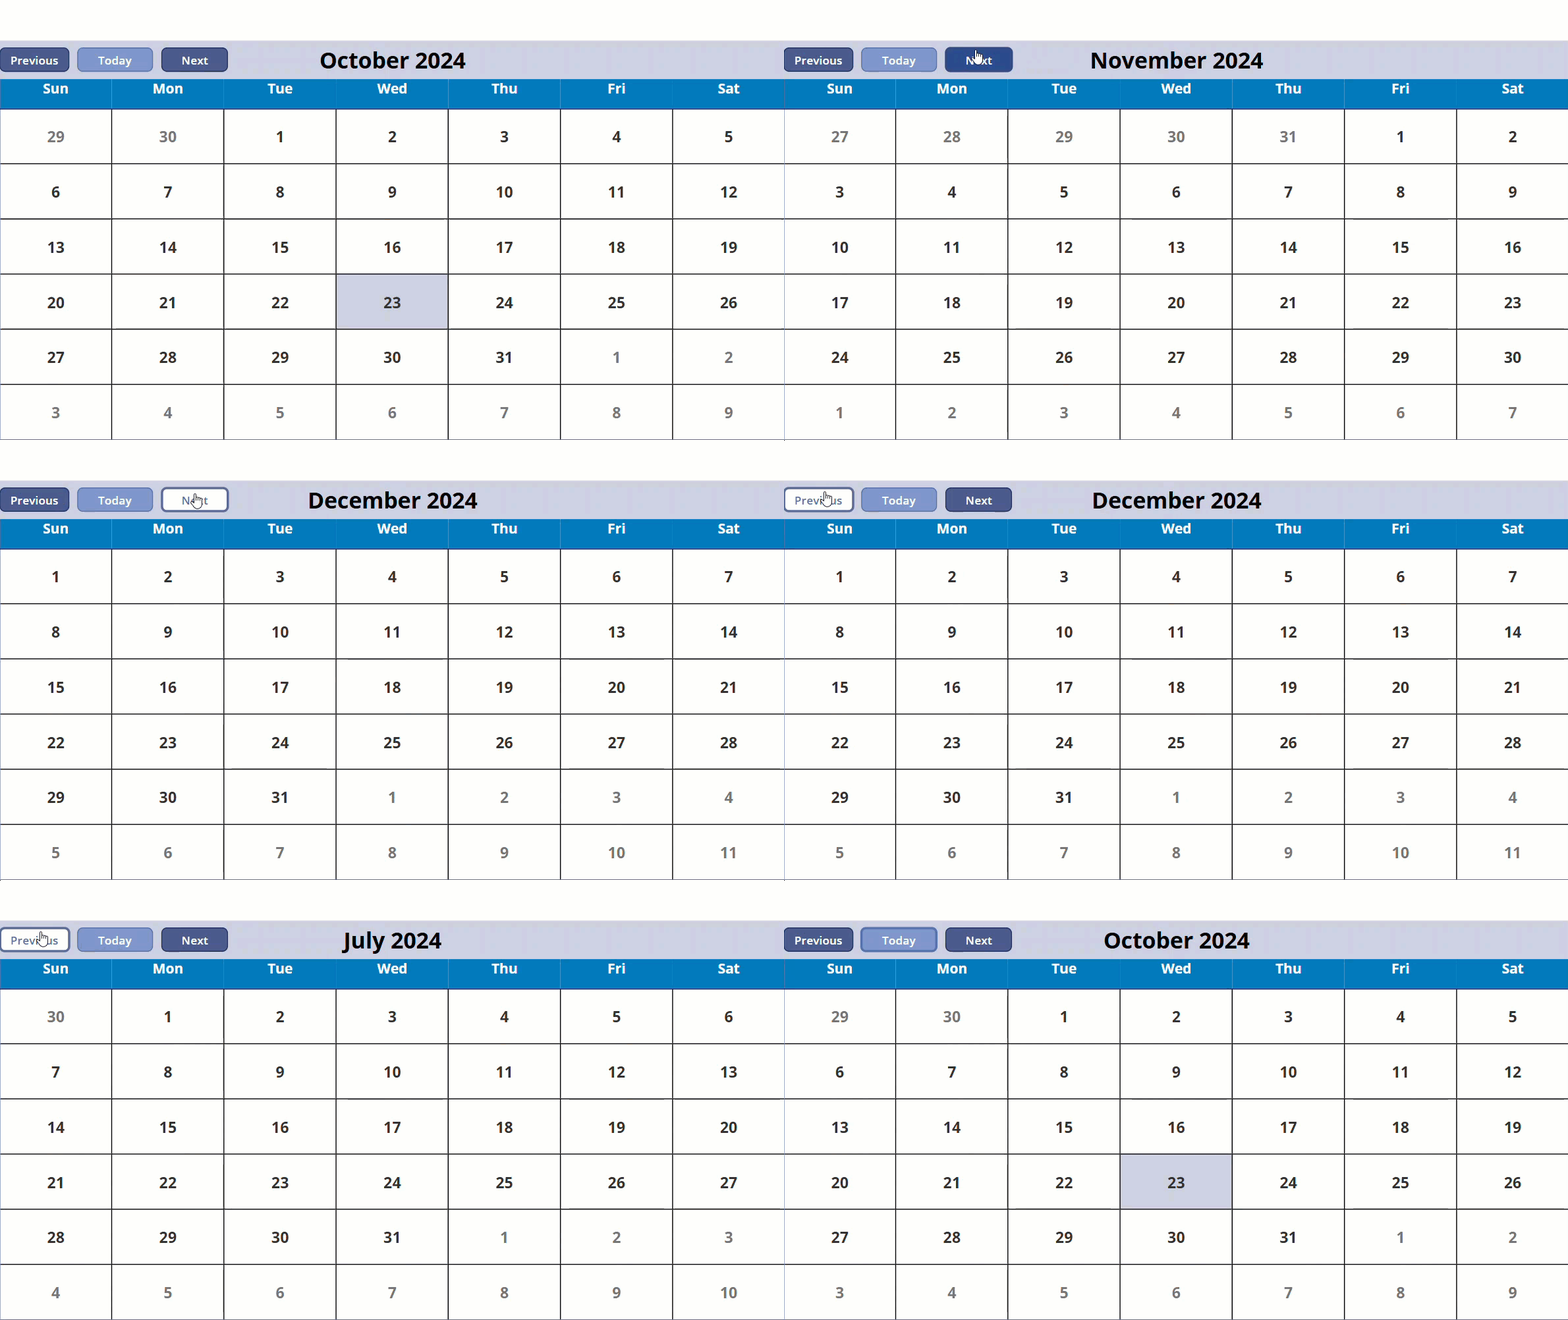
8. Preview the app once and click on the previous and next buttons. You can see the dates for each month are exactly present in the calendar.
9. To display the tasks on their due dates in the calendar, add a gallery control within the calendar gallery control as in the image below.
Provide the below code in its items property.
Filter('Task Tracker',DueDate=ThisItem.Value)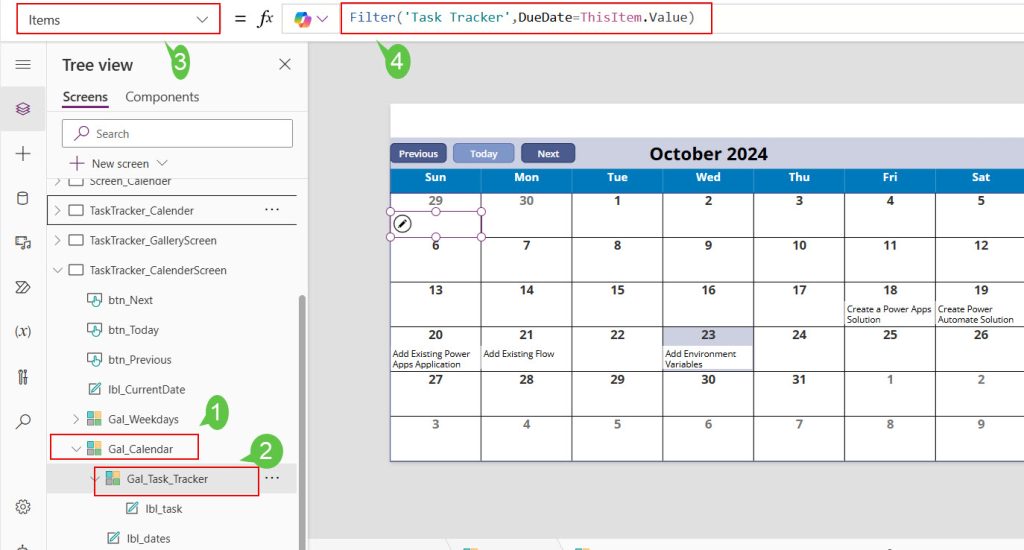
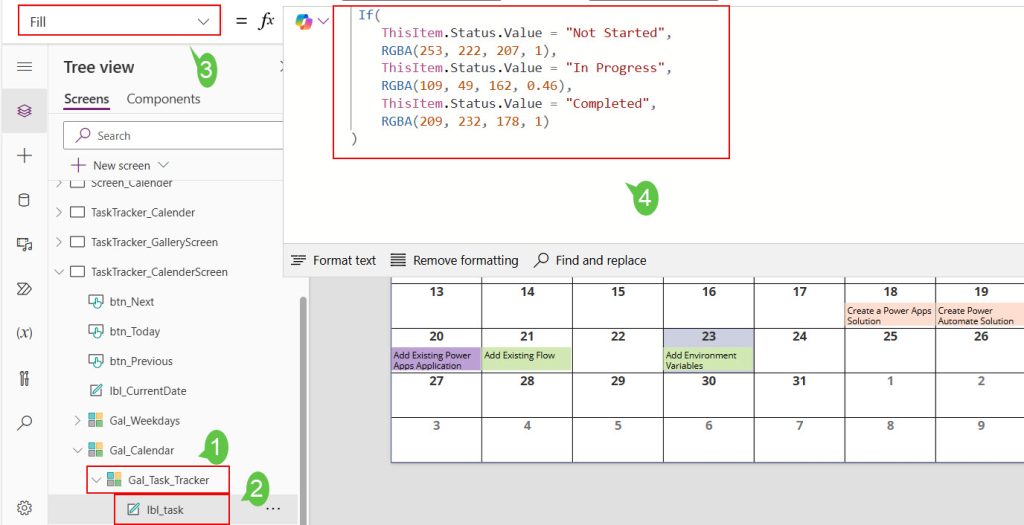
10. Now, add the following properties to the text label present within the gallery.
Text = ThisItem.Title

Fill = If(
    ThisItem.Status.Value = "Not Started",
    RGBA(253, 222, 207, 1),
    ThisItem.Status.Value = "In Progress",
    RGBA(109, 49, 162, 0.46),
    ThisItem.Status.Value = "Completed",
    RGBA(209, 232, 178, 1)
)
Based on the status value of each task, the color will be applied to the text label.
11. Add a button control to the current screen to navigate back to the gallery view screen. Provide the code below for its OnSelect property.
Navigate(TaskTracker_GalleryScreen);Here, TaskTracker_GalleryScreen is the screen name.

12. To navigate to the calendar view screen, add a button control in the gallery view screen and give the formula below to its OnSelect property.
Set(varCurrentDate,Date(Year(Today()),Month(Today()),1));Navigate(TaskTracker_Calender);Here, the varCurrentDate variable contains the current month’s 1st date. TaskTracker_Calender is the screen name.
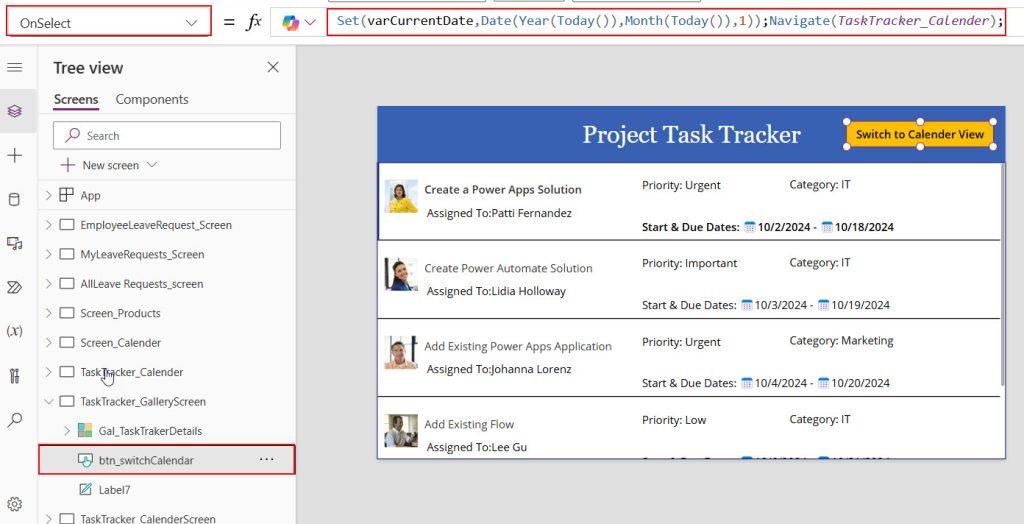
Save the changes and preview the app. This way, we can create a Power Apps calendar view from the gallery view.
I hope you understand how to convert the Power Apps gallery view to a calendar view. In this article, I also explained the Power Apps calendar function with examples and how to create calendar view examples.
You follow this approach to track tasks based on their due dates. You can also use this approach for other scenarios where you must notify employees based on due dates.
Also, you may like:
- Power Apps Split Function
- Power Apps Print Function
- Power Apps date functions
- Power Apps timer control
- Date format in Power Apps data table
- Power Apps Modern Form Control
- Power Apps get dates from current week
I am Bijay a Microsoft MVP (10 times – My MVP Profile) in SharePoint and have more than 17 years of expertise in SharePoint Online Office 365, SharePoint subscription edition, and SharePoint 2019/2016/2013. Currently working in my own venture TSInfo Technologies a SharePoint development, consulting, and training company. I also run the popular SharePoint website EnjoySharePoint.com