I developed a Power Apps application for Employee Travel Request Management a few days back. As a part of this, I needed to create repeating tables in Power Apps to submit flight and family details information during the request submission process.
After submitting the data, I had to fetch and display these flight and family details in a repeating table format, making it easier for employees to view and understand their entries.
In this article, I will explain how to show repeating table data from SharePoint list in Power Apps with a simple example.
Additionally, I will show you how to update the Items in PowerApps Repeating Table [Individual Items] to the SharePoint list.
Show Repeating Table Data From SharePoint List in Power Apps
Look at the example below. I have a gallery in Power Apps that contains employee travel requests. When I click on any item, it navigates to another screen, and the selected items’ full details are displayed in a Power Apps form control and repeating tables.
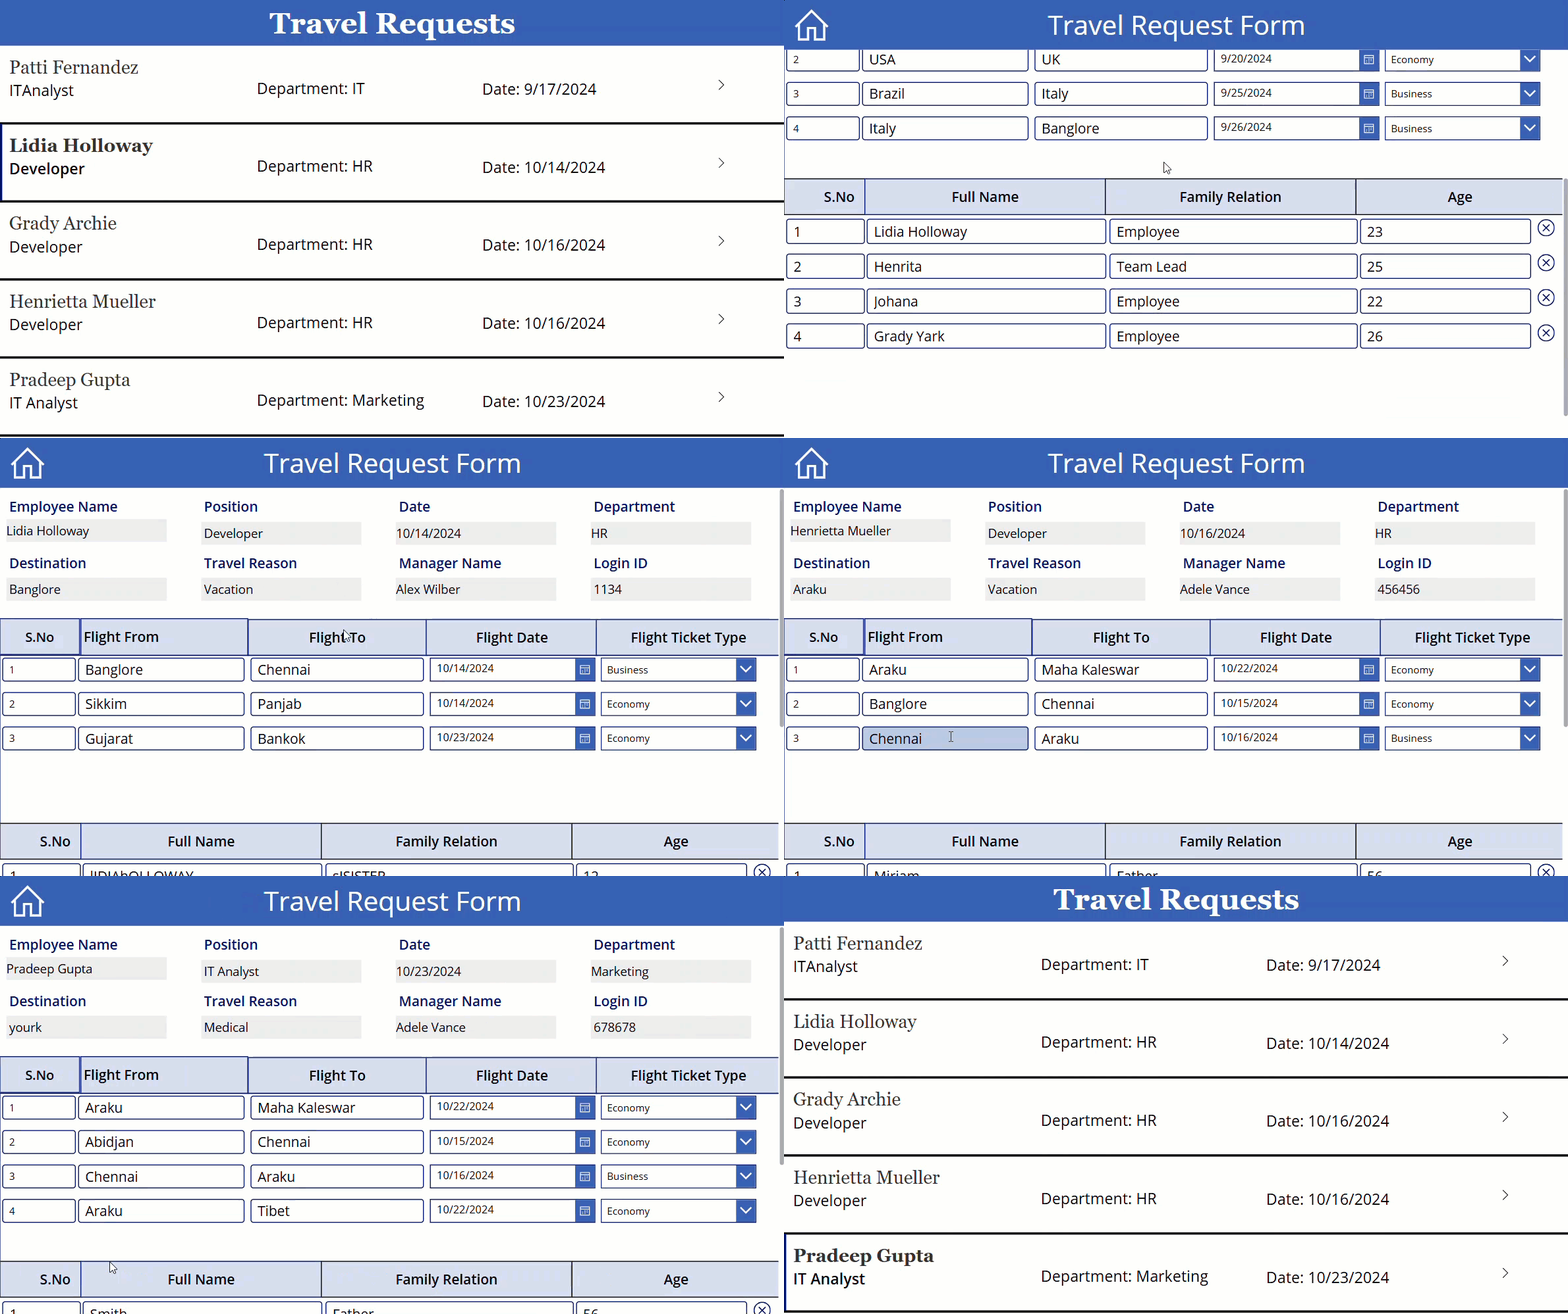
I have three SharePoint lists that store employee travel requests separately. The main SharePoint list, Employee Travel Request Details, is below.
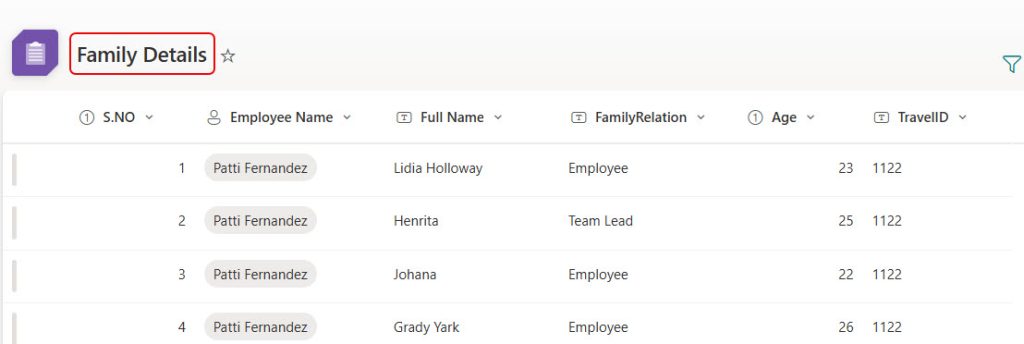
Note: Travel ID and Employee Name are the common fields in all three lists.
Here is the SharePoint list that stores flight details for employee travel requests.

This is the SharePoint list that stores family details of employee travel requests.
Follow the steps below to achieve this!
1. Connect the Power Apps application with the above three SharePoint lists. Then, add a Power Apps gallery control on a new screen and provide the list name below in its Items property.
'Employee Travel Request Details'
2. Provide the formula below for the gallery control‘s OnSelect property. Before that, add a new scrollable screen and name it like in the first parameter of the navigate function.
Navigate(TravelRequest_Screen_View,ScreenTransition.CoverRight)When we click on any item in gallery control, it will navigate to another screen with the help of the above formula.
- TravelRequest_Screen_View = Screen name.
- ScreenTransition.CoverRight = Screen transition property.
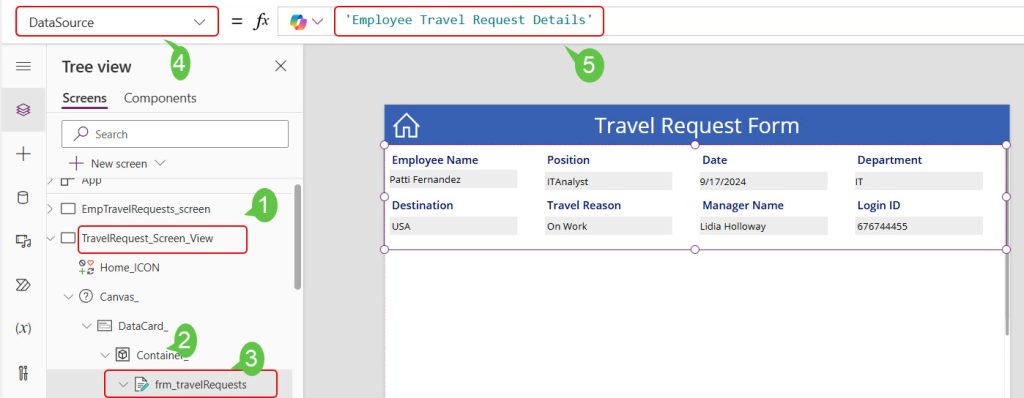
Note: On the scrollable screen, you'll see a Canvas object, and DataCard will be present, so we need to add the form and gallery controls to the data card. Unfortunately, we can't add a form control directly, so first add a Power Apps Container, and within that, we can add the remaining controls. 3. Add a Power Apps form control to the “TravelRequest_Screen_View” screen. Then, add the below formulas to the provided properties.
DataSource = 'Employee Travel Request Details'
Item  = Gal_TravelRequests.Selected
DefaultMode = FormMode.View
Layout = Vertical
Columns =4
After providing all the above formulas to the respective properties, you can preview it once; whatever we select in the gallery will display the details in the form.
4. To display the gallery-selected flight details on the Power Apps repeating table, add a gallery control and the formula below to its Items property.
Items = Filter('Flight Details',TravelID=Gal_TravelRequests.Selected.TravelID)This formula filters the flight details of the selected item in the gallery.
Also, add the controls below within the Power Apps gallery. [You can also use Text labels instead of these controls].
- Three Text input controls = For S.No, Flight From, Flight To.
- DatePicker = For Flight Date.
- Dropdown = For Flight Ticket Type.
Provide the formulas below in the Default property of each control within the gallery to display data.
S.No = ThisItem.'S.NO'
Flight From =ThisItem.'Flight From'
Flight To = ThisItem.'Flight To'
Flight Date = ThisItem.'Flight Date' [Provide formula to DefaultDate property of date picker]
Flight Ticket Type = ThisItem.'Flight Ticket Type'.Value
[Provide the Choices([@'Flight Details'].'Flight Ticket Type') to the dropdown Items property]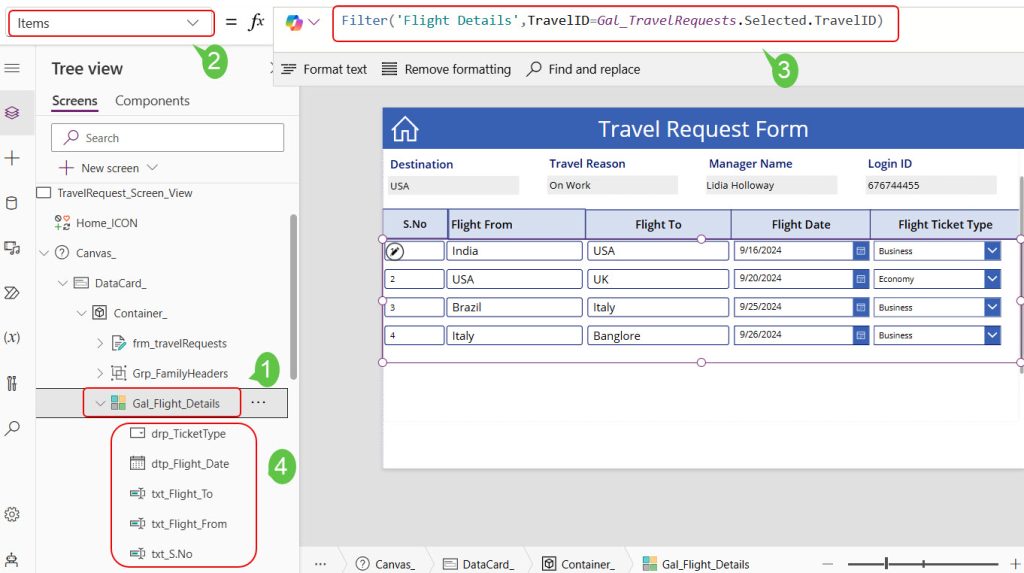
5. To fetch family details of the gallery-selected item, add another gallery control and provide the below formula in its Items property.
Filter('Family Details',TravelID=Gal_TravelRequests.Selected.TravelID)The above formula filters the family details of the gallery-selected item.
Also, add four text input controls within the gallery control and provide the formulas below for its Default property.
S.NO  = ThisItem.'S.NO'
Full Name = ThisItem.'Full Name'
Family Relation = ThisItem.FamilyRelation
Age = ThisItem.Age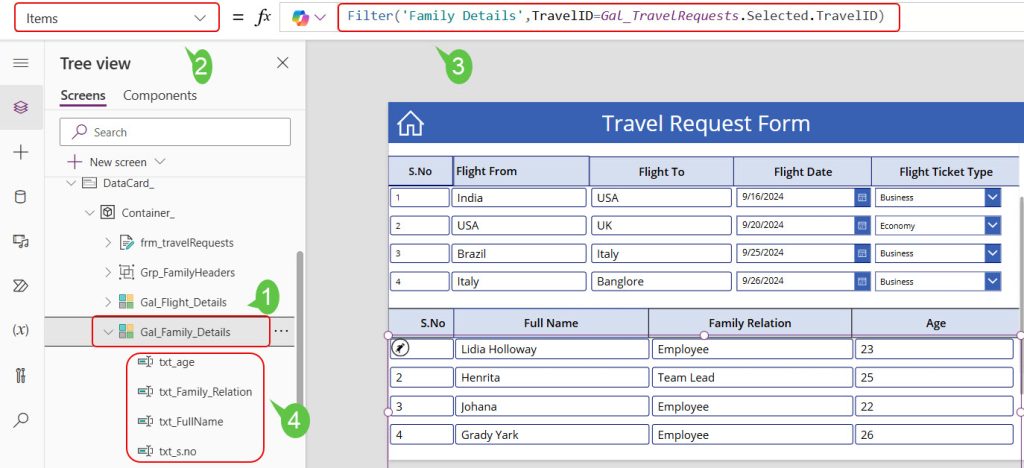
Now, save the changes and preview the app once. The details of the gallery-selected item will appear in the Power Apps form and repeating table controls.
Update PowerApps Repeating Table Data [Individual Items] to SharePoint List
Let’s see how to update the Power Apps repeating table items into a SharePoint list. In the example below, you can see that I can update the items in the repeating table.
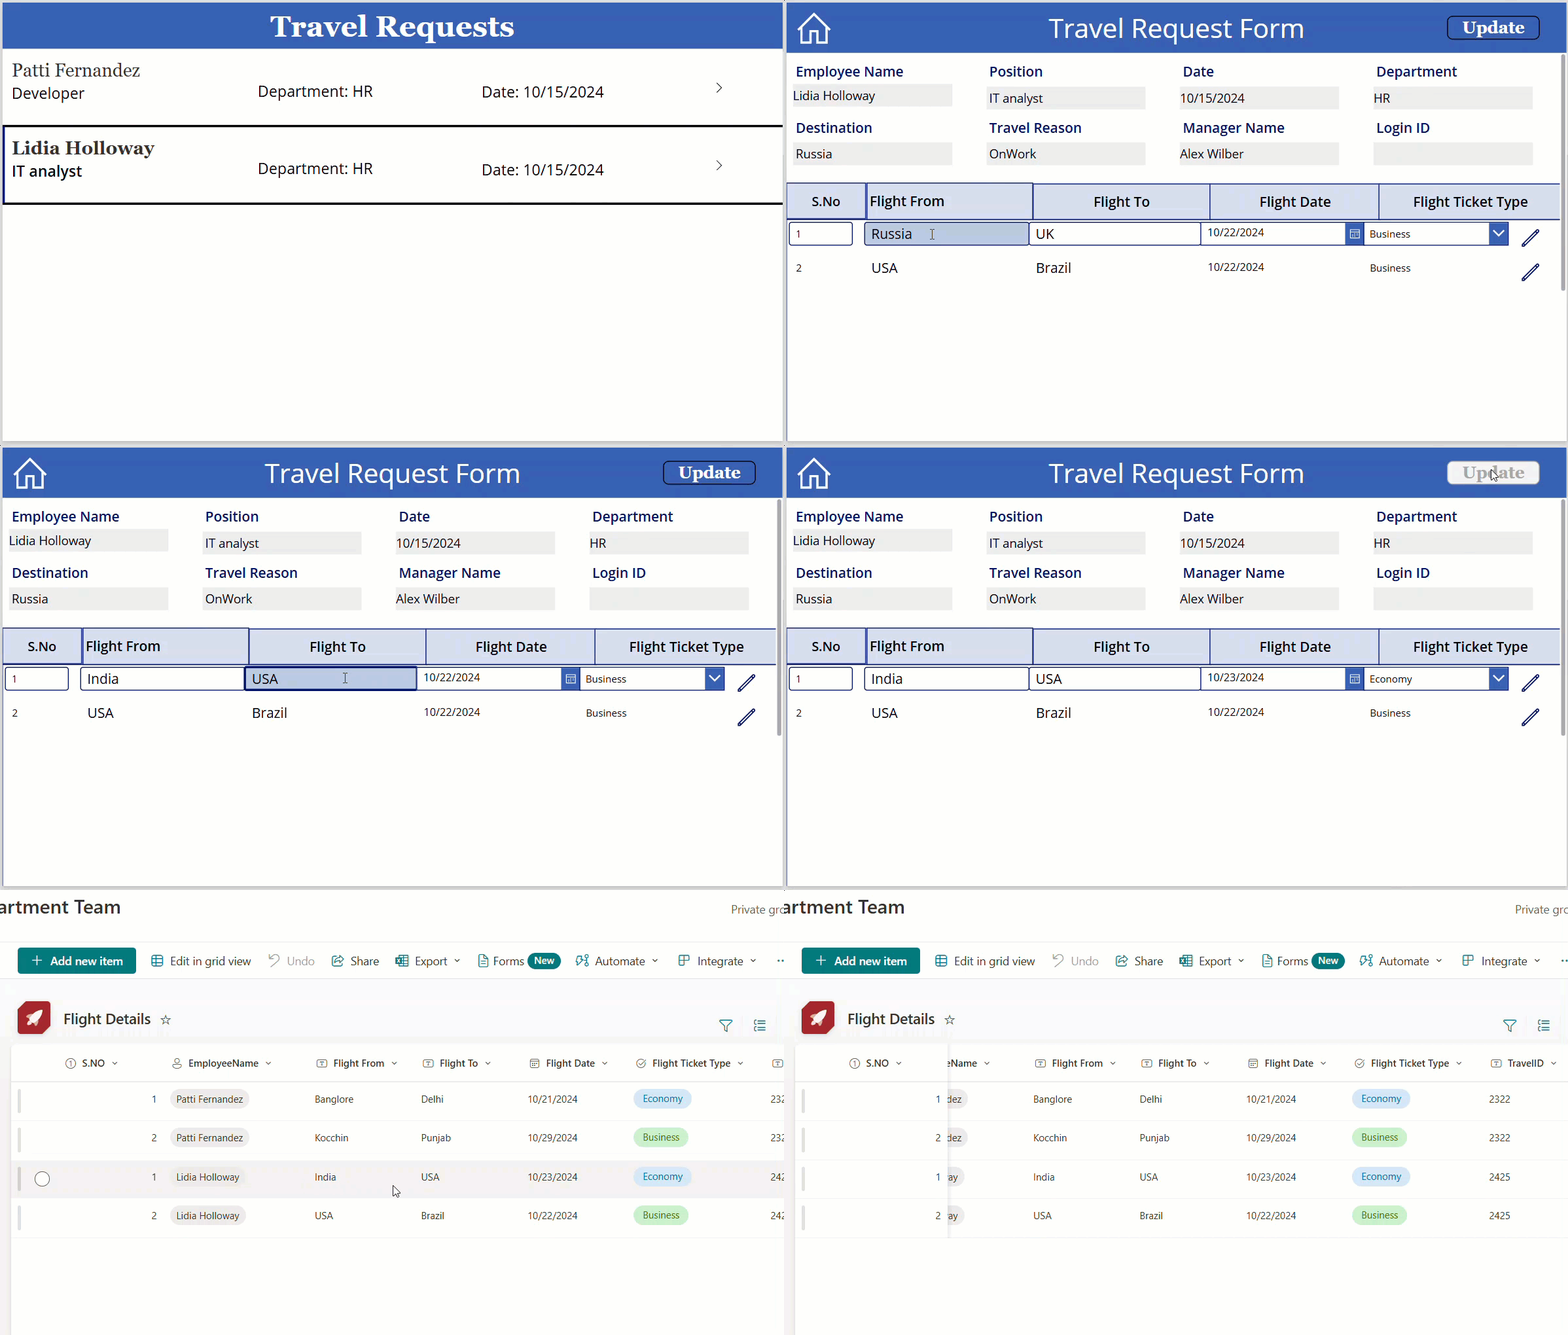
Follow the steps below to achieve this!
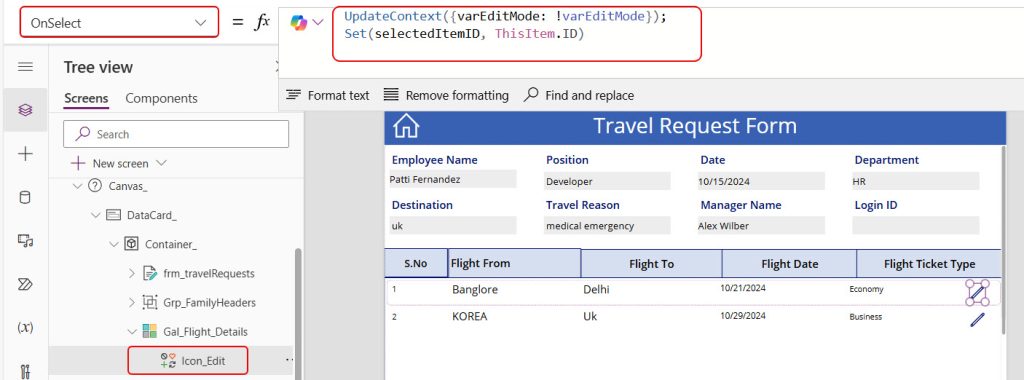
1. In the “TravelRequest_Screen_View” screen on the flight details repeating table [ gallery], add an Edit icon and provide the formula below in its OnSelect property.
UpdateContext({varEditMode: !varEditMode});
Set(selectedItemID, ThisItem.ID)
The UpdateContext and Set functions are used to create variables.
- varEditMode = toggled variable.
- selectedItemID = Contains current item id.
2. Provide the formulas below for each control DisplayMode property in the gallery control.
If(selectedItemID = ThisItem.ID && varEditMode, DisplayMode.Edit, DisplayMode.View)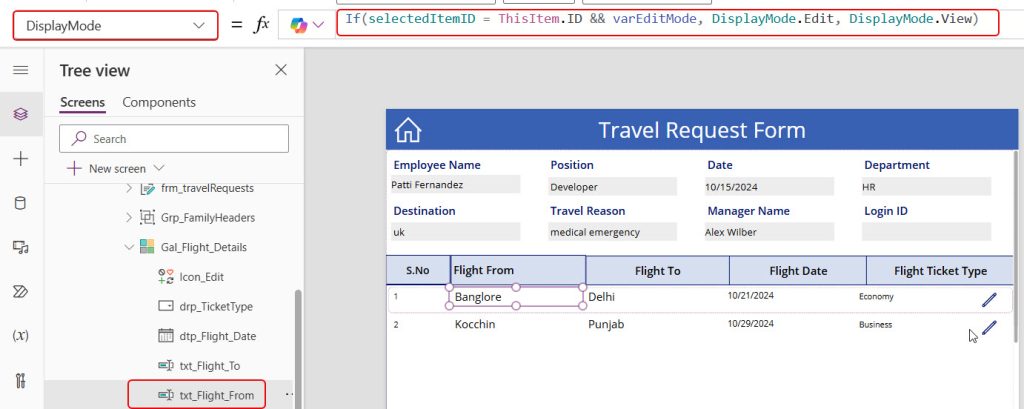
4. Now, add a button control, name it “Update,” and provide the formula below in its OnSelect property.
Patch(
    'Flight Details',
    LookUp(
        'Flight Details',ID= selectedItemID
    ),
    {
        'Flight From': txt_Flight_From.Text,
        'Flight To': txt_Flight_To.Text,
        'Flight Date': dtp_Flight_Date.SelectedDate,
        'Flight Ticket Type': {Value: drp_TicketType.Selected.Value}
    }
)
5. Save the changes and preview the app once. Then, try to edit an item and update it once. Then, in the SharePoint list, check it once, and it will update.

I hope you understand retrieving & updating SharePoint list details on the Power Apps repeating tables. This approach can be used when you have multiple SharePoint lists connected with a common field and want to display those fields’ data in Power Apps.
Also, you may like:
- How to create Power Apps repeating table with a new form
- Power Apps Print Function
- send approval emails using the Power Apps button
- Reset checkboxes in Power Apps gallery control
- Power Apps create table
I am Bijay a Microsoft MVP (10 times – My MVP Profile) in SharePoint and have more than 17 years of expertise in SharePoint Online Office 365, SharePoint subscription edition, and SharePoint 2019/2016/2013. Currently working in my own venture TSInfo Technologies a SharePoint development, consulting, and training company. I also run the popular SharePoint website EnjoySharePoint.com