Recently, I developed one Power Apps application that needed a SharePoint list data source. Before running the application, the client must create the specific SharePoint list on their site.
So, I wrote a Power Shell script to create the SharePoint list along columns to avoid mistakes when creating it manually. This script will first check whether the SharePoint list is already present.
- If yes, then it will be deleted permanently and recreated again.
- If no, then it will create the SharePoint list along with columns and rename the title column.
In this article, I will explain how to create SharePoint list & add columns using PnP PowerShell.
Create SharePoint List and Add Columns Using PnP PowerShell
Here, we will see how to create a SharePoint list and add different types of columns to it using PnP PowerShell. If that list already exists, we must permanently delete and recreate it.
Note:
You must have the Site Collection Administrator permission to delete items from the second-stage recycle bin.
Look at the SharePoint list and its columns in the image below, which was created using the PnP PowerShell script.

This SharePoint list has the following columns.
| Column Name | Data Type |
|---|---|
| User ID | Title(Single line of text) |
| Password | Single line of text |
| First Name | Single line of text |
| Last Name | Single line of text |
| Phone Number | Single line of text |
| Single line of text | |
| Department | Choice(IT,HR,Marketing,Sales,Finance) |
| Company Name | Single line of text |
| Job Title | Single line of text |
| Set as Admin | Yes/No |
| Address | Multiline of text |
# Variables
$SiteURL = "Enter Site URL"
$UserID = "Enter your username"
$Password = "Enter your Password"
$ListName = "TSinfoUserRegistrations" #Enter your list name

# Convert the password to a secure string
$securePassword = ConvertTo-SecureString -String $Password -AsPlainText -Force
$creds = New-Object -TypeName System.Management.Automation.PSCredential -ArgumentList $UserID, $securePassword

# Column Names for the SharePoint list
$list1Columns = @(
    @{DisplayName='Password'; InternalName='Password'; Type="Text"; Required=$false},
    @{DisplayName='First Name'; InternalName='FirstName'; Type="Text"; Required=$true},
    @{DisplayName='Last Name'; InternalName='LastName'; Type="Text"; Required=$true},
    @{DisplayName='Phone Number'; InternalName='PhoneNumber'; Type="Text"; Required=$false},
    @{DisplayName='Email'; InternalName='Email'; Type="Text"; Required=$true},
    @{DisplayName='Department'; InternalName='Department'; Type="Choice"; Choices=@("Information Technology", "Human Resources", "Marketing","Sales","Research","Finance"); Required=$false},
    @{DisplayName='Company Name'; InternalName='CompanyName'; Type="Text"; Required=$false},
    @{DisplayName='Job Title'; InternalName='JobTitle'; Type="Text"; Required=$false},
    @{DisplayName='Address'; InternalName='Address'; Type="Note"; Required=$false},
    @{DisplayName='Set as Admin'; InternalName='SetasAdmin'; Type="Boolean"; Required=$false}
)

# Rename the Title column using function
function Rename-TitleColumn {
    param (
        [string]$listName,
        [string]$NewTitleName
    )

    Set-PnPField -List $listName -Identity "Title" -Values @{Title=$NewTitleName}
}

function Create-List {
    param (
        [string]$listName,
        [array]$columns,
        [string]$NewTitleName
    )

    # Create the list
    New-PnPList -Title $listName -Template GenericList -OnQuickLaunch
    Write-Host "List '$listName' created successfully!" -ForegroundColor Green

    # Rename the Title column
    Rename-TitleColumn -listName $listName -NewTitleName $NewTitleName

    # Add columns to the list
    foreach ($column in $columns) {
        if ($column.Type -eq "Choice") {
            $choiceValues = [string[]]$column.Choices
            Add-PnPField -List $listName -DisplayName $column.DisplayName -InternalName $column.InternalName -Type $column.Type -AddToDefaultView
            Set-PnPField -List $listName -Identity $column.InternalName -Values @{Choices=$choiceValues}
        } else {
            Add-PnPField -List $listName -DisplayName $column.DisplayName -InternalName $column.InternalName -Type $column.Type -AddToDefaultView
        }
    }
    Write-Host "Columns added successfully to list '$listName'!" -ForegroundColor Green
}

# Function to delete a list if it exists
function Delete-ListIfExists {
    param (
        [string]$listName
    )

    $list = Get-PnPList -Identity $listName -ErrorAction SilentlyContinue
    if ($list) {
        Write-Host "Deleting existing list '$listName'..." -ForegroundColor Yellow
        Remove-PnPList -Identity $listName -Force -Recycle

        try {
            $recycleBinItems = Get-PnPRecycleBinItem -RowLimit 100 | Where-Object { $_.Title -eq $listName }
            foreach ($item in $recycleBinItems) {
                Clear-PnPRecycleBinItem -Identity $item -Force
            }
            Write-Host "List '$listName' deleted permanently!" -ForegroundColor Green
        } catch {
            Write-Host "Failed to delete items from the recycle bin. Make sure you have the necessary permissions." -ForegroundColor Red
        }
    }
}
# Function to ensure list exists or create it
function Ensure-List {
    param (
        [string]$listName,
        [array]$columns,
        [string]$NewTitleName
    )

    # Checking if list exists or not
    $list = Get-PnPList -Identity $listName -ErrorAction SilentlyContinue
    if ($list) {
        # List exists, delete it permanently
        Delete-ListIfExists -listName $listName
    }

    # Create the list
    Create-List -listName $listName -columns $columns -NewTitleName $NewTitleName
}

# Connect to SharePoint site
Connect-PnPOnline -Url $SiteURL -Credentials $creds

# Process the list
Ensure-List -listName $ListName -columns $list1Columns -NewTitleName "User ID"
Here, I took some variables to store the details of the site URL, list name, and user credentials. Then, I created four Functions for
- Creating lists and columns,
- Renaming the title column,
- Deleting the SharePoint list,
- Ensuring that the list exists or not.
Finally, after the connection, I called the Ensure-List function by passing parameter values. This function calls all other functions according to the condition.
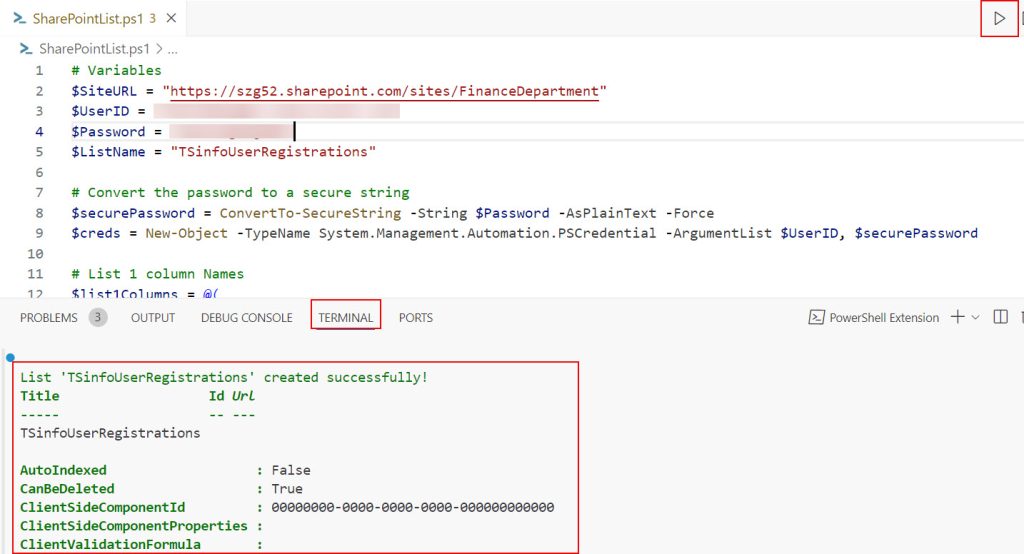
Now, click on the Run button. After creating the list, you can see the success message in the TERMINAL.

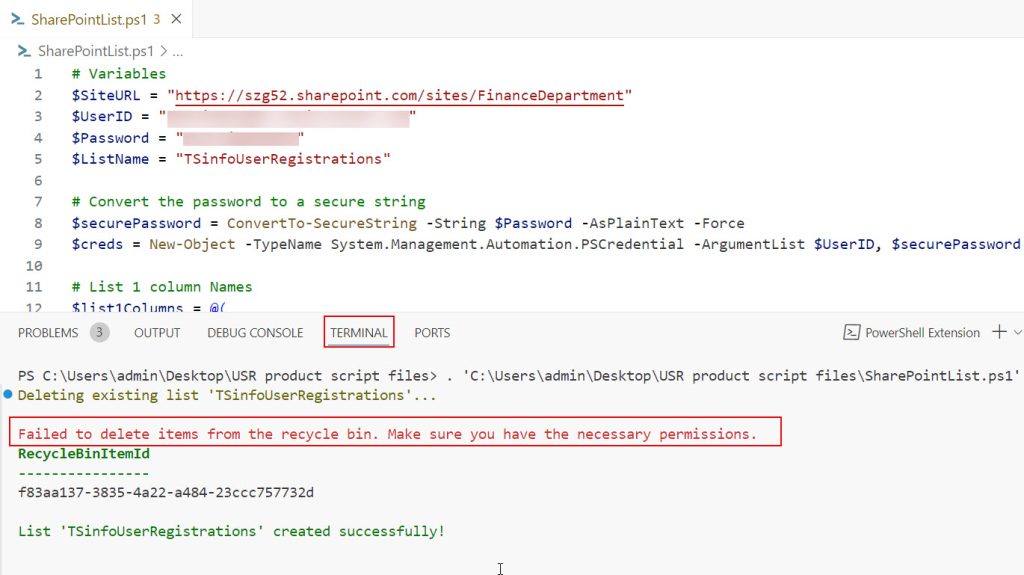
If the list already exists and you don’t have permission to delete the SharePoint list from the recycle bin. You’ll see the following error message.

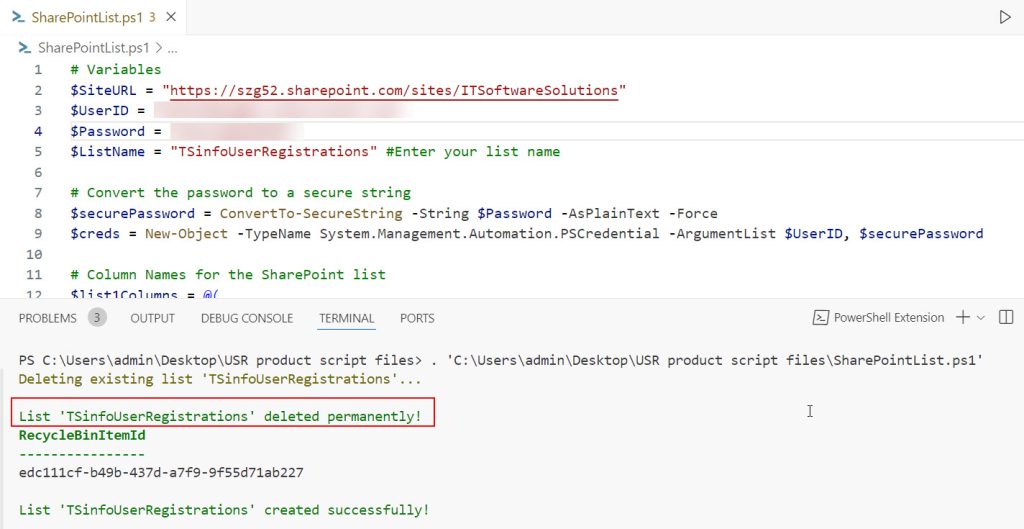
If you have permission to delete the SharePoint list from recycle bin. You’ll see the following message after deletion in the TERMINAL.

Now, see the commands that I used in the above script to create the list, add columns, delete the list, and rename the title column.
1. To Create a SharePoint list, we must use the New-PnPList cmdlet. The syntax is,
New-PnPList -Title <String> -Template <ListTemplateType> [-Url <String>]
 [-OnQuickLaunch] [-Connection <PnPConnection>]
Look at the usage of parameters of the New-PnPList command below.
- -Title: Provide SharePoint list name.
- -Template: Provide the list template. For example,
- GenericList, DocumentLibrary, Survey, Links, Announcements, etc.
- -OnQuickLaunch: To display the SharePoint list on navigation.
- -Connection: Provide the connection for the list.
2. To Add Columns to the SharePoint list, we use this Add-PnPField cmdlet. The syntax is,
Add-PnPField [-List <ListPipeBind>] -DisplayName <String> -InternalName <String> -Type <FieldType>
[-AddToDefaultView] [-Required]
Look at the usage of parameters of the Add-PnPField command below.
- -List: Provide the list name.
- -DisplayName: Provide the display name for the column.
- -InternalName: Provide the internal name for the column.
- -Type: Provide the data type of the column. For example,
- Integer, Text, Note, DateTime, Counter, Choice, Lookup, Boolean, Number, Currency, URL, etc.
- -AddToDefaultView: It makes the column visible in the default view.
- -Required: It takes the boolean value. Set this parameter to true if you need to make this column required.
3. To Rename the Title Column, use this Set-PnPField cmdlet. The syntax is,
Set-PnPField [-List <ListPipeBind>] [-Identity <FieldPipeBind>] [-Values <Hashtable>] Look at the parameters of the Set-PnPField command below.
- -List: Provide the list name.
- -Identity: Provide the column name.
- -Values: Provide the new name for the column.
4. To Delete the SharePoint list, use this Remove-PnPList cmdlet. The syntax is,
Remove-PnPList [-Identity] <ListPipeBind> [-Recycle] [-Force]The usage of parameters for this command is,
- -Identity: Provide the list name.
- -Recycle: To move the list to the recycle bin.
- -Force: Without asking permission, it forcefully moves the list to the recycle bin.
5. To Delete the SharePoint list from the recycle bin, use this Clear-PnPRecycleBinItem cmdlet. The syntax is,
Clear-PnPRecycleBinItem -Identity <RecycleBinItemPipeBind> [-Force] Here,
- -Identity: Provide the list name to delete.
- -Force: It deletes the list without asking user permission.
6. For creating Functions to reuse it whenever we want. Follow the sample example below.
function Rename-TitleColumn {
    param (
        [string]$listName,
        [string]$NewTitleName
    )

    Set-PnPField -List $listName -Identity "Title" -Values @{Title=$NewTitleName}
}
The above Rename-TitleColumn function took the $listName and $NewTitleName as the parameters. So, while calling the function, we must pass the values for those parameters. Then, it will rename the title column.
- The Rename-TitleColumn is a function name.
- [string] is the parameter’s datatype.
7. To store all the columns in an array, follow the array syntax with an example below.
$a = @(.........)Based on the above syntax, I have created an array to store all the column details.
$list1Columns = @(
    @{DisplayName='Password'; InternalName='Password'; Type="Text"; Required=$false},
    @{DisplayName='First Name'; InternalName='FirstName'; Type="Text"; Required=$true},
    @{DisplayName='Last Name'; InternalName='LastName'; Type="Text"; Required=$true},
    @{DisplayName='Phone Number'; InternalName='PhoneNumber'; Type="Text"; Required=$false},
    @{DisplayName='Email'; InternalName='Email'; Type="Text"; Required=$true},
    @{DisplayName='Department'; InternalName='Department'; Type="Choice"; Choices=@("Information Technology", "Human Resources", "Marketing","Sales","Research","Finance"); Required=$false},
    @{DisplayName='Company Name'; InternalName='CompanyName'; Type="Text"; Required=$false},
    @{DisplayName='Job Title'; InternalName='JobTitle'; Type="Text"; Required=$false},
    @{DisplayName='Address'; InternalName='Address'; Type="Note"; Required=$false},
    @{DisplayName='Set as Admin'; InternalName='SetasAdmin'; Type="Boolean"; Required=$false}
)
8. The function for creating the SharePoint list.
function Create-List {
    param (
        [string]$listName,
        [array]$columns,
        [string]$NewTitleName
    )

    # Create the list
    New-PnPList -Title $listName -Template GenericList -OnQuickLaunch
    Write-Host "List '$listName' created successfully!" -ForegroundColor Green

    # Rename the Title column
    Rename-TitleColumn -listName $listName -NewTitleName $NewTitleName

    # Add columns to the list
    foreach ($column in $columns) {
        if ($column.Type -eq "Choice") {
            $choiceValues = [string[]]$column.Choices
            Add-PnPField -List $listName -DisplayName $column.DisplayName -InternalName $column.InternalName -Type $column.Type -AddToDefaultView
            Set-PnPField -List $listName -Identity $column.InternalName -Values @{Choices=$choiceValues}
        } else {
            Add-PnPField -List $listName -DisplayName $column.DisplayName -InternalName $column.InternalName -Type $column.Type -AddToDefaultView
        }
    }
    Write-Host "Columns added successfully to list '$listName'!" -ForegroundColor Green
}
Here,
- The function took three parameters. $listName, $columns, $NewTitleName.
- New-PnPList creates list.
- Write-Host is used to display the message.
- After the list creation, we’re calling the Rename-TitleColumn function.
- We used the foreach() to travel on each column in the $columns array. If it is a choice column, we add the Set-PnPField cmd to insert the choice values.
- Otherwise, Add-PnPField cmd will add the columns to the SharePoint list.
- After adding, it will show the success message.
9. Function to delete if the list already exists.
# Function to delete a list if it exists
function Delete-ListIfExists {
    param (
        [string]$listName
    )

    $list = Get-PnPList -Identity $listName -ErrorAction SilentlyContinue
    if ($list) {
        Write-Host "Deleting existing list '$listName'..." -ForegroundColor Yellow
        Remove-PnPList -Identity $listName -Force -Recycle

        try {
            $recycleBinItems = Get-PnPRecycleBinItem -RowLimit 100 | Where-Object { $_.Title -eq $listName }
            foreach ($item in $recycleBinItems) {
                Clear-PnPRecycleBinItem -Identity $item -Force
            }
            Write-Host "List '$listName' deleted permanently!" -ForegroundColor Green
        } catch {
            Write-Host "Failed to delete items from the recycle bin. Make sure you have the necessary permissions." -ForegroundColor Red
        }
    }
}
Here,
- The function took the $listName as a parameter.
- With the Get-PnPList cmd, we check whether the list is on the SharePoint site and store the value in the $list variable.
- If the list exists, the Remove-PnPList will move the list to the recycle bin.
- The Clear-PnPRecycleBinItem permanently removes the sharepoint list from the recycle bin in the try block.
- If the user doesn’t have certain permissions, the control goes to catch block and returns the error message “Failed to delete items from the recycle bin. Make sure you have the necessary permissions.”
10. Function to check whether the SharePoint list exists or not.
# Function to ensure list exists or create it
function Ensure-List {
    param (
        [string]$listName,
        [array]$columns,
        [string]$NewTitleName
    )

    # Checking if list exists or not
    $list = Get-PnPList -Identity $listName -ErrorAction SilentlyContinue
    if ($list) {
        # List exists, delete it permanently
        Delete-ListIfExists -listName $listName
    }

    # Create the list
    Create-List -listName $listName -columns $columns -NewTitleName $NewTitleName
}
Here,
- The Ensure-List function took three parameters
- $listName,
- $columns,
- $NewTitleName
- The Get-PnPList cmd checks whether the list is present. The result is present in the $list.
- If the list exists, the control enters the if block. There, we call the Delete-ListIfExists function, which will delete the list.
- Then, control comes out of the block. Now, we’re calling the Create-List function to create a SharePoint list.
- Control also exits the block if the condition fails, creating the SharePoint list.
11. Calling the Ensure-List
Ensure-List -listName $ListName -columns $list1Columns -NewTitleName "User ID"After connecting the SharePoint site with the provided URL, we call this function by passing the parameter values.
As I explained above, this article can be a reference if you’re trying to create a SharePoint list and columns, etc.
Also, you may like:
- Customizing SharePoint List Fields with PnP PowerShell
- Remove all items in SharePoint list using PnP PowerShell
- Convert string to secure string using PowerShell
- Best practices of PowerShell
- Create folder if not exists using PowerShell
I hope you found this article helpful. I have explained many PnP PowerShell commands for creating SharePoint lists, adding columns, deleting SharePoint lists, Renaming column names, and permanently deleting lists with syntax and examples.
I am Bijay a Microsoft MVP (10 times – My MVP Profile) in SharePoint and have more than 17 years of expertise in SharePoint Online Office 365, SharePoint subscription edition, and SharePoint 2019/2016/2013. Currently working in my own venture TSInfo Technologies a SharePoint development, consulting, and training company. I also run the popular SharePoint website EnjoySharePoint.com