I will show here one SharePoint designer workflow example. Step by step, I will create a workflow using SharePoint Designer 2013. We will create a leave request workflow using SharePoint Designer 2013.
Note: If you have been working with SharePoint Online recently, you should use Microsoft Power Automate to create workflows, not SharePoint Designer 2013.
SharePoint Designer Workflow Example
Let us see how to create a leave request workflow using SharePoint Designer 2013.
Create a leave request workflow using SharePoint Designer 2013
Here, we will create an approval workflow in SharePoint Designer 2013.
Let’s take a SharePoint Designer 2013 workflow example of a leave request approval workflow. The business logic will be like the following:
- Employees will apply for leave in a SharePoint list form with the leave duration and the reason for leave.
- Once a user submits the leave request form, the initiator and the Team Lead will receive an email.
- Based on the Team Lead’s action, an email notification will be triggered.
- If the Team lead approves the Leave Request, the initiator and the team lead’s immediate manager will be notified.
- If the Team Lead Rejects the Leave Request an email notification will only go to the initiator.
- Suppose the Team Lead Approves the Leave request, the immediate manager will get a mail notification about the Leave request and the Team Lead’s action.
- Now, the manager needs to take action on the Leave request, based on which another set of emails will be sent to the concerned person.
- If the manager approves the request, an email notification will be sent to the initiator, team lead, and HR team. If the manager rejects the Leave request, a mail notification will be sent to the initiator and the team leads.
- Suppose the manager approves the request. The HR team will have to perform the same action of approving or rejecting the leave request. If the HR is okay with the Leave Request, he/she can approve it. The mail will trigger the manager, team lead, and initiator.
- The Leaves of the initiator will be updated in the back-end system.
- If the HR rejects the Leave Request, the Workflow will end, and a mail notification will be sent about the same to the manager, team lead, and initiator.
We will achieve all the steps by using a SharePoint online workflow example.
Create an approval workflow in SharePoint Designer 2013
Now, we will see step by step how to create an approval workflow in SharePoint Designer 2013.
To create a workflow using SharePoint Designer Workflow 2013, follow the below steps.
Step 1: First, create a SharePoint Online list. For this example, I have created a SharePoint custom list named “LeaveRequestProcessWF.” This list contains the columns below.
- Title – Single line of text
- LeaveType – Choice
- DateOfFirstDayOfLeave – DateTime
- DateOfLastDayOfLeave – DateTime
- ReasonForLeave – Multiline textbox
- ManagerName – People and Group
- LeadName – People and Group
- HRName – People and Group

We want to attach the workflow to the “LeaveRequestProcessWF” list.
Step 2: Now, we will see how to create a Workflow using SharePoint Designer 2013.
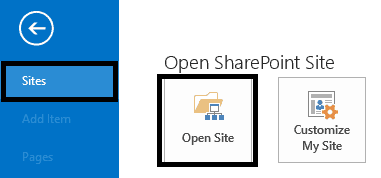
- Open SharePoint Designer 2013. Click on “Open Site” on the SharePoint Designer 2013 start page, as shown below.
Step 3: Enter the SharePoint site that we want to connect to. For example, here I want to open in ” https://<tenant name>.sharepoint.com/sites/HR” site. Click on Open.
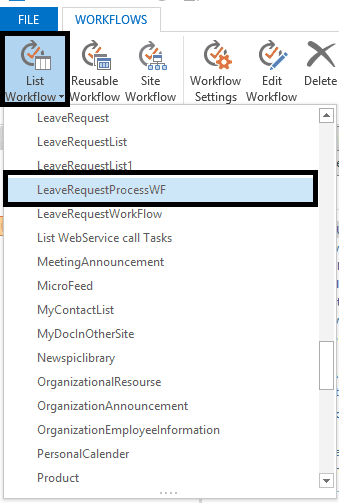
Step 4: From Navigation Click on Workflows like below. Then click on List Workflow from the ribbon and choose the list (LeaveRequestProcessWF) for which you want to create the workflow.
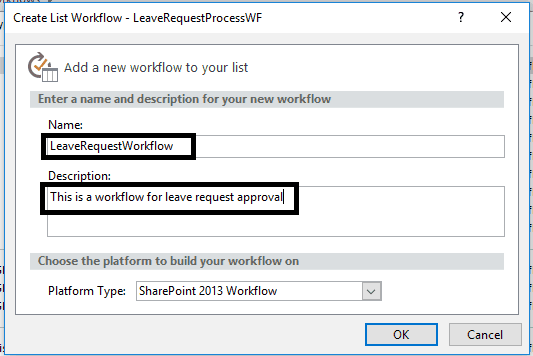
Step 5: This will open the Create List Workflow dialog box.
Enter the SharePoint list workflow Name, Description, and Choose the Platform Type.
- SharePoint 2013 workflow
- SharePoint 2010 workflow
Then Click on OK.
Step 6: Here, we will add a Log to History SharePoint designer workflow action to log some information like below:

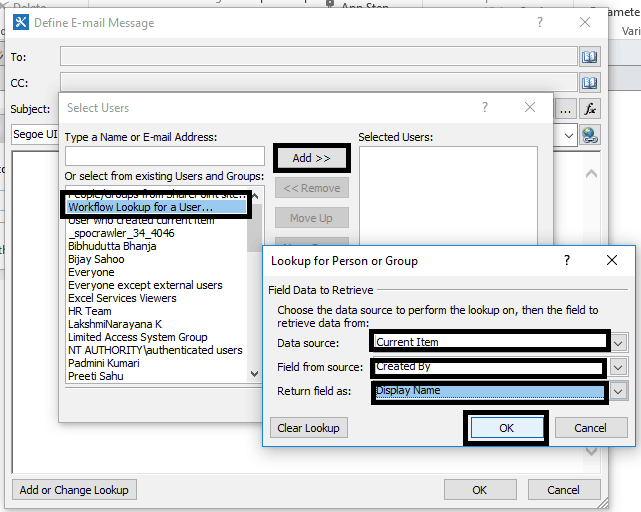
Step 7: Then add a Send an Email SharePoint designer workflow action to send a notification to the user. Then click on there users -> Workflow Looking for a User… And choose like below:
- Data source -> Current Item
- Field from source -> Created By
- Returned field as -> display name
Then click on OK, and you can see the Created by user will be added to the To field.
Similarly, enter information for the Subject and Body. In the body, if you want to provide a link for the item, then choose the below:
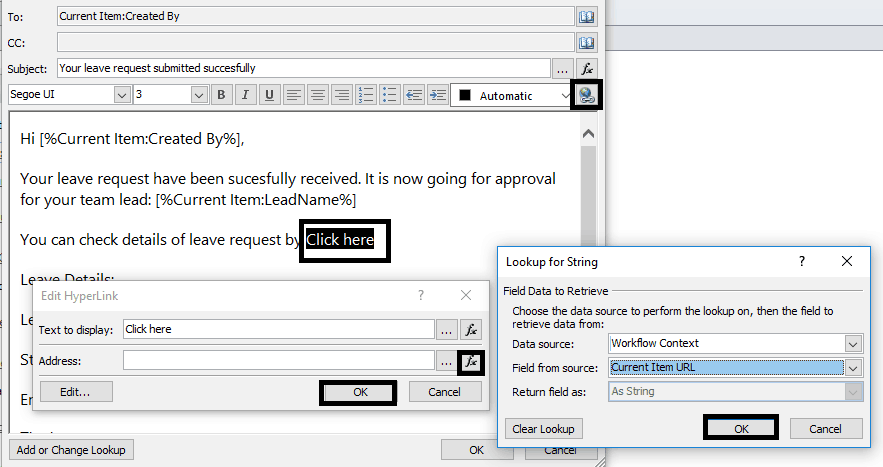
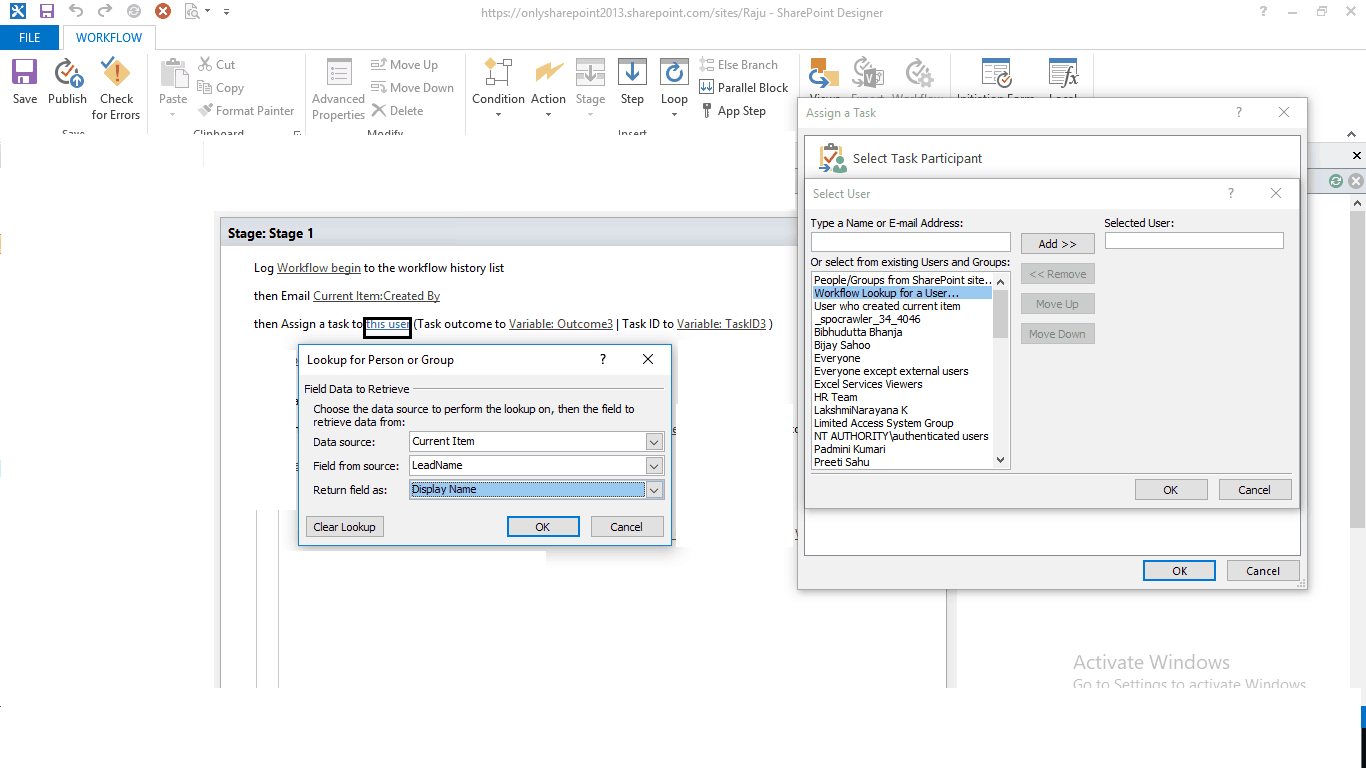
Step 8: Now, we need to create a task for the team lead so that s/he can approve or reject it. For this, choose an Assign a task SharePoint designer workflow action.
Follow the same step as above and choose the LeadName column. Check out the fig below:
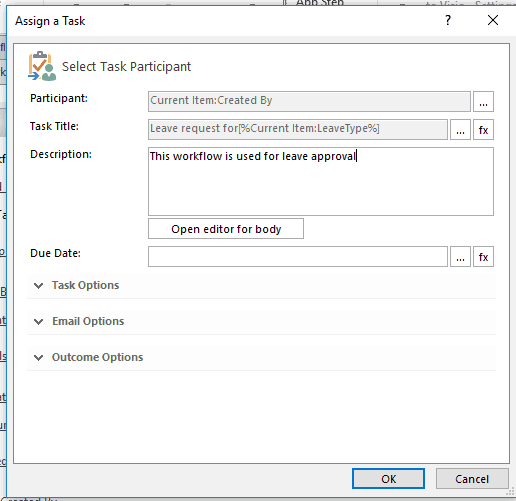
Then you can provide a Task title and a description like the below:
Step 9: We can see and then assign a task to Current Item:Created by.
Within the bracket, we can see Task outcome and task ID. The task outcome is stored in Variable:outcome and the task ID is stored in variable Task ID3.
Here, the Task outcome value is stored in Variable:Outcome3 and task id to Variable:Task id.

Now, from the Condition, add if any value equals value. Configure like below:

Below the if statement, we can see orange line; click on that to add “Else Branch”

Using if else and some of the action I have designed the entire workflow like below.
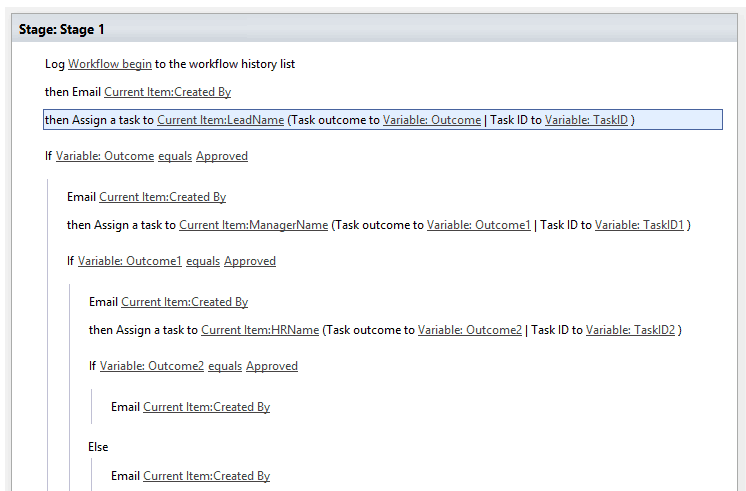
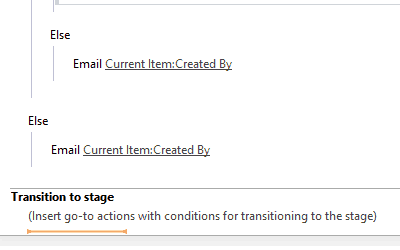
The transition stage is the end of the workflow. Below, in the transaction stage, we can see a new box. Click on Go. Then click on End of the workflow.

Save and Publish the SharePoint Designer 2013 workflow
Now, how to save and publish the SharePoint Designer 2013 workflow.
Once the workflow is created, click on the Save and Publish button from the ribbon to Save and then publish the SharePoint Designer 2013 workflow to the SharePoint Online site.
To test the workflow, you can add an item to the SharePoint list, and then you will see the email will be triggered to the lead and the initiator.
The lead will receive a task to complete. If the lead approves the task, then you will see another task created for the manager.
If the manager rejects the task, an email will be sent to the initiator and the team lead.
Finally, once every task is completed, the SharePoint Designer 2013 workflow will be completed.
Conclusion
In this tutorial, I have explained how to create a workflow using SharePoint Designer 2013.
You may also like the following tutorials:
- Update SharePoint List from Excel using Power Automate
- Start and Wait for an Approval in Power Automate
- Power Automate Email Body Formatting
- How to Create a File in Power Automate?
I am Bijay a Microsoft MVP (10 times – My MVP Profile) in SharePoint and have more than 17 years of expertise in SharePoint Online Office 365, SharePoint subscription edition, and SharePoint 2019/2016/2013. Currently working in my own venture TSInfo Technologies a SharePoint development, consulting, and training company. I also run the popular SharePoint website EnjoySharePoint.com
Very useful article
hi thank you for the useful article. If u don’t mind can u do for room booking reservation with a checkbox and the checkbox go to a different person in charge?
Your contribution is highly appreciated