In this Dataverse tutorial, We will discuss what is Dataverse in Power BI, and how to use Power BI with Microsoft Dataverse data.
Also, We will see some more topics below related to Dataverse Power BI:
- What are the prerequisites for Dataverse Power BI?
- How to connect Dataverse Connector in Power BI
- How to create a Power BI Report using data from Dataverse
- Unique Dataverse Column types in Power BI
Read: How to Patch Dataverse Number Field in Power Apps
Dataverse Power BI
With Power BI Desktop and Microsoft Dataverse, you may generate reports and publish them to Power BI by connecting directly to your data. Reports from Power BI are available for usage in dashboards, sharing with other users, and cross-platform access via Power BI mobile apps.
You may see your business data using Power BI, which offers various services and capabilities. With the help of the Dataverse connectors, it is simple to use Power BI to visualize and analyze data from the Dynamics 365 Sales and Customer Service apps or from the Microsoft Dataverse.
Prerequisites for Dataverse Power BI
You need the following things in order to utilize Power BI with Dataverse:
- Download and install Power BI Desktop, a free tool that runs locally on your computer. Here is where you can download Power BI Desktop.
- A Power Platform environment has the following rights:
- You must have read access to a table in order to access its data.
- You must have a security role with maker privileges, such as system customizer or environment maker, in order to alter a table in make.powerapps.com.
- To create and share Power BI reports, you need the necessary Power BI license.
- Your environment must have the Enable TDS endpoint setting enabled in order to use the Dataverse connector.
NOTE:
The Tabular Data Stream (TDS) protocol data used by the Dataverse connection for Power BI is not supported by the majority of proxy servers.
Connect Dataverse Connector in Power BI
So before creating a Power BI Report, we need to connect the Dataverse connector in Power BI. Follow the steps below to connect:
Step – 1:
- Open Power BI Desktop and sign in with your valid Microsoft credentials.
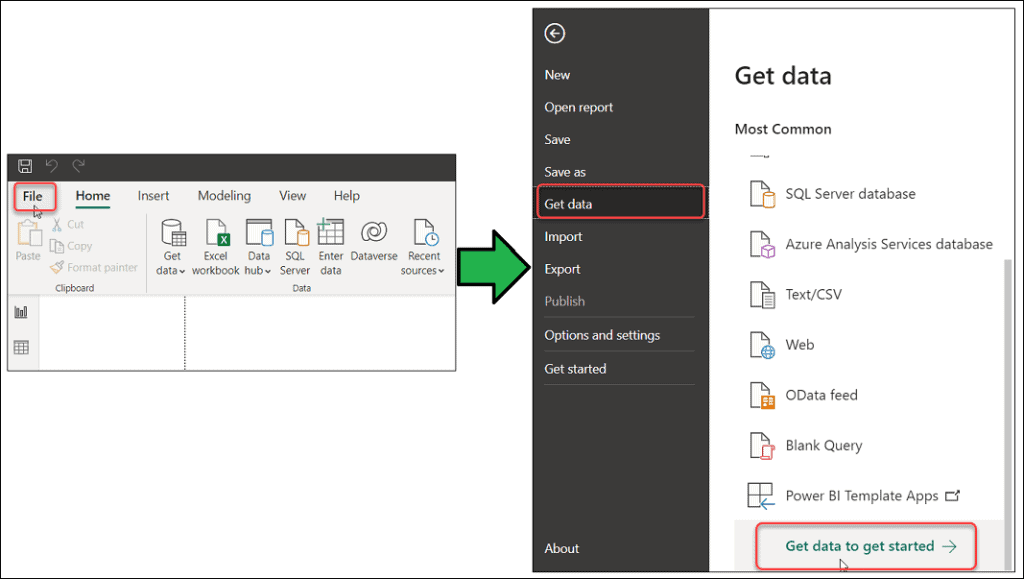
- Go to File -> Select Get data -> Get data to get started as shown below.
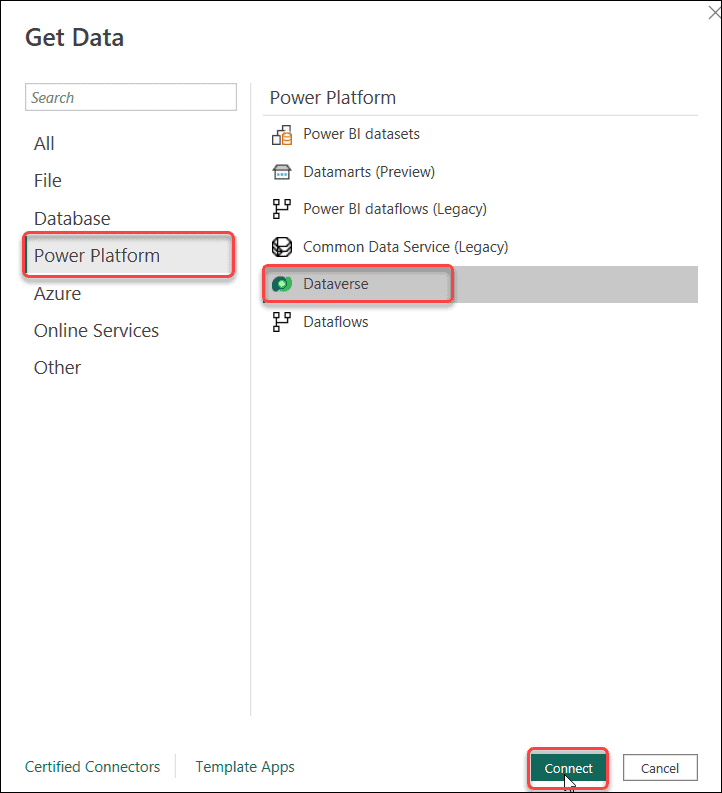
- Go to Power Platform -> Select Dataverse.
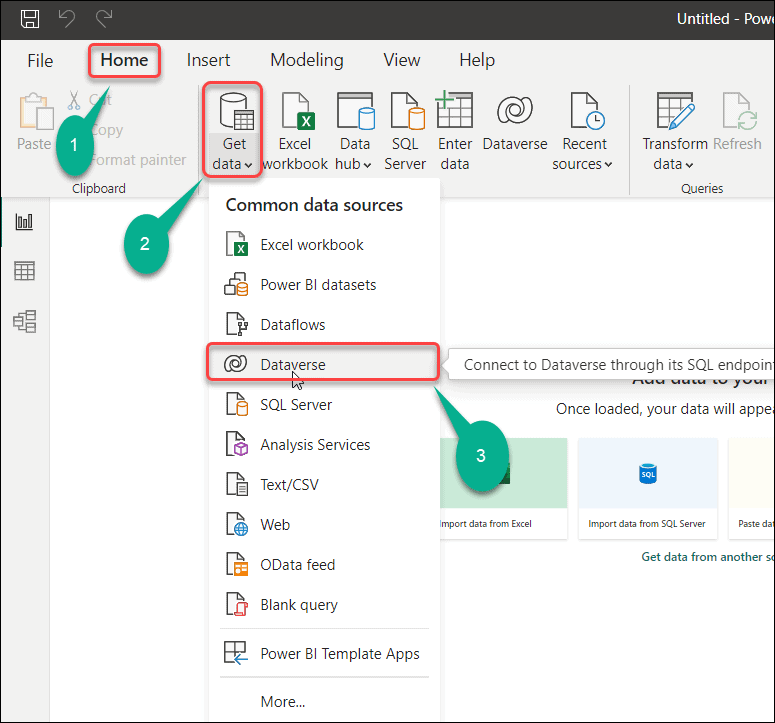
- Also, there is another shortcut approach to connect the Dataverse connector in Power BI.
- Go to the Home tab -> Expand Get Data -> Click on the Dataverse.
Step – 2:
- The Common Data Service window will then appear, prompting us to sign in to our organizational account in order to connect to the Dataverse.
- Click on Sign in -> Pick an Office 365 account or use another account -> Tap on Connect.

Step – 3:
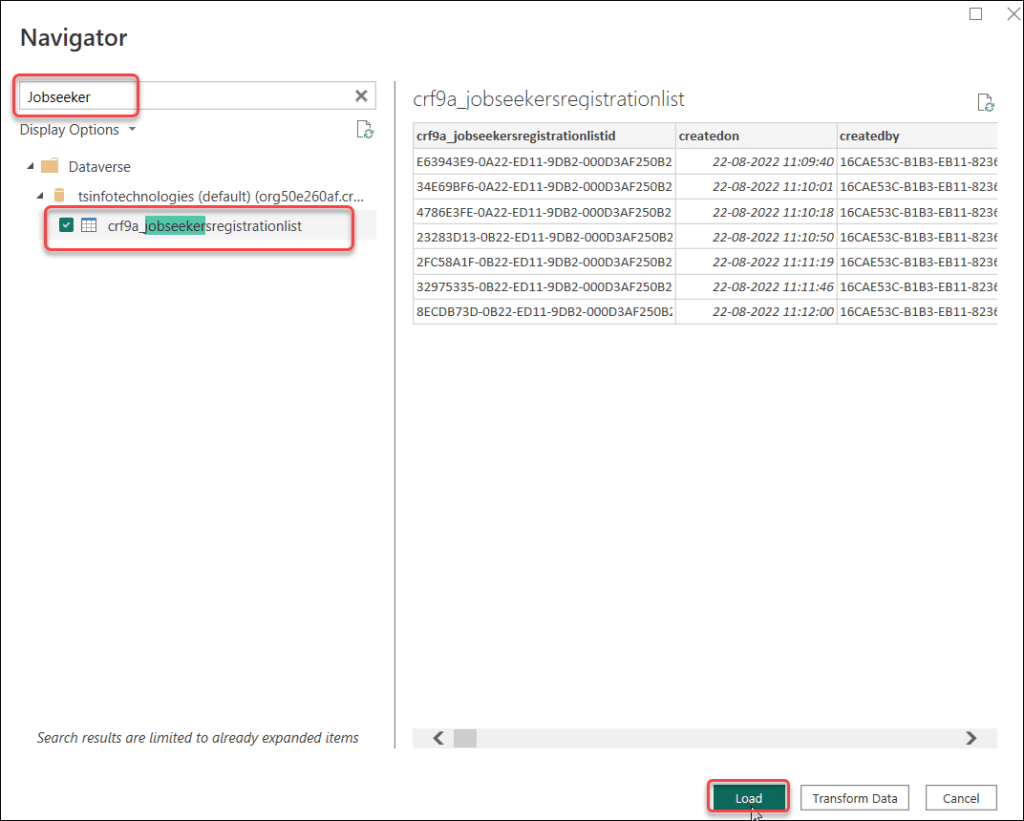
- From the Navigator window, Expand the desired environment in the list of environments, pick the desired Dataverse table (crf9a_Jobseekersregistrationlist), and then click Load.
- Here, the dataverse table are appearing with the internal name with a prefix like crf9a_Jobseekersregistrationlist.
Step – 4:
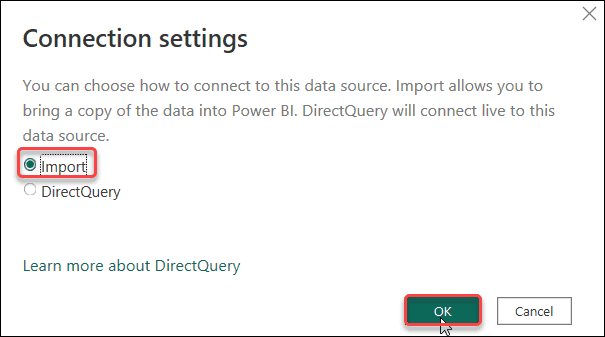
- Choose one of the following Data Connection modes:
- Import: Whenever possible, we recommend that you import data into Power BI. Data is cached in the Power BI service and imported on a regular basis in this manner.
- DirectQuery: Connects to Dataverse data directly. Utilize this mode to retrieve data in real-time. This mode can also enforce the Dataverse security model more strongly.
- By default, the connection settings will be Import only. Click on OK.
NOTE:
TCP ports 1433 and/or 5558 must be open to connect to the Dataverse connection. If just port 5558 is enabled, the environment URL must be appended with that port number, such as yourenvironmentid.crm.dynamics.com:5558.
Step – 5:
- Power BI Desktop will now require some time to connect to the appropriate Dataverse table (Job Seekers Registration List).
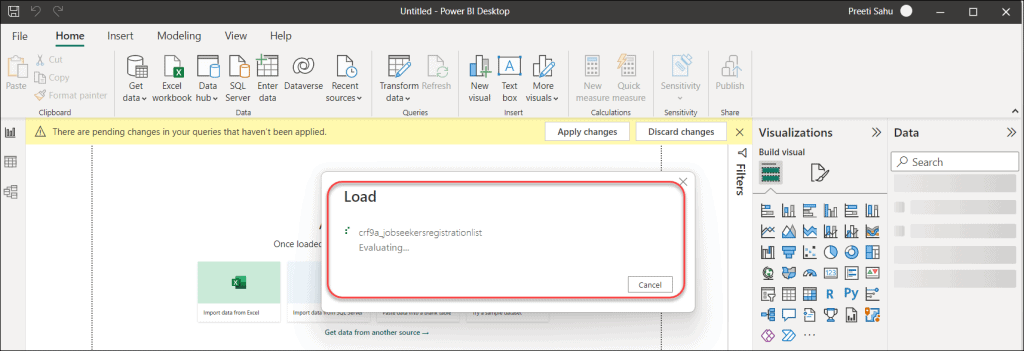
- When the Dataverse table is loaded, it will look like the image below.
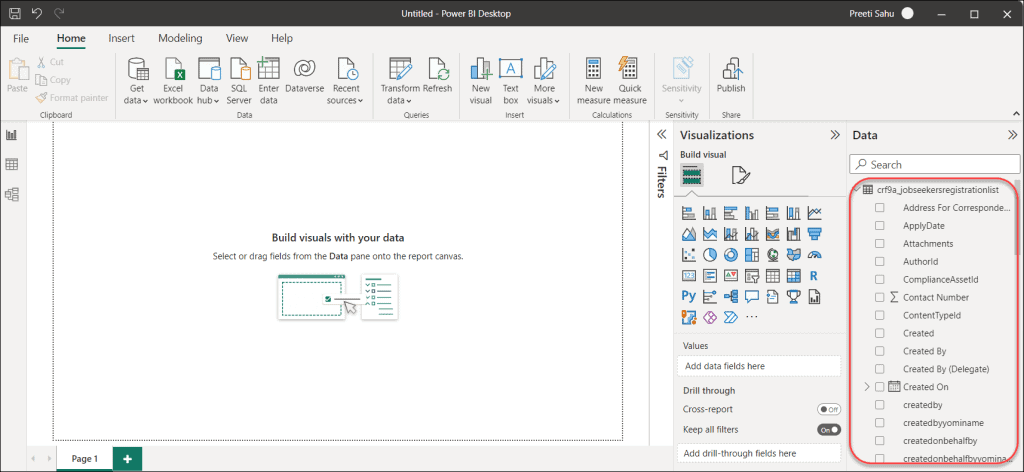
This is how we can connect the Dataverse connector in Power BI.
Also Read: Power BI integration with PowerApps Portals
Create a Power BI Report using Data from Dataverse
You can start creating reports after using a connector to load the tables, or you can go back and add more tables by repeating the previous steps.
For example, from the Job Seekers Registration table, I’d like to show each candidate’s graduate mark and their names. To achieve this, refer to the instructions below:
- Select a Donut chart under the Visualizations pane.
- Drag the Name field and drop it into the Legend section of the Donut chart. Here, Name is a Single line of text field in the Dataverse table.
- Drag the Graduation% field and drop it into the Values section of the Donut chart. Here, Graduation% is a Number Decimal field in the Dataverse table.
- Once we add these two fields to the donut chart, then the chart will display like the screenshot below.
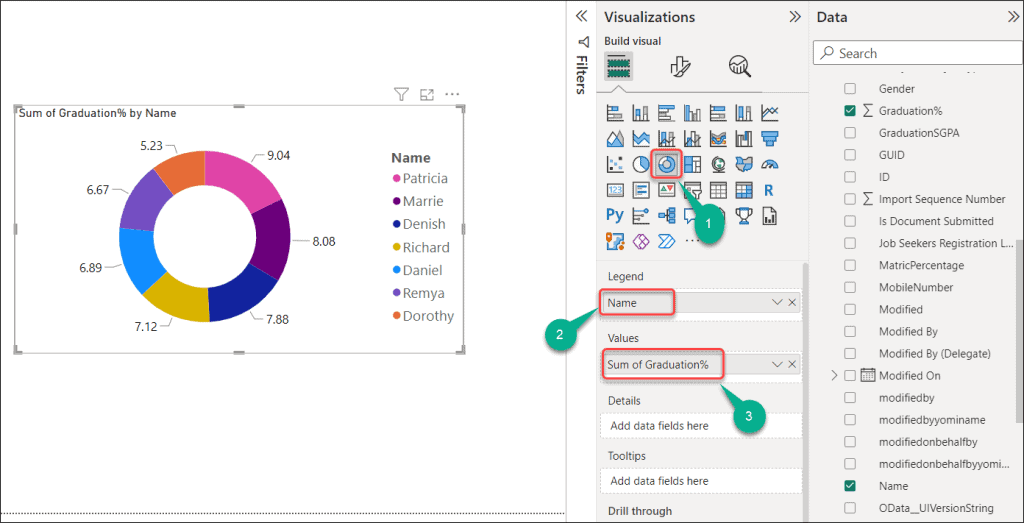
- When you click on a specific name, the graduate mark will be displayed for that individual person.
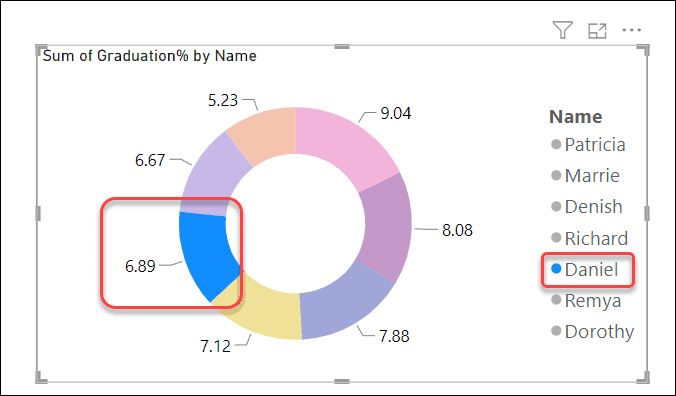
This is how to create a Power BI Report using data from Dataverse.
Unique Dataverse Column types in Power BI
Here we will discuss the special Dataverse Column types in Power BI.
Dataverse Choice columns
- In apps and flows, choice columns are used in tables to present a drop-down list of things to a user so that they can make a single option.
- When using the Dataverse connector, choice columns will be displayed as two columns, one for the unique value and the other for the display item value.
For example, if you had a table with a choice column called itemcolor, Power BI would show you two columns:
- itemcolor – This will display a unique integer value for each item in your selection. When applying filters, itemcolor can help ensure that the filters are not affected if the display name changes in the future.
- itemcolorname – This displays the item’s friendly display name and is most typically used when presenting the option in a table or chart.
| itemcolor | itemcolorname |
| 1 | Black |
| 2 | White |
| 3 | Red |
| 4 | Blue |
Dataverse Choices columns
- Choices are similar to choice columns, except that users can select multiple things from a list. The Dataverse connector does not presently support all options.
- When you utilize the Dataverse connector with choices columns, you only get comma-separated numeric values. The item label and item name columns are not returned.
Dataverse Lookups
- Lookup columns use a many-to-one (N:1) table relationship between the table you’re working with and the lookup target row type.
- Lookups are displayed as two columns in Power BI Desktop: lookupid and lookupid-name.
These are some unique or special Dataverse Column types in Power BI.
Additionally, you may like some more Dataverse tutorials:
- How To Get Row by ID From Dataverse Table
- Power Automate Dataverse Add New Row
- How to Export Dataverse Table to Excel
- Delete All Records From Dataverse Table [With Examples]
- How to Detect Text in Dataverse Using AI Builder
- How to Get Power Apps Environment ID
In this Dataverse tutorial, We discussed what is Dataverse in Power BI, and how to use Power BI with Microsoft Dataverse data.
Also, We saw some more topics below related to Dataverse Power BI:
- What are the prerequisites for Dataverse Power BI?
- How to connect Dataverse Connector in Power BI
- How to create a Power BI Report using data from Dataverse
- Unique Dataverse Column types in Power BI
I am Bijay a Microsoft MVP (10 times – My MVP Profile) in SharePoint and have more than 17 years of expertise in SharePoint Online Office 365, SharePoint subscription edition, and SharePoint 2019/2016/2013. Currently working in my own venture TSInfo Technologies a SharePoint development, consulting, and training company. I also run the popular SharePoint website EnjoySharePoint.com