In this PowerApps Tutorials, we will discuss how to create a Date filter in PowerApps. Also, we will cover these below things that are related to PowerApps Date Filter as:
- PowerApps filter SharePoint list by date
- PowerApps filter gallery by date range
- PowerApps date range picker or PowerApps Date Validation
- PowerApps between dates or PowerApps between two dates
- How to sort the Date column in PowerApps or PowerApps sortbycolumns filter date
Create PowerApps Date filter
As you may know, In PowerApps, you can filter any field values or column values using the PowerApps Filter function. Similarly, also you can filter the Powerapps Date Time column. Let’s take an example.
Suppose I have a SharePoint List named as “Project Details“. This list has some columns with different data types. Also, it has a Date Time column named “Project Created Date” as shown below.
Here what I want to do is, I will create a Powerapps Gallery that will show the last 15 or 30 days of records from the SharePoint list. In this case, We need to create a Date filter in PowerApps.

Follow these below steps that we needs to do:
- First of all, In the PowerApps app, Connect the SharePoint List Date Source.
- Then, On the PowerApps Blank screen, Insert a Gallery control (Insert -> Gallery -> Vertical).
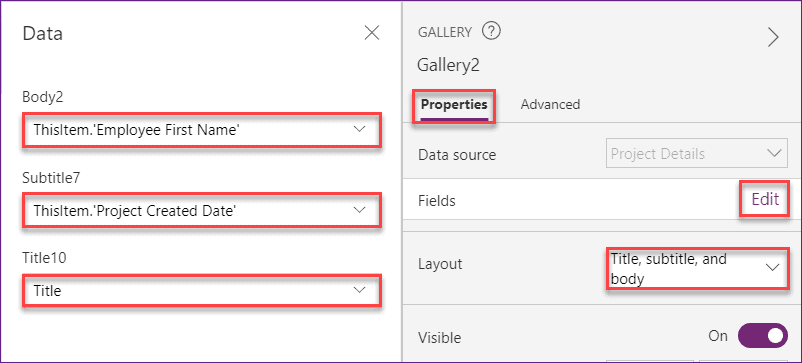
- Select the Gallery control and go to Properties pane (from the right side of the page). Select the Layout as “Title, subtitle, and body”.
- Click on Edit from the Fields section. Enter these below field values (you can add any field that you want to display in the gallery but the Date field should be there) as:
- Body: Select Employee First Name
- Subtitle: Select Project Created Date
- Title: Select Title
Powerapps create a Date Filter for last 15 Days:
Select the Vertical Gallery control and apply this below formula on its Items property as:
Items = Filter(
    'Project Details',
    'Project Created Date' >= DateAdd(
        Today(),
        -15,
        Days
    )
)
Where,
- ‘Project Details’ = SharePoint List name
- ‘Project Created Date’ = Date Time column that is present in the SharePoint list
- DateAdd = Powerapps DateAdd function helps to add a number of units to a date/time value
- Today() = It is the Powerapps function that retrieves the current Date
As my Today’s Date is 9/9/2020, So it will filter and display all the last 15 days’ records in the Gallery control.

Powerapps create a Date Filter for last 30 Days:
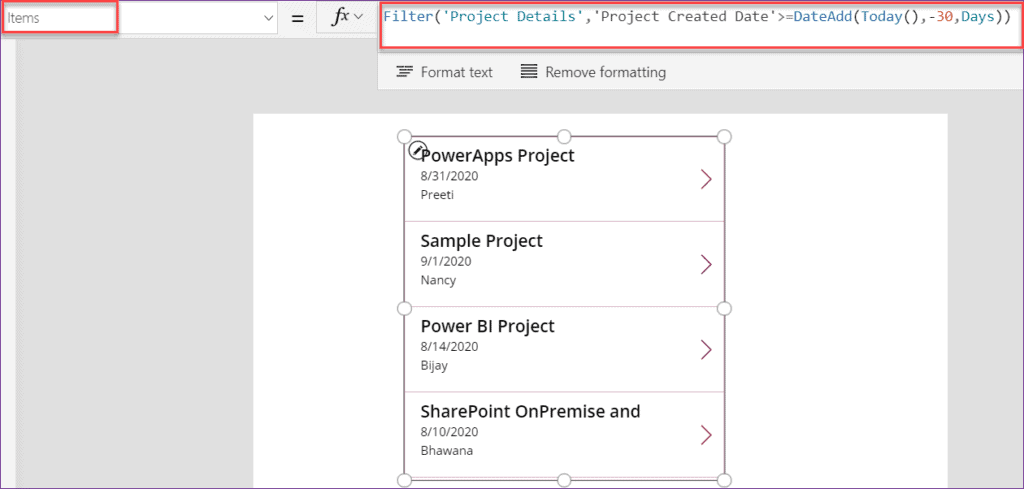
Similarly, if you want to display the last 30 days records in the Gallery control, then apply the below formula on Gallery controls Items property as:
Items = Filter(
    'Project Details',
    'Project Created Date' >= DateAdd(
        Today(),
        -30,
        Days
    )
)
In the below screenshot, you can see all the last 30 days’ records in the Powerapps Gallery control.
NOTE:
Not only you can retrieve 15 or 30 days records from the SharePoint List, But also, you can retrieve any number of last days. Instead of 15/30, Just you need to apply the number of last days that you want. Then your data will filter and display in the Gallery control.
PowerApps filter SharePoint list by date
By taking a simple scenario, We will see how we can use the Powerapps filter SharePoint list by date.
I have a SharePoint list named “Gadget Details“. This list has some columns with different data types. Also, it contains a Date Time column (Order Date) with a single line of the text data type as shown below.

- In the Powerapps screen, connect the SharePoint list Data source to the app.
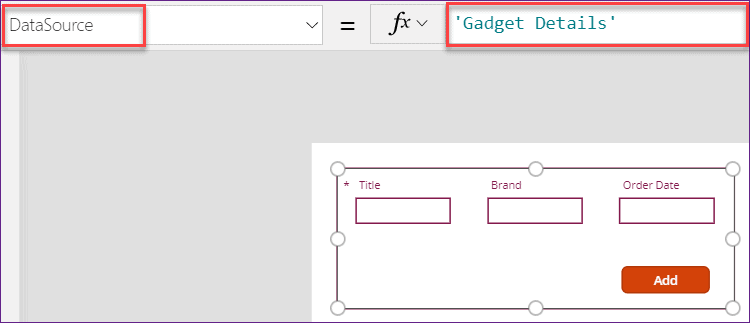
- Create one Edit form (Insert -> Forms -> Edit). Enter the SharePoint list name (Gadget Details) in DataSource property.
- Add a Button and set its Text property to Add.
- Select the Add Button and set its OnSelect property to SubmitForm(Form1) where Form1 represents the Edit form name.
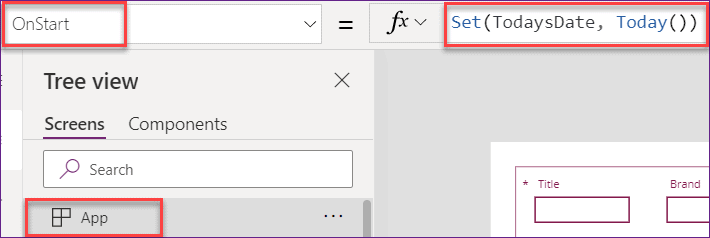
- Create a new variable on Powerapps App’s OnStart property as:
OnStart = Set(TodaysDate, Today())Where,
- TodaysDate = Variable name
- Today() = This function retrieves the current or today’s date
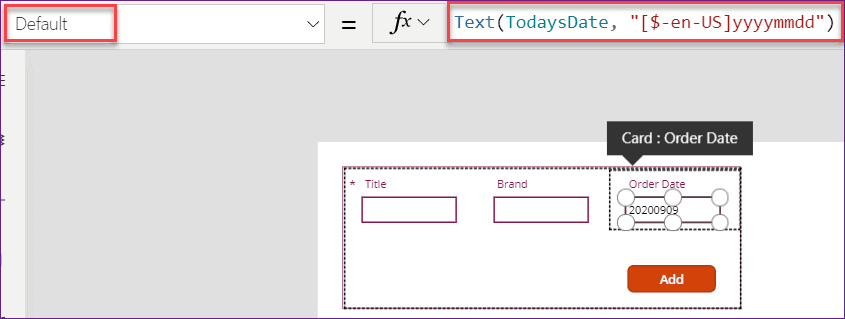
- Select the Date Text field (Order Date) and apply this below formula on its Default Property as:
Default = Text(TodaysDate, "[$-en-US]yyyymmdd")Once you applied the formula, it will retrieve Today’s date with “yyyymmdd” format.
- Insert a Vertical Gallery control (Insert -> Gallery -> Vertical). Select the Gallery and go to Properties pane. Make the Layout to Title and subtitle.
- Click on Edit from Fields section and insert these below values as:
- Subtitle: Select Order Date column
- Title: Select Title column

- Next, Select the Gallery control and apply this below formula on its Items property as:
Items = Filter('Gadget Details', 'Order Date' = Text(TodaysDate, "[$-en-US]yyyymmdd"))
- If you want to remove the specific item from the gallery control, then, take a Trash icon (Insert -> Icon -> Trash) and put this below formula on its OnSelect property as:
OnSelect = Remove('Gadget Details',ThisItem)
- Save and Preview (F5) the app. Enter the field values and click on the Add button. By default, the Order Date will be Today’s date. So no need to change the date from the Order Date.
- Then you can see, the item will be displayed in the gallery. Also, this new item has been added to the SharePoint List.
- If you want to remove any specific item from the gallery, then click on the Trash icon of that particular item.

- Go to the SharePoint list (Gadget Details). You can see the new record has been added as shown below.

PowerApps filter gallery by date range
Suppose, there are two Date picker controls named “Select Start Date” and “Select End Date“. What I want to do is,
- The user will select a Start Date from Select Start Date.
- The user will select an End Date from Select End Date.
- PowerApps Gallery Control will display all SharePoint items or records that fall between those two selected dates.
To make this above scenario, follow these below steps:
- I have a SharePoint list named “SharePoint Project Expenses“. This list has some columns including a Date time column (Project Created Date). Also, it has some records as shown below.
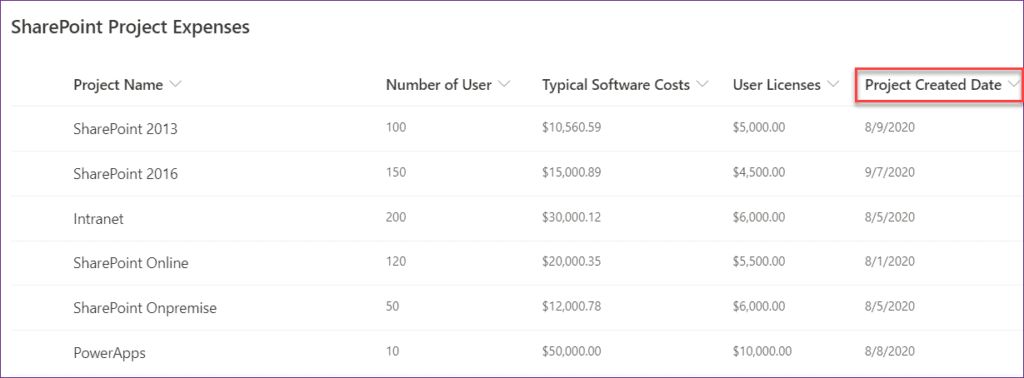
- In PowerApps, Connect the SharePoint list Data source (SharePoint Project Expenses) to apps.
- On the PowerApps screen, Take two Date Picker controls and rename it to “StartDatePicker” and “EndDatePicker“.
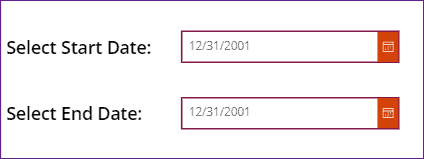
- Insert one Vertical Gallery control. Go to Properties pane and change the Layout to “Title, subtitle, and body“.
- Click on Edit from the Fields section and enter these below fields as:
- Body: Select the Number of User column
- Subtitle: Select Project Created Date column
- Title: Select Title column
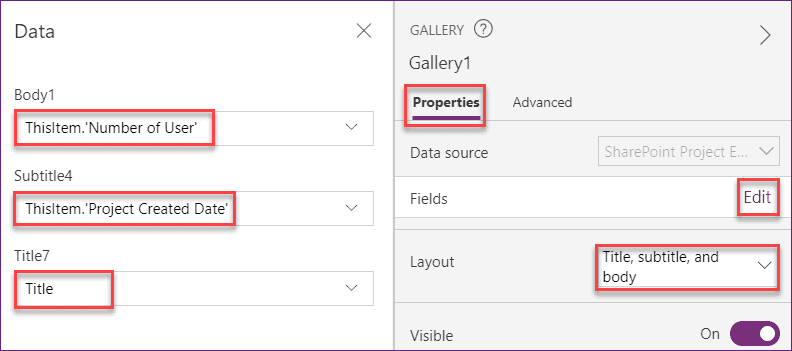
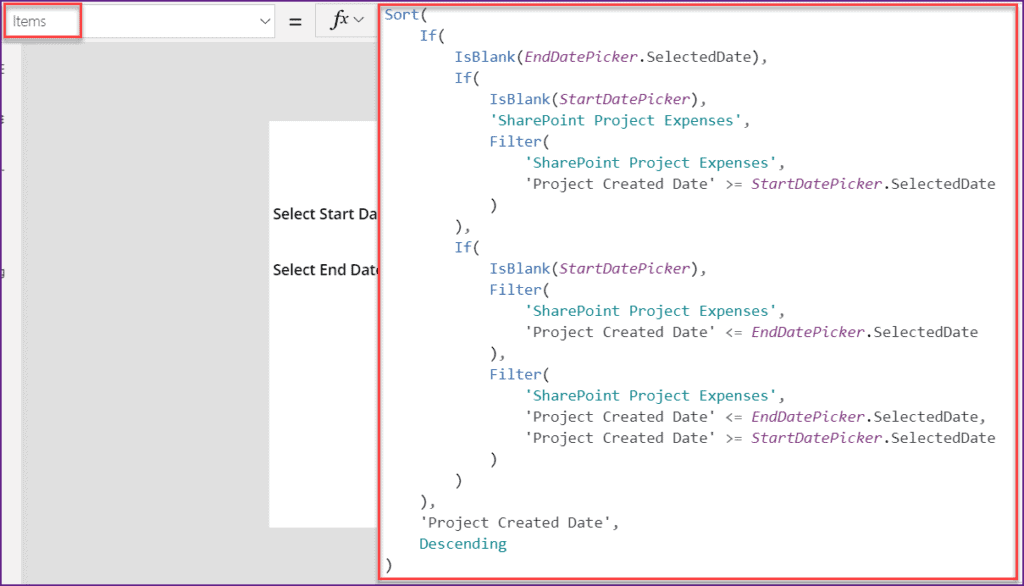
- Next, Select the vertical Gallery control and apply this below formula on its Items property as:
Items = Sort(
    If(
        IsBlank(EndDatePicker.SelectedDate),
        If(
            IsBlank(StartDatePicker),
            'SharePoint Project Expenses',
            Filter(
                'SharePoint Project Expenses',
                'Project Created Date' >= StartDatePicker.SelectedDate
            )
        ),
        If(
            IsBlank(StartDatePicker),
            Filter(
                'SharePoint Project Expenses',
                'Project Created Date' <= EndDatePicker.SelectedDate
            ),
            Filter(
                'SharePoint Project Expenses',
                'Project Created Date' <= EndDatePicker.SelectedDate,
                'Project Created Date' >= StartDatePicker.SelectedDate
            )
        )
    ),
    'Project Created Date',
    Descending
)
Where,
- ‘SharePoint Project Expenses’ = SharePoint List name
- StartDatePicker = Start Date Picker control name
- EndDatePicker = End Date Picker control name
- ‘Project Created Date’ = Date Time column name (from SharePoint list)
You can refer the below screenshot.
- Now, Save and Preview (F5) the app. Select Start Date and Select End Date. It will filter the records (that fall between those two selected dates) and display them in the Gallery control as shown below.

PowerApps date range picker
In this below example, we will see how we can use the Powerapps Date range picker between two dates. That means, we need to validate the Powerapps Date picker values. Let us take a simple scenario.
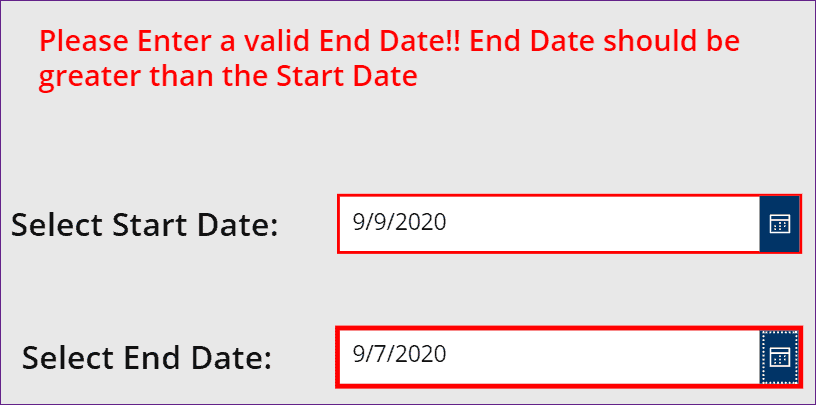
In the below screenshot, there are two Powerapps Date picker controls named Select Start Date and Select End Date.
As per the scenario, When I will select the End date is less than the Start date, then an error will appear as shown below. Here, the end date should be equal to or greater than the Start date.
For the above Date validation scenario, follow these below steps that we need to do in Powerapps:
- Insert two Labels (Insert -> Label). Set one Labels Text property to “Select Start Date” and another Labels Text property to “Select End Date“.
- Insert two Date Picker controls (Insert -> Input -> Date picker). By default, the dates should be current or Today’s date.
- Add one Label (To display the Invalid Date error message) and place it above the date picker controls. Select the Label and set its Text property to “Please Enter a valid End Date!! End Date should be greater than the Start Date“. (you can set the text to any error message)
The Powerapps screen looks like below.

- Select the Error Label and set its Visible property as:
Visible = DatePickerEnd.SelectedDate < DatePickerStart.SelectedDateWhere,
- DatePickerEnd = End Date picker control name
- DatePickerStart = Start Date picker control name
The above code specifies, if the End Date picker value will greater than the Start Date picker value, then the invalid date error will display.

- Next, select the Start Date picker control and apply this below formula on its BorderColor property as:
BorderColor = If(
    DatePickerEnd.SelectedDate < DatePickerStart.SelectedDate,
    Color.Red,
    RGBA(
        101,
        128,
        187,
        1
    )
)
- Select the End Date picker control and apply this below formula on its BorderColor property as:
BorderColor = If(
    DatePickerEnd.SelectedDate < DatePickerStart.SelectedDate,
    Color.Red,
    RGBA(
        101,
        128,
        187,
        1
    )
)
- Just save and preview (F5) the app. Select the Start Date (you can choose any date). Select End Date (the date should be equal or greater than the Start Date). Then you will not see any invalid date error message.
- But if you will choose the End date is less than the Start date, then you will get an invalid date error message with the red background color as like the below screenshot.

PowerApps between dates
First of all, we need to understand what does this PowerApps between dates means? Below I have taken a simple example to get these things easily.
I have a SharePoint List named “Project Details“. This list has two Date time columns as “Project Created Date” and “Project End Date“. Both Date columns are having with different dates (Upcoming Dates and as well as Old Dates).
Here, What I want to do is, If the current date and time is in between the Project Created Date and Project End Date, then that specific record will filter from the data source and display in the PowerApps Collections.
In the below screenshot, you can see, In the SharePoint list, there is only one record that is having with the current Date i.e. “9/9/2020“. So I will create a Powerapps Collection and it will filter the record details with the current Date.

Follow these below steps to do so:
- In the PowerApps screen, Insert a Button (Insert -> Button) and set its Text property to Collect Current Dates.
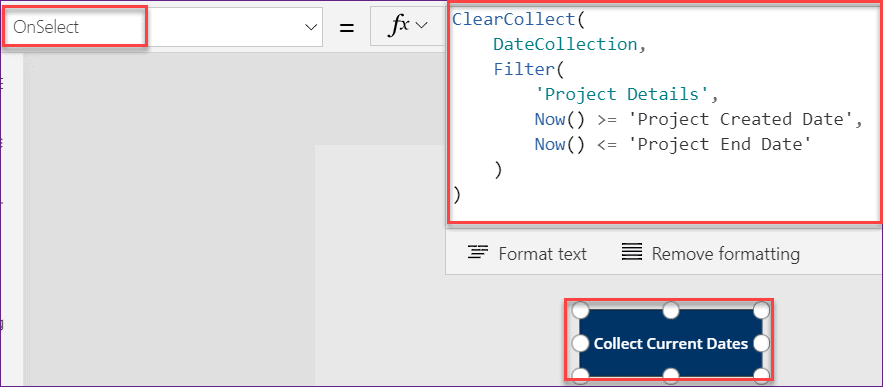
- Select the Button (Collect Current Dates) and apply this below formula on its OnSelect property as:
OnSelect = ClearCollect(
    DateCollection,
    Filter(
        'Project Details',
        Now() >= 'Project Created Date',
        Now() <= 'Project End Date'
    )
)
Where,
- ClearCollect = This is the function that helps to create the Powerapps Collections where always it clears the previous value and stores the new one.
- DateCollection = PowerApps Collection Name where the value will be stored.
- ‘Project Details’ = SharePoint List Name
- ‘Project Created Date’ = It is a Date Time column that is present in the SharePoint List
- ‘Project End Date’ = It is also a Date Time column that is present in the SharePoint List
- Now, Save and Preview (F5) the app. Click on the Button (Collect Current Dates).
- Then, go to PowerApps Collections (View -> Collections -> Date Collection). You can see the Data has been filtered with the current Date and Time as like the below screenshot.

PowerApps sortbycolumns filter date
Suppose, In Powerapps, you want to arrange the order of the Dates as Ascending or Descending. Then, in that case, you can use the Sort function to filter the Powerapps Date column.
This below screenshot represents a PowerApps Data Table that contains some fields from a SharePoint List Data source named “Product Details“. This data table also contains a Date column named as “Project Created Date“.
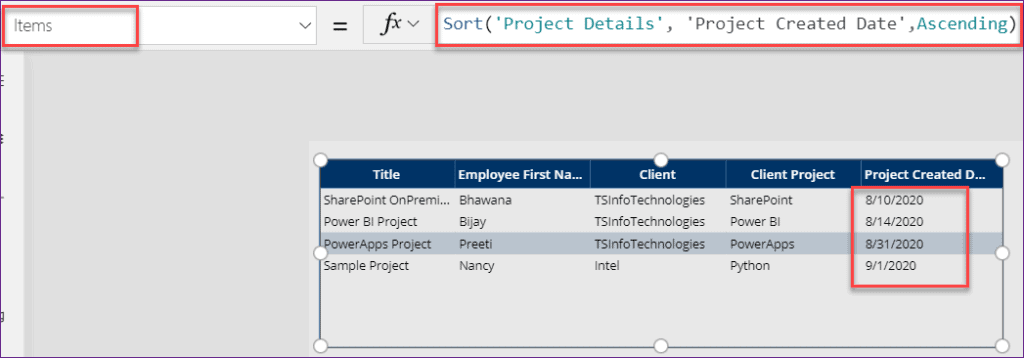
Here, As you can see in the below table, the Date column (Project Created Date) is present with a random order. So, I want to sort the Date column as Ascending or Descending order.

PowerApps Sort Date column to Ascending order:
To sort the Powerapps Date column as in Ascending order, follow this below things as:
Select the Data Table and apply this below formula on its Items property as:
Items = Sort('Project Details', 'Project Created Date', Ascending)Where,
- Sort = This is the Powerapps function name that helps to sort the Date field to Ascending order.
- ‘Project Details’ = SharePoint List Name that contains all the columns and fields
- ‘Project Created Date’ = Date Time column that is present in the SharePoint List
- Ascending = To sort the Date field as Ascending, We need to specify the order type.
Once you applied the above formula, then you can see the Date column has been sorted with an ascending order as shown below.
PowerApps Sort Date column to Descending order:
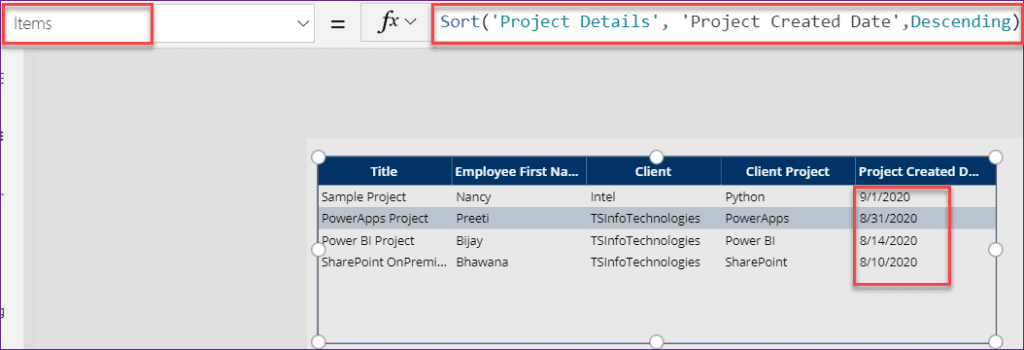
Similarly, if you want to sort the PowerApps Date column as Descending order, then select the Data table and apply the below formula on its Items property as:
Items = Sort('Project Details', 'Project Created Date', Descending)Where,
- Descending = To sort the Date field as Descending, We need to specify the order type.
Also, you may like these below PowerApps Tutorials as:
- PowerApps Microphone Control – How to use
- How to Create Login Screen in PowerApps
- PowerApps Popup message Box with Examples
- Get users from SharePoint Group in PowerApps
- PowerApps camera control + Save captured image in SharePoint
- PowerApps role based security SharePoint example (SharePoint Groups)
- PowerApps: Submit data to two SharePoint Lists
- PowerApps Patch Function with examples
- Show hide fields based on dropdown selection PowerApps
- Embed PowerApps in SharePoint modern page
- PowerApps Sum function
In this PowerApps Tutorials, We discussed how to create a Date filter in PowerApps. Also, we saw these things as:
- PowerApps filter SharePoint list by date
- PowerApps filter gallery by date range
- PowerApps date range picker or PowerApps Date Validation
- PowerApps between dates or PowerApps between two dates
- How to sort the Date column in PowerApps or PowerApps sortbycolumns filter date
I am Bijay a Microsoft MVP (10 times – My MVP Profile) in SharePoint and have more than 17 years of expertise in SharePoint Online Office 365, SharePoint subscription edition, and SharePoint 2019/2016/2013. Currently working in my own venture TSInfo Technologies a SharePoint development, consulting, and training company. I also run the popular SharePoint website EnjoySharePoint.com
Hi Bijay, I found this article on filtering by date. I’m trying to filter modified dates on a document library subfolder and I’m not sure how to incorporate the date filter with the folder filter. There are no errors with this filter, Filter(Documents, IsFolder = false && StartsWith(‘Folder path’, “Shared Documents/Estimating”), ‘Modified’>=DateAdd(Today(),-7,Days)); but there are no records displayed in the Gallery. How else can I display the modified files? Thanks for your help!
Patti
I have different scenario can you please help, I would like to sort my gallery in power app on basis of single date selection. my Sharepoint List name is Action Log>> and I have action completion date single column >> now I need to select that date and filter gallery for that specific date only
great