In this PowerApps tutorial, we will see an example of PowerApps role-based security in SharePoint. We will implement PowerApps role-based security by using a SharePoint list as well as by using a SharePoint group.
Here we will take a simple example, there will be a PowerApps form that will have a few fields. We will take a SharePoint list which will contain a few users (email id). Only those users can edit all the fields, other users can not be able to edit all the fields. Other users can edit a few fields.
We will see how to implement the above things using the PowerApps role-based security.
PowerApps role based security SharePoint example
Here, I have created two SharePoint Lists named:
- SharePoint Project Expenses
- User Email
The SharePoint Project Expenses list is having the below columns with different data types, and this list we can customize using PowerApps.
- Project Name (By default, this is a Title column with a Single line of text, just renamed it)
- Number of User (Number Data type)
- Typical Software Costs (Currency Data type)
- User Licenses (Currency Data type)
- Project Created Date (Date picker)
Refer to the below screenshot:

Similarly, the User Email list is having only two columns:
- Title (By default it is a single line of text)
- Email Address (Single line of text)
Refer to the below screenshot:
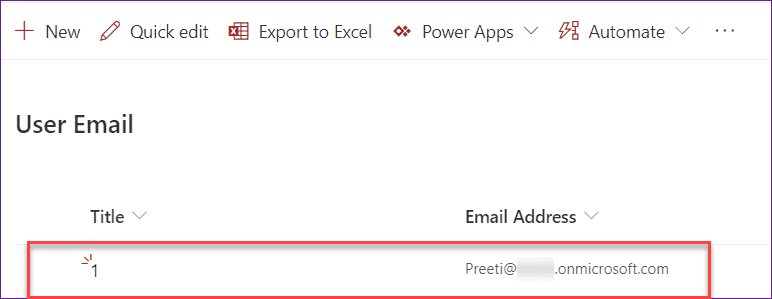
You can add the users to the SharePoint list, those you want should be able to modify all the fields. You can simply add the user’s email address.
If there will be 10 users in this SharePoint list, then these 10 users will act as an admin and they can modify all the fields in the SharePoint list form.
Other uses can modify a few fields from the PowerApps form.
Powerapps form with Role-Based Security
As per my requirement, I have a Powerapps Edit form with all the SharePoint List fields (SharePoint Project Expenses). The Powerapps Edit form looks like the below screenshot:
If you are new to PowerApps, you can check out the below articles to know how to create a canvas app or customize the SharePoint list form using PowerApps.
- Create PowerApps App for SharePoint List
- How to Create a Canvas app from SharePoint List in Power Apps
- Create a canvas app from Excel in Power Apps (Step by Step tutorial)
- PowerApps submit form to SharePoint Online list
- Customize SharePoint online list forms like new, edit and display form using Microsoft PowerApps
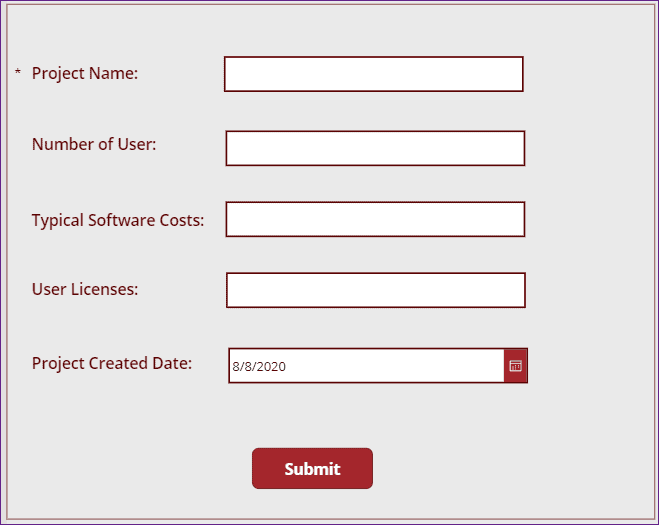
Here, I want to make this Powerapps Edit form as Role-based security where the Admin (Users who are presented in the SharePoint List) can edit all the fields but the Non-Admin or an End User can edit only two/three fields from that Powerapps form.
For this, We need to do these below things as:
- First of all, in the Powerapps app, Connect the SharePoint List Data source (User Email) where you are maintaining all the Admin User names.
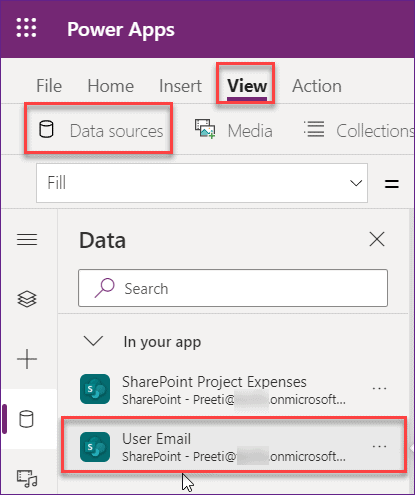
- Suppose, in the above form, As I am the Admin, So I only can edit all the fields but a Non-Admin user (Users who are not presented in the above SharePoint List) can not. As per my scenario, I want to make these two fields non-editable (i.e. View mode) for a Non-Admin or an End-user.
- Typical Software Costs
- User Licenses
- To do so, select the specific input field (Suppose, Typical Software Costs) that the Non-Admin or an End user can not edit. Apply this below formula on its DisplayMode property as:
DisplayMode = If(User().Email in 'User Email'.'Email Address',DisplayMode.Edit,DisplayMode.View)Where,
- User().Email = User is a Powerapps function where it contains the Email address of users.
- ‘User Email’ = SharePoint List Name that contains all the Admin user names.
- ‘Email Address’ = This is the field that contains the Email address of the Admin User.
- DisplayMode.Edit = This helps to make the field as Edit mode.
- DisplayMode.View = This helps to make the field as View mode.
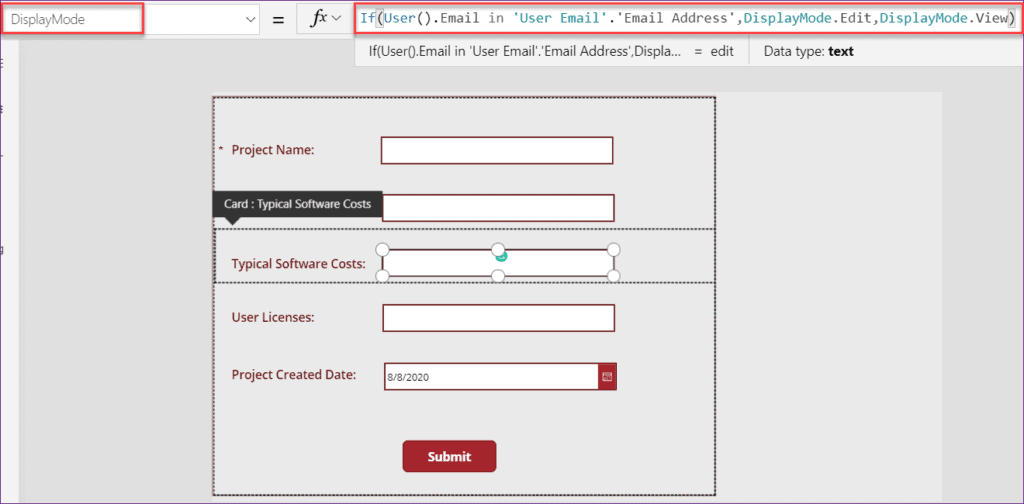
The above Powerapps formula specifies if the user email condition satisfies, then the specific input field will be Edit mode otherwise it will be View mode.
Just preview (F5) the Powerapps app. As I am the Admin, in the below screenshot, you can see, the field (Typical Software Costs) is editable for me as:
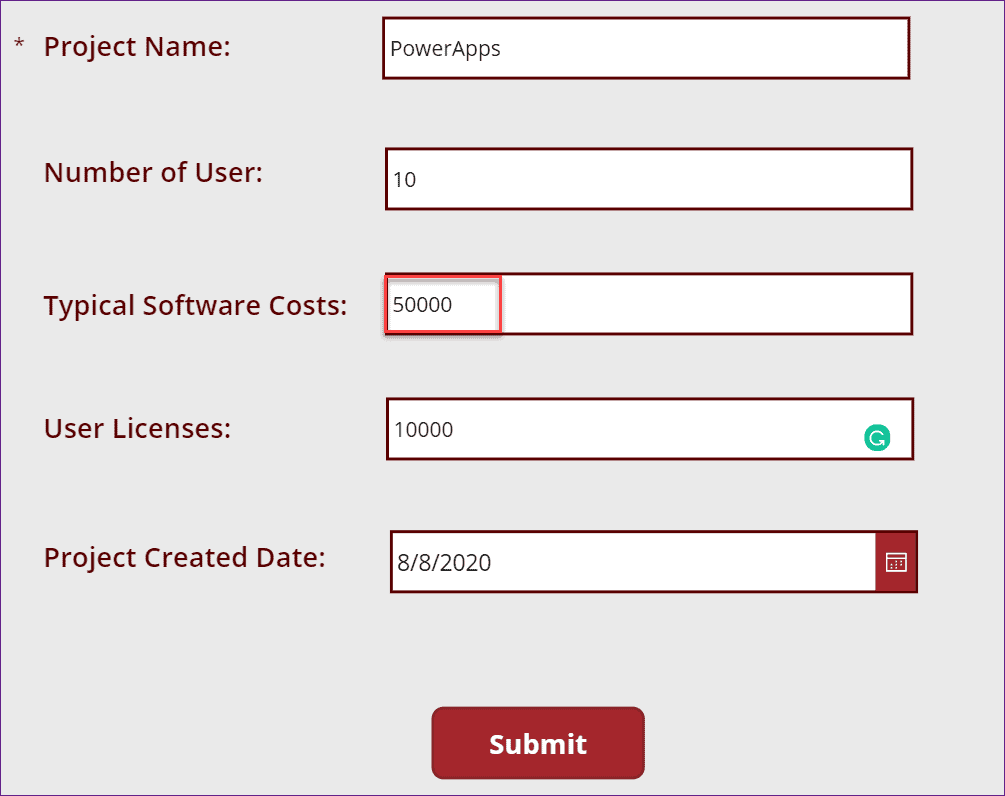
When a user is not presented in the SharePoint list, open the same Powerapps form, then he/she can not edit that specific field (Typical Software Costs). He/she can only view the field as shown below:
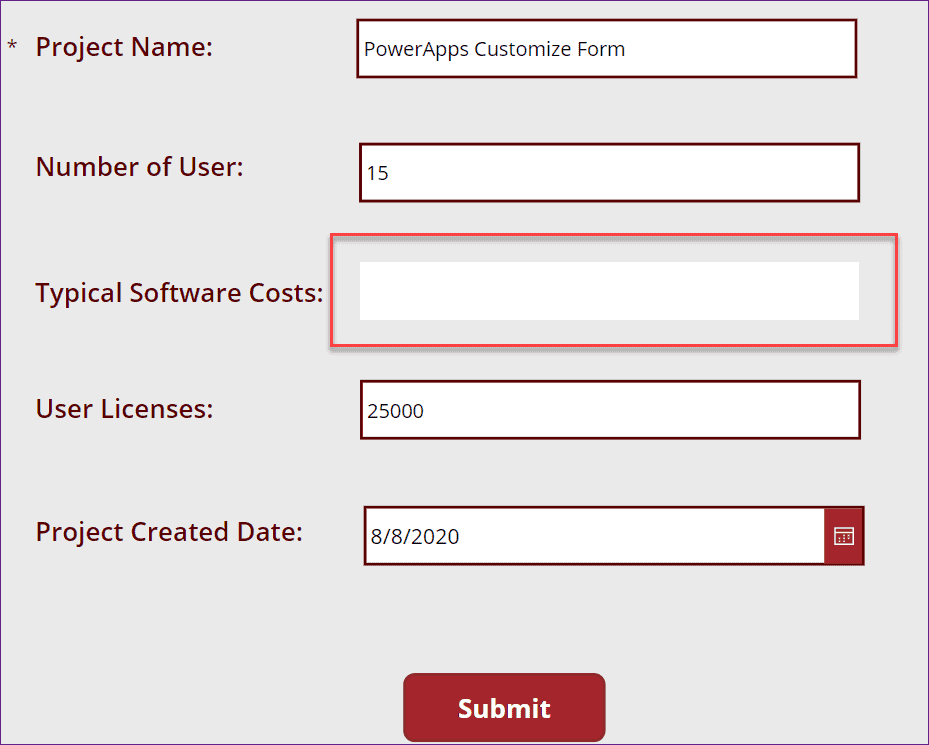
Like the above field, you can also make edits or view multiple fields in the Powerapps form. In the same way, you will select the input field and apply the above Powerapps formula on its DisplayMode property.
Role based security in PowerApps using SharePoint groups
Now, we will see how to give SharePoint Group permission to some specific Powerapps form fields and how to implement PowerApps Role-Based Security using SharePoint Group.
By taking a simple scenario, I will explain to you how to use the SharePoint Group for PowerApps roles-based security.
SharePoint Group Permission to PowerApps Fields
In the Microsoft Office 365 Groups, I have created a SharePoint Group named PowerAppsMembers. This SharePoint group contains two members as shown in the below screenshot:
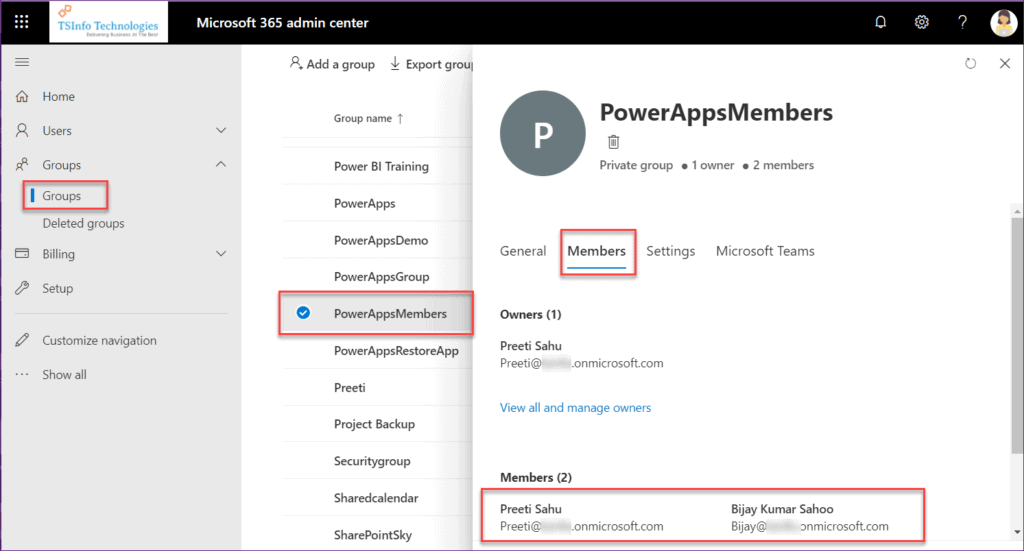
As in this scenario, those who (users/members) are present in the SharePoint Group (PowerAppsMembers), only can edit the Powerapps form fields.
For other users who are not present in the SharePoint Group (PowerAppsMembers), they can not edit the Powerapps fields, they only can view those non-editable fields.
For all these SharePoint Group Permission things, We will use the Powerapps Office 365 Groups connector.
PowerApps permissions SharePoint Group
The below screenshot represents the PowerApps Edit form where only a specific SharePoint Group member can edit all the fields but the Non-Group members can edit only two/three fields from that Powerapps form.
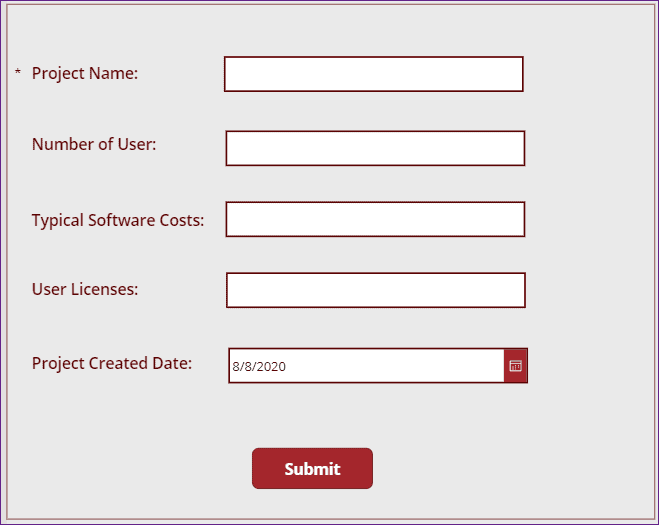
Suppose, in the above Powerapps edit form, I want to make one field (User Licenses) as View mode for Non-group members. That means, they can not edit the field, they only can view it.
For the Group members (those who are present in the group), all the fields should be editable. That means all group members can edit all the fields.
Follow these below steps to do so:
- At first, you need to connect the Office 365 Groups connector on the Powerapps screen.
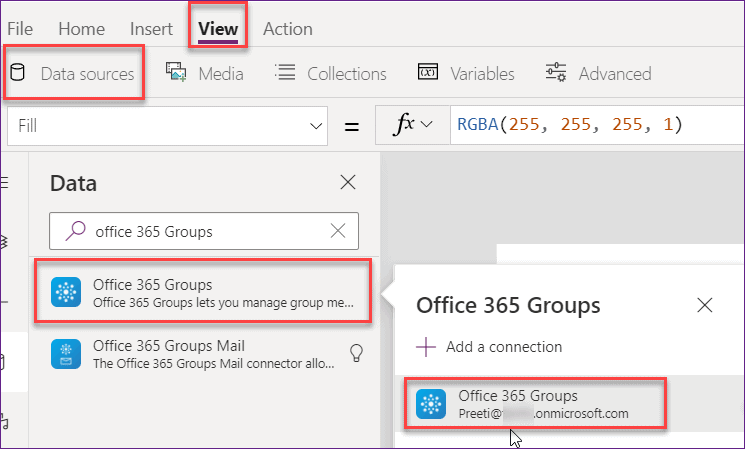
- Go to View tab -> Data sources -> Search Office 365 Groups in the search box -> Add a new connection or existing connection as below. Now the Office 365 Groups connector will be added to the Powerapps screen.
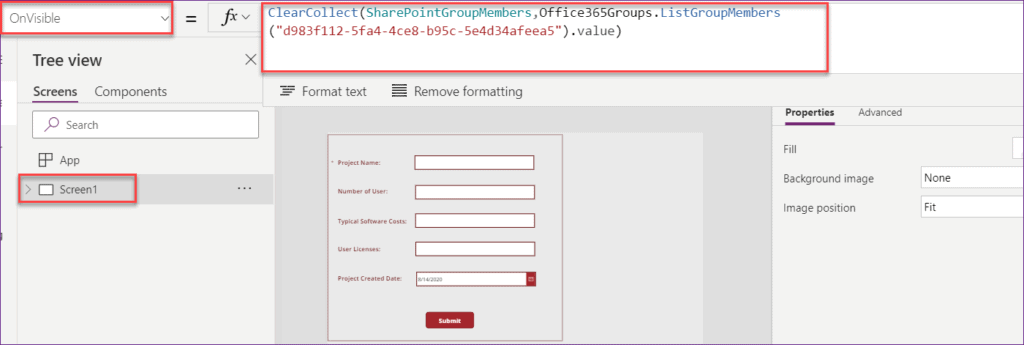
- On the Powerapps screen, Click on the Screen and apply the below formula on its OnVisible property as:
OnVisible = ClearCollect(SharePointGroupMembers,Office365Groups.ListGroupMembers("d983f112-5fa4-4ce8-b95c-5e4d34afeea5").value)Where,
- ClearCollect = This function helps to create the Powerapps collection where it will clear all the previous data and always store the new one.
- SharePointGroupMembers = Collection Name
- Office365Groups.ListGroupMembers(“Group ID”) = It helps to get the information about all the users from the specific SharePoint Group
NOTE:
Not only you can add the above formula on Powerapps screen’s OnVisible property, but also you can add it on the App’s OnStart property.
The way to get the SharePoint Group ID, you can refer to the below Powerapps article on how to get users from SharePoint Group in PowerApps.
- Next, insert a Gallery control (Insert -> Gallery -> Vertical) where you can display all the Group member details.
- Add the Collection Data source (Select the Gallery -> Properties -> Data source -> SharePointGroupMembers [It is created on the Screen’s OnVisible property]) in the Gallery control.
- Also, in another way, you can select the gallery control and put the Collection name on its Items property.
- Select the Gallery control Layout as Title and Subtitle.
- Click on Edit option from Fields and provide these below field values:
- Title: displayName
- Subtitle: mail
Now, In the Gallery control, you can see all the Group members that are present in the specific SharePoint Group (PowerAppsMembers).
If you want to display this Gallery control to other members, then you can use it otherwise make its Visible property false.

Next coming back to the Powerapps Edit form. Suppose, I want to make this below User Licenses field as View mode for the Non-group members. So what you will do is,
- Select the specific input field (User Licenses) that the Non-group member can not edit. Apply this below formula on its DisplayMode property as:
DisplayMode = If(
   User().Email in SharePointGroupMembers.mail,
   DisplayMode.Edit,
   DisplayMode.View
)
Where,
- User().Email = User is a Powerapps function where it contains the Email address of users.
- SharePointGroupMembers = It is the Collection Name. You can provide any name.
- DisplayMode.Edit = This helps to make the field as Edit mode.
- DisplayMode.View = This helps to make the field as View mode.
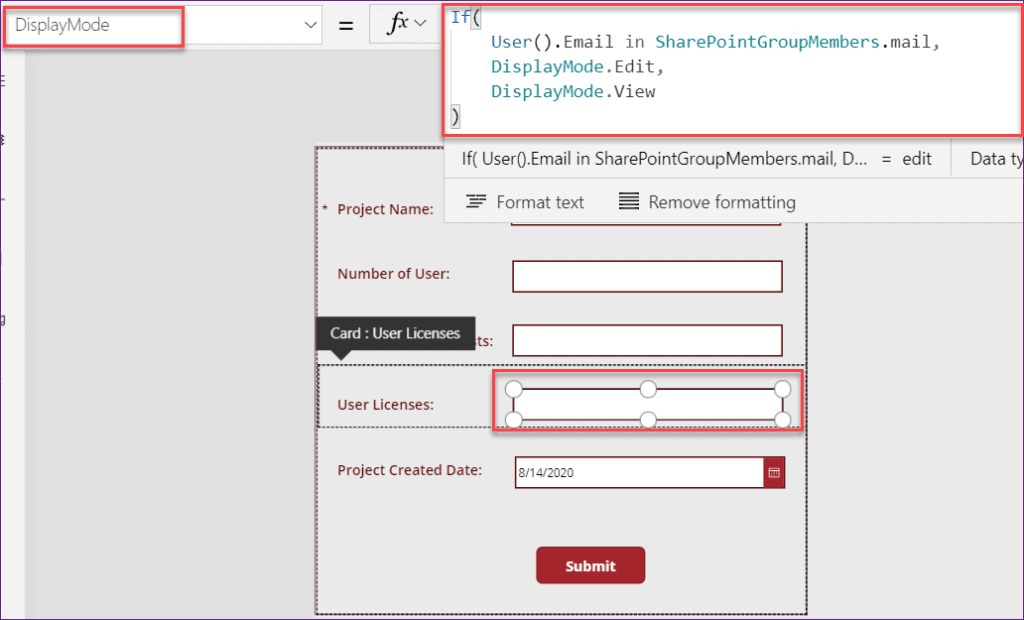
The above Powerapps formula specifies if the user email condition satisfies, then the specific input field will be Edit mode otherwise it will be View mode.
Just preview (F5) the Powerapps app. As I am a member of the SharePoint Group (PowerAppsMembers), in the below screenshot, you can see, that the field (User Licenses) is editable for me as:
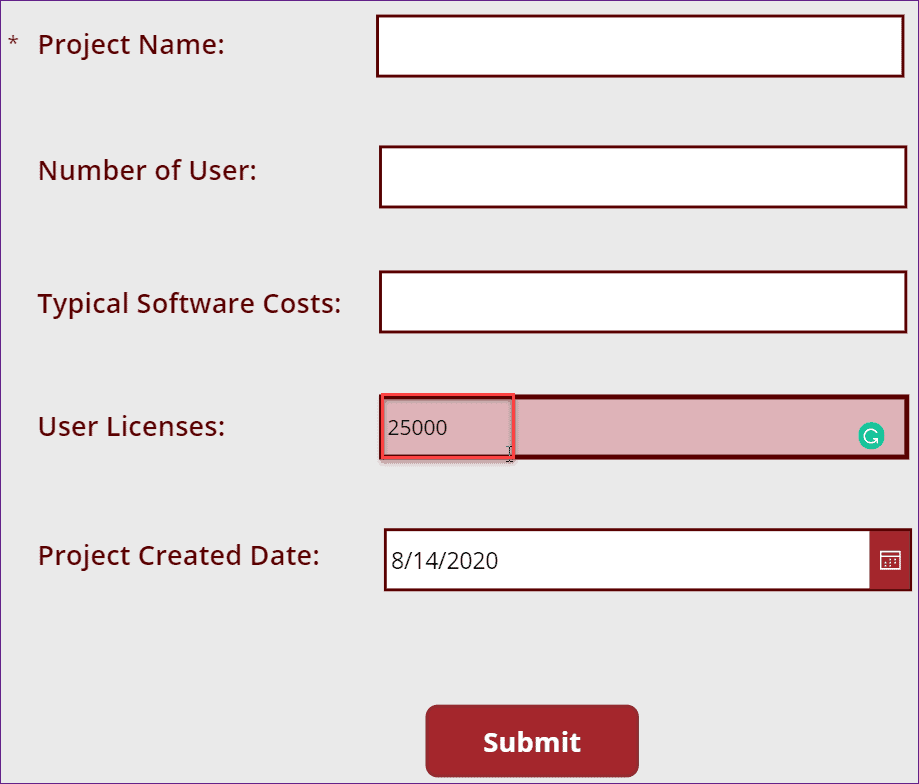
But in case the Non-Group members (members who are not present in the SharePoint Group), if they will open the same Powerapps form, then he/she can not edit that specific field (User Licenses). He/she can only view the field as shown below:
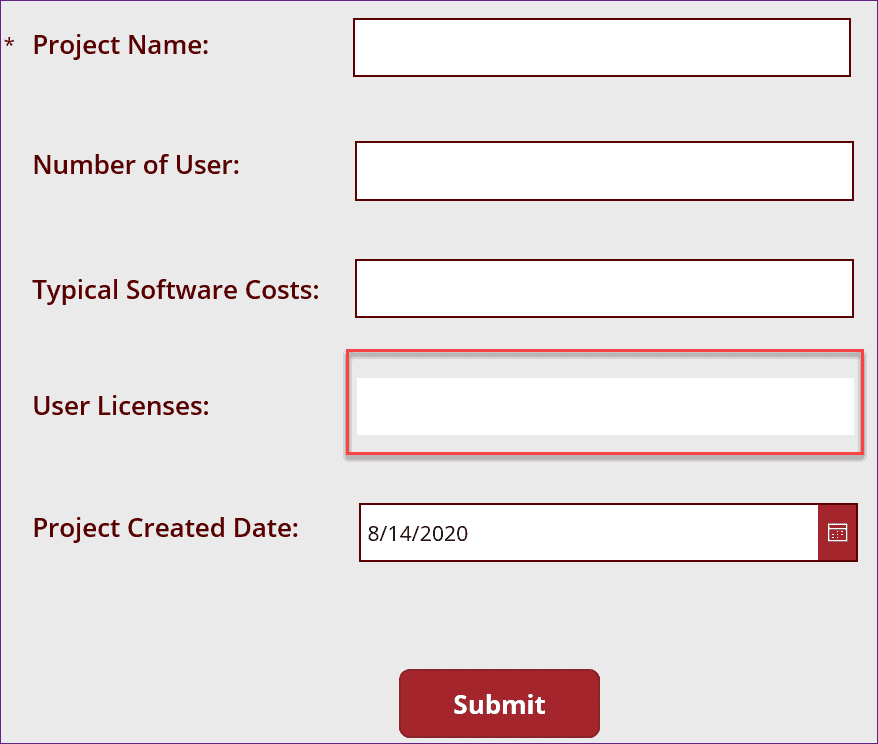
Like the above field, you can also make edits or view multiple fields in the Powerapps form. In the same way, you will select the input field and apply the above Powerapps formula on its DisplayMode property.
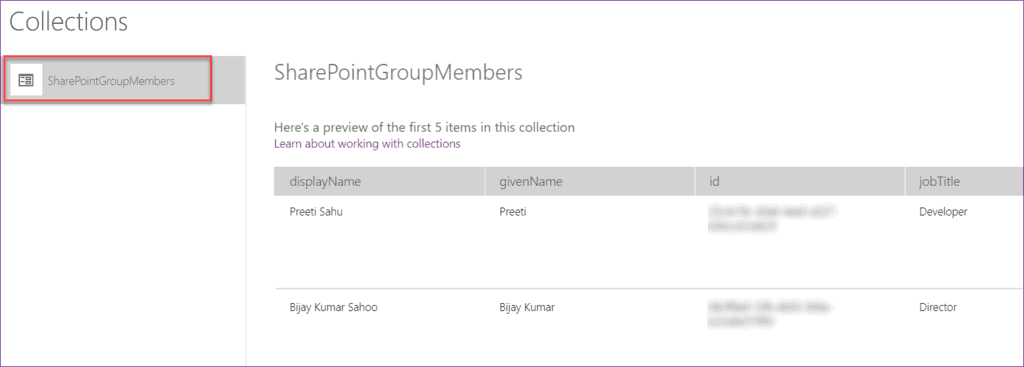
You can also view all the SharePoint Group member information in the Powerapps Collections (View -> Collections -> Collection Name [SharePointGroupMembers]) as:
In this PowerApps tutorial, We saw how to give SharePoint Group permission to Powerapps form fields. Also by taking a simple example, We discussed how to display the SharePoint Group member information in the Powerapps Gallery.
Also, you may like these below Powerapps Tutorials:
- PowerApps: Submit data to two SharePoint Lists
- PowerApps Validation: 9 Examples [Required Field, Email, Date, URL, Password, Number, ZIP]
- Create People Picker in PowerApps with Combo Box
- PowerApps Patch Function with examples
- PowerApps set field value based on another field
- Embed PowerApps in SharePoint modern page
- Show hide fields based on dropdown selection PowerApps
- How to use date time picker in PowerApps
- PowerApps toggle control + How to use with example
- How to format number as currency in PowerApps
In this tutorial, we learned how to implement PowerApps role based security with SharePoint. We saw the example, where the users who are presented in the SharePoint list can modify the entire form, other users can modify a few fields. We saw how to implement role based security in PowerApps using SharePoint groups
I am Bijay a Microsoft MVP (10 times – My MVP Profile) in SharePoint and have more than 17 years of expertise in SharePoint Online Office 365, SharePoint subscription edition, and SharePoint 2019/2016/2013. Currently working in my own venture TSInfo Technologies a SharePoint development, consulting, and training company. I also run the popular SharePoint website EnjoySharePoint.com
This was very helpful especially the user list for managing permissions, especially since I am not able to create the user groups.